When adjusting the pattern keep in mind what you learned about proportion and balance; how a change in length could affect the design of the pattern and affect your figure. (Re-read that section in Section 1.)
- Keep “structural” lines or seams unchanged and located in the same position on the figure; e.g., in a princess-lined garment or six-gored skirt, if the alteration is very great, make a small increase or decrease in each gore so as to maintain balance.
- Sewing guides accompanying each pattern are excellent. Read the in formation on the entire guide. Select pattern pieces for the “view” you intend to make. Read the information printed on each pattern piece. Do you understand the meaning of the terms used? Many are self- explanatory. Consult Section 9 for explanation of terms.
- Observe seams that will be joined — they have corresponding “notches”. If one pattern piece has been altered the piece that joins it will re quire an alteration so the seams will be the same length. Lay edges to be joined side by side and try to make adjustments so as to keep notches in same location for joining.
- Think about each piece in relation to garment.
- Trim pattern pieces you intend to use. Why? They can be placed on fabric with no overlapping of excess paper; you can leave any space required for adjustments that can be drawn on fabric before cutting; sometimes slippage occurs when cutting through paper and certain fabrics.
- As you trim each piece, note symbols that indicate: straight of grainline, place on fold, dots for “ease”, dots to match a cross seam, hemlines, width of seam (5/8”, 1.5cm.), position of zipper, buttons, button holes, and other fasteners, location of pockets.
- Check chart of your body measurements and note alterations required for the garment you intend to make. Select pattern pieces that will require adjusting.
- Make as many alterations as possible on pattern pieces before laying then) on fabric.
- If adjustments can be drawn on fabric after pattern has been placed, such as increasing at side seams, lengthening at lower edge of pattern section, use a (20k)red pencil and write amount of adjustment on edge of pattern piece. As you place pattern pieces on fabric leave sufficient room for drawing amount of increase. Use marking chalk or pencil and transparent ruler. Be accurate.
- If adjustment necessitates a fold in the pattern, remember that depth of fold should measure one-half of amount of alteration required. Use transparent ruler. Be accurate. Keep fold at right angles to grainline.
- When cutting to lengthen, if there is no cutting line indicated on pattern piece, draw a straight line to mark cut. Extend grainline so it will he marked on both cut pieces and will not he shifted out of line by the adjustment. Cut pattern. Use strips of lined looseleaf note paper to separate pattern; the lines are inch apart. Pin pattern on strips of paper, leaving required amount of increase; keep cut edges of pattern parallel to lines are ¼” paper insert. Check grainline marking. Be sure it has not been shifted out of line. Keep grainline straight.
- Original outline of pattern, of curved seams and on slanted seams will be distorted by pattern adjustment. This break or jog in seamline must he corrected very carefully to keep a smooth, flowing curve and straight slanted seam.
- If adjustment interferes with a dart, re-draw dart lines; using transparent ruler and colored pencil, draw a straight line from point of dart to widest part. If dart is shaped slightly or curved, draw a similar new line.
- If adjustment interfered with locations of fasteners, buttons and buttonholes, they will require re-positioning. (Remember: Never have a large button at bust level; never have a button at the waistline if a belt is being worn with the garment.)
- If size of dart has to he increased or decreased for a body curve (large or small bust, large or flat buttocks, large abdomen), re-draw dart lines. With transparent ruler, check new length of seamline and check length of edge of seamline that will be joined to it. They must correspond.
Many world famous designers, when asked if sewing is difficult, reply that it's not — most procedures are “logical” and just “common sense”. If you keep this in mind you can usually solve most problems which arise when making a garment.
- Re-read the section in Section 6 regarding allowance for “ease” in the paper pattern. As this ease varies with style and type of garment and is also a matter of individual preference, select a similar style of garment that you have been wearing and is comfortable. Measure back waist length, sleeve length, width of bodice at bust level in front, and at corresponding level across bodice hack, etc. Measure same points on paper pattern. Compare. Adjust pattern accordingly.
COMMON PATTERN ADJUSTMENTS
- To shorten bodice—If no line is marked on pattern, draw one about 2 inches above waistline. Crease pattern on this line. Fold and pin a tuck
(remember, the folded tuck should measure one-half of amount required). Straighten seamlines and dart lines. (See diagram 32.)
- To shorten skirt — 2 methods:
1. Cut required amount of alteration off lower edge of pattern.
(See diagram 33.)
2. Fold and pin a tuck across pattern at a point several inches below fullest part of hip. Straighten job in seam lines. (See diagram 34.)
jos-32-35.jpg
- To shorten sleeve — To maintain elbow position shorten sleeve both above and below elbow, using one-half of total decrease for each tuck. (See diagram 35.)
- To lengthen bodice — Extend grainline marking. Slash pattern and
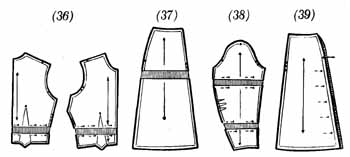
separate. Pin pattern to a strip of lined paper. Keep grainline straight. (See diagram 36.)
- To lengthen skirt — 2 methods:
1. Slash pattern on a line below fullest part of hip. Pin pattern to a strip of lined paper. Keep grainline straight. (See diagram 37.)
2. Add extra length at lower edge. Use ruler and extend seamlines the required amount. Measure and maintain curve of lower edge.
- To lengthen sleeve — Extend grainline. Slash pattern and proceed, using lined paper, as for bodice. Keep grainline straight. (See diagram 38.)
- Large Hips — Add to side seams. As there will be 4 cut edges for skirt side seams, divide total increase by 4. Mark level for fullest part of hip.
Mark size of increase at this point — carry this amount of increase along side seam to hem. Above hip level — taper increase to nothing at waist line. (See diagram 39.)
- Rounded hips and small waist — To accommodate large curve of hips, increase width of dart. This will shorten back waistline seam. If waistline is still too large, take some off front side seam edge, tapering to hip level. If back waistline seam has become too short, add at back side seam.
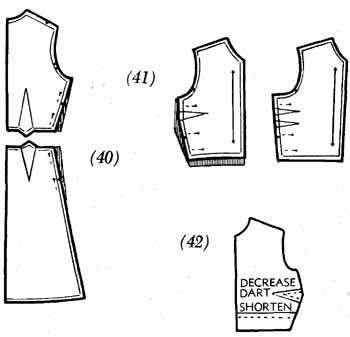
- Large waist — Divide total amount of increase by 4 and add this amount to side seams at waistline on both bodice and skirt sections. Taper bodice side seam to nothing at armhole. Taper skirt side seams to nothing at fullest point of hip level. (See diagram 40.)
- Large bust — To accommodate curve of bust both extra length and extra width are needed on bodice front. Check body measurement chart and note over-bust measurements (shoulder to waist, neck to waist ease allowance, measure paper pattern). Add extra length at lower edge of bodice front pattern. Extra bodice front length can be adjusted to fit bodice back seam by increasing bust dart. If increase is large make two smaller darts, bust point level located in between. Baste darts in garment and fit on body. Add extra width at side bodice seam at armhole edge, tapering to nothing at waistline edge. (See diagram 41.)
Remember: A similar increase must be made on front seam of sleeve or facing for armhole.
- Small bust Bodice is too long in front. Alteration procedure is the reverse of large bust. Check measurements and required ease. Decrease width of bust dart accordingly. Check length of side seam with back side seam and fold a small tuck horizontally on back bodice pattern to make side seam the required length. (See diagram 42.)
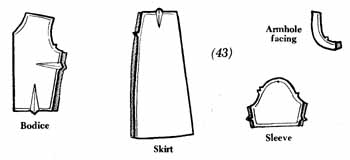
- Small increase in width of bodice, skirt and sleeve — If your measurements are in between two sizes a small increase can be made on side seams of front and back of bodice and of skirt, at underarm seam of sleeve or of an armhole facing. Divide total amount of increase by 4 to determine amount for each seam. (See diagram 43.)
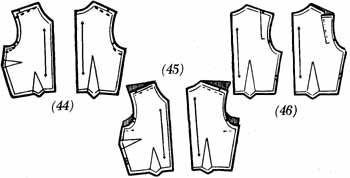
- Sloping shoulders — This alteration can be made when preparing the garment for fitting. Deepen shoulder seam of front and back the required amount at armhole edge, tapering decrease to nothing at neck edge. This has made armhole smaller. Lower armhole at side bodice seam. Do this carefully. Use flexible 12-inch ruler to measure finished length — must he same size as original armhole so sleeve will fit. If sleeveless, make an alteration in armhole facing to correspond with alteration on bodice front and back. (See diagram 44.)
- Square shoulders — This adjustment is the reverse of adjustment for sloping shoulders. Increase front and back shoulder seam at armhole edge, tapering to nothing at neck edge. Raise under-armhole seam. Use flexible 12-inch ruler to check finished length — it must he the same as original length, so the sleeve will fit. If sleeveless, adjust armhole facing to match bodice. (See diagram 45.)
- Narrow shoulders — Small adjustment can be made in shoulder area of armhole. For a larger amount, draw a vertical line at a point about 13 inches from armhole edges, about 5 to 6 inches long, then across to stitching line of armhole seam. Lap one slashed edge over the other the amount necessary. Pin r tape. Straighten jog in shoulder seam by drawing a straight line from neck edge to armhole edge. Alter front and back bodice the same. (Consider using small shoulder pad to give the appearance of a more perfect figure, rather than making a large decrease.) (See diagram 46.)
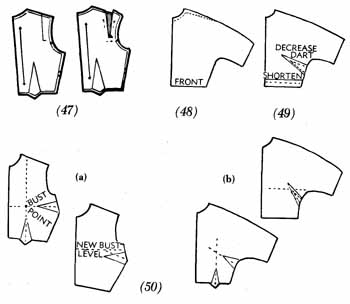
- Broad shoulders — This adjustment is the reverse of the adjustment for narrow shoulders. Slash pattern as for narrow shoulders. Lay a strip of paper under slash. Spread slash the amount necessary. Tape. Alter front and back bodice the same. (See diagram 47.)
WHEN SLEEVE and BODICE ARE CUT in ONE
- Small bust — No underarm dart. Shorten bodice front at shoulder line of Overarm seam. Start at neck edge, tapering to nothing at a point slightly beyond shoulder tip point. Lower neckline if necessary — see diagram. (See diagram 48.)
With bust dart. Proceed as for ordinary bodice alteration. Decrease bust dart the required amount, and take a corresponding amount off length of bodice by folding a horizontal tuck in pattern about J inches above waistline. (See diagram 49.)
To raise or lower a bust dart — Check bust level of individual. Locate bust level on pattern by drawing a horizontal line through center of bust dart to center front. Draw a vertical line through center of waist dart to shoulder seam. The point at which these lines cross is the bust point. Establish a new bust dart at the required level. (See diagram 50a.)
In the case of the french dart or slanting underarm dart, establish bust point. Raise or lower dart as required. The new dart will become more slanted or less slanted, depending on whether dart was raised or lowered. (See diagram 50b.)
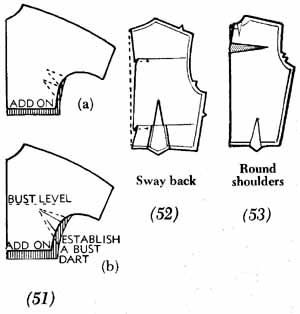
Large bust Enlarge bust dart and add corresponding amount at lower edge of bodice front. If an increase is necessary for around-the-bust measurement, add required amount at front and back side seams, as in the alteration on an ordinary bodice. If increase is considerable, a more pleasing effect can he obtained by making two narrow’ darts. The lower one should be slightly shorter than the upper one. (See diagram 51a.)
If there is no bust dart, establish one at the correct level, size depending on extra length needed. Increase length of front bodice accordingly (See diagram 51b.)
Sway back Alter back bodice only. Back of bodice wrinkles near waistline — see diagram. Place a small tuck or fold in pattern at either or both positions shown. Straighten jogs in center back line. (A similar alteration will he required near waistline of skirt.) (See diagram 52.)
Round shoulders -- Alter back bodice only. Draw a line across pattern marking level of roundest part of back — see diagram. Slash pattern. Place over strip of paper, spread slash the required amount, and tape. Straighten center back line. This has increased neckline. Draw a tiny short dart at neckline, equal to amount of increase. (See diagram 53.)
