Knits are available in many weights and with various degrees of stretch-ability.
Heavy double knits and bonded knits have very little stretch-ability and handle
like woven fabrics.
Pattern companies have patterns designed for knits with
moderate stretch, and for very stretchy. Check and choose your pattern and your fabric carefully. The degree of stretch is tested by stretching the crosswise
grain. Adjust patterns for your figure and measurements.
There are many specialty shops for “Stretch and Sew” knit fabrics. They hold
classes illustrating the principles of stretching as you sew for making sweaters,
T shirts, lingerie, bathing suits, etc.
These garments can be made for about
one-third of the cost of similar ready-made garments. The shops carry special
patterns and notions required. The basic techniques outlined in this section
are used, along with their special techniques. Preparing fabric. Shrink all
knit fabrics. Some cotton knits shrink as much as 5 inches per yard. Wash all
washable knits. Shrink wool knits by following the procedure for wool fabrics
(Section 7).
The right side is sometimes difficult to determine. Stretch the fabric at the crosswise cut edge. The edge will usually curl toward the right side.
Test-press to see if the fold will press out. If not, avoid using the folded edge if possible. Moistening the folded line with vinegar will often relax the fibers and allow fold to be pressed out.
Selvage. Because most knits don't have an obvious selvage, measuring from the edge is often inaccurate. Mark the lengthwise grainline with a basting thread along a lengthwise rib of the knitting. The crosswise grainline will be at right angles to the lengthwise rib. Mark crosswise grainline. Stretch fabric if necessary so it will “lie square” (Section 7).
To insure an accurate cut, spread fabric on a flat surface and allow it to relax overnight or sometimes as long as 24 hours. Pat fabric to lie smooth and flat. Do not rub. Never allow fabric to hang over cutting table or sewing machine table or ironing board. If crosswise edges curl, pin to strips of paper; cotton knit edges may be sprayed with starch.
Cutting. Use serrated shears. Remember: Polyester fabrics dull ordinary shears.
Marking. Tailor’s tacks are the most satisfactory.
Pinning and stitching. Use ball point pins and sewing machine needles. Ball point hand sewing needles are also available.
To hold pattern to fabric use magic tape or heavy weights (small cans, knives, small jars, etc.) as well as pins.
Use polyester or cotton and polyester thread.
Test sample seams for stitch length and tension.
Tension must be balanced; check by stretching to see if both threads break at the same time.
Number of stitches per inch is determined by the fabric’s degree of stretch. This can be measured on a ruler. A fabric with 30 to 35 % stretch requires a minimum of 14 to 15 stitches per inch. A short, straight stitch is satisfactory, or you can use a chain stitch, a short zigzag stitch or one of the special stretch stitches on the new sewing machines. If you have a slant needle machine you can use the overedge foot and fashion disc.
Test stitch samples of your fabric, using whatever stitch you will use on garment seams. Stretch the seam by hand. If it “pops”, increase the number of stitches per inch.
Use a smooth even feed presser foot or a roller presser foot. Feed fabric evenly, without undue pulling or pushing. Pull gently when necessary.
Hold top thread and bobbin thread taut when beginning to machine stitch to prevent fabric from pulling down into throat plate.
Interfacing is recommended for collars, cuffs, necklines, belts and but ton and buttonhole areas. Interfacing should be feather weight polyester or very light weight non-woven.
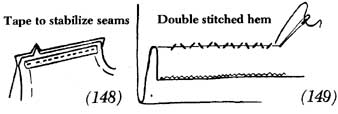
Use 1/4-inch tape or straight seam binding (pre-shrunk) to stabilize seams at shoulders, neckline and waistline. Some armholes require stabilizing. (See diagram 148.)
Underlining and lining are optional, depending on fabric. Not recommended for stretch fabrics as it restricts the stretchability and com fort.
Fitting. The fit is in the knit and the fabric automatically adjusts to minor figure faults.
* Skirts — Tie string around waistline and adjust to hang properly. Mark position. See Section 13 for other problems.
* Slacks — Tie string around waistline; bend over to check fit of crotch. See fitting of pants, Section 13, for other problems.
Pressing. Press as you go. Sufficient steam is important. Press with lengthwise grain, lowering and lifting iron. Use a thoroughly wet press cloth. Use clapper to absorb moisture. Don’t use too much pressure. Never press on right side without a cloth to protect fabric. Use strips of paper to prevent marking. Always test-press sample seams. Press curved sections over tailor’s ham. Some fabrics tend to hold the steam, and if pressed dry, mark or flatten the texture. Lay carefully on flat or curved surface to dry out.
Hem. Let garment hang overnight or 24 hours to take its own weight. Then mark and hem. Many knit fabrics don't ravel so hem edge may not re quire finishing. Machine ease stitch to draw up excess fullness. Follow procedure in Section 14 for pressing and finishing.
Double-stitched hem for bulky and heavy knits. These fabrics require extra support so the weight of the fabric will not cause hemming stitches to show. Baste lower edge. Shrink out fullness. Place a second row of basting half way between lower and top edge. Fold loose edge back at basting line and use stitch for french or tailor’s hem (Section 14) — keep stitches loose. Lay hem back against garment, baste 1/4 inch from cut edge and hand stitch as for tailor’s hem. (See diagram 149.)

