|
Chances are, if you’re working on a machine-sewing project, you’re going to use a straight stitch — and you want the stitch to look good. An ideal straight stitch lies flat, holds firm, and doesn't pucker the fabric. These qualities don’t sound like a lot to ask for but sometimes seem impossible to obtain. The first step towards mastering the art of the straight stitch is fully
understanding how the stitch is made (see figure). It is also important to
be aware of the variables that can affect stitch quality, such as the choice
of throat-plate and foot, stitch length, upper and bobbin-thread tension, and even the thickness of the fabric. And finally, you must match your straight
stitch settings to the task at hand, whether basting, easing, or topstitching. What is a stitch? When a sewing machine makes a stitch, the upper and lower threads twist around each other in a knot and hold the fabric layers together, ideally with the knot centered between the layers (see the drawing on the facing page). The thread that shows on the surface should lie flat without wavering. You should note that there’s a difference between wavering and the slight natural curve of the thread between each stitch. A waver is irregular and doesn't always curve in the same direction. The natural curve in a straight stitch, caused by the upper thread emerging from one side of a knot and entering the next knot on the other side, always slants in the same direction, as shown in the photo on the facing page. This curve will be less notice able when you sew with a straight-stitch foot and throat plate, because the narrow holes in the foot and plate support the fabric all around the area where the needle enters the fabric, reducing any unwanted fabric movement. A sewing machine that does straight stitching only, with a side-loading bobbin and a needle that threads from the side (such as the Singer Featherweight and most simple treadle machines), makes straight stitches with less built-in curve than a zigzag machine. Since the eye of the needle in a straight-stitch- only machine faces to the side, the upper thread doesn’t twist as much to pass around the bobbin thread, which results in a straighter stitch. Regardless of whether you have a straight-stitch-only or a fancy 200-stitch electronic machine, there are a few mi nor adjustments you can make that will improve your stitch quality, including alter ing the straight-stitch length and settings to better per form specific tasks. Analyzing stitch problems There are many variables working together to create a machine stitch, so the cause of a poor-quality stitch can be difficult to pinpoint. If you’re not satisfied with your stitch quality, first look at where the knots lie in relation to the fabric surface, then check the thread quality, feed dog, and choice of presser foot. Location of knots—If the knots show above the fabric surface and the fabric doesn’t pucker, the lower tension could be too loose. Loose lower tension is usually caused by an incorrect bobbin tension setting, which can be corrected by adjusting the screw on the bobbin case. Loose lower tension can also he the result of the thread feeding through the bobbin tension mechanism incorrectly. If the knots show above the fabric surface and the fabric puckers, the upper tension could be too tight. Too-tight upper tension can be caused by an incorrect tension set ting, which can be corrected simply by adjusting the tension dial. Too-tight upper tension can also be caused by a snag somewhere in the thread path between spool and needle, or can occur if you use thread that’s too thick for the eye of the needle. If the knots lie on the under side of the fabric and the fabric doesn’t pucker, the upper tension could be too loose. This can be caused either by an in correct tension setting (check the dial) or by the thread feeding through the upper tension mechanism incorrectly. If the knots lie below the fabric and the fabric puckers, the lower tension could be too tight. To fix this, adjust the screw on the bobbin case.
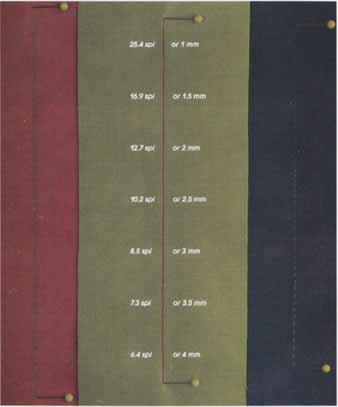
If these adjustments fail to correct a tension problem, the machine may need professional repair. Choice of thread — The type of thread you choose also affects the quality of your stitches. My rule is to avoid threads that stretch, especially when you’re sewing on lightweight fabrics. Poor-quality polyester or cotton- wrapped polyester thread can lengthen during sewing and then contract in the seam, causing puckers. To test the thread, stretch a 12-in.-long piece; a high-quality thread has very little stretch. Spun polyesters, made from short fibers, often stretch quite a bit, while the more expensive extruded polyesters, made from a single filament of poly ester, don't . Poor-quality thread can also cause irregular stitches. If the thread has lumps, bumps, and skinny spots, it can't travel through the tension mechanism smoothly and will not produce a good stitch. When you sew thin cotton or silky fabrics, your choice of thread size becomes an important factor in stitch quality. Since the stitching looks best when the knot is buried inside the fabric layers, the knot needs to be smaller than the thickness of the fabric. For a good seam in a thin fabric, you’ll need to use a fine thread, such as size 60/2. Quilting has its own special thread needs. Because quilting requires many short seams, quilters pack thou sands of stitches into a small area. For smooth results, quilters need to use a flexible thread. Many quilters insist on sewing with cotton fabrics because cotton presses well and is pliable; for the same reason, they should sew with cot ton thread. Seams sewn with cotton are smooth and fiat. Feed dog problems—A poorly constructed or misaligned feed dog can cause uneven stitches. Many machines made during the 1960s have rubber feed dogs that are now drying out and wearing unevenly. If the teeth on the feed dog are irregular or rough, they don't grip the fabric firmly or feed evenly. And if the two sides of the feed dog don't move smoothly and straight, the fabric will fight the feed dog, causing a wavy line of stitching. If you have to fight with the fabric to get a straight line of stitching, your feed dog probably needs re pair or replacement. Selecting a presser foot— The shape of the bottom of the foot, which presses the fabric against the feed dog, helps the machine make good stitches. Sewing with the wrong foot for your fabric can result in irregular stitches and a wavy seamline. Some feet, for example, have a groove on the bottom to allow them to ride smoothly over thread build up, as in satin stitching, or to permit a thick fabric to move under the foot easily. If a foot with this groove is used for straight stitching on a smooth or thin fabric, the foot will not make firm contact with the fabric, so the fabric may jerk and feed unevenly. For precise stitching, especially on fine, thin fabrics like the fine cottons used in heir loom sewing, you need even and precise feeding. A special fine-fabric foot, which has a wide, flat bottom, improves the stitch quality by making firm contact with the feed dog for even feeding and decreased fabric flutter. Fine fabrics also require looser up per and lower tension to help prevent puckering. For any type of sewing, make sure the foot is wide enough to cover the feed dog, prefer ably on both sides. A wide feed-dog may not contact some feet adequately to hold the fabric firmly and feed evenly. A rough spot on the bottom of the foot or on the throat plate can cause uneven feeding. Even the tiniest burr can catch on the fabric. Every time the fabric catches, it jerks, causing uneven stitches. Understanding stitch length Another factor that affects the appearance and performance of straight stitches is their length. On sewing machines, stitch length is usually expressed in one of two ways: either as stitches per inch (spi); or as millimeters between stitches or knots, usually 0 to 4 (or even longer on newer machines), with the standard at 2.5 mm. But get ting the stitch - length you want isn't just a matter of setting a knob or a number. You need to understand the relationship between the feed dog and the fabric.
When the sewing machine makes a stitch, the feed dog rises and moves a distance determined by the stitch length setting. The stitch length mechanism is designed to give the prescribed length stitch on a medium-weight, firm fabric. However, this same motion of the feed (log will give different stitch lengths on other fabrics. The amount of resistance of the fabric (in the form of thickness, nap, or slipperiness) affects the distance the feed dog movement pushes the fabric. A thick, rough fabric, for ex ample, is hard to move, so the distance covered at a given stitch-length setting is less, and the stitches are short (see the photo above). A thin or slippery fabric moves farther with the same amount of feed dog movement, which results in longer stitches. If the stitches appear too short or too long at a chosen setting, adjust the setting to give the desired stitch length for the fabric you’re using. The fact that a fine, thin fabric moves farther at a given stitch length setting contributes to puckering. When the distance that the fabric moves is greater than the length of thread the machine feeds out for each stitch, the short thread will pull up the fabric and cause puckering. Shortening the stitch length will enable you to produce smoother seams. If your sewing machine stitch-length knob is poorly marked, you can sew a test swatch of straight stitches on a piece of medium-weight cot ton, such as the one shown at center in the photo on the facing page. Measure each different stitch length on the swatch, and use a fine-point permanent marker to record the lengths directly on the stitch-length knob. A smooth start and consistent sewing speed also help the feed dog maintain an even stitch length. Rapid, uneven starts and stops don’t al low the feed dog to grasp the fabric firmly. Instead, the teeth slide over the fabric, re suiting in shorter-than-nor mal stitches at the beginning and end of a seam. Special uses for straight stitching Pattern instructions often call for special straight stitches. Following are tips that will give you better results with some specific stitches. Staystitching—Often recommended in pattern instructions on one layer of fabric along necklines and sleeve openings, staystitching helps to prevent stretching and distortion of bias areas. Because it's sewn on a single layer, staystitching often puckers the fabric. Using a shorter-than-normal stitch length will improve stitch quality and reduce puckering. Reinforcing—A line of reinforcing stitches is often recommended on single and double layers to strengthen the seamline. On a single layer, the reinforcement stitching helps to prevent raveling or tearing when a clip ends on the seamline. On a double layer, reinforcement stitching next to the seamline can pre vent tearing at a stress point, such as on an armhole or crotch seam. Always use a short stitch length (such as 1.5 to 2 mm) to achieve maximum strength. Basting—Basting must hold layers of fabric together temporarily and be easy to rip out. A long stitch length creates the fewest knots to rip but often causes the fabric to pucker. The solution is to de crease the upper tension, which reduces puckering and causes the knots to fall to the bottom, making stitches easy to remove—just pull the bob bin thread. Gathering—Gathering stitches are also sewn on the longest setting. For stitching that’s easy to gather, increase the upper tension. This causes the tension mechanism to hold firmly onto the thread, reducing the amount of thread that enters the stitch, while the feed dog pulls through the maximum amount of fabric. The fabric gathers and the knots pull to the top, allowing the fullness to be adjusted easily by pulling the top thread. Easing—To sew shape into a garment, it's often necessary to stitch two layers of different lengths together, such as an armscye to a sleeve cap, without puckers. This is called easing. To coax the longer layer to the length of the shorter layer, you need to compress the longer layer slightly at the seamline be fore stitching the two layers together. If you sew gathering stitches on the longer layer, the finished scam will often have tiny pleats or gathers in stead of appearing smooth. Rather than gathering, ease smoothly by using a medium stitch length with the upper thread tension slightly in creased. The seam will short en slightly without pleating. Then when you’re ready to stitch the two layers together, sew the seam with the longer layer against the feed dog. This allows the machine’s tendency to pull the bottom layer through faster than the top to work to your advantage. Don’t forget to test: Before sewing, you probably test interfacing on your fabric, but you may not think to test your stitching. Always test stitch quality by sewing a sample with the needle, thread, foot, stitch length, and thread tension you plan to use. Only then can you confidently begin each project knowing that your sewing will be successful. Don’t forget to test. Before sewing, you probably test interfacing on your fabric, but you may not think to test your stitching. Always test stitch quality by sewing a sample with the needle, thread, foot, stitch length, and thread tension you plan to use. Only then can you confidently begin each project knowing that your sewing will be successful.
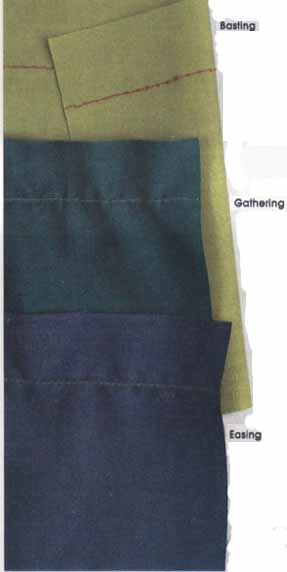
Basting Using along stitch: decrease upper tension to reduce puckering and bring knots to bottom tar easy stitch removal. Gathering: Using a long stitch, increase upper tension so fabric starts to gather and knots pull to top for easy adjusting of fullness. Easing: First ease one layer, using a medium-length stitch and increasing upper tension slightly. Then assemble two layers with longer side down. |
| PREV: Mechanical, Electronic, or Computerized | NEXT: Why Stitches Skip and Fabric Puckers: How to improve stitch quality of your sewing machine | Home |
Wednesday, 2014-02-19 21:50
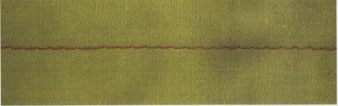
 If your straight stitching looks like this, you’re doing fine. Straight
stitches aren’t straight; they slant uniformly, as shown in the bottom figure.
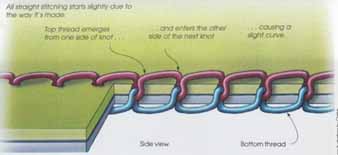
Natural curve of a straight stitch: All straight stitching starts slightly
due to the way it’s made. Top thread emerges from one side of knot... and enters the other side of the next knot…causing a slight curve.
If your straight stitching looks like this, you’re doing fine. Straight
stitches aren’t straight; they slant uniformly, as shown in the bottom figure.
Natural curve of a straight stitch: All straight stitching starts slightly
due to the way it’s made. Top thread emerges from one side of knot... and enters the other side of the next knot…causing a slight curve.