Zigzag stitching
Zigzag stitches are lockstitches with a side-to-side width as well as a stitch length. Basic stitch formation is dictated mainly by a stitch pattern cam; maximum pattern width is established by the stitch width regulator. Stitch length is selected as for straight stitching, and. is the same for both stitch types at the same setting, but occurs to the eye as a distance between points rather than an actual stitch measurement.
The cams, which may be either built- in or inserted, control stitch formation by means of indentations in their outer edges. A fingerlike follower, connected to the needle bar, tracks these indentations, moving the needle from side to side. The adjoining diagram illustrates the principle.
When cams are multiple, as they are with any machine that offers several built-in stitch patterns (and with interchangeable cam stacks, which some machines provide), a stitch pat tern selector positions the follower onto the appropriate cam.
The cams that produce zigzag stitch patterns are single; stretch stitching requires double cams.
Besides the controls mentioned, some machines have a needle position selector, which places stitches to the left or right of a normal (usually center) position-helpful in constructing hand-guided buttonholes, sewing on buttons, and positioning stitches closer to or farther from an edge.
A zigzag stitch has more give than a straight stitch, and so is less subject to breakage. Stitches lie diagonally across the fabric so more thread is used, and the stress is not on a single line, but apportioned across a span. In any zigzag stitching, always use a zigzag foot and throat plate.
The diagram shows, in simplified form, the inner workings of a zigzag stitch mechanism. As the cam rotates, a fingerlike follower, connected to the needle bar, rides along the cam and tracks its indentations. As the follower moves in and out, the needle bar is moved from side to side. (At the same time, the needle bar is also moving up and down in time with the shuttle hook to form lockstitches between the top and bottom threads.) With regard to controls activated by the user, the stitch width regulator establishes the maximum side-to-side motion; the stitch length regulator controls the distance the feed moves the fabric for each successive stitch. In machines with a number of built-in zigzag patterns, each formed by a different cam, a stitch pattern selector positions the follower onto the appropriate cam.
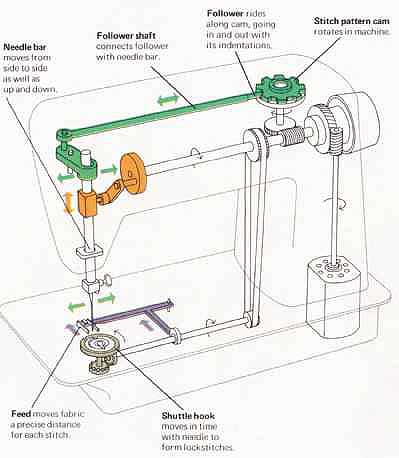
Feed moves fabric a precise distance for each stitch.
Shuttlehook moves in time with needle to form lockstitches.
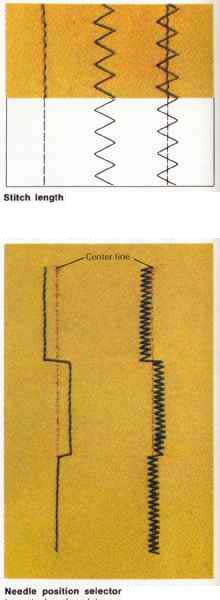
Stitch length is the distance between needle penetrations. It is
the same for straight or zig zag stitches at the same setting, but penetrations
for zigzag are from side to side. Needle position selector permits
stitch pat terns to be placed to a side (or sides) other than normal. In the
example, center is normal position; stitches can go to left or right.
Length and width in zigzag stitching
A zigzag stitch can be varied in both length and width: length by the same stitch length regulator that controls straight-stitch length (see p.30); width (how far the needle moves from side to side) by the stitch width regulator, with either symbols or numbers indicating the range. The higher the number, the wider the stitch; "0" setting produces a straight stitch.
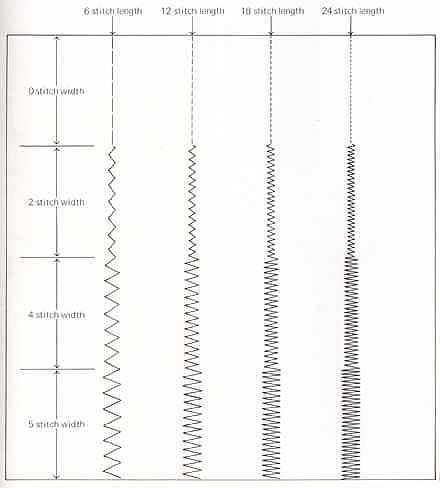
The choices will depend on the fabric and the job. The stitch length rule in seaming (at a very narrow width setting) is usually the lighter the fabric, the shorter the stitch. In edge-finishing, the more fabric ravels, the wider the stitch should be. In decorative applications, the length and width are less crucial and can be set according to the desired effect.
Tension in zigzag stitching
The tension of a zigzag stitch can be adjusted just like that of a straight stitch. In a balanced zigzag stitch, the interlocking link of the top and bottom threads falls at the corner of each stitch and midway between the fabric layers. When the tension (and, to some extent, the pressure) is incorrect, the stitch tends to draw up the fabric, particularly one that is lightweight or spongy. Pressure is important in stitch formation because it holds the fabric layers so that stitches can be properly set. A zigzag stitch used in construction should be properly balanced. In decorative uses, the top tension can be loosened so that the link falls toward the bottom layer, causing the resulting stitch pat tern to be more rounded.
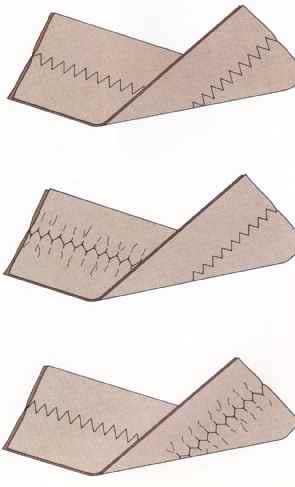
b___ The correct tension places the link at the corner of each zigzag,
and uses a balanced amount of both top and bobbin threads. Fabric lies flat;
it has not been puckered by the zigzag stitching.
Too tight a top tension places the link toward the top fabric layer; the fabric might be puckered. To bring the link down toward middle of fabric layers, either decrease the top tension or, if machine permits it, increase the bobbin tension.
Too loose a top tension places the link toward the bottom fabric layer; also, the fabric might be puckered. To bring the link up toward the top fabric layer, either increase the top tension or, if machine permits it, decrease the bobbin tension.
Zigzag patterns that use straight stitches:
In some of the patterns in this group, straight stitches are part of the de sign; an example is the blindstitch. Others, such as the multi-stitch, consist of straight stitches only, but in a zigzag configuration.
Length and width variations affect the practical uses of either type. For example, when the stitch length of the blindstitch is shortened, there are more zigzags per inch to catch the fabric more often, an important consideration in hemming. When the stitch is widened, the zigzags extend farther from the straight stitches to cover a wider span, good for heavier fabrics. The multi-stitch, combining zigzag placement with the frequent "bites" of straight stitches in series, offers great flexibility and fabric control. Set narrow, it is excellent for edge- finishing fabrics that ravel; at a wider width, for mending, attaching elastic, stitching lapped and abutted seams.
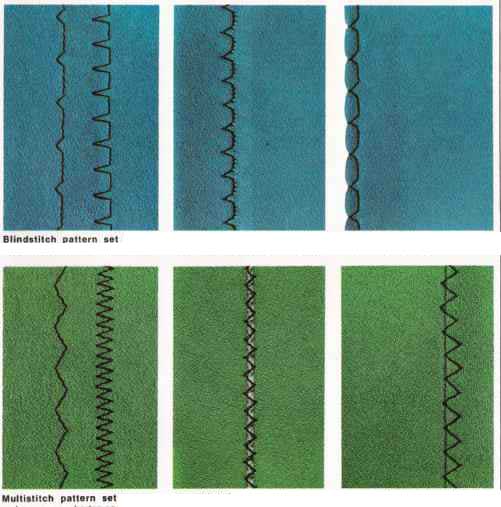
a__top___Blindstitch pattern consists of several straight stitches followed
by one zigzag. An important fact about the blindstitch: The zigzag always
falls to the left of the straight stitches, so the edge to which the zigzag
should go must be to the left of the needle. Length and width can be varied
to suit the job. Use longer and narrower (near right) for delicate fabrics;
shorter and wider (second row) for heavier fabrics. Used for blind hemming,
seam finishing, double-stitched seams; decoratively, for hemstitching, shell-stitched
edges (shown), and shell tucks.
Blindstitch pattern set longer and narrower, shorter and wider; the blindstitch pattern shown as used for hemstitching application; the blindstitch pattern used as a shell-stitched edge.

b___bottom__Multistitch pattern is a series of straight stitches placed
in a zigzag design. The longer, narrower version (near right) is excellent
for edge-finishing fabrics that revel. Set shorter and wider (second row),
the stitch is tine for mending. Pattern grows equally to the right and left
of a center line. For a fagotted seam (shown), the two edges should be an
equal distance from the center so that each stitch will catch an edge. The
seamline should be at the pattern's center in a lapped seam; the meeting
edges should be at the center in an abutted seam.
Multistitch pattern set longer and narrower, shorter and wider; the multistitch pattern as it is used in stitching of a fagotted seam; the multistitch pattern shown top stitching a bound edge.
Decorative zigzag patterns---With decorative stitch patterns, it is useful to know whether one or both sides of the pattern are shaped. This helps in deciding which can be used for edgestitching or appliqué and how to place fabric under the foot.
Both sides of most patterns are shaped. Patterns of this type are ideal as the center motif in a decorative panel. If the stitch width is narrowed, the pattern can be placed to the left or right of the center.
A right-sided pattern is shaped on the right side and straight on the left. When such a pattern is being used for edgestitching, place fabric edge to the right of the needle. It the needle position is changed, stitch width must be reduced to fit within the narrower side-to-side limits.
A left-sided pattern is shaped on the left side and straight on the right. When such a pattern is being used to finish en edge, place the fabric edge to the left of the needle. It the needle position is changed, stitch width must be reduced to fit within the narrower side-to-side limits.
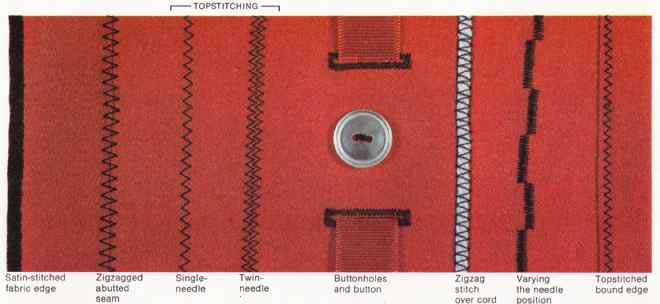
a___ Using the plain zigzag stitch As shown in the sample at the right,
plain zigzag stitching can be both functional and decorative. First, a plain
satin stitch decoratively finishes a raw edge. In the second example, an
abutted seam is sewed with a zig zag stitch. The next two rows show topstitching
with a zigzag-the first is stitched with a single needle, the second with
a twin needle.
In the fifth example, machine buttonholes create finished openings for threading a ribbon. The ribbon is held in place by the zigzag stitches that are used to attach the button. Next, a length of cord is secured to fabric with zigzag stitching. The row to its right shows how, by changing the needle position, stitch groups can be placed on either side of a center. The final row is a bound edge finished with zigzag topstitching.
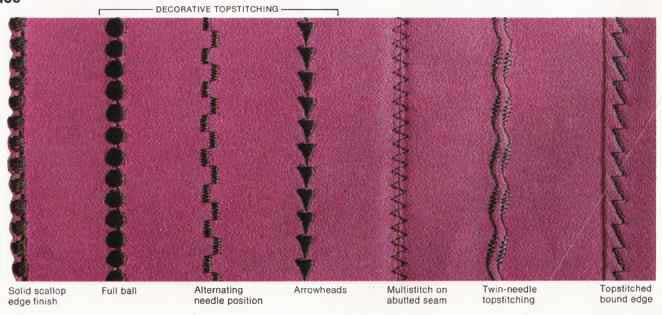
b___ Using patterned zigzag stitches---Though patterned zigzag stitches
are most often used decoratively, they can be functional as well. Several
patterns are used in this way in the sample at the right. To finish a raw
edge, instead of the plain zigzag in I he sample above, the choice is a solid
scallop. Next to the edge finish, a full- ball motif is topstitched onto
the fabric. In the third pattern, the needle position alternates to place
groups of stitches to the left and right of a center line. The next row is
a series arrowheads. The two that follow ate examples of zigzag/straight
stitch patterns, the first the multi-stitch used iii an abutted seam, the
second a wavy motif that is topstitched onto I u Fabric with a twin needle.
In the last example, slanted groups of narrow zigzag stitches are topstitched
onto a bound edge.
Stretch stitching:
Stretch stitches are produced by coordinated motions of needle and feed -that is, while the needle is moving as for straight or zigzag stitches, the feed is automatically moving the fabric forward and backward according to the pattern's requirements. Pat tern formation, as with zigzag stitches, is cam-controlled. Because of the dual action, however, stretch stitch patterns have double (two track) cams. The indentations on one track control the needle action; those on the other, the movement of the fabric by the feed. The diagram at the right illustrates the basic principles by which stretch stitches are formed.
Stretch stitches require a stitch pattern selector to position the followers onto the appropriate cam tracks and, as a rule, stitch width and length regulators that permit the operator to control the stitch size.
The forward/backward feed action results, with most stretch stitches, in several stitches being formed in the same place. A typical straight stretch stitch consists of two stitches for ward and one in reverse, or a total of three stitches in each place.
In any stitching, reverse stitches tend not to be exactly the same length as those sewed forward. In stretch stitching, where forward and reverse are used coordinately, this tendency can cause pattern distortion. To help correct it, many machines with stretch stitch capability are equipped with a pattern balance control.
Except for certain precise patterns, stitch tension is not as critical for stretch stitches as for straight or zigzag. If the tensions look too unbalanced, adjust them until stitches appear correct to the eye (see p. 31). Remember also to adjust the foot pressure as described on pages 28-29.
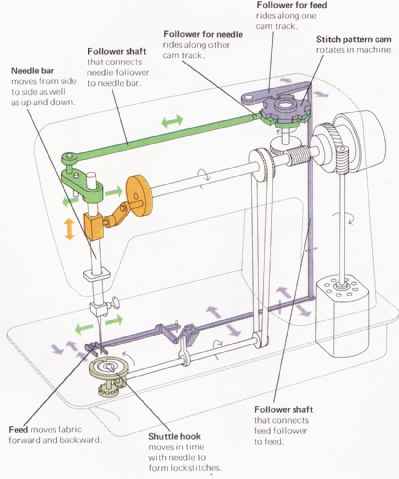
-- a___ Stretch stitches are produced basically as shown in the diagram.
As two-track cam rotates, a follower, connected to the needle bar, rides
along one track to move the needle bar from side to side. Another follower,
connected to the teed, simultaneously rides the other cam track to move the
feed for forward and reverse stitches as required by the design. Stitch pattern
selector positions followers onto appropriate cam tracks; stitch width regulator
determines the maximum width of the pattern; stitch length regulator controls
the stitch length. As these actions are taking place, the needle bar is moving
up and down in time with the shuttle hook to form lockstitches between the
top and bottom threads.
Follower for feed rides along one cam track.
---
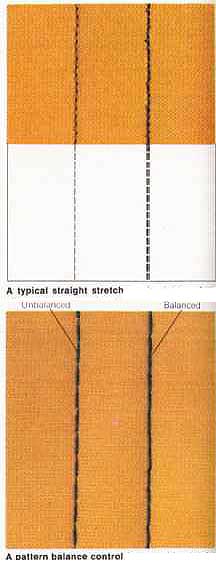
b___A typical straight stretch stitch, right, is two stitches forward
and one reverse, putting three stitches in one place. Plain straight stitch,
left, forms one stitch in each place.
A pattern balance control (see machine book let) helps to equalize slight length differences that can result between stitches sewed for ward and backward in stretch stitch patterns.
Length and width in stretch stitching
Must stretch stitches look best sewed it the length and width recommended l)y the machine manufacturer, but icy can usually be modified. Only certain patterns are approved for use, at "0" width setting, as a straight stretch stitch (see machine booklet). This is because, unlike others, they produce neither too much nor too little thread buildup in the seam.
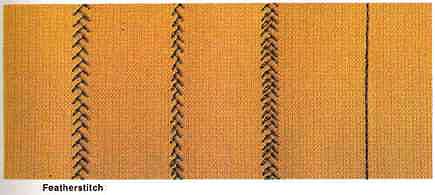
a___Featherstitch set at recommended length and width; sewed at a longer
stitch length and a narrower width; sewed at shorter stitch length but at
a wider width; at recommended length, but "0" width (straight stretch
stitch),
--- Alternatives to stretch stitches Straight and zigzag stitches, used in a certain way, can sometimes substitute for stretch stitches. In some applications, they may even be better. A stretch stitch might, for example, be somewhat heavy for a very soft, lightweight stretchy fabric. The examples below show the plain and overedge stretch stitches used in seams and substitutes for them.
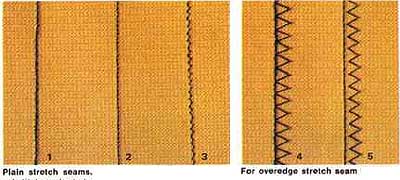
b----Plain stretch seams. For straight stretch stitch (1), substitute
a short straight stitch (2), stretching fabric as you stitch; or (3) a narrow,
short zigzag.
For overedge stretch seam (4), substitute short straight stitches on seamline , with zigzag next to that.
-- 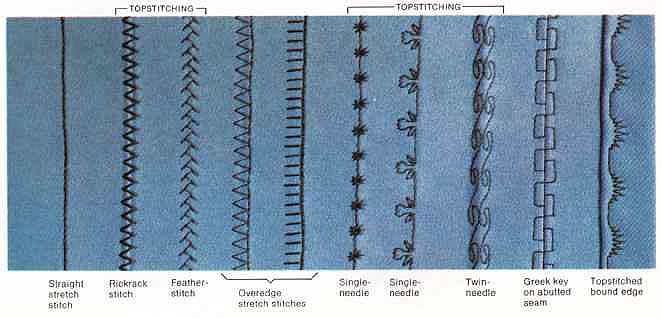
c----Using stretch stitches---As shown in the stitching sample at the
right, stretch stitches can be decorative as well as functional, and sonic
patterns can be both. The first low shows the straight stretch stitch, which
is used for seaming. Next to that is a rickrack stitch, used most of ten
for topstitching, but usable also a lapped seam. The next example the featherstitch;
although top i itched onto this sample, this stitch is ideal for a fagotted
seam.
The two rows that follow are stitch stitches used for overedge stitch seams. After these come three lows of decorative stitches, all top ',tiicIicd here-the first two with a nt needle, the third with a twin needle. A familiar motif, the Greek key, is next used to stitch an abutted 'ea,n. The final example is again top-stitching, this time to a bound edge.
Accessories:
Shown below and opposite are additional accessories designed to in crease a sewing machine's versatility and efficiency. Most of them take the form of variations on the presser foot, but the group also includes stitch pattern cams, special-purpose attachments, and stitching guides and gauges. The accessories illustrated are a representative collection of those that are available. The names given to them may vary. Also, some manufacturers may combine several features into one foot, e.g., a button hole foot that can also be used for stitching over cord. It should not be assumed that all the accessories shown are available for all machines, or that they are interchangeable from one machine to another. To learn what attachments are available for your machine, and how to use them, consult machine instruction book.
When using any type of presser foot, it is important to know what stitch can be sewed with it. This depends upon the needle hole. If it is small and round, the foot can be used only for straight stitching; if the hole is wide, the foot can be used for straight and zigzag stitching. The same is true for throat plates-use the straight stitch throat plate (small hole) for straight stitching, the zigzag throat plate (wide hole) for zigzag (and straight stitching as well). For multiple-needle work, foot and throat plate must have wide needle holes.

a--------Straight stitch throat plate and foot. Zigzag throat plate and
foot.
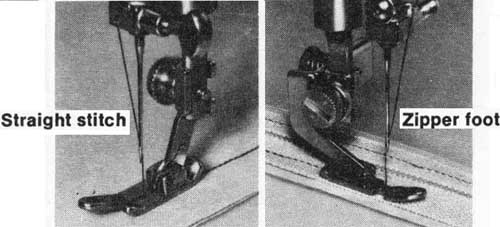
b-----Straight stitch foot is the best one to use when doing single-needle
straight stitching. It is a narrow foot; one toe is slimmer than the other.
Zipper foot, used to stitch any seam with more bulk on one side than the other. Examples of such instances: zipper insertion, covering cord, and sewing bound buttonholes.
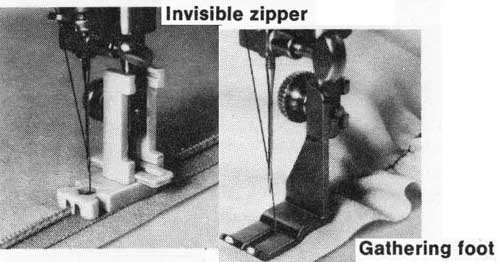
Invisible zipper foot is used only for insertion of invisible zippers; each zipper brand has its own. Bottom of foot has two channels through which zipper coils pass while zipper is being stitched.
Gathering foot gathers up a length of fabric as it is being stitched. Some gathering feet will simultaneously gather one layer of fabric while stitching it to another flat piece of fabric.
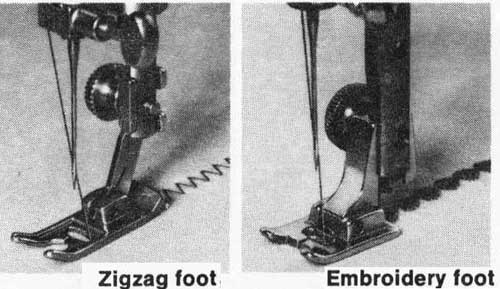
c-----Zigzag foot, often referred to as an all-purpose foot is used primarily
for plain zigzag stitching but can also be used for straight stitching.
Embroidery foot is best for stitching decorative stitch patterns. Bottom of this foot is grooved to create a shallow "tunnel" that permits the dense stitching to pass easily under the foot.
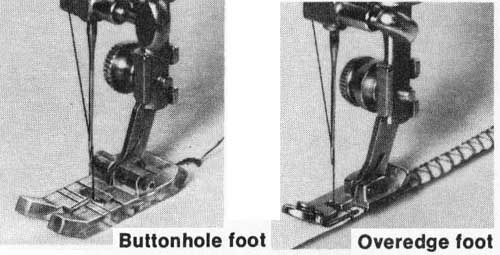
Buttonhole foot is used when stitching machine-worked buttonholes. It may be of metal or see through plastic.
Guidelines are usually etched into foot to help with stitch placement.
Overedge foot is designed to be placed along a fabric edge so that the stitches will fall over the edge of the fabric.
A metal bar holds edge in place so stitches will set properly.
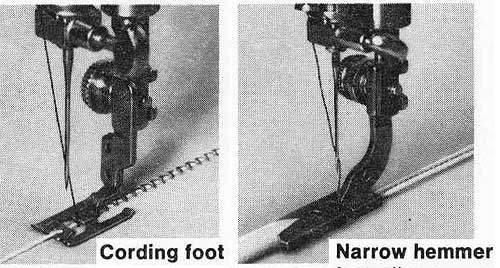
d-----Cording foot has a built-in device that provides for a steady supply
of cord to be fed with and attached to the fabric. Sometimes incorporated
into buttonhole foot.
Narrow hemmer foot allows a raw edge of fabric to be clean-finished. It does this by automatically turning under the edge, which is then fed under the needle and stitched into place.
Pin tuck foot, with the aid of a twin needle, will form small pin tucks. These are sometimes called air tucks.
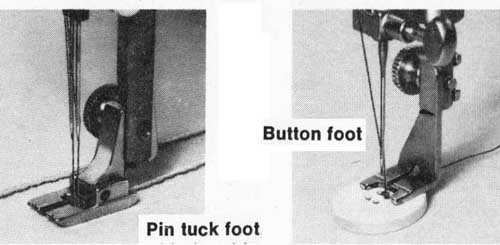
Button foot is used for sewing on buttons. Usually has a groove into which toothpick or needle is inserted, permitting the stitches also to be the basis of a thread shank.
Stitching accessories: The accessories described below are typical of auxiliary units that can in crease a machine's stitching capabilities, or help to speed completion of large sewing jobs. The stitch pattern cams manipulate the action of the needle, and sometimes the feed, to produce intricate stitching designs. The chainstitch attachments permit stitch formation by the top thread alone (as compared to the usual machine stitch, the lockstitch, which uses both top and bottom threads for each stitch). The other attachments- the buttonholer the ruffler, and the binder-utilize the machine's basic capabilities to complete particular jobs fast and accurately.

a----Stitch pattern cams, inserted into the ma chine, produce various
stitch patterns.
Chainstitch attachments permit just the top thread to form a Continuous row of stitches.
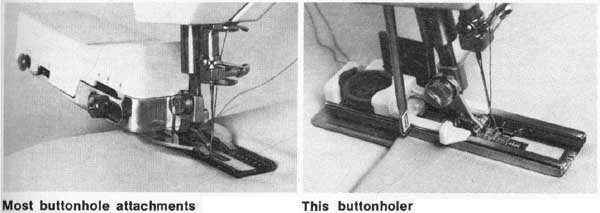
b----Most buttonhole attachments require special cams to produce the
buttonholes.
This buttonholer stitches buttonhole of the Cone Ct size for button in the attachment.
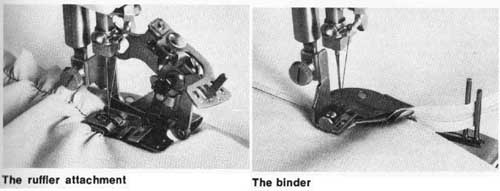
c----The ruffler attachment will quickly gather up a length of material.
It is especially helpful with home decorating projects.
The binder positions the fabric and binding so that they can simultaneously be fed under the needle and stitched together.
Feed-related accessories:
For proper stitching, fabric layers should move evenly together under the presser foot. Even feeding can be difficult, however, with some fabrics. To help with such feed problems, there are "top feed" assists that sup ply auxiliary grasping action on fabrics, especially the top layer.
For some sewing jobs, the action of the feed should be disengaged. Two such "no feed" situations are sewing on buttons and free-motion sewing.
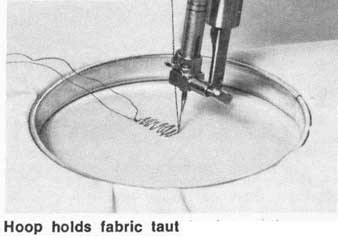
d-----Hoop holds fabric taut for free-motion sewing. For this process,
feed is disengaged.

e----The roller foot grasps and rolls along with the top layer of fabric
so it will feed at the same rate as the bottom layer.
Another "top feed" assist attachment is synchronized with needle and feed to help both of the fabric layers to feed evenly.
Guides and gauges
Among the most useful supplements to the sewing machine are the gauges that help you to stitch a consistent distance from an edge or another line.
Another valuable aid is the guide that is used when blind-hemming by machine. It holds both garment and hem edge in place for stitching.
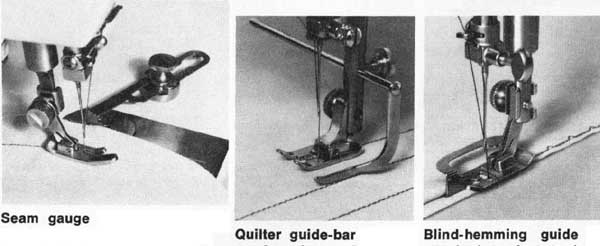
f----Seam gauge is attached to the machine bed, then adjusted to be a
specific distance from needle.
Quilter guide-bar extends out from foot to fall along a guiding line.
Blind-hemming guide is attached to foot to hold garment and hem in place.
Solving common machine problems
BOBBIN (outside winding)
Does not wind:
1. Make sure the thread is caught around the bobbin and in the proper direction. (It bobbin winds vertically, thread should be winding over top of bobbin from front to back; if it winds horizontally, thread should be coming in a clockwise direction around the bobbin back.)
2. Check to see that the bobbin is placed correctly on the winding spindle. )Some bobbin winders have a notch that must be fitted into a groove in the bobbin.)
3. Bobbin winding mechanism may not be set properly for winding. Check instruction booklet.
4. Rubber friction ring may be worn. It is replaceable. In the mean time, you can hold the bobbin winder spindle against the handwheel with a finger (it location of bobbin spindle makes this possible).
Winds unevenly:
1. Thread may not be inserted in the thread guides and/or bobbin- winding tension spring.
2. You may be running the machine too test.
3. The tension spring may need adjusting. With some models, you can do this yourself )see instruction booklet for further details); with other models service is required. In the meantime, run the machine slowly end, using thumb and index finger, guide the thread from side to side.
During winding, needle moves up and down:
1. Needle has not been disengaged. On most machines, this is done by turning the knob flywheel located in the center of the handwheel; on some machines, a lever must be released. See instruction booklet.
2. It knob or lever has been released, and needle still moves, the handwheel bearing probably needs oil.
3. The problem need not cause immediate concern as it does the machine no harm (provided needle is undamaged and unthreaded).
BOBBIN (inside winding)
Does not wind:
1. Power may not be on.
2. Check whether the thread has tailed to catch, or perhaps the thread is broken.
3. Thread end may not be fastened to foot screw.
4. Winding mechanism may not be engaged.
5. Needle may not be threaded, or the machine may be threaded incorrectly.
6. Machine settings may be wrong for winding. Check machine instruction booklet.
Winds unevenly:
1. Machine settings may not be correct.
2. Machine may not be threaded correctly.
3. Machine may be operating too test.
Thread breaks:
1. Machine may be operating too fast.
2. Settings may be incorrect.
3. Machine and/or needle may be threaded improperly.
4. Check for nicks on bobbin, throat plate, end/or needle. Replace damaged parts.
5. Needle may be hitting foot or throat plate.
signifies need for professional service.
Thread snarls during winding:
1. Bobbin )two-piece type) may be improperly screwed together.
2. Winding procedure may be incorrect.
3 Machine settings and threading way be incorrect.
4. Thread end may not be caught properly. Stan over, taking care to secure thread end properly when starting.
FABRIC
Layers feed unevenly:
1. Presser foot pressure may be too heavy or too light.
2. You may need to stitch more slowly or apply surface tension.
3. It usually helps to place pins horizontally across the seam every 3 to 4 inches. It is best to remove each pin as you come to if, especially with heavy fabric; on medium to lightweight fabric, you can stitch over the pins.
4. With sticky or very lightweight fabrics, use tissue paper when stitching.
5. There are attachments that help maintain even feed on all fabric types, including piles and slippery materials.
6. For straight stitching, use both the straight stitch foot and throat plate if possible.
Does not feed in a straight line:
1. Presser foot may be loose.
2. Presser foot could be bent. If may be possible to straighten if, but a new one is not expensive, end would probably be better.
3. Presser toot pressure may be too light or too heavy.
4. Needle may be bent.
5. There may be a defect in the machine teed.
6. You may lie pulling or pushing fabric to the point of interfering with machine feed.
7. For straight stitching, use both the straight stitch foot and throat plate if possible.
Puckers when stitched:
1. Many fabrics pucker when stitched as a single layer.
2. It fabric is sheer, or very lightweight, the stitch length should not be too long. Also, pressure on the presser foot should be lessened.
3. If fabric is tightly woven or knitted, puckering is an indication that stitch length is too short.
4. Thread may be too thick for the fabric.
5. Needle may be too coarse for fabric.
6. Bobbin may be wound unevenly.
7. Stitch tension may be unbalanced.
8. If fabric is a lightweight stretchy knit, apply some surface tension.
9. If doing straight stitching, use both the straight stitch foot and throat plate.
10. If all adjustments fell, feed dog could be out of sync.
Shows feed marks on the underside:
1. Presser foot pressure may be too heavy.
2. If fabric still marks with pressure lessened, place tissue paper between the fabric end the feed.
3. The feed may be damaged or set too high.
Is damaged (snagged or has holes around stitches):
1. Needle may be blunt or burred, too coarse for the fabric, or the wrong type of point for the fabric.
2. Check for a burr on the foot or feed or a nick in the throat plate--especially at needle hole. Replace damaged pens.
MACHINE:
Motor does not run:
1. Cord is not plugged in or is not plugged into a live outlet.
2. Power switch )present on some newer machines) is turned off.
3. Knee or foot accelerator may be jammed or improperly attached to power source.
4. If none of the foregoing solves the problem, there may be a loose or broken wire in the knee or foot accelerator, or other pert of the electrical system. Motor runs, but handwheel does not turn Thread or lint may be caught or tangled in the bobbin case areas. It can usually be loosened by turning the handwheel back and forth a few times. If this does not work, remove the throat plate, bobbin, and case, end pick the thread or lint out with tweezers. When thread or lint has been removed, put a drop of machine oil in the bobbin case housing and run the machine for a few minutes without thread or fabric. This will loosen any remaining lint or other din. Clean oiled areas with lint brush or cotton swab. To keep thread from jamming the bobbin, remove fabric immediately if machine stalls.
Motor runs, handwheel turns, but needle does not move:
1. The needle may have been disengaged for bobbin winding and not tightened back to sewing position.
2. If needle has been tightened but still does not move, the motor belt is slipping because it is loose or worn.
Motor, handwheel, and needle move, but fabric does not teed:
1. Make sure the presser foot is down.
2. Check the stitch length regulator. It may be set at zero.
3. The pressure regulator may be at zero or "darn" position. If should be set for at least light pressure. If fabric is heavy, more pressure may be necessary for fabric to feed.
4. The feed dog may be in the lowered or "down" position.
Motor, handwheel, needle, and fabric move, but no stitch is formed:
1. Thread way have come out of the needle.
2. Needle may be threaded in the wrong direction.
3. Needle may be inserted backward or may not be pushed all the way up info the clamp.
4. Needle may be the wrong length for the machine. Most fairly recent machines-manufactured over the pest twenty years-take a standard-length needle (celled a lSxl). Some older machines, how ever, require a special length. You must find a supplier for these.
5. Machine may be threaded incorrectly.
6. Bobbin may be empty.
7. Bobbin and/or case may be inserted incorrectly.
8. TM timing of the machine might be off.
Runs sluggishly
1. Bobbin winder may still be engaged.
2. Knee or toot control might be improperly positioned.
3. Machine may be in need of oiling and/or cleaning.
4. Motor belt may be worn.
5. Electrical control may have a loose wire or need adjusting.
Runs noisily
1. Machine probably needs oiling and/or cleaning.
2. The needle could be bent end hitting against foot or throat plate.
3. Bobbin and/or case may not be in tight enough.
4. Bobbin may be almost out of thread.
Will not stitch in reverse
1. If machine is very old, it may not have thin capability.
2. If it is a recent model, check the stitch control. It may be set for ''stretch stitch'' or buttonhole''; sometimes these stitches cannot be reversed manually.
NEEDLE--Unthreads
1. Insufficient thread may have been pulled through the needle be tore the seam was started.
2. Machine may be out of top thread.
Breaks
1. You may be using the incorrect presser foot and/or throat plate for the stitch (e.g., using straight stitch toot and throat plate tor a zigzag stitch).
2. Presser foot and/or throat plate may be bone or improperly fastened.
3. Needle might have become bent and hit the presser foot and/or throat' plate.
4. Needle may be incorrectly inserted.
5. Needle might be too fine for the fabric being sewed and for the (oh being done.
6. You may have pulled too hard on fabric while stitching.
7. Check machine settings. They may be wrong or have been accidentally changed during stitching.
8. Needle may be defective.
PRESSURE REGULATOR--Hard to adjust:
1. Presser foot may not have been lowered before change wan made in the pressure setting.
2. Pressure regulator may be turned to its maximum. Try turning the other way. If thin doesn't work, regulator may need a servicing.
SLIDE PLATE:
Falls off:
1. Plate may have been inserted incorrectly.
2. The spring that holds plate in place may be bent or broken. If it is bent, you may be able to re-shape it. If broken, take it to a sewing machine dealer and order a new one.
3. Always remember to clone the plate before lowering the machine into the cabinet.
STITCHES---Are uneven lengths:
1. You might be pushing or pulling the fabric too much.
2. Pressure on the presser foot could be either too light or too heavy for the fabric.
3. There could be lint or other clog between the teeth of the feed dog.
4. The problem may actually be skipped stitches, seated between the tension discs on the machine's upper portion. Loops on top of the fabric are the result of the bobbin thread’s not being properly inserted into the bobbin case.
2. If loops are small, tensions are unbalanced. If loops are on the fabric's underside, tighten upper tension (or loosen lower if the instruction booklet specifies a way of doing it). If loops are on the top, loosen the upper tension (or tighten bobbin tension if thin it possible).
3. Bobbin may be wound unevenly.
4. There may not be enough pressure to hold the fabric taut during stitch formation.
5. Problem could be timing, or some adjustment that would require a service call.
Skip here and there:
1. The most common cause of skipped stitches in the wrong type or size of needle for the fabric being sewed.
2. Needle may be blunt or bent.
3. Needle may be inserted backward or it might not be all the way up into the clamp.
4. Even if you detect nothing wrong with the needle, it may have accumulated lint or sizing from the fabric. Thin can happen with certain synthetics and permanent press fabrics, or in stitching through adhesives. Clean the needle, or change it.
5. There may be insufficient pressure on the presser foot.
6. Throat plate may be wrong for the purpose.
7. You may be stitching at an uneven speed.
8. While stitching, you may be pulling too hard on the fabric.
Break or "pop" in knit or other stretch fabric:
1. Stretch fabrics require a ''stretchable" thread. Use silk, synthetic, or cotton-wrapped synthetic.
2. If you are using one of these threads, and stitches still break, try stretching the fabric slightly an you stitch.
3. Stitch length and/or tension may be wrong.
4. If your machine has a stretch stitch, try that.
Zigzag stitches draw in the fabric, or cause it to ripple:
1. Tension in probably too tight. Less tension in required for moat zigzag stitching.
2. Fabric may be too sheer or lightweight for the width of your stitch. Use a backing fabric or narrower width,
3. Stitching may be too unbalanced.
4. Pressure may be too light or too heavy.
5. Zigzag may be totally wrong for the fabric. Try another type of at it oh.
TENSION
Does not seem to hold an adjustment
1. A tension spring may be morn loose after many yearn of machine use. It in replaceable. (One may to reduce wear on the tension spring in never to pull thread through the tension dials when presser foot in down.)
2. Timing could be off.
3. Bobbin may be unevenly wound.
THREAD
To release snarl, turn handwheel back and forth a few times to loosen caught material, then remove it and resume stitching. Snarls at the start can usually be prevented by placing needle in fabric before lowering presser toot and taking care to have both threads under the presser foot and drawn diagonally to the rear. Hold thread ends for the first few stitches. (On very soft or slippery fabrics, it in beat not to backstitch.)
2. The machine may be improperly threaded.
3. You may be using the wrong throat plate, i.e., one with too large a hole for delicate or lightweight fabrics.
Snarls during stitching
1. Lint from the bobbin area may be caught in the stitching.
Clean the bobbin area.
2. Bobbin thread may be running out. Replace with full bobbin.
3. Problem may be improper top or bottom threading and/or tension.
4. You may be using the wrong throat plate.
5. Timing may be off.
Snarls at end of seam
1. Fabric and thread are being pushed into the bobbin area and are knotting. Turn the handwheel back and forth a few times to loosen; then remove snarl.
2. An a general rule, it in not good practice to stitch off the fabric- the threads can become knotted in the bobbin area.
Needle thread breaks
1. Usually thin in canned by the needle being inserted backward or threaded backward.
2. Thread may be caught in the spool notch or it could be wrapped around the spindle.
3. There may be a rough or burred place on a thread guide, the presser foot, the needle eye, or throat plate hole. Replace dam aged parts.
4. The needle may be blunt.
5. Needle may not be all the way up into the clamp.
6. Needle may be too fine for the thread, causing it to fray-often the cane with silk buttonhole twist.
7. Thread might be old and dried out-silk and cotton tend to be come brittle with age.
a. A knot may have formed in the thread, preventing it from traveling through one of the thread guides or the needle eye.
Bobbin thread breaks
1. Bobbin cane may not be threaded properly and/or the cane not inserted properly.
2. Bobbin may be too full.
3. Check for dirt or clog in the bobbin cane.
4. Hole in the throat plate may be rough, making it necessary to replace the throat plate.
5. Bobbin tension may be too tight.
6. The bobbin or bobbin cane could be damaged.
Bobbin thread cannot be raised through hole in throat plate:
1. Bobbin cane may be improperly threaded, or it may not have been properly inserted.
2. Thread end coming out of bobbin cane may not be long enough to pull up. Several inches should always be allowed.
3. Go through all threading and insertion steps more deliberately to be sure you are taking each one correctly. To raise bobbin thread, needle thread should be held taut, handwheel turned, then end of bobbin thread pulled frau when loop appears.
Hive loops between them:
1. If the loops are large, the machine in improperly threaded. Loops Snarls at beginning of seem on the underside of fabric indicate that thread in not properly 1. Thread and/or fabric are probably pulled down into bobbin area.
