General introduction
With so much emphasis on the differences between sewing machine types and brands, it is natural to forget how basically similar all sewing machines are. All of the operating parts labeled on the machine prototype at the right are common to any average machine that will do both straight and zigzag stitching. A basic requirement of all machines is a precisely timed movement of needle and shuttle hook to manipulate a top and bottom (bobbin) thread into a stitch (see below). Tension discs and thread guides, which are basic to any machine, help to control the flow of these threads. Another important working relationship in stitch formation is the interaction between the presser foot, needle, and feed. While the presser foot is holding the fabric in place, and the needle is going through the fabric into the bobbin area to form stitches, the feed is moving the fabric into position for each stitch.
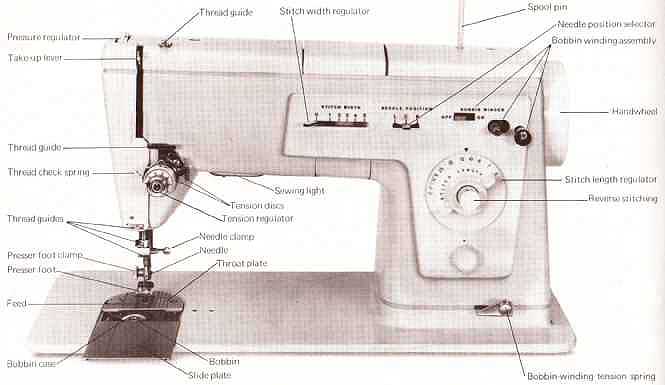
The functions so far described are all that are required for any plain straight stitch. They are also basic to stitching of other types, such as zigzag and stretch, but devices other than those mentioned are needed for the formation of these. For zigzag stitches, the needle must be able to move from side to side. With stretch stitches, the needle sometimes moves from side to side, but it is the movement of the feed that distinguishes stretch from either straight or zigzag stitching. The feed moves the fabric in two directions, forward and re verse. Capabilities such as these are built into the machine, but provision must also be made for the user to activate them-by manipulation of stitch length and width regulators and/or insertion of special cams.
---
Upper threading:
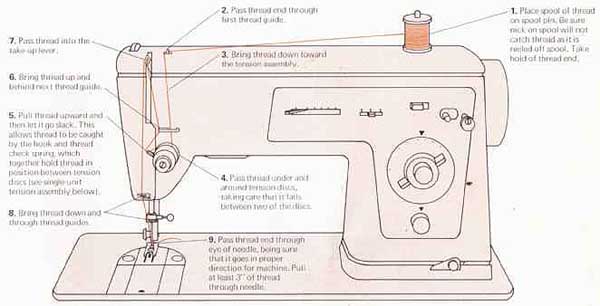
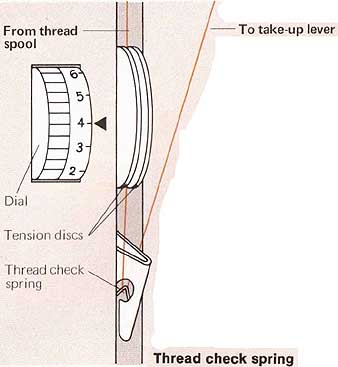
Though the parts involved differ in location and appearance, the upper threading progression for any ma chine is basically the same. As illustrated at the right, thread is fed from the spool through the tension discs, then to the take-up lever, and finally down to the needle. The number of thread guides between these points will vary with the machine. The part that differs the most from one ma chine to another is the tension assembly (three types are shown below).
Before threading any machine, re member to do two things: (1) raise the presser foot-this will allow the thread to pass between the tension discs; (2) bring the take-up lever to its highest point so needle will not come unthreaded when first stitch is started. The illustrations on this page will be useful as a general guide to upper threading; for specific instructions regarding your machine, refer to its instruction book.
5. Pull thread upward and then let it go slack. This allows thread to be caught by the hook and thread check spring, which together hold thread in position between tension discs (see single-unit tension assembly below).
6. Bring thread up and behind next thread guide.
7. Pass thread into the- take-up lever.
8. Bring thread down and through thread guides.
- 2. Pass thread end through first thread guide.
1. Place spool of thread on spool pin. Be sure nick on spool will not catch thread as it is reeled off spool. Take hold of thread end.
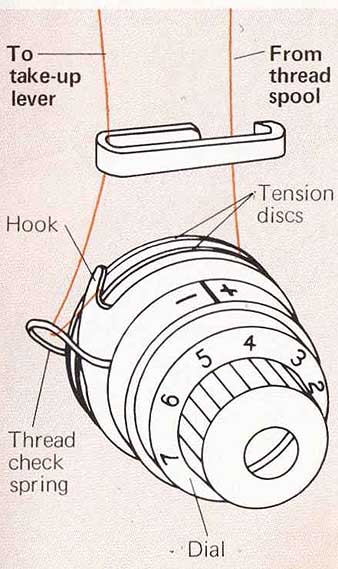
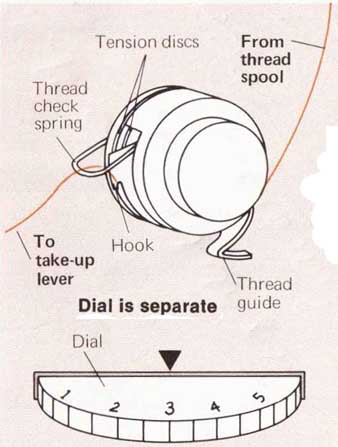
Types of tension assemblies:
A single-unit tension assembly is the most common arrangement. All of the parts- tension discs, dial, hook, and thread check spring-are located within the same unit.
Dial is separate with this type of tension assembly, but tension discs, hook, and thread check spring are together.
Thread check spring is separate from the rest of this tension assembly. The dial may be with the tension discs (as shown) or separate from them. Because thread is laid onto tension discs, there is no need for a hook. This type of unit is found on newer machines.
-----
-- Basic parts and controls
Pressure regulator
- ff Thread guide
Thread check spring
- Stitch width regulator
Thread guides [ Sewing light] discs Tension regulator Presser foot; Presser foot; Feed; A Needle clamp
-.------ Needle , plate; Bobbin case; Bobbin; Slide plate unwinding assembly; Spool pin
_- Needle position selector
2 Handwheel Stitch length regulator Reverse stitching Bobbin-winding tension spring
---
Timed sequence in stitch formation:

1. Needle penetrates the fabric to bring top thread into bobbin area.
2. As needle rises, top thread forms a loop for shuttle hook to catch.
3. Shuttle hook carries thread loop around and under the bobbin case.
4. Loop slides off hook and bobbin case, goes around bobbin thread.
5. Threads are pulled up and are set into the fabric as a lockstitch.
---
Bobbin winding:
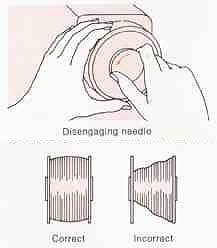
The lower thread supply for any sewing machine is stored in the bobbin area, situated under the needle and throat plate and consisting of a small spool (the bobbin) and a case into which it fits. Both are precisely sized to fit each other and the machine. To play its part in stitch formation, the bobbin must be filled with thread, a procedure that differs with the type of sewing machine (see right). On some, the up and down action of the needle must be deactivated before the bobbin can be wound. This usually means loosening the flywheel. To disengage needle, hold the handwheel still and turn the flywheel toward you.
The thread should be wound evenly onto the bobbin. If it is not, there may be trouble in stitching, or unevenness in stitch tension. An uneven wind can sometimes be corrected by simply loosening or tightening the bob bin-winding tension spring. If this doesn't work, professional service may be needed.
Correct---Incorrect; Disengaging needle
----
Methods of winding bobbins:
With bobbin-winding mechanisms outside the machine (this row and below left), the needle is first disengaged. On machine above, the thread feeds off the thread spool over through two thread guides, down through bobbin-winding tension spring, then up to bobbin.
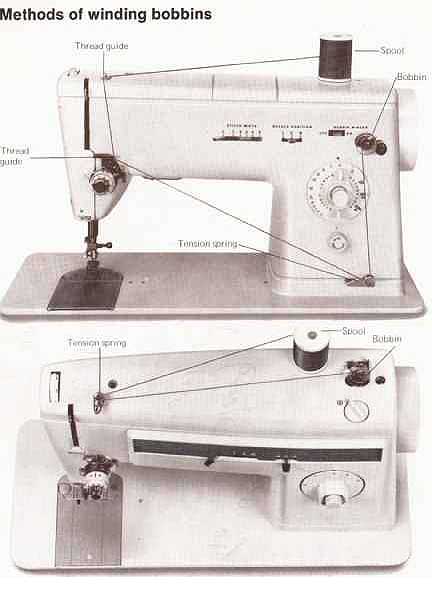
This bobbin is wound on side of machine.
Thread goes from spool through thread guide and tension spring, then to bobbin.
On the machine above, the bobbin is being wound on the top of the machine arm. The thread feeds from the spool over through the bobbin-winding tension spring, then onto the bobbin, which is in position on its spindle.
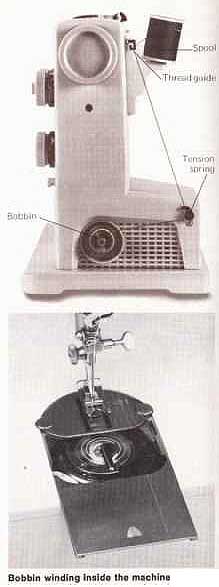
Bobbin winding inside the machine. With up per portion of machine threaded, bobbin rotates and fills as needle goes up and down.
Types of bobbins:
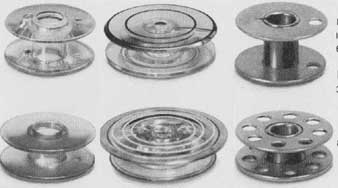
Bobbins are made to exact size and other specifications to conform to the requirements of particular sewing machines. Use only the type recommended by the manufacturer of your machine (non-sewing machine companies also make bobbins). Replace any bobbin that is worn, cracked, or nicked; a damaged bobbin can cause sewing problems. A few extras are good to have on hand in any case.
Most drop-in bobbins are made of clear plastic, but they can be of metal also. They are smooth-surfaced and their sides are usually rounder than those of other bobbin types.
Special drop-in bobbins, made for machines that employ an inside-machine bobbin-winding mechanism, look like this. They are made of clear plastic; the top half is sometimes larger than the bottom half.
Removable-case bobbins may be made of plastic or metal. Their sides may be smooth- surfaced but some of the metal ones have several holes in each of the sides.
Bobbin removal:
It is often necessary to remove a bob bin to either refill or replace it. Be lore removing a bobbin, bring needle and take-up lever to their highest positions, lift the presser foot, and, if necessary, remove the fabric beneath it. Then open the slide plate to gain access to the bobbin area. The photos below show the procedure for removing different bobbin types from their cases. Before removing any bobbin, it is best that the thread extending from the bobbin be cut short. This assures that a minimum of thread will be pulled out from under the bobbin case tension spring.

A latch must be lifted out of the way before this type of drop-in bobbin can be removed from its built-in case.
Another type requires sliding a latch out of the way before the bobbin can be removed.

A removable bobbin case must be lifted out of the machine before the bobbin itself can be removed.
1. With thumb and index finger, take hold of the latch on the outside of the case.
2. Still holding latch, pull the bobbin case and bobbin out of the machine.
3. Release latch and tip the case over slightly, letting the bobbin slip some distance out of case. Grasp bobbin with other hand and pull it completely out of case.
Lower threading:
Threading the lower portion of the machine involves threading the bob bin into its case. The way this is done depends upon the bobbin case itself. There are basically only two types of bobbin cases, built-in and removable, but within these types there are variations. Illustrated on these pages are examples of how various bobbin cases are threaded. Notice that built-in cases remain in the ma chine during threading and removable cases are taken out of the machine for threading.
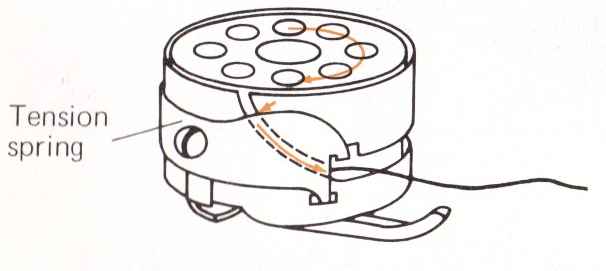
For proper stitch formation, the flow of thread from the bobbin must be controlled. One way to control the flow is to force the thread to feed off the bobbin and through the slot opening of the bobbin case in a "V" direction. Another device, present on most bobbin cases, is the bobbin tension spring. Positioned over the slot opening of the bobbin case, this spring exerts pressure (tension) on the thread. The illustration below shows the direction the bobbin thread should take through the slot opening, under the tension spring. Some bobbin cases, however, have neither a slot opening nor a tension spring; these employ other devices, such as a latch, to control the flow of bobbin thread. The illustrations on these pages are meant to serve as a general guide for threading the lower portion of the machine. For more precise instructions for your machine, consult the manufacturer's instruction book.
Tension spring:
- Threading built-in bobbin cases
 Standard
built-in bobbin case. First, drop bobbin into case so that the thread feeds
in the same direction as the slot. --- Exerting pressure on bobbin with one
hand, grasp thread with the other hand and bring it to the opening of the
slot. --- Still exerting pressure on bobbin, pull the thread back and under
bobbin tension spring. Release thread and let go of bobbin.
 Case with latch
but no threading points. With this type of bobbin case, you must first lift
the latch up out of the way. --- Then drop the bobbin into the case so that
the thread is feeding off the bobbin toward the right-hand side of the latch.
--- Then push the latch down. The pressure that the latch exerts on the bobbin
acts as a "tension" for the bobbin thread.
 Case
with latch and threading points. Push latch over out of the way and drop
in bobbin (thread feeds in same direction as finger). --- Slide latch back
over bobbin. Hold bobbin; grasp thread with other hand and bring it to the
'finger" opening, threading point 1. --- Pass the thread back and completely
under the finger' to threading point 2. Then release your hold on the thread.
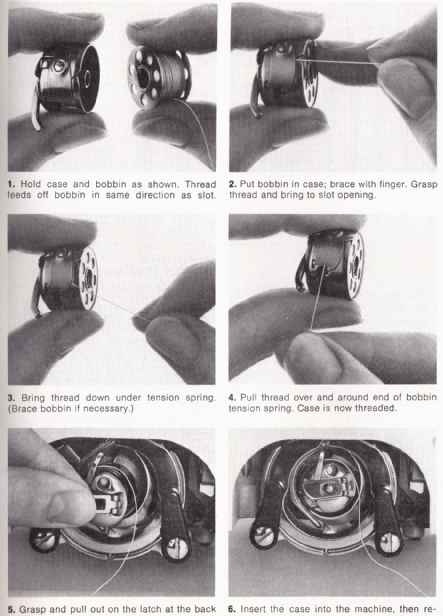
Threading a removable bobbin case:
1. Hold case and bobbin as shown. Thread feeds off bobbin in same direction as slot.
2. Put bobbin in case; brace with finger. Grasp thread and bring to slot opening.
3. Bring thread down under tension spring. (Brace bobbin if necessary.)
4. Pull thread over and around end of bobbin tension spring. Case is now threaded.
5. Grasp and pull out on the latch at the back of the bobbin case; bring case to machine.
6. Insert the case into the machine, then re lease the bobbin case latch.
-------------
Raising the bobbin thread:
After the bobbin case has been threaded and, if necessary, inserted into the machine, close the slide plate and raise the bobbin thread as follows:
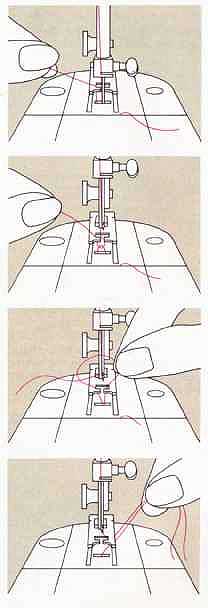
1. Holding the top thread with the left hand, turn the handwheel with the
right hand until the needle is all the way down in the bobbin area.
2. Still holding thread and rotating the handwheel, bring the needle up to its highest point. As the needle rises, a loop of bobbin thread will come up with it. Pull on the top thread to draw up more bobbin thread.
3. Release top thread, then pull on loop of bobbin thread to bring up free end of bobbin thread.
4. Pass both the top and bobbin threads under the presser foot and bring them back toward the right. The thread ends should be at least 3" long.
Needle sizes and types:
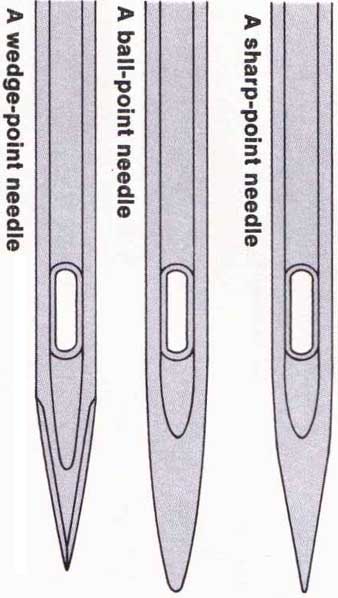
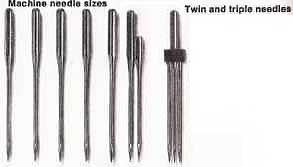
Machine needles are made in different sizes and types to suit the varying needs of sewing. Sizes range from 9 (fine) to 18 (coarse). Coarser needles exist, but are harder to find. The higher the number, the coarser or thicker the needle. As a rule, the finer the thread and fabric weight, and the closer the fabric construction, the finer the needle should be. A second consideration is the type of point. Regular, sharp-pointed needles are used for most sewing. A ball-point is recommended for knits because its rounded point tends to slide between the yarns rather than pierce them. The third point type is the wedge, especially designed to penetrate leathers and vinyls so as to reduce the risk of splitting.
A sharp-point needle is the type used most often. Recommended for all types of woven fabrics, it commonly ranges from size 9 to 18.
A ball-point needle has a rounded point that makes it ideal for sewing on all types of knits. Sizes of these range from 9 to 16.
.A wedge-point needle is expressly designed for use on leathers and vinyls. Needles of this type are available in sizes 11 to 18.
Machine needle sizes range, as a rule, from fine (size ) to coarse (18). When selecting a needle, remember that the finer the weight of the fabric and thread being used, the finer the needle should be.
Twin and triple needles are used mainly for decorative stitching, and are usually a size 14. Additional spool pins are required for the multiple thread supply. Consult your sewing machine instruction book for their use, especially in zigzag stitching (you cannot always stitch full width).
Needle insertion:
Besides choosing a needle that is the correct size and type for the fabric, it is also important that the overall size or conformation of the needle be correct for your sewing machine. Needles can differ in length, in the size of the shank (and the position of the shank, a consideration with twin or triple needles), and in the position and size of the scarf. All of these aspects of needle conformation can be critical in stitch formation. Most ma chine needles are interchangeable but it is important to follow the recommendations of the machine manufacturer. Or you can read the machine- needle package to see if that brand of needle will fit your machine.
Having chosen the proper needle, take care to insert it properly into the machine. The most universal method of needle Insertion is explained be low, but refer also to your machine instruction book. To remove a needle, reverse the insertion process. Check the needle condition at frequent intervals while sewing.
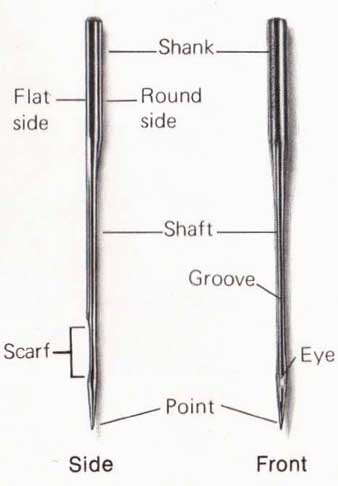
Side and front views of a machine needle are illustrated here. The upper part of a needle is called the shank; the lower part is the shaft. One side of the shank is flat, the other rounded. On the same side as the rounded part of the shank is the groove of the needle. The eye of the needle is just above the point. The scarf is an indentation behind the eye.
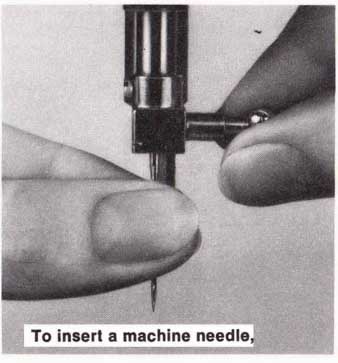
To insert a machine needle, first loosen the needle clamp screw. Then, with the flat side of the shank facing away from and the groove of the needle facing toward the last thread guide, push needle up into clamp as far as possible. Then tighten needle clamp screw. This procedure is correct for most machines, but it is wise to check the instruction book that accompanies your machine. To remove a needle, reverse the insertion process.
- Needle faults:
Many stitching problems are traceable to the needle. Listed below are the most common difficulties and remedies for them.
Needle is incorrectly inserted. If needle is not fully inserted into the needle clamp, or the groove is not positioned to the correct side, the result is usually skipped stitches or none at all.
Solution: Carefully re-insert needle.
Needle is wrong size for machine or fabric. If wrong size for machine, stitch formation is affected. If too fine a size for the fabric, thread might fray; if too coarse, needle might damage fabric. With either too fine or too coarse a needle. the stitches might look unbalanced.
Solution: Select needle of the proper con formation and size, and insert.
Needle is damaged or dirty. If needle has a burr on the point, eye, or groove, the thread might fray or break, or fabric might be damaged. A blunt needle can cause a thumping noise as it penetrates the fabric; it might also result in pulling on the fabric yarns or in skipped stitches. If the needle is bent, there might be skipped stitches, the fabric could be pulled to one side, or the needle might hit the throat plate and break. If the needle is dirty, it could cause skipped stitches.
Solution: Replace with a perfect needle.
--
Needle/thread/stitch length selection:
The table at the right is a guide to the recommended needle, thread, and stitch length combinations for most home sewing jobs. The selections are based on the following criteria. Size of needle and thread depends. Fundamentally on the size of the fabric yarns-the finer the yarns, the liner both the needle and thread.
Needle type relates to fabric structure-sharp-point (regular) for wovens; ball-point for knits; wedge- point for leather and vinyl. Thread type is chosen for its compatibility with the fabric's structure and fiber content (see Threads). Stitch length for ordinary seaming depends on fabric weight (heaviness and density), texture, and structure (how the fabric is made). Of the three, weight is most important. As a general rule, the heavier the fabric, the longer the stitch; the lighter weight the fabric, the shorter the stitch. Within this rule, however, adjustments are made according to the other two characteristics, texture and structure. That is why the selection chart gives a range of stitch lengths for a specific fabric weight. Both velvet and crepe, for example, are classified as medium-weight, soft fabrics, with a recommended stitch length range of 10 to 12 stitches per inch. Because the crepe is less bulky, it needs a shorter stitch than a bulkier velvet. A relatively long stitch is recommended for such fabrics as leather ci and unbacked vinyls. This is because the structure of such fabrics is susceptible to ripping, and the longer stitch length reduces this risk by making fewer needle holes.
Before starting any sewing project, it is wise to test and, if necessary, adjust the combination of needle, thread, and stitch length.
===
--Fabric:
Lightweight (soft)---Wovens: Chiffon, organza, challis, crepe de Chine Nets: Fine lace; tulle Knits: Lingerie tricot, panne velvet
Lightweight (crisp) Wovens: Lawn, dimify, voile, organdy, eyelet Nets: Some laces; coarser nets Knits: Ciré Medium-weight (soft) Wovens: Velvet, velveteen, gingham, chambray, batiste, crepe, corduroy Knits: Jersey, stretch terry, some double knits, some sweater knits
Medium-weight (crisp) Wovens: Brocade, shantung, faille, taffeta, peas de sole, chintz, piqué, percale, poplin, linen, some denims, some tweeds
Knits: Some double knits, some bonded knits Heavy (soft) Wovens: Fleece, velours, wide-wale corduroy, terry cloth, some coating fabrics, some fake furs Knits: Stretch velours, some fake furs, some sweater knits Heavy (Crisp) Wovens: Heavy suiting, burlap, ticking, canvas, upholstery fabric, double-faced wool, sailcloth, some denims, some gabardines, some coating fabrics, some tweeds Knits: Some jacquarda, some double knits Leathers and vinyls
Lightweight: Kidakin, patent, capeskin, cobra, chamois, imitation leathers and suedes Medium-weight: Vinyls such as crinkle patent, embossed vinyl, imitation reptile, imitation suedes, some genuine suedes Heavy: Cabretta, buckskin, calfskin, upholstery vinyl, some suedes
--Thread:
Silk, size A; nylon, size A; extra-fine (any fiber) Silk, size A; nylon, size A; mercerized cotton; extra-fine (any fiber) Polyester; cotton- wrapped polyester; mercerized cotton Polyester; cotton- wrapped polyester; heavy-duty (any fiber) Polyester; cotton- wrapped polyester; heavy-duty (any fiber) Silk, size A; polyester; cotton- wrapped polyester Silk, size A; polyester; cotton- wrapped polyester; mercerized cotton Polyester; cotton- wrapped polyester; heavy-duty (any fiber)
--Needle:
Size 9 or 11 regular for wovens and nets; size 10
01 11 ball-point for knits Size 11 regular for wovens and nets; size 10 or 11 ball-point for knits Size 11 or 14 regular for wovens; size 10, Il, or 14 ball-point for knits Size 11 or 14 regular for wovens; size 10, 11, or 14 ball-point for knits Size 14 or 16 regular for wovens; size 14 or 16 ball-point for knits Size 16 or 18 regular for wovens; size 14 or 16 ball-point for knits Size 11 or 14 leather (wedge Size 14 leather (wedge-point)' Size 14 or 16 leather (wedge
* If fabric is backed, a sharp-point can be used.
Stitch length: 10-15 10-15 10-12 10-12 10-12 8-12 8-12 8-12 6-10
TOPSTITCHING RECOMMENDATIONS
Procedure and fabrics:
Topstitching (straight) Wovens and knits, leathers and vinyls, all weights Topstitching (zigzag) Wovens and knits, all weights Topstitching (multi-needle) Wovens, light- and medium-weight
Thread:
Silk, size D (regular bobbin thread); cotton- wrapped polyester; mercerized cotton; heavy-duty (any fiber) Polyester; cotton- wrapped polyester; mercerized cotton; heavy-duty (any fiber) Polyester; cotton- wrapped polyester; mercerized cotton
Needle:
Size 16 or 18 regular for wovens; size 14 or 16 ball-point for knits; size 16 wedge-point for vinyls and feathers Size 14 or 16 regular for wovens; size 14 or 16 ball-point for knits Size 14 twin or triple
Stitch length:
6-12 8-12 (length) 2-4 (width) 10-14
Pressure and feed
As it is used here, pressure means the force exerted on the fabric as it is moved, by the action of the feed, under the presser foot. The two forces, pressure and feed, work together to produce p stitched seams.
Pressure has several functions. It holds the fabric layers in such a way that they move evenly with one another. Another function of pressure is to hold the fabric taut; this helps to assure that stitches are properly set into the fabric, and thus that an even stitch tension is maintained.
Pressure also prevents fabric from (1) being pulled down into the bobbin area, and (2) hugging the needle, which can cause skipped stitches. The primary function of the feed, which is controlled by the stitch length regulator, is to move the fabric into position for each stitch. Feed also helps in holding the fabric layers taut during stitch formation.
Both the pressure and feed (stitch length) can be adjusted to suit fabric and sewing situation. As a rule, light pressure is used for lightweight fabrics, heavy for heavy fabrics. The length of the stitch depends on the job being done and the fabric being stitched. For some sewing jobs, the action of the feed is totally eliminated-for example, when buttons are sewed on, so that there is no stitch length; or in free- motion stitching, in which stitch length is determined by how far you move the fabric. Both pressure and stitch length (feed) should be tested before the start of any sewing project. Some fabrics, such as piles and vinyls, because of their surfaces, are difficult to feed evenly. Pile fabrics tend to slip against each other, vinyls to stick together. Attachments are available to help solve teed problems posed by these and other materials.
--
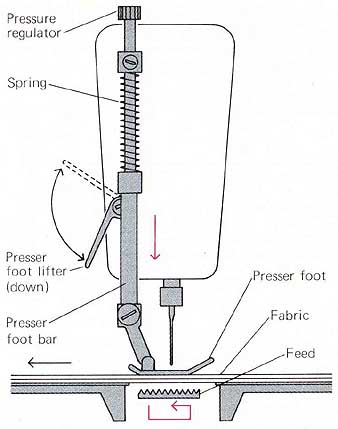
Pressure and feed interact to produce an evenly stitched seam. Pressure is the downward force exerted on the fabric by the presser foot to hold the fabric layers so that they move evenly together during stitching. Feed is an upward force that moves the fabrics under the presser foot. The pressure on the presser foot is supplied by a spring on the presser foot bar. The spring is controlled by a pressure regulator and activated when the presser foot is in the "down" position. The feed is controlled by the stitch length regulator. The smaller the stitch length setting, the shorter the distance the feed moves the fabrics for each successive stitch.
--
Interaction of feed and pressure:
1. While needle and thread penetrate fabric, both feed and presser foot hold fabric taut.
As needle descends, feed descends, leaving only the presser foot in contact with fabric,
2. As the needle is coming up out of the fabric, the feed is moving forward. While this is happening, the presser foot continues to be in contact with the fabric.
3. As the needle continues to, move up, and to bring the stitch with it, the feed is also moving up toward the fabric. The presser foot continues to hold the fabric,
4. As the stitch is being set into the fabric the feed comes up to help the presser fool keep the fabric taut and then to advance the fabric one stitch length.
--
Correct and incorrect pressure
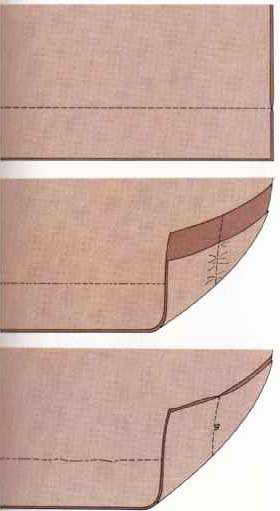
The correct amount of pressure assures even feeding of fabric layers that are properly stitched and are undamaged in the process. The amount of pressure used will depend on the weight of the fabric. Generally, the lighter-weight the fabric, the lighter the pressure needed. With some fabrics, however, it is difficult to achieve a precise enough pressure to feed the fabric layers evenly. Examples are vinyls, pile fabrics, and plaid or stripe fabrics that are being matched. "Top feed" attachments are available to assist in the even feeding of such fabrics.
Correct pressure ensures that the fabric layers feed evenly with each other, the stitches look even in length and tension, and the fabric is not damaged by either feed or presser foot.
Too much pressure can have several results. Most often, the top layer slips while the bottom layer gathers up. Stitches could be uneven in length and tension. The feed could damage the bottom fabric layer. The combined action of presser foot and feed could mar the face side of the fabric layers.
Too little pressure can also have undesirable results. A frequent one is poor control over guidance of the fabric layers, even though they may be feeding evenly. The stitches can be uneven in length and tension. On some fabrics, too little pressure can also cause skipped stitches, or pulling of the fabric into the bobbin area.
-- Pressure regulators
The amount of force the presser foot exerts on the fabric is usually con trolled by a pressure regulator. (On some machines, there is an automatic pressure adjustment mechanism.) This regulator is attached to a spring on the presser foot bar (see opposite page). Pressure is increased when the spring is compressed, decreased when it is elongated. Depending on the type of regulator, adjustments are made in several ways (see below).
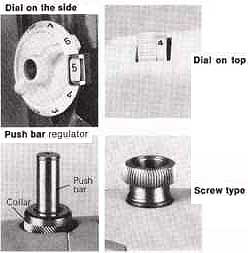
Dial on the side of machine arm will provide either numerals or words for the purpose of selection. Words are self-explanatory; with numerals, the higher the number, the greater the pressure.
Dial on top of the machine may also have either numbers or words. Where settings are words, they are usually "maximum," "minimum," or "darn."
Push bar regulator has a lock-release collar around it. When bar is pushed down to increase the pressure, collar locks bar into place. When collar is pushed, the bar is released and pressure is decreased.
Screw type regulator is turned clockwise to increase pressure, counterclockwise to decrease pressure.
- No-feed controls

The movement of the feed is important in almost all sewing, since it is the force that moves the fabric under the foot. In certain sewing situations, however, such fabric movement is undesirable. Examples of such situations are button sewing and free motion sewing; for such techniques, the effect of the feed should be eliminated. Depending on the machine, this will be accomplished in one of two ways: (1) by dropping the feed, or (2) by covering the feed. Both methods are explained below.
Feed us dropped by pushing a knob, button, or lever. This causes the feed to be brought below the level of the throat plate.
Feed is covered by means of a special throat plate, part of which is elevated above the level of a regular throat plate.
Stitch length in straight stitching:
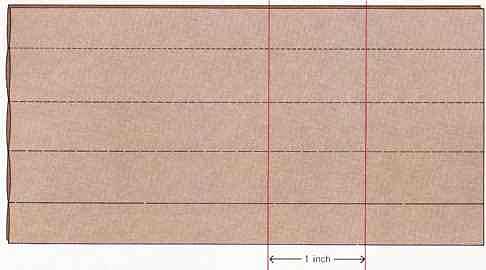
All sewing machines provide a stitch length regulator that permits changes in stitch length for different sewing situations. For seaming, the range is usually from 10 to 15 stitches per inch, depending on the fabric (see chart, p. 27). For temporary jobs, such as basting, or nonstructural details, such as topstitching, the stitches can be longer. (Very short stitches, 16 to fine, are used mainly for satin stitching, a zigzag stitch. For the meaning of length in zigzag stitching. Most machines also have a reverse control, as part of the stitch length regulator or separate from it. When this is activated, the machine sews in reverse at approximately the same stitch length as it does when stitching forward.
Fine stitch length ranges from 16 to 24 stitches per inch. Mainly used for seaming lightweight fabrics and for satin stitching.
Regular stitch length, ranging from 10 to 15 stitches per inch, is the length used for most sewing situations.
Basting stitches range from 6 to 9 stitches per inch. This stitch length is used for easing and gathering as well.
Longer basting stitches can be produced by some sewing machines. They can be as long as one stitch to every 2 inches.
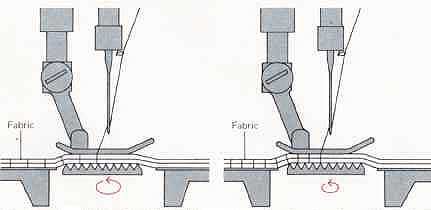
-- Feed and stitch length--The major purpose of the feed is to move the
fabric into position for each stitch. The distance that the feed moves the
fabric is controlled by the stitch length regulator. When the regulator is
set for a long stitch, the feed moves in a long elliptical path, advancing
the fabric a considerable distance. When the control is set for a short stitch,
the elliptical path of the feed is shorter, and the fabric is moved a shorter
distance.
The larger the elliptical path of the feed, the longer the stitch will be.
The smaller the ellipse formed by the feed, the shorter the stitch will be.
---
Stitch length regulators:

The numbers on a stitch length regulator used to select stitch length may be based on either the inch or the metric system of measurement. In the inch system, numerals stand for number of stitches to an inch; those in the metric system, for the actual length of the stitch in millimeters. Both, how ever, are measuring the same stitch. If, for example, there are 12 stitches to a measured inch, each stitch will measure 2.1 millimeters.
The inch system of measurement is the basis of this stitch length regulator. The reverse stitching control is not part of the dial shown here.
Both systems are used on this lever-type stitch length regulator. Stitches per inch are on the left and metric measurements are on the right.
The metric system of measuring stitch length is used on this dial. The button in the center of the dial is the reverse stitching control.
Stitch tension:
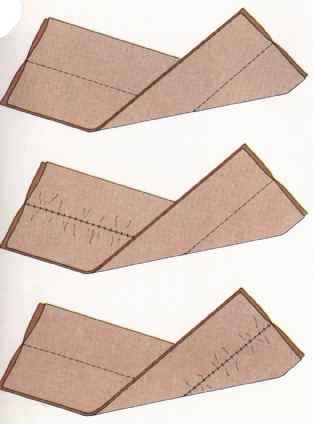
Every sewing machine has a tension control for the top thread; most machines also have one for the bobbin thread. These controls increase or decrease the pressure on the threads as they are fed through the machine. Too much pressure results in too much tension and too little thread for the stitch; too little pressure produces too little tension and too much thread. In general, too little thread causes fabric puckering and strained, easily broken stitches; too much produces a limp, weak seam. When pres sure is correct on both threads, a balanced amount of each thread is used, and the connecting link of each stitch is centered between fabric layers. The link position is a good indicator of which thread tension is incorrect (see below). It can happen, however, that the link is in the right place, but either too much or too little of both threads has been used. To remedy this, adjust both tensions.
Test stitch tension before starting any sewing project. Use the same number and types of fabric layers as will be sewed, and the correct needle, thread, and pressure for them.
Correct tension: Link formed with each stitch will lie midway between fabric layers. Balanced amounts of both top and bobbin threads have been used for each stitch.
Top too tight: Links will fall toward top layer of fabric. This means that there is either too much tension on the top thread or too little on the bobbin thread.
Top too loose: Links are toward bottom fabric layer. This indicates either that the top tension is too loose or there is too much tension on the bobbin thread.
Top thread tension
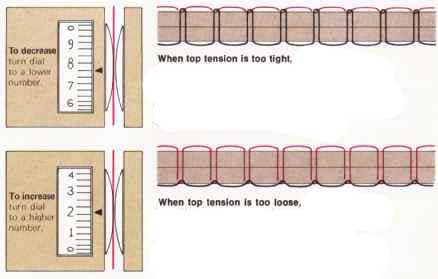
The top thread tension control, situated on top of or close to the tension discs, bears numbers or symbols to indicate the amount of tension the dial is set for. Adjust this control with machine threaded and presser foot down (when foot is up, tension discs are open).
[To decrease turn dial to a lower number.]
When top tension is too tight, link in stitch will fall toward top layer of fabric. To bring link down, toward the center of the fabric layers, decrease the top tension: Turn dial to a lower number (or into the minus range). This decreases the amount that the tension discs press against each other and the thread.
When top tension is too loose, the link will lie toward the bottom layer of fabric. To bring link up, toward the center of the fabric layers, increase the top tension: Gradually turn control to a higher number (or into the plus range). This increases the amount that the tension discs press against each other and the thread.
Bobbin thread tension
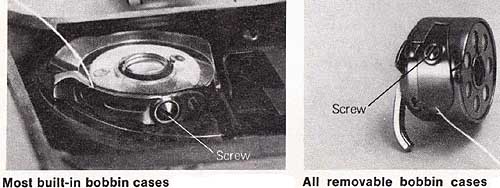
Most built-in bobbin cases have an adjustable tension screw. Using a screwdriver, turn the screw clockwise to increase and counterclock wise to decrease the tension.
All removable bobbin cases have a tension screw. Like the screws in the built-in types, it is turned clockwise to increase and counter clockwise to decrease the tension.

