The discussions below describe how to install the parts of a hard-wired or wireless home-security system.
Full Coverage: it's vital to have a sensor at every point of entry easily accessible to an intruder. The most widely used sensors for doors and windows are the two-piece magnetic type, though they will not suffice for the entire house.
Among other useful sensors are bars equipped with mercury switches to protect tilting windows, electronic glass-break detectors that sound the alarm if someone tries to break the glass in a door or window, and special screens that allow you to open a window while the system remains armed.
But no matter how well protected the perimeter of the house, it's important to install sensors inside the house in case someone manages to gain entry. The major types of interior sensors work by detecting heat, motion, or both.
The Rest of the System: In addition to the control box, to which all the elements of the security system are wired, you will need at least one siren. The types available are illustrated below.
Added security comes from smoke detectors, as well as heat sensors that detect dangerous rises in room temperature. and a panic button, which sets off the alarm at a touch, provides still greater peace of mind. Once all the devices are in place, you must mount the keypads, through which you give the system its instructions.
How to Proceed: First determine which components you need and where to place them around the house. If the component is wireless you can simply screw it in place, but if it's hard-wired you must then fish its wires to the control box. Connect the wires to each component—either by screwing them to terminals on the device or by soldering them to leads on the device—and secure the component in place. Finally, connect all the wires to the control box and attach the transformer and back up battery.
TOOLS
- Electric drill
- Soldering gun
- Screwdriver
- Hammer
- Electronic stud finder
- Keyhole dry-wall saw
- Pliers
MATERIALS
- Glue
- Rosin core solder
- Electrician’s tape
- Low-voltage cable
SAFETY TIPS: Safety goggles protect your eyes when you are hammering and working with power tools.

CALLING FOR HELP
The best protection for your home is provided by local police and fire departments. To notify them when your alarm goes off, hire a security company to monitor your system. Whenever a sensor is tripped, an automatic telephone dialer installed in the control box contacts the company, which alerts the fire department if a smoke or heat detector has gone off, and the police if any other element has caused the alarm. To guard against false alarms, a security-company employee calls your house and asks for a pre-established password. If nobody answers the phone—or an incorrect password is offered—the proper authorities are dispatched.
If you install your own security system, the monitoring company will probably want to inspect your work. A reputable company will display the seal of the National Burglar and Fire Alarm Association, which trains security professionals throughout the country.
Recessed Triggers for the House Perimeter
(to be added)
Protecting a Double-Hung Window
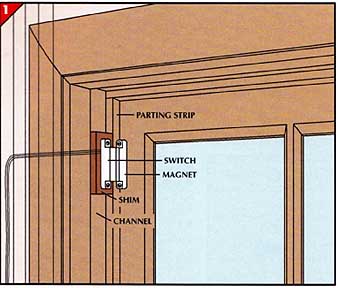
1. Arming the outer sash.
• Raise the outer sash to the top of the window frame.
• Fasten the magnet of a magnetic-switch sensor to the edge of the sash, near the top.
• Cut a wood shim the same width as the frame’s parting strip and slightly longer than the switch. Nail the shim to the frame at the magnet’s level.
• Lower the sash to provide room to work, and drill a 3/8-inch hole through the shim, the sash channel, and the adjacent wall studs.
• Run circuit wires behind the wall and through the hole.
• Connect the wires to the switch, and screw it to the shim so that it barely clears the magnet when you raise the sash.
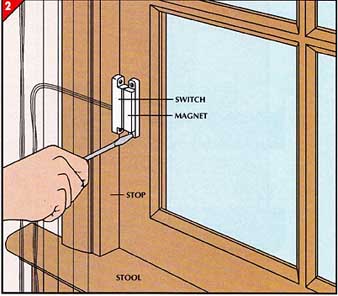
2. Equipping the inner sash.
• Raise the inner sash to provide room to work.
• At least 4 inches above the window stool, drill a 3/8-inch hole through the window stop, the jamb, and the studs next to it.
• Run circuit wires behind the wall and the casing and out the hole.
• Connect the wires to the sensor switch and mount the switch on the stop, next to the sash.
• Then close the window and screw the sensor magnet to the sash, along side the switch.
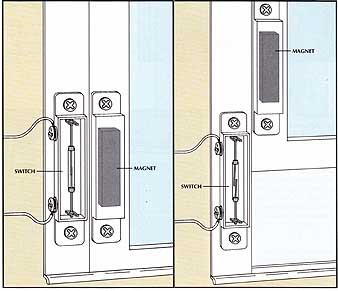
HOW A MAGNETIC-SWITCH SENSOR WORKS: The switch portion
of a magnetic sensor contains two metal filaments called reeds. The reeds
are encased in a sealed glass tube that helps prevent corrosion, which can
lead to false alarms.
When the magnet is near the switch (above, left), it pulls the reeds into contact with each other, completing an electrical circuit that carries a small current from the control box. As the window is opened (above, right), the magnet moves away from the switch. The reeds separate, breaking the circuit and interrupting the current from the control box, which turns on the alarm-system siren and activates the automatic telephone dialer.
Unusual Safeguards for Windows
76-0 Glass-break detectors.
These sensors consist of wall boxes that contain sound-analyzing microchips. The most reliable types will trigger the alarm only if they detect two sounds: a low-frequency thump against the glass, followed by the higher frequencies generated when the glass shatters. By waiting for both sounds, the device avoids the false alarms that might result from a bird’s flying into a windowpane without breaking it, for example.
Most glass-break detectors work when mounted within about 15 feet of a window. This wide field of coverage allows you to position a single detector so that it can monitor several windows.

Barrier bars.
Ideal for casement windows and other hinged windows, this device contains a mercury switch concealed in a spring-loaded horizontal bar that you wedge into the window frame. To get into the house, an intruder must push the bar aside, jostling the mercury switch and triggering the alarm. Auxiliary vertical bars slide onto the horizontal bar to make it more difficult for the intruder to overcome this defense by slipping over or under the horizontal bar.

A wired screen.
Set into a window in place of an ordinary screen, this sensor allows you to leave a window open for ventilation while the security system remains armed. Extending from a contact at the bottom of the screen are a series of trigger wires running vertically through the mesh. An intruder can't cut through the screen without severing at least one of the wires, setting off the alarm. To prevent the intruder from entering by re moving the screen, install the switch of a magnetic sensor like the one shown above. Mount the switch on the window frame next to a magnet built into the screen frame.
Eyes for the Interior of a House
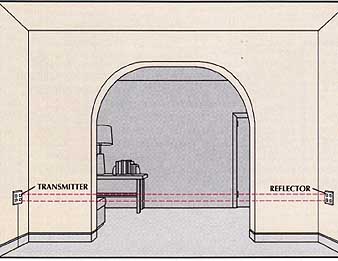
A photoelectric detector.
This sensor transmits a beam of light across an entranceway to a reflector on the opposite wall, which directs the beam back to the transmitter. When the beam is interrupted by someone walking across the entranceway, the alarm goes off.
To install this device, you must carefully position the reflector so that it bounces the signal back to the transmitter. The reflector needs no wiring of its own, but the transmitter requires four-conductor cable, which provides the power needed to generate the light beam while keeping the sensor in touch with the control box.
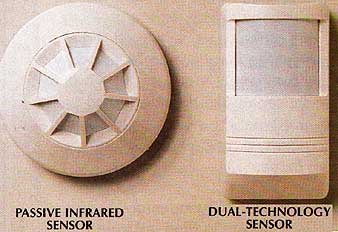
HEAT and MOTION SENSORS
For a large interior space, passive infrared (PIR) devices usually provide better protection than photoelectric devices, which cover only a narrow area. PIR sensors—a ceiling model appears at near right—detect the presence of infrared energy, or heat. Remarkably sensitive, they are able to distinguish the difference between the amount of heat given off by a person and that emitted by a pet.
More reliable are so-called dual-technology sensors like the wall-mounted model shown at far right. In addition to a heat-sensing PIR element, these devices contain a motion detector — a transmitter that sets up in a room a pattern of low-power microwave radiation, a type of radio signal. The slightest motion disturbs the pattern, alerting the sensor. If both heat and motion occur within a preprogrammed interval—usually a few seconds—the alarm sounds.
PIR and dual-technology sensors, both available in wall- and ceiling-mounted models, look very much alike; read labels carefully when making your selection. Both require at least four-conductor cable; models with built-in tamper switches require six-conductor cable. All models come with reflective foil strips that you can stick inside the device to block the view of a heat source such as a furnace or space heater. Furthermore, you can position the sensors so that they ignore heat or motion in part of a room. The manuf’s installation instructions explain how to get the coverage you need.
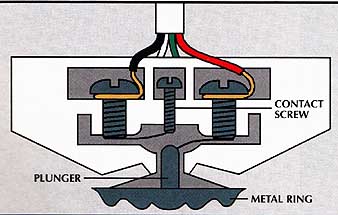
Heat detectors.
Located in a garage or a boiler room, these sensors detect a potentially dangerous buildup of heat. The type illustrated at left, which is wired with four-conductor cable, has a ring of corrugated metal that pops upward at a specific temperature. This action pushes a metal plunger against a contact screw to complete a circuit that sets off the alarm. Typically, heat detectors for rooms with a relatively low average temperature are built to activate at 135°F. Models for rooms with a higher average temperature respond at 200°E
Panic Buttons
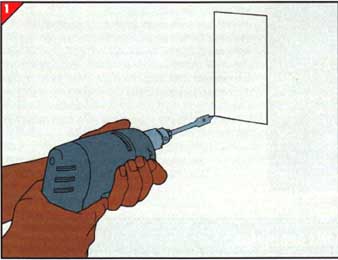
1. Cutting the opening.
This procedure calls for an electrical box without built-in mounting brackets.
• Identify a spot on the wall, between studs, for an outlet box that will house the panic button. Find the studs with an electronic stud finder.
• Hold the back of the outlet box against the wall in the desired location and out line it with a pencil.
• Drill a 3/8-inch hole in each corner of the outline.
• Cut away the area inside the outline with a keyhole dry-wall saw, using the corner holes to insert and turn the blade.
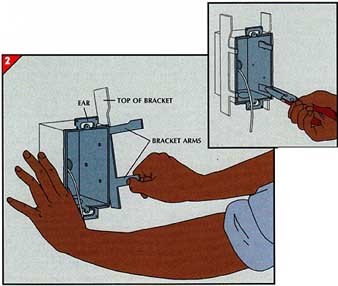
2. Installing a wall box using brackets.
• Place the box in the hole and adjust the ears, if necessary, to make the box flush with the wall surface. Then remove the box.
• Fish the necessary wires from the control box to the hole, and then into the box.
• Replace the box in the hole. While holding the box in place, slip a bracket into the wall between one side of the box and the edge of the opening. Slip the top of the bracket in first, then the bottom.
• Pull the bracket against the inside of the wall by one of its arms, then bend the arms into the box. If necessary, use pliers to make a tight bend (inset).
• Install the second bracket in the same manner on the other side of the box.
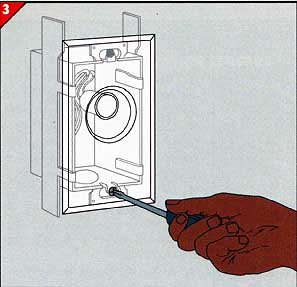
3. Hooking up the panic button.
• Connect the wires from the control box to the wire leads of the panic button.
• Mount the panic button and the cover plate to which it's attached onto the outlet box with the screws provide.

ALARMS and SIRENS: Security experts recommend that
you install one siren inside the house, in or near a bedroom, and another
on an exterior wall of the house or in an attic near a gable vent. Sirens
for outdoor use are weatherproof and are unlikely to be disabled or to sound
a false alarm because of rain or snow. Many sirens are also booby-trapped
to go off if any at tempt is made to disable them. Tamper-resistant alarms
require four-conductor cable, instead of the two-conductor cable used to
deliver power to sirens without such a safeguard.
If you live in a townhouse or in a neighborhood where the homes are clustered tight, install a siren with a flashing light (center). Located on an exterior wall, the light will eliminate confusion as to the source of the alarm among police or firefighters arriving on the scene.
Many localities require that the control box have an automatic cutoff to silence an exterior siren after a specific amount of time—usually 10 minutes. This feature prevents the device from blaring in definitely if it should go off while you are away from the house. Once the siren shuts off, the sys tem automatically rearms itself, bypassing the de vice that originally tripped the alarm.
While sirens for outside or attic use are large, horn-shaped devices, the ones for indoor use are designed to be as unobtrusive as possible. The unit shown below, left, for example, is flush mounted in the wall; it protrudes only ½”.
A Keypad Command Center
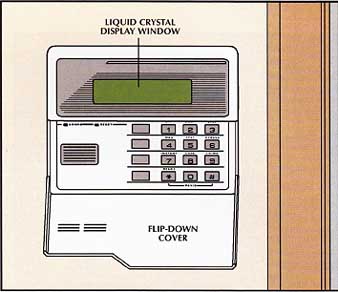
The keypad.
Wired with four-conductor cable—two conductors pro vide power, the other two allow for communication with the control box—the keypad displays the status of the system at all times. Colored lights let you know if the system is armed or deactivated, and more specific information—such as which sensors have been tripped when the alarm goes off—appears on the display panel. A set of buttons, hidden by a flip-down cover, let you arm and disarm the system by entering a code. Many keypads also act as panic buttons; pressing the star and pound keys sets off the alarm on this model.
Connecting the Control Box
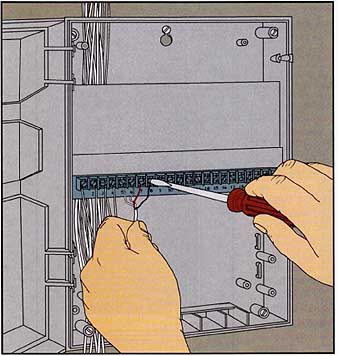
Wiring the box.
Most control boxes use a wiring scheme similar to the one illustrated at left. Each conductor from every cable is connected to a strip of screw terminals. The manufacturer will specify which terminals serve each kind of security-system device. Typically, spaces are reserved for cables coming from the sirens, the keypad, and the smoke and heat detectors. Furthermore, there are terminals on the strip dedicated to devices that are tripped when a circuit is broken—called normally open devices—and those tripped when a circuit is made—called normally closed. For large systems, you can buy and install additional strips. To make it easier to maintain and service the system, label each cable to indicate which sensor it serves.
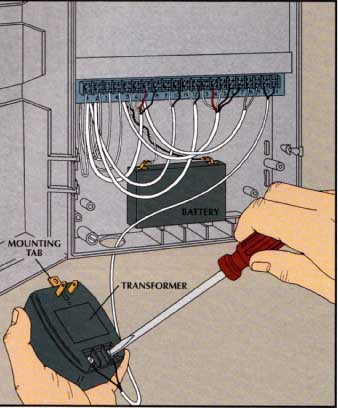
Wiring the transformer and battery.
If your box comes with a pair of battery leads already connected to the back of the terminal strip, attach the positive and negative leads to the positive and negative ends of the battery. Otherwise, the terminal strip will have positive- and negative-labeled screws from which you can run wires to the battery.
To wire the transformer to the box, connect its two wire leads to the screws on the terminal strip identified for this purpose. Before plugging it into a receptacle, first remove the screw for the receptacle’s cover plate. Hold the cover plate in place, plug the transformer into the receptacle, and reset the cover plate screw so that it goes through the mounting tab on the transformer. At this point, the system is ready for use.
A Wireless Security System
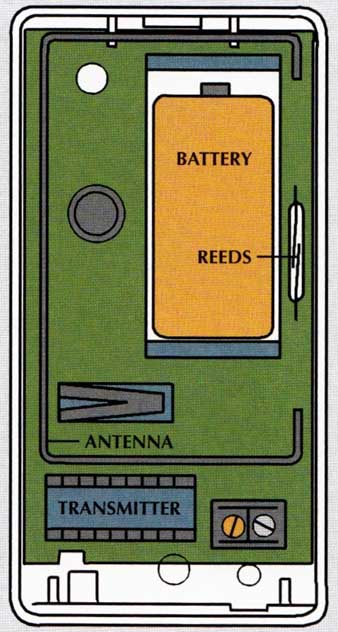
A wireless sensor.
Every sensor available for a hard-wired system has a wireless counterpart. Each communicates with the control box by way of a small battery-powered radio transmitter instead of wires fished throughout the house. The diagram at right illustrates the inside of the wireless version of the magnetic switch shown above. When aligned with the same kind of magnet used with a hard- wired switch, reeds touch to close a circuit, preventing the transmitter from broadcasting. When the magnet is moved away, the reeds separate to open the circuit and activate the transmitter. Power for both the circuit and the radio transmitter comes from a 3-volt lithium battery, which lasts from 3 to 5 years. You must still hard-wire sirens and keypads to the control box. The transformer and backup battery are wired to the box as they are in a hard-wired system.

Accessories for a Wireless System: Wireless components
operate on what is called a “supervised” network, in which each element maintains
contact with the control box by means of a unique radio signal. If a portable
device such as a wireless keypad or panic button is taken out of radio range,
for example, or if the batteries in a sensor run down, the box notes the
loss of signal and sends an alert through the key pad display.
Though wireless systems have drawbacks— y are more expensive than hard-wired ones and require periodic battery changes—they allow you great freedom. The wireless keypad (top), for example, provides you with total access to the system from inside the house. The key ring controller (center) functions in a similar manner, though its abilities are much more limited. and while both can be used as panic buttons, you can also purchase a remote panic button (bottom), which works both inside and outside the house.
Previous: Snaking Cable through the HouseNext: Smoke Detectors