The electrical codes that cover low- voltage wiring allow you to fish security system cable behind base boards and in other places you can't run standard household wiring. The guidelines below are designed to let you hard-wire your entire house with a minimum of difficulty.
The Wire: Most security systems use 18- to 22-gauge cable with stranded wires, available at most home-supply stores. Some components call for two-conductor cable, others for up to five-conductor cable; the manufacturer’s instructions will specify which type to buy. To figure out how much cable you will need, first estimate the total distance from each element to the control box. Then add 20 % to that figure, since cables rarely run in a straight path. Finally, add an extra foot for each component in the system, to al low for making the connections.
The Path of Least Resistance: In most houses, the simplest wiring route is through an unfinished attic or basement. Start by running the cable through the unfinished room to a location directly above or below the alarm component. Use a staple gun with a wiring attachment to se cure a cable along exposed joists; if you need to cross joists, drill a 3/8-inch hole through the center of each joist and string the cable through it.
Next, make the short run through the inside of a wall from the unfinished room to the alarm component. The tools required for this task include springy steel fish tapes and a long string or chain — both used for pulling cable through walls—and a long electrician’s extension bit for your drill. A straightened wire coat hanger may come in handy for pushing insulation out of the way in an exterior wall.
Wiring Shortcuts: Usually, the wiring of a security system will re quire at least one long vertical run between attic and basement. Since every house has at least one plumbing stack running from the basement to the roof, the excess space along this stack offers an excellent route.
Closets on successive levels of a house can also provide a handy vertical path. If the closets are stacked directly over each other, drill through the ceiling of one into the floor of the next. If they are offset, you may be able to fish cable a short distance through a joist space shared by the closets; alternatively, you can run cable out of the top of a lower closet to a molding, then into the bottom of an upper closet.
When running cable through closets or unfinished rooms is impossible, look for other ways to avoid long, tricky fishes through walls. Tuck and staple cable along the edges of wall-to-wail carpets (a crochet hook to lift the edge of the carpet is sometimes helpful), or hide it behind baseboards, chair rails, moldings, or door and window casings. You can also hide cables under rugs or carpeting, but be sure to avoid places where the insulation could be damaged or the wires broken by foot traffic or furniture.
Making Connections: To guarantee secure, long-lasting connections between two wires, or between wires and components, solder them. An inexpensive soldering iron with a 25- to 50-watt heating element will serve, though a soldering gun can speed the job. Whichever tool you choose, sandpaper the pieces to be connected before beginning the job, and be sure to use rosin-core electrical solder: The acid core in plumbing solder would weak en a connection. After soldering, wrap the exposed wires tightly with electrician’s tape.
TOOLS
- Electric drill
- Flexible drill bit
- Fish tapes
- Chain
- Fishing weight
- Magnet
- Staple gun with wiring attachment
- Wire hanger
- Crochet hook
- Wood chisel
- Hammer
- Cold chisel
- Utility knife
- Soldering iron or gun
- Long-nose pliers
MATERIALS
- 18-gauge cable
- Rosin-core solder
- Electrician’s tape
- Wire cap
- Staples
SAFETY TIPS: Wear safety glasses to protect your eyes when stapling, drilling, and chiseling. When using an electric drill in a cramped space, reduce the noise with earplugs.
Wiring from a Basement or Attic
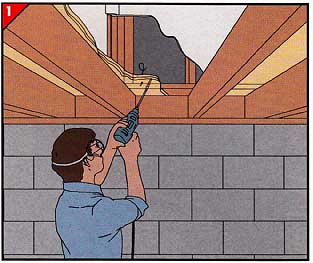
1. Drilling from below.
• In a room above the basement, bore a small location hole through the floor, just out side the wall space through which you will pull cable. Stick a scrap of stiff wire through the hole in order to mark the position of the hole.
• From the basement, find the marker wire and drill up through the sole plate of the wall with a long bit. If you are working near the foundation wall, you may have to angle the bit to hit the plate.
When running cable from the attic down to a finished room, follow the same procedure in reverse: Drill the location hole up through the room’s ceiling, then drill through the top plate of the wall from the attic.
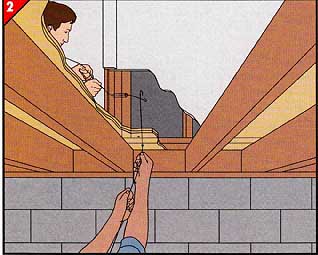
2. Fishing the cable.
• From the position of the component, drill a hole through the doorframe or window frame—or through the nearest wall stud, in the case of an interior sensor or keypad—and push the end of a fish tape through it into the wall.
• Have a helper push a second tape through the hole drilled in the wall plate and maneuver both tapes until their ends catch. In an exterior wall filled with insulation, use the natural curl of the fish tape to keep it between the inside face of the wall board and the vapor barrier of the insulation.
• Pull the hooked tapes into the basement or attic, unhook them, attach the cable to the tape leading from the component’s position, and pull the cable through the wall.
Routing Cable between Walls
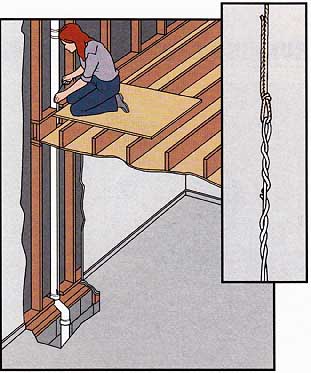
Wiring along a stack vent.
• From the attic, lower a small fishing weight attached to a long piece of string or chain into the space along side the plumbing stack. If the weight is blocked, jiggle and bounce it until it falls past the obstruction.
• When the string reaches the basement, attach cables to the string, staggering the points of attachment to avoid a bulky connection (inset).
• Pull the string and cables back up through the stack.
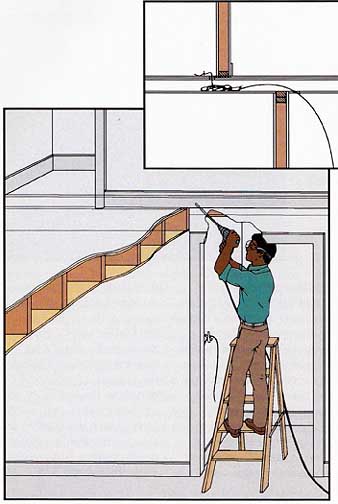
Wiring through closets.
Use the following procedure when closets are not stacked directly above one another:
• Fish cables from the basement through a hole drilled in the floor of a closet above.
• Drill a hole through the closet ceiling into the space between the joists above.
• Drill a hole down into the same joist space through the floor of a closet on the next floor.
• Tack one end of a heavy string to the floor of the upper closet. Wrap the other end into loops, and stuff the loops down into the joist space.
• Push a fish tape through the hole in the lower closet and snag the string (inset). Pull the string into the lower closet, tie it to the cables, and pull them into the upper closet.
If the closets don't share a joist space, remove a section of baseboard in an upper room and drill behind it on an angle into the joist space above the lower closet. Fish cables through and run them behind the baseboard (below) to the nearest closet or sensor.
Running Cable in a Finished Room
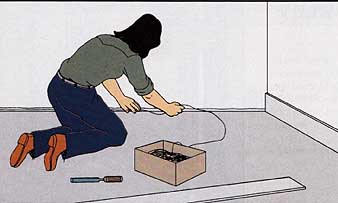
Hiding cable behind baseboards.
• Insert the blade of a wood chisel between the wall and the top of the base board and , working from one end of the baseboard to the other, carefully pry it away from the wall.
• Push the cable into the gap between the floor and the bottom of the wall board, stapling it in place if necessary. If there is no gap, cut a groove for the cable along the wall; use a utility knife to cut away wallboard and a hammer and cold chisel for plaster.
• Nail the baseboard back in place, angling the nails to avoid the cable.
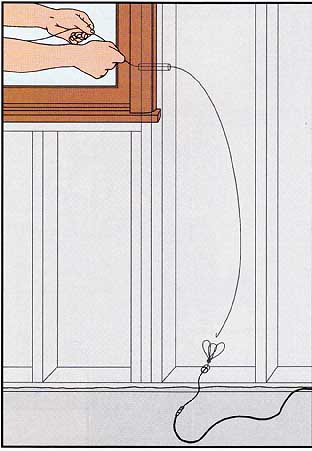
Fishing cable from behind a baseboard.
• Tie one end of a piece of string into a series of loops, and tie the other end to the alarm cable.
• Below the sensor location, drill a hole in the wall behind the baseboard, and push the string loops through.
• Push a fish tape through the sensor hole and catch the string loops with it. Then pull the tape, string, and cable through the sensor hole.
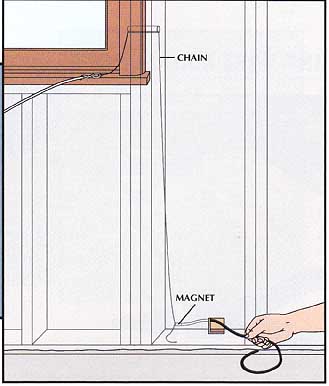
TRICKS OF THE TRADE: Fishing Cable with a Magnet
Instead of using a looped string and fish tape to run cable down along a wall, it's often easier to do the job with a magnet and a length of non-rigid ferromagnetic chain. Simply drop the chain through the sensor hole into the wall and draw it out the exit hole at the base of the wall with the magnet. Then tie the cable to the chain and pull it through the sensor hole. You can buy chain-and-magnet sets at an electrical supply shop, or fashion your own.
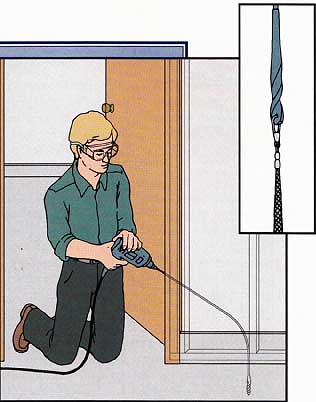
A DRILL BIT THAT GOES AROUND CORNERS
If you need to make many short wiring runs from door or window sensors to spaces below or above, you can save time by purchasing a flexible drill bit like the one shown at right. Available in lengths of 44 and 6 feet, the bit has a flexible, spring-steel shaft with a small hole in each end. These features make it possible to drill through walls then attach wires to the bit and pull them through the hole as you with- draw the bit.
For best results, use the bit with a variable-speed reversible drill. First bore a hole halfway through the jamb at the sensor’s location with a regular bit, angling the hole to ward the attic or basement. Then complete the hole with the flexible bit. When you feel the bit emerge from the studs of the rough frame stop the drill and slide the bit forward until it strikes the next stud, which will deflect it up or down to the wall plate. Then drill through the plate.
Fish the wires with a device called a wire basket, consisting of a net and a swiveling hook that attaches to the hole in the bit (inset). To link the cable to the basket, push the cable into the net; as you pull on the cable, the net pulls tight around it. The swivel hook allows you to run the drill—sometimes necessary to pull the bit back out of the holes—without twisting the wires.
Flexible bits and wire baskets are available at electrical- and alarm system-supply houses. Other helpful accessories include alignment handles and guide tubes to bend the bit into tight curves, and extensions that allow you to drill as far as 10 feet.
Making Wire Connections
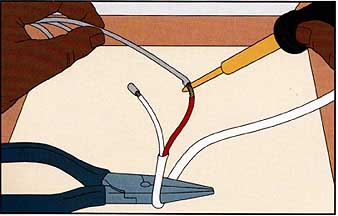
Tinning a lead.
• Strip inch of insulation from the lead and twist the strands of wire together tightly.
• Hold the soldering iron to the wire for a few seconds to heat it thoroughly.
• Touch the solder to the heated wire— not to the iron—and let it flow evenly over the lead. The solder should be gin to flow almost instantly; if it does not, remove the solder, heat the wire a little longer, and try again.
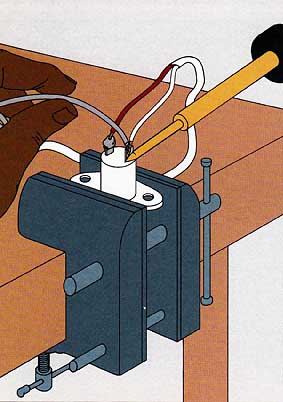
Soldering a wire to a tab.
• Pull the tinned end of the wire through the hole in the tab with long- nose pliers and wrap the wire in a loop around the tab.
• Heat the tab on one side and dab enough solder on the other side to cover the joint smoothly.
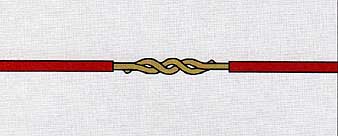
Soldering wires together.
• Expose about inch of each wire and wrap them around each other as shown above.
• Heat the wire joint with a soldering iron, then touch the solder to the wires until the joint is evenly covered with solder.
• Cover the joint completely with electrician’s tape.
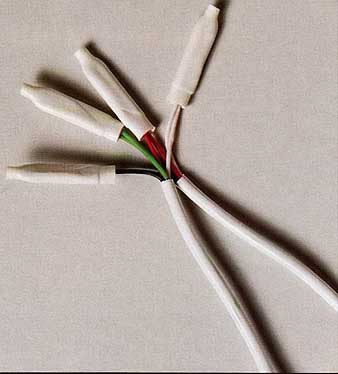
MAKING CONNECTIONS WITH WIRE CAPS: As an alternative
to soldering, you can splice cable with wire caps specially made for thin,
low-voltage wires. Though not as strong as soldered joints, such splices
will serve in tight spots where soldering is difficult.
To use the caps, strip about inch of insulation from the end of each wire, twist the ends together, and then insert the exposed wire into the cap. With pliers pinch the cap flat; this causes the metal teeth within the cap to clamp down on the wires. Finally, wrap the entire connection with electrician’s tape.
Previous: A Network of ProtectionNext: Elements of a Home-Security System