Tree, Bush, or Vine: A Lifetime Harvest of Fruits and Nuts
By raising your own fruits, you gain freshness and a range of flavor that cannot be matched by store-bought fruit, which is often limited to a few varieties more pleasing to the eye than to the taste. You can grow such historic favorites as the Spitzenburg apple, relished by Thomas Jefferson, and the famous Concord grape, plus fine modern varieties including the Reliance peach, so hardy that it defies the severe winters of New Hampshire. You can enjoy such unusual treats as yellow and purple raspberries or fresh currants and gooseberries, not to mention pies, jam, cider, or wine made with your own fruit. And fruits yield beauty as well as food: clouds of fragrant blossoms in spring, colorful clusters of fruit in fall.
Nut trees, while needing more space than fruit trees, thrive with minimal care and live for generations, often reaching giant size. They provide welcome shade in summer and valuable timber, as well as bountiful crops of nuts-a source of pleasure long after your own lifetime. As an added benefit, both nut and fruit trees provide food and habitat for many species of wildlife.
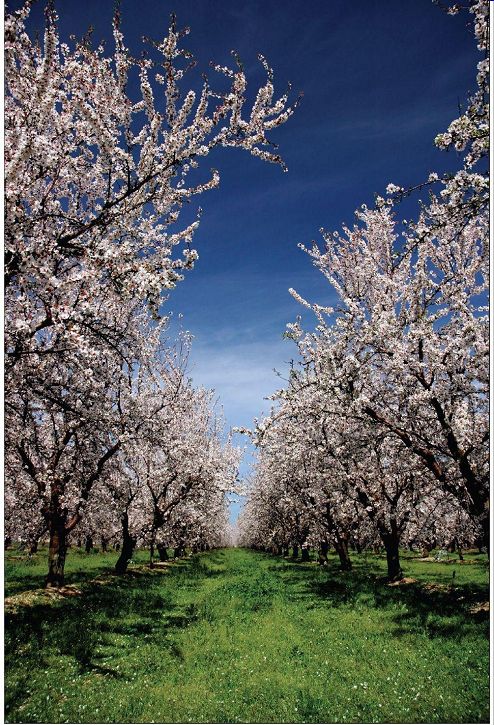
-------- Almond trees in full bloom. Fruit and nut trees can be beautiful as well as practical.
It is easy to grow your own fruit and nuts if you have enough space for a couple of trees or a few berry bushes.
They need less care than flowers and vegetables; and although fruit-bearing plants take one to five years before they come into production, with care most of them will keep on producing for many years-even for generations.
Starting Your Orchard
The most important step you can take for your newly purchased stock is to plant it properly. An old adage advises that you should plant a $5 tree in a $10 hole, meaning that the hole should be large enough to give the roots ample room to spread. Cramped roots grow poorly and may even choke one another.
If you buy a tree or bush from a local nursery, it is probably either growing in a container of soil or balled-and burlapped. (Balled-and-burlapped, or B & B, means that the roots are embedded in a ball of soil and wrapped in burlap.) Stock from a mail-order nursery, which offers a far wider range of choices, will arrive with its roots bare, packed in damp moss or excelsior. For B & B or container grown stock, planting is simple: make the hole as deep as the root ball and a foot wider, place the plant in position, loosen the top of the burlap, and replace the soil. Bare-root stock needs more care (see below).
Ideally, stock should be planted as soon as it arrives. If this is not possible, it can be stored. B & B stock can be held for several weeks by placing it in a shady location and keeping the root ball moist. Bare-root stock can be kept up to 14 days by opening the base of the package and keeping the roots moist. If kept over 14 days, it should be "heeled in" until you are ready to plant: remove the plants from their package, place them roots down in a shallow trench, and cover the roots with soil. Keep the plants out of the sun, and keep the soil moist.
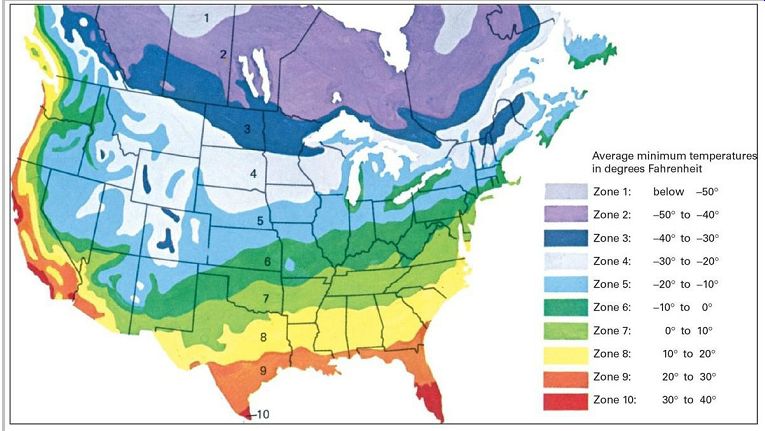
---------- Hardiness Zones
Climate is a critical survival factor for fruit trees, nut trees, bushes, and vines. Fruit- and nut-bearing plants vary widely in hardiness (resistance to subfreezing temperatures). Many require an extended period of chilling below 45°F to bear fruit. The map show s average minimum temperatures for winter over broad zones. Local features, such as hills and valleys, w ind patterns, and urban areas, can cause sharp variations within each zone.
Frost dates and length of growing season can also affect the kind of fruit or nuts that can be raised in your area.
Contact your county agent for varieties that do well locally.
When planting, do not expose bare roots to sunlight or air any longer than necessary. If they dry out, the plant may die.
To avoid this, keep roots immersed in a pail of water or wrapped in a wet cloth until the hole is ready. Fruit or nut stock can be planted in either spring or fall provided the plants are dormant and the soil is not frozen. In Zones 3 and 4 and the northern part of Zone 5 spring planting is safer.
Choose a site that has at least eight hours a day of full sunlight during spring and summer. The best locations are on high ground or on slopes to permit cold air to drain off.
Avoid areas that are wet for most of the year.
If the soil is poor, mix peat moss or compost with it before planting the stock, but do not use fertilizer when planting: it may burn the roots and cause severe damage to the plant. Give newly planted stock plenty of water during the first growing season. If rainfall is insufficient, provide each young plant with a laundry pail of water once a week.
Young trees have thin bark that is easily scalded (injured) by winter sun. To avoid sunscald, loosely wrap the trunks of newly planted trees from the ground to their lowest branches for the first few years. Use burlap, kraft paper, or semirigid plastic spirals (obtainable from nurseries). It may be removed in summer or left on year round as protection against deer, rodents, and farm animals.
Any vegetation close to the young tree, including grass, competes with it for water and nutrients. Therefore, the soil around the tree should be clean cultivated or heavily mulched from the trunk out to the drip line (the ends of the branches). If mulch is used, place a collar of hardware cloth around the base of the trunk to protect against field mice and other small nibblers.
After the first year, fruit and nut plants can be lightly fertilized. Overfeeding makes them produce a profusion of leaves and branches with fruit of poor quality. Manure, compost, wood ashes, and fertilizers high in nitrogen, phosphorus, and potassium are recommended.
Organic-minded fruit growers are usually willing to accept some blemishes and even the loss of some fruit as the price for avoiding sprays. However, in many areas spraying is necessary to get a crop at all. Organic insecticides include pyrethrum, rotenone, nicotine sulfate, and ryania.
Also available are man-made insecticides that do not have a long-lasting toxic effect.
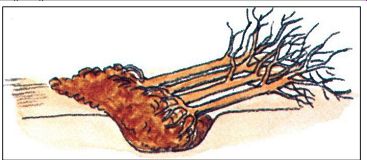
-------- Heeling-in is a method of storing plants for up to a month.
How to Plant a Tree
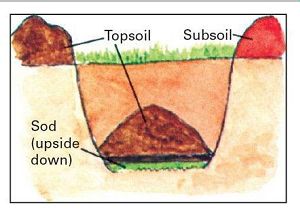
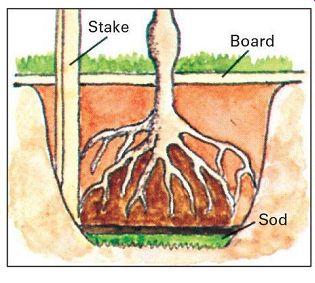
1. Dig hole at least 2 ft. deep and 2 ft. wide for nut trees, 1 1/2 ft. deep and 1 1/2 ft. wide for fruit trees, to give roots room. When digging hole, keep sod, topsoil, and subsoil separate. Loosen soil at bottom of hole and place sod upside down on it. Then make a low cone of topsoil in the center of the hole.
----------
2. Prune broken or damaged roots with a sharp knife or pruning shears. Also remove roots that interlace or crisscross. shorten any roots that are too long to fit the hole. Do not allow the roots to dry out during this operation, and avoid crow ding them into the hole when positioning the tree.
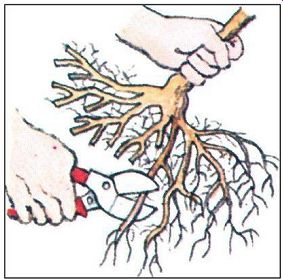
---------------
5. Add soil until roots are covered, then work it around the roots with your fingers, leaving no air pockets. Fill hole almost to top and pack the soil by treading it. Gently pour a pail of water onto soil to settle it further. Fill in remainder of hole, leaving a shallow saucer for watering. Do not pack this soil.
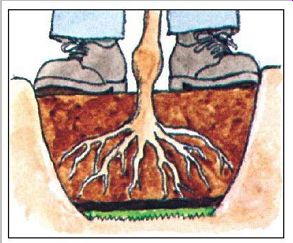
--------------
6. Prune off all but the three or four strongest branches, and head these back a few inches to a strong bud. Lowest branch should be about 18 in. above soil. These "scaffold" branches will be the tree's future framework. Tie tree to stake with soft material, such as a rag, to avoid injury to the bark.
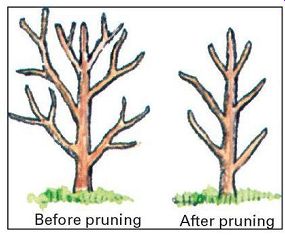
--------------
3. if tree is grafted, the graft union will appear as a small bulge near bottom of trunk. standard trees should be planted so graft is about 2 in. below soil level. For dwarf trees the graft should be 2 in. above soil level to prevent the upper part of the tree from forming its own roots and growing to full size.
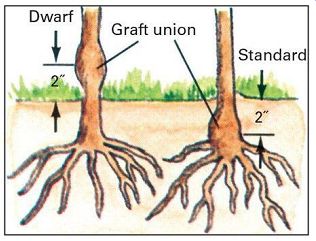
--------- 4. Newly planted trees need support. set a temporary stake in
hole before planting tree to avoid damage to roots. Place tree on cone of topsoil
with roots spread out evenly. if necessary, adjust height of cone to bring
graft union to proper level; a board laid across the hole makes a handy depth
gauge.
Less Means More: Pruning, Grafting, and Espaliering
Pruning, grafting, and espaliering are skills that will keep your plants productive, help you propagate special varieties, and enable you to shape your trees so they can be grown on a wall or along a fence.
Pruning is the art of selectively trimming or removing parts of a living plant. Properly done, pruning will promote the formation of flowers and fruit, eliminate dead and diseased wood, and control and direct the growth of the tree, bush, or vine. Pruning can also compensate for root damage at transplanting time. One of the most important rules is not to injure the bark when making a cut. The inner bark, or cambium, is the lifeline of woody plants, whether trees, bushes, or vines. This thin green layer of living tissue, only one cell thick, is not only the actively growing part of the tree, it is also the pathway that transports nutrients from the leaves to the roots. Whenever the cambium is injured or destroyed, the tissue around the injury will also die back.
When a limb is removed, the cambium forms a scar-like tissue called a callus and gradually begins to grow back over the exposed wood surface. A small wound often heals over in a single growing season, thereby excluding decay organisms. Wounds larger than a 50-cent piece should be painted to keep out rot, which weakens the tree and shortens its life, besides ruining the wood.
The traditional time for pruning is in late winter or early spring, while the tree is dormant and the weather is not excessively cold. (Pruning should not be attempted when the temperature is below 20°F, since dieback may result.) In general, summer pruning is not recommended, since it encourages plants to put out new growth to replace what has been removed. The new growth seldom has time to harden before frost comes; as a result, it is usually killed.
The exceptions to the rule against summer pruning are dead, diseased, or damaged branches, and so-called water sprouts or suckers, which should be cut off as soon as they appear. Water sprouts are vigorous, vertical shoots that spring from a tree's trunk and limbs; suckers are similar but spring from the roots.
An important function of pruning is to keep branches from crowding one another; thus weak and interlacing branches should be removed regularly. A light pruning every year is better-and easier-than a heavy one every two or three years.
Pruning Tools for Every Job
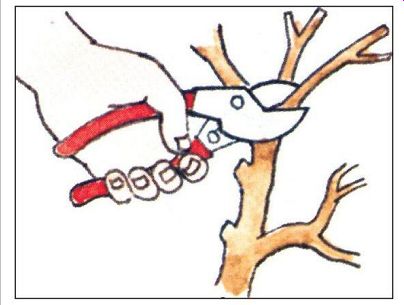
----------- One-hand pruning shears sever branches up to 1/2 in. in diameter
and are handy for light work.
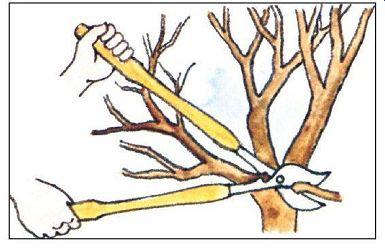
--------------- Two-hand lopping shears are used on branches up to 1 1/2
in. in diameter and for extending reach.
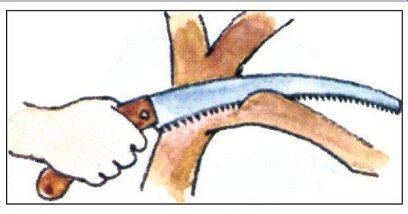
------------ Small-toothed pruning saw can handle branches up to 5 in.
thick if necessary.
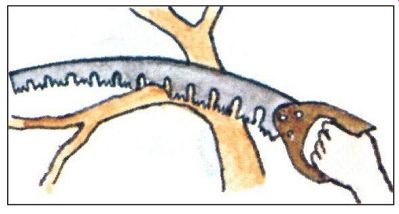
------------ Speed saw, with large teeth, cuts fast but coarsely; do not
use it for branches under 3 in.
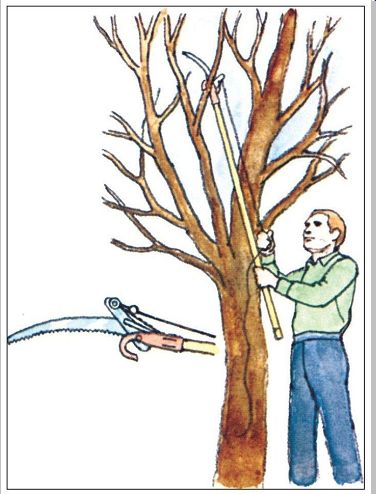
-------------- Pole saw is for work too high to reach without a ladder.
Many models include cord-operated shears for twigs.
Fundamentals of Good Pruning
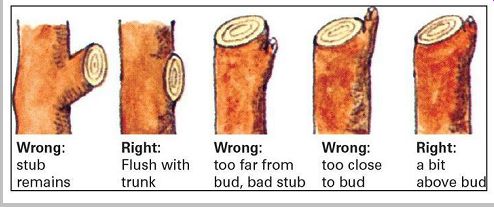
------------ "Leave no stubs" is the pruner's first commandment.
Subs soon die, creating an entryway for decay organisms and harmful insects. Make your cut flush with the main stem or as close to it as possible without injuring the bark.
Such a cut will soon begin to heal over. When heading back a branch, leave at least one strong bud to ensure that the branch survives. Use a slanting cut just beyond the bud to promote healing. select a bud that points in the direction in which you wish to direct the growth of the branch after pruning.
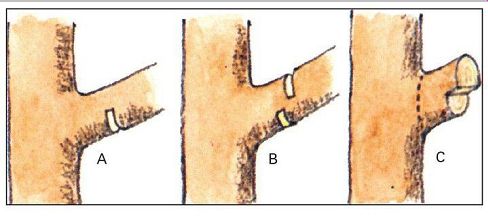
----------------- Pruning off large branches can injure trees if not done
properly, since the weight of the branch may cause it to break loose when partly
cut through, tearing away large areas of bark or even splitting the tree. To
prevent this, first cut upward from the lower side of the branch, about 6 in.
from the trunk or main stem (A). This undercut should go a third of the way
through the branch. Then cut down through the branch an inch or two farther
out (B). The undercut prevents tearing when the branch falls. The stub can
now be removed with a cut flush to the trunk (C).
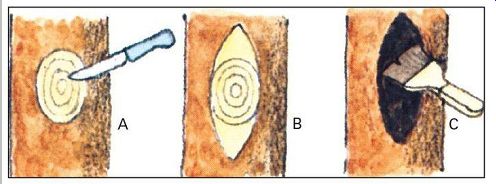
-------------- To speed healing, trim the bark around the edge of the wound
with a sharp knife and smooth off rough spots and projections on the bare wood
(A). If the wound is large, use a wood rasp for smoothing, and trim the bark
lengthwise in a diamond shape (B). This eliminates bark that would die because
sap cannot reach it. Wounds more than 1 to 1 1/2 in. in diameter (about the
size of a 50-cent piece) should be painted with shellac or water-soluble asphalt
based tree wound paint to seal them against decay organisms and insects (C).
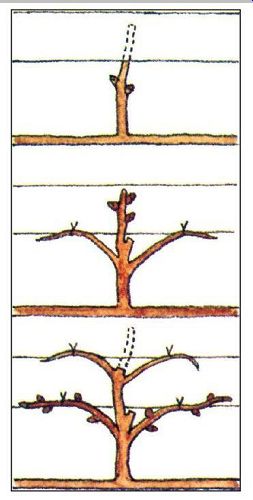
------------ First year. At planting cut tree back to three buds just below
bottom wire. One bud will form new vertical leader; the others will become
lateral branches. Keep all other shoots that sprout later pruned back to
6 in. to encourage fruit buds to form.
Second year. Cut leaders back below second wire. Gently bend the two laterals and tie them to wire with a soft material such as twine. Remove all other first-year shoots.
Leave three strong buds at top of leader to develop into new leader and new laterals.
Third year. Tie down second tier of laterals to wire. Cut back leader slightly below wire. Remove shoots from trunk and leader as before. Trim all side shoots on laterals to three buds. Do not cut back ends of laterals until they reach desired length.
Espaliers for Fence or Wall
The ancient art of espaliering is finding new popularity with space-conscious modern gardeners. The technique, which dates back to ancient Rome, was revived in Bud grafting medieval times by monks who needed to utilize every inch of their cramped monastery gardens. It has also been part of the New World tradition since colonial days.
Despite its high-sounding French name, espaliering is simply a method of training fruit trees or ornamentals to grow flat against a wall or on supports. Espaliered trees occupy a minimum of space and can be planted in spots that would otherwise be unproductive. When grown against a wall, they benefit from reflected light and heat so that their fruit often ripens early.
Espaliering is most easily done with dwarf trees. They may be trained on trellises, on wires strung between spikes in a wall, or on fence rails. In the North espaliers should have a southern exposure; in the South and Southwest an eastern exposure is favored. Since a healthy tree needs balanced growth, espaliers are often trained in symmetrical geometric patterns that combine economy of space with beauty.

------------- Bud grafting, or budding, is done in late summer. With a
sharp knife or razor blade make a small T-shaped cut in the bark of the rootstock
(A). Cut a twig from the tree you wish to propagate and snip off the twig's
leaves, leaving about 1/2 in. of each leaf stem. At the base of each leaf stem
is a bud that will produce the next year's growth. Cut toward the tip from
just behind the bud (B). You should get a broad, shallow slice of bark and
cambium and a little inner wood (C). spread the flaps of the T-cut and insert
the bud so that its cambium contacts that of the rootstock (D).
Fasten tightly with soft twine or adhesive tape, leaving the bud and leaf stem exposed (E). This protects the graft from drying out. Remove the wrappings after three weeks.
In the spring, when the bud sprouts, cut off the rootstock 1 in. above the bud.
Shown below are the basic steps for training a one-year old tree into an espalier. The pattern is the double horizontal cordon. A new tier of laterals can be added each year until the desired height is achieved; after that, keep the leader trimmed back.
Grafting for Propagation
Because of their complex genetic makeup, cultivated fruit and nut plants do not come true from seed, and the vast majority of seedlings are of poor quality. The only way to ensure that a young plant has all the desirable qualities of its parent is to propagate it non-sexually by grafting, layering, or division. Grafting is used principally with fruit and nut trees; layering is used to propagate grapes and some bush fruits; division is used with bush fruits.
Cleft grafting
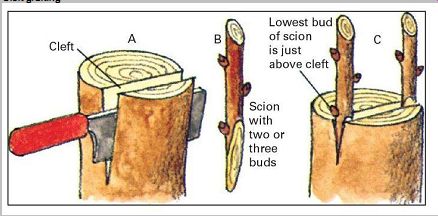
------------ Cleft grafting, the simplest way to graft, is done in early
spring before growth starts. Cut off the rootstock a few inches above the ground.
With a cleaver, heavy knife, or wide chisel, split the rootstock stem near
one edge 2 to 3 in. deep (A) and wedge the split open. Take a scion (a short
section of a shoot with several buds) and cut one end to a wedge shape (B).
insert the scion at one side of the cleft so that cambium touches cambium (C).
Cover all cut surfaces with grafting wax to prevent drying out. As insurance,
use two scions: if both take, cut off the weaker one.
Whip grafting
-------------
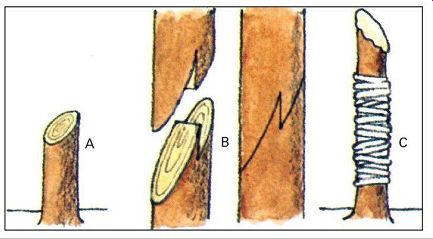
Whip grafting is used when the scion and rootstock are of equal size and less than 3/4 in. in diameter. it is done in early spring. With a sharp knife, cut off the rootstock diagonally about 6 in. above the ground (A). Make a matching cut on the scion. The cuts should be smooth and clean. Now cut a slanting tongue in the rootstock and another in the scion and fit the two pieces together so that cambium meets on both sides (B). Fasten firmly with twine, waxed thread, or adhesive tape and cover the top of the scion with grafting wax (C) to prevent it from drying out.
Grafting is the most complex of these techniques but is still simple enough for amateurs to master. It has been practiced at least since the days of the ancient Romans.
Grafting involves joining the top of one variety to the roots or trunk of another. Old-time farmers propagated their best fruit trees by grafting and gave buds and scions (young shoots) to their friends. The famous McIntosh apple was propagated in this way from a single wild seedling discovered on a pioneer farm in the Canadian bush in 1811. All McIntosh apples in existence today are descendants of that one seedling.
In addition to propagating desirable varieties, grafting is used to impart special characteristics such as hardiness, extra-small tree size, or disease resistance. Three common grafting techniques are shown below.
Apples and Pears Are Old Favorites
Apple and pear trees are closely related and have similar cultural requirements. Both grow best in a deep, rich, well drained, slightly acid soil but can be grown in almost any type of soil that is not excessively acid or alkaline. The orchard should be sited on a north-facing slope if possible to delay blossoming and reduce the danger of frost damage.
Both apple and pear trees need a period of cold and dormancy to set flowers and fruit. Apples thrive best in Zones 5 to 7 (see map on p.131), although there are hardy varieties that succeed in Zone 4 and a few heat tolerant ones that grow in Zones 8 and 9. Pears, more delicate than apples, do best in areas with mild winters and cool summers, such as the Pacific Northwest, but can be grown in Zones 5 to 7.
Most varieties of apples and pears are not self-fertile; that is, they need at least one other variety planted close by to set fruit. Even those listed in catalogs as self-fertile produce better when they are cross-fertilized by another variety. Standard apple trees should be planted 20 to 30 feet apart, with the same distance between rows; for standard pear trees the figures are 20 feet apart and 20 feet between rows. Dwarf trees can be planted as close as 10 by 10 feet or even 6 by 10 feet. Semidwarfs should be at least 12 feet apart.
Like other fruit trees, apples and pears are prey to a variety of diseases and insect pests. For a good crop of unblemished fruit, commercial growers must spray as often as 13 times a year. Home growers can get by with six sprayings--fewer if they do not mind a few blemishes.
Both types of trees bear fruit on spurs-short, gnarled twigs that grow from the branches and produce blossoms for several years in a row. Spurs can be identified in winter by their buds-fruit buds are plump and rounded, while leaf buds have a slenderer, more pointed shape. With a little practice it is not hard to tell the difference. For best results the fruit should be thinned three to six weeks from the time it first forms, after the early summer "June drop." First eliminate any wormy, diseased, and undersized fruits. Then space out the remaining fruits to 6 or 7 inches apart.
Thinning produces larger and more flavorful fruit and also reduces the danger of branches breaking from too heavy a load. Be careful not to break off fruit spurs when removing the fruits.
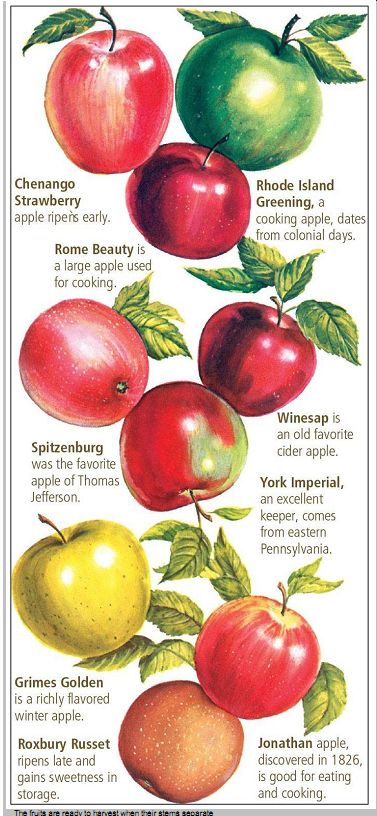
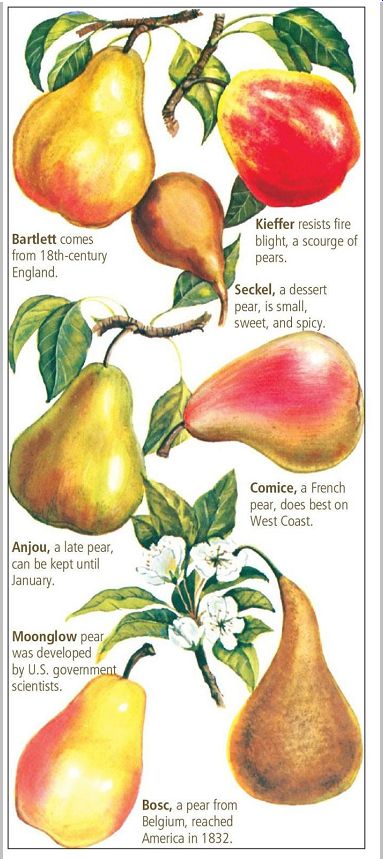
------------- The fruits are ready to harvest when their stems separate
easily from the tree. Pears should be picked before they are ripe, when their
color changes from deep green to light green or yellow. Apples should be tree
ripened and have reached their mature coloration. Pears should be ripened in
a cool, dark place for immediate use or held in storage in the refrigerator.
When picking fruit of any kind, try to keep the stem on the fruit-removing it creates an entry for rot. Place fruits gently in a basket or other container rather than dropping them in; bruises cause rapid spoilage.
Apples and pears should begin to bear at 5 to 10 years of age for standard trees and 2 to 3 years for dwarfs.
Owners of commercial orchards replace their trees at 25 to 40 years, but with care a tree will survive, blossom, and bear fruit for as long as 100 years.
==========
Dwarf trees for efficiency
Where space is limited, dwarf trees can be the answer. Dwarf trees, produced by grafting standard varieties onto special rootstocks or by inserting a special stem section, bear full-sized fruit but seldom grow more than 8 to 10 ft. tall.
Because of their small size, they are easy to prune and care for, and the fruit can be picked without climbing a ladder. Dwarf trees usually bear much sooner than standard (full-sized) trees, and as many as 10 dwarfs can be planted in the space required by one standard tree. This not only increases the yield but allows you to plant more varieties. On the debit side dwarf trees require more care than standards and must usually (except for interstem dwarfs) be staked permanently to prevent them from toppling under the weight of a heavy crop.
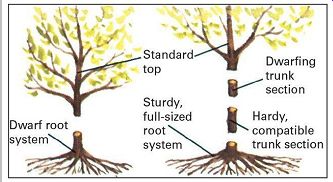
------ Dwarf trees are created by two methods: using dwarf rootstock or
interstem grafting.
============
Both apples and pears have early, midseason, and late ripening varieties. The early and midseason varieties do not keep well and should be eaten soon after picking or else be dried or canned. Late varieties are picked before they are fully ripe and attain peak flavor and aroma in storage.
Training for Better Trees
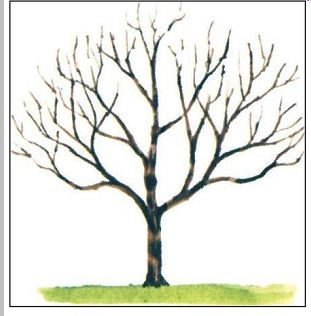
Left to themselves, fruit trees grow into a nearly impenetrable jungle of branches that yield small, inferior fruit and leave the trees vulnerable to destruction in storms or under the weight of snow. The fruit grower's aim is to direct the growth of the tree into a shape that is structurally sound, easily cared for, and requires little pruning. This training should begin when the tree is two to four years old and the branches are still pliable. The best configuration for apple and pear trees, known as the central leader shape, features a tall main trunk surrounded by lateral, or scaffold, branches. The lowest scaffold branch should be 18 inches from the ground. Each succeeding scaffold branch should be at least 8 inches above the one below it. No two scaffold branches should be directly opposite each other.
Scaffold branches should grow at an angle between 45 and 90 degrees to the main leader; a narrow crotch is structurally weak, and vertically growing branches produce fewer fruit buds. If possible, select scaffold branches that grow naturally at this angle. If the tree has none--and many varieties are upright growers--you can force them to grow horizontally with the aid of spreaders (see illustration on right). Prune the trees to maintain a Christmas-tree profile so light can reach the lower branches. The central leader should be headed back each year to encourage the scaffold branches to grow-the leader will produce new shoots to continue its own growth. Head back the laterals, too, to keep them within bounds and promote formation of fruit spurs.
-------- Trees that naturally tend to produce more than one leader can
be trained on the modified central leader plan. The traditional open-center
plan should not be used for apple and pear trees. It tends to produce lots
of water sprouts and makes the tree vulnerable to splitting.
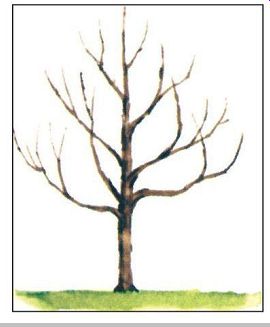
--------- Central-leader system produces a strong tree that resists breakage.
The shape allows sunlight to reach the lower branches.
----------- Modified central leader tree has a main leader that is headed
fairly low and scaffold branches nearly as long as the leader.
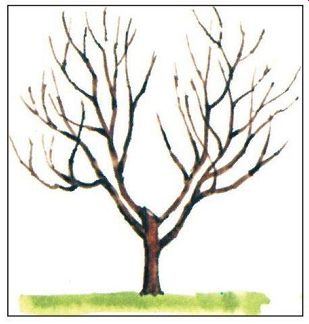
---------------- Open-center system is best for peaches and other stone
fruits but experts no longer recommend it for apple or pear trees.
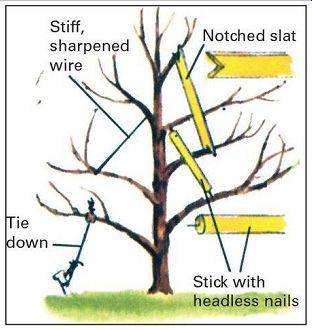
------------ Train branches to the best growing position by tying them
down to stakes or by using spreaders like the homemade types above.
Rejuvenating Old Trees
An old, overgrown apple or pear tree, picturesque but unproductive, can often be restored to fruitfulness by pruning and feeding. The first task is to head the tree back to a manageable height, such as 15 to 20 feet (some varieties may reach 35 to 40 feet), and to cut off all dead, diseased, and damaged branches. Next, eliminate branches that are weak, crisscross, grow downward, or have narrow crotches, and cut off water sprouts and suckers. Paint wounds with tree-wound compound.
If the tree has a major limb that can serve as a central leader, save it and try to select branches that form a natural scaffold. If there is no leader, prune the top into an open vaselike shape to let in light and air. In addition to pruning, a neglected tree almost certainly needs cultivation and feeding. Rototill or spade up the soil, starting near the trunk and moving out to the drip line of the branches. This frees the tree's feeder roots from the competition of sod and weeds. It is helpful to till in compost or rotted manure.
Another way to feed the tree is by using a crowbar to make a circle of 12-inch-deep holes around the drip line 18 inches apart and filling them with 10-10-10 fertilizer. Apply a thick layer of mulch around the tree to keep down weeds, but leave an 18-inch circle clear around the trunk to discourage rodents.
The Stone Fruits: Cherries, Peaches, Apricots, and Plums
The stone fruits-cherries, peaches, nectarines, apricots, and plums-get their name from the hard, stony pits that encase their seeds. In general, the stone-fruit trees are smaller and come into bearing sooner than apple and pear trees. They are also shorter lived, although with reasonable care they can remain productive for 20 to 40 years, depending on type.
All the stone fruits need well-drained soil, and good drainage is particularly important for peaches and cherries.
Like apples and pears, the stone fruits need a period of winter chilling to blossom and produce fruit. Plant standard sized trees 20 feet apart and dwarfs 10 feet apart. Some dwarf varieties can be grown even closer together; the nursery from which you buy them should supply details on planting and care.
The stone fruits are highly perishable and keep only a few days in storage. However, they are excellent for canning, drying, and, in some cases, freezing. All of them make fine preserves.
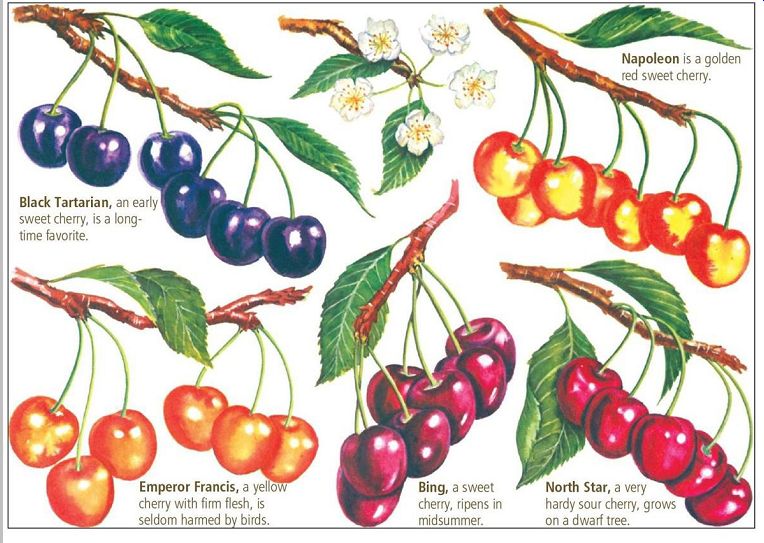
Cherries. There are two basic types of cherries: sweet and sour. Sweet cherries can be eaten fresh or cooked; sour cherries, also known as pie cherries, are used mainly for pies and preserves, although some are sweet enough to eat from the tree. The black cherry, a wild native American tree, yields small, sour cherries that can be used in pies; they are also a favorite food of songbirds.
Sweet cherries are grown in Zones 5 to 7; pie cherries in Zones 4 to 7. Bush cherries, a different species, grow throughout Zones 3 to 7 and bear small, sour fruits. Sweet cherry trees are upright in form and reach 25 to 30 feet if not pruned back. Most sour cherry trees are spreading and reach 15 to 25 feet, although the black cherry, an upright tree, occasionally grows as high as 100 feet. Sweet cherries should be trained as central leader trees. Sour cherries do better on the modified-leader plan.
Sour cherries are self-fertile, but sweet cherries must be cross-pollinated by another variety of sweet cherry if they are to bear fruit. Check with your county agent for compatible varieties, since certain types are not mutually fertile. Bush cherries also require cross-pollination, but they are not as finicky as sweet cherries. Sweet cherries rarely cross-pollinate with sour varieties.
Commercial varieties of both sweet and sour cherries live 30 to 40 years; bush cherries about 15 to 20 years.
Wild black cherry trees live much longer; individual trees that are 150 to 200 years old have been found. Sweet cherries begin bearing about five years after they are planted, sour cherries usually bear three years after planting, and bush cherries often bear after the first year. All of them produce their fruit on spurs. Thinning is seldom needed for cherries. Robbing by birds can be countered by covering the trees with netting.
Peaches and nectarines. Often thought of as warmth loving southern fruits, the peach and its smooth-skinned variant, the nectarine, flourish in Zones 5 through 8. Several hardy varieties, such as the Reliance peach, produce fruit in Zone 4. Peaches and nectarines must have a substantial winter chilling period to blossom-the number of hours of chill required differs with the variety. A few recently developed varieties produce fruit in the cooler parts of Zone 9.
Peaches and nectarines grow best on slightly acid soil (pH 6 to 7), but their prime requirement is good drainage.
Late spring frosts often kill blossoms; to avoid this danger, plant the trees on high ground.
Peach and nectarine trees should be trained to the open center or modified-leader plan with three or four scaffold branches. They bear on shoots that were formed the previous year, not on spurs like apples, pears, and cherries. Most peaches and all nectarines are self-fertile.
Thin the fruits to 6 to 8 inches apart. Thinning is especially important with peaches and nectarines to get fruits of good size and flavor and to avoid weakening the tree by overproduction.
Peaches and nectarines should ripen on the tree. They should be picked when they feel soft under gentle pressure and when they separate readily from their stems. They keep only a few days in cool storage but are excellent fruits for freezing and canning. The quality is better if they are frozen in syrup or sugar.
Apricots. Although little grown for home use, apricots are not difficult to raise. The prime requisite for success is protecting these early-blossoming trees from spring frosts.
Planting them on a north slope or on the north side of a building helps by delaying blossoming. If the tree is small, it can be covered on a frosty night. Apricot trees themselves are quite hardy and can be grown in Zones 4 through 8.
Standard apricots, if left unpruned, will reach a height of 20 feet and a spread of 25 to 30 feet; dwarfs reach a maximum height of 8 feet and a spread of 10 feet. Both produce better when kept pruned back.
Apricots should be trained on the open-center plan, with three or four main scaffold branches beginning between 18 and 30 inches from the ground. Each scaffold branch should have one or two secondary scaffold branches arising 4 to 5 feet above ground level.
Apricots bear fruit on short-lived spurs. Almost all apricots are self-pollinating and set heavy crops without the aid of another variety. The fruit should be thinned conscientiously to 6 inches apart. Apricots normally begin to bear two or three years after planting and can produce for as long as 70 years.
For eating fresh and for drying, apricots should be harvested when they are fully ripe and separate easily from the stem. For canning, harvest the fruit while it is still firm.
---------- Some nurseries have developed strains of apricots with edible
kernels. (The kernels of most varieties of apricots, like those of most stone
fruits, contain enough cyanide to render them bitter and even poisonous if
eaten in quantity.) Plums. Plums fall into two major groups: European and Japanese.
Japanese plums are mostly round and red;
European plums are mostly oval and blue. There are also green and yellow varieties, such as the Greengage and Yellow Egg, both old European-type favorites. Most European plums are self-fertile; all Japanese plums require another variety of Japanese plum as a pollinator. Certain European varieties with a very high sugar content are called prunes, and dried prunes are made from their fruits.
They are also delicious fresh.
Plums thrive on soils with a pH of 6.0 to 8.0. European plums do best in Zones 5 to 7; Japanese plums in Zones 5 to 9. A few hardy varieties, produced by crossing European or Japanese plums with native American species, will bear fruit in Zone 4.
Standard plum trees reach a height and spread of 15 to 20 feet; dwarfs reach 8 to 10 feet. European plums do best when trained on the modified-leader plan; Japanese plums on the open-center plan. Plums usually bear three to four years after planting. The fruit, borne on long-lived spurs, should be thinned to 3 or 4 inches apart.
For eating fresh or for drying, pick plums when they are soft and come away from the tree easily. For canning, pick them when they have acquired a waxy white coating and are springy to the touch but still firm.
The Warmth-Loving Citrus Fruits
Citrus fruits are semitropical plants requiring a warm frost free climate the year round. They do best in Zone 10 and the warmer parts of Zone 9 (see map, p.131). The members of the genus vary in their resistance to cold. Limes are the most cold tender; tangerines are the hardiest. Kumquats, which belong to a related genus, are even hardier. Cold hardiness is influenced by the weather just before a freeze: cool weather makes the trees hardier.
However, citrus trees rarely survive prolonged exposure to temperatures in the lower teens.
Citrus trees grow best in a slightly acid soil (pH 6.0 to 6.5). They can be planted at any time of the year, but the winter months are preferred because less watering is necessary then. No pruning is needed except to remove dead wood and to shape the tree to fit the available space.
Citrus trees reach a height of 20 to 40 feet, with an equal spread; kumquats usually reach half this size.
Both grafted and ungrafted citrus trees are available.
Most are sold in containers. Look for plants with large healthy leaves; reject any that are potbound, that is, whose roots have grown until they fill the containers.
Grafted citrus trees begin to bear when they are two to four years old. Ungrafted plants bear much later; in addition, they are quite thorny and tend to become very large. Citrus trees are long-lived-some that are more than 100 years old are still producing.
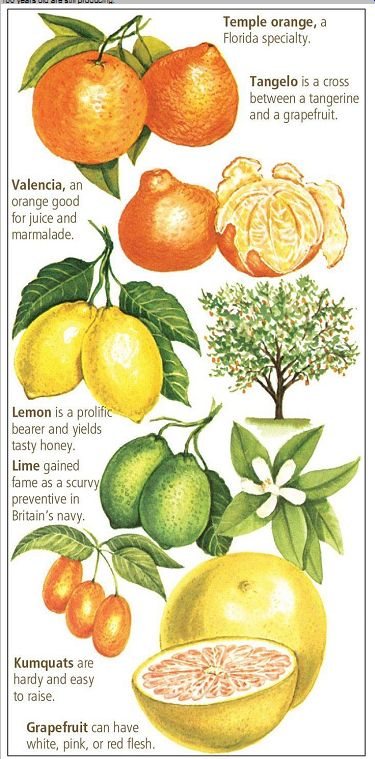
-------- Most citrus trees produce fruit without pollination, although
some of the tangerine hybrids do need cross pollination. Citruses can be prolific
bearers: a mature navel orange tree will yield more than 500 pounds of fruit
per year, and large lemon trees can bear even more. The fruits should be allowed
to ripen on the tree for the best flavor.
Color is usually, but not always, a guide to ripeness. (Cool weather enhances color while delaying ripening.) The fruit also becomes softer as it gets ripe, usually about 8 to 12 months after bloom. In the cool coastal areas of California it can take 24 or more months for the fruit to mature, and three crops of fruit can be found on the trees at the same time. Tangerines should be harvested by clipping their stems to avoid tearing the loose rind; other citrus fruits can be pulled off by giving the fruit a slight twist. Citrus fruits keep well in cool storage. Most citrus varieties can be left on the tree for long periods without the fruit developing any symptoms of deterioration.
Protecting trees from frost
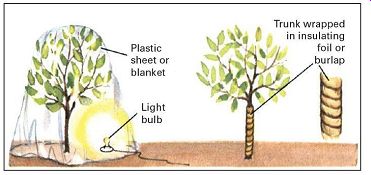
------- When temperatures drop below 26°F, citrus trees need protection, either by covering them or providing artificial heat. Smudge pots-containers of burning oil-are seldom used anymore.
Grapefruit can have white, pink, or red flesh and is available in seeded and seedless varieties. Grapefruit trees tend to be larger than orange trees and need more warmth. When ripe, the fruit grows to 6 inches in diameter, usually with a thick, pale yellow rind. Best quality is reached after Christmas.
Kumquats are valued as ornamentals as well as fruit producers. The bright orange fruit is eaten whole, rind and all. Kumquats have a tart, spicy flavor and are commonly made into preserves. Limequats, a pale yellow lime- kumquat hybrid, are useful lime substitutes in climates where limes will not survive.
Lemons grow very vigorously and are thorny; thus they are suitable only for very large gardens. Their sensitivity to cold limits them to Hawaii, southern Arizona, coastal California, and the Gulf Coast. The Meyer lemon, a semihardy hybrid, is a good choice for home gardens.
Lemons bloom and bear fruit the year round, but the main crop is usually set in summer.
Limes, like lemons, tend to fruit the year round. They are very cold tender and are common only in southern Florida.
The Key lime is small, sour, and seedy and thrives only in the warmer areas of Florida.
Oranges are divided into early, midseason, and late varieties; these in turn can be subdivided into seeded and seedless types. The best-known early orange is the navel orange. The most common late variety is the Valencia.
Tangelos and tangors are common garden trees in the citrus belt. Tangelos are crosses between tangerines and grapefruits, tangors between tangerines and oranges. The temple orange is a well-known tangor.
Tangerines, also called mandarins, are hardier than most other citrus fruits. They have a loose skin that is easily peeled and are best when eaten fresh. As with oranges, there are early, midseason, and late varieties, most of which are well suited to home gardens.
Long-lived Nut Trees For Food and Shade
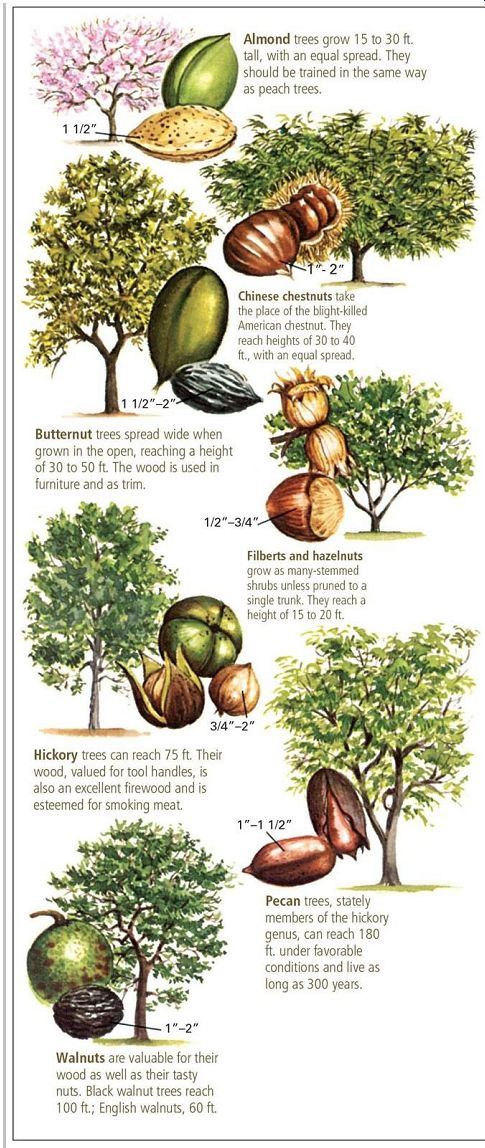
Nut trees adapt to a wide range of climates and soils, although they prefer a deep, rich, crumbly soil that is neutral or slightly alkaline. (An exception is the Chinese chestnut, which does well in acid soil.) Nut trees even thrive in rough or otherwise uncultivatable land, provided the drainage is good. Full sunlight is needed for best results. Most nut trees do not succeed where minimum temperatures fall below- 20°F, and they need a frost-free growing season of at least 150 days to produce a crop. Nut trees also need ample summer heat for their nuts to develop properly.
Nut trees are planted like fruit trees. However, walnuts and hickories have a single deep taproot rather than a branching root system. Since the taproot should not be cut back or bent, dig the hole deep enough to accommodate it.
At planting time the top of the tree should be cut back by a third to a half to force it to grow a strong new sprout that will mature into the main trunk. Nut trees need little pruning except to maintain a strong central leader during the first years of growth and to remove dead and crisscrossing branches.
Nut trees can be propagated from seed, but in many cases the extraction of the kernels will be so difficult that it is hardly worth the effort. As a result, with the exception of Chinese chestnuts and Carpathian walnuts, only grafted trees of named varieties should be planted. However, seedlings can be grafted with buds or scions of named varieties after they have become established.
Well-cared-for grafted nut trees usually begin to bear at three to five years of age. For proper pollination it is advisable to plant two or more of each kind of tree. With cultivated strains plant at least two varieties. When mature, nuts will fall from the tree by themselves or with the aid of gentle shaking. For best quality they should be gathered as soon as they fall; when allowed to lie on the ground, they deteriorate rapidly if not eaten by squirrels and other wildlife.
The nuts should be husked and dried in a shaded spot until the kernels are brittle-usually about three weeks. The dried nuts, stored in a cool place, will remain in good condition for a year. Freshness can be restored by soaking them in water overnight. Shelled nuts will keep indefinitely if stored in a plastic bag in the freezer. (Chestnuts should be boiled for three to five minutes before freezing them.) Almonds are grown mainly on the West Coast because of their climatic needs: a long, warm growing season with low humidity. For other sections nurseries sell hardy strains that can be raised where peaches succeed, but the kernels are toxic to some people.
Butternuts are a species of walnut and the hardiest of all native nut trees. They grow in Zones 4 to 8. The oil-rich nuts can be pickled when immature as well as eaten ripe. A gray-brown dye can be made from the bark. The nuts can be dried with their husks on.
Chinese chestnuts are resistant to the blight that wiped out the native American chestnuts. About as hardy as peach trees, they succeed in Zones 5 to 8. Chinese chestnuts yield large crops of high-quality nuts, borne in sharp-spined burrs that split open at maturity. Each burr contains from one to three nuts. When fresh, chestnuts are high in starch and low in sugar, which gives them a taste like potatoes. However, as the nuts dry out the starch changes to sugar.
Filberts and hazelnuts are closely related. (The name filbert is generally used for the European species, hazelnut for the native American species.) There are also numerous hybrid varieties. American hazelnuts grow in Zones 4 to 8; European filberts are hardy in Zones 5 to 8.
Hickory trees are native to North America and grow over most of the eastern half of the United States in Zones 5 to 7. Two species, the shagbark and the shellbark, produce edible nuts that are hard to crack. However, cultivated varieties with meatier kernels and thinner shells have been developed and are sold by nurseries.
Pecans belong to the hickory clan. Essentially a southern tree, the pecan's native range is the Southeast and lower Mississippi Valley. Papershell pecans grow in Zones 7 to 9. There are hardy northern varieties that grow in Zones 6 to 9, and even one that survives in Zone 5. However, pecans in the North often fail to produce nuts when summer is cool or frost comes early.
Walnuts include the native American black walnut; the English, or Persian, walnut native to Central Asia; and the heartnut, a Japanese walnut variety. The roots of black walnuts give off a substance that is toxic to apples, tomatoes, potatoes, and a number of other plants. Do not plant these susceptible plants within 30 feet of a black walnut. The black walnut can be raised in Zones 5 to 9.
English walnuts reach a height and spread of about 60 feet.
Easier to shell than black walnuts, they are hardy in Zones 5 to 9. Heartnuts are low, spreading trees that reach 30 to 40 feet in height. They are hardy in Zones 4 to 8. The nuts, which grow in clusters of 8 to 10, resemble butternuts in flavor.
------------
Tasty Strawberries Give Vitamin C Too
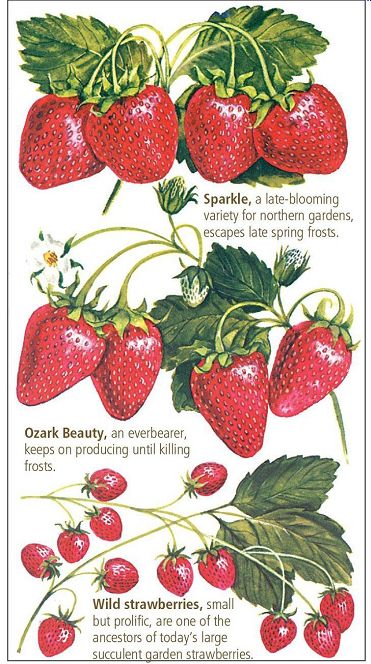
Strawberries, though short-lived, are one of the most adaptable of fruits. They can be grown from Florida to Alaska, and since the plants are small, they can be raised in containers, in ornamental borders, or among vegetables, provided they have full sunlight.
----------
Three Culture Systems
---------------
Hill system requires that all runners be kept pruned off the plants. Plants are spaced 12 in. apart. Growers usually plant double or triple rows with 12 in. between rows and a 24-in. alley between each set of rows. The hill system gives high yields and large berries, but it requires a great deal of labor and attention.

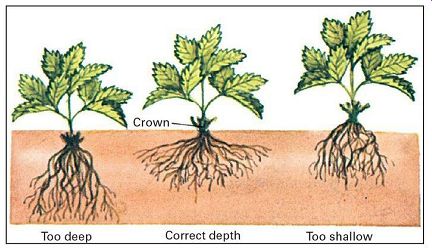
------------ Strawberries must be planted with their crowns level with
soil.
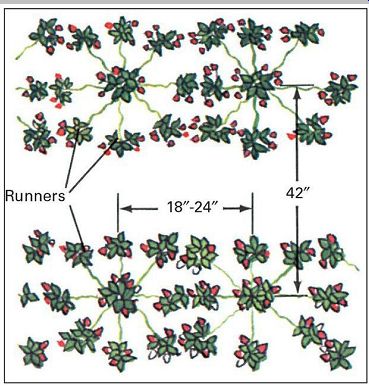
------------- Matted-row system requires very little maintenance. However,
the yields are lower and the berries are smaller than they are under other
systems of culture. in the matted-row system almost all the runners are allowed
to root. The plants are spaced 18 to 24 in. apart in single rows with about
42 in. between rows.
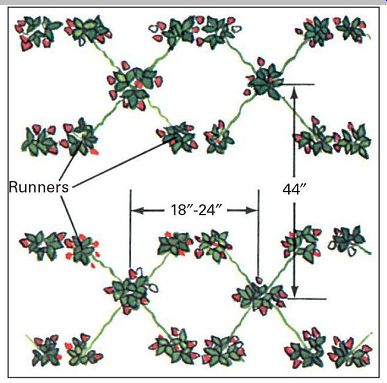
------------- Spaced matted-row system is popular with home gardeners.
it is a compromise between the hill and matted-row systems. The plants are
spaced 18 to 24 in. apart in a single row ; only four to six runners per plant
are allowed to develop. The spaced matted-row system gives good yields and
high quality.
Once established, strawberries spread by sending out numerous slender stems, or runners, along the ground.
When a runner is about 8 inches long, it bends sharply upward. At this bend the runner sends roots down into the soil and begins to form leaves. Once the new plant is formed, it sends out runners of its own.
The best planting time for strawberries is in the early spring, although in the South they can be planted in the fall.
Plant them in well-tilled soil mixed with compost or rotted manure. Spread the roots out fanwise in the hole and pack the soil firmly around them. Some growers find that trimming the roots to 4 inches simplifies planting. Proper planting depth is critical for strawberries (see diagram on previous page). Spacing depends on which system of culture you choose: hill, matted-row, or spaced matted-row.
Most strawberries bear fruit in May or June, depending on the local climate. There are also so-called everbearing varieties that produce a crop of berries in early summer and another in late summer or early fall.
Strawberries will produce blossoms the year they are planted, but these blossoms should be pinched off to strengthen the plants and ensure a good crop the next year.
The yield is greatest on two- and three-year-old plants.
Production tends to drop sharply after three years, and the recommended practice is to replace the plants, preferably putting them in a new bed to avoid soil-borne disease. You can use runners that rooted the previous year in the old bed, but it is safer to order new certified virus-free plants from a nursery.
Strawberries thrive when mulched between the rows and under the plants. The plants should be covered with 6 inches of straw, leaves, or pine needles after the ground has frozen. Remove the mulch cover in late spring when new leaves are about 2 inches long.
Grapes: A Variety For Every Palate
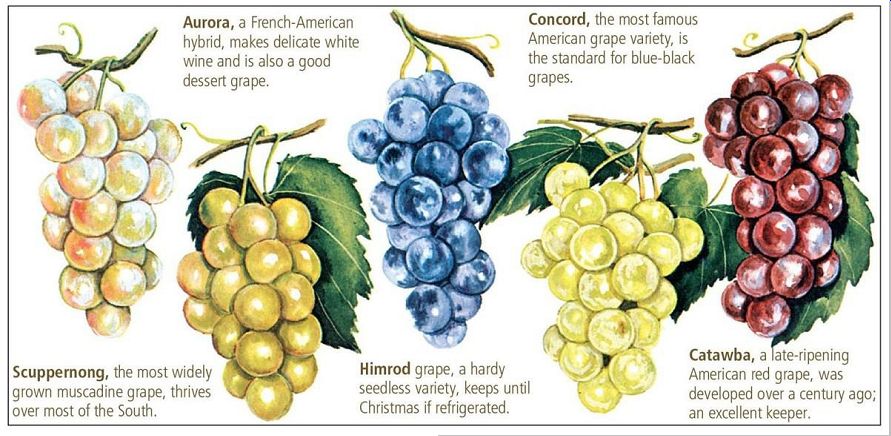
Three types of grapes are raised in the United States.
Labrusca grapes are descended from the native eastern wild grape. They are grown in the northern two-thirds of the country east of the Rockies in Zones 5 to 8.
Muscadine grapes are grown in the Southeast, where they are natives, in Zones 7 to 10. Vinifera (European) grapes, the kind usually found at fruit stores, do best in Zones 6 to 9 and are raised mainly in California and Arizona (in other areas they are subject to disease and pests). In addition to the basic types there are many hybrids that combine the tastiness and the winemaking qualities of European grapes with the hardiness and resistance of American grapes.
Most Labrusca and European grapes are self-fertile; most muscadines are not.
Grapes can be propagated easily by rooting cuttings of dormant stems in damp sphagnum moss or by layering- bending a shoot down and burying part of it in the soil, while leaving a few leaves or buds at the tip uncovered. This should be done in spring; roots will form along the buried portion during the growing season. Early the next spring, before growth starts, cut the newly rooted portion away from the parent vine and transplant it.
Grapes are produced on each year's new growth, and the best fruit is produced from the new shoots formed on canes from the previous year. The year-old canes are easy to recognize at pruning time: they are about as thick as a pencil and have light, smooth bark whereas older canes are stouter and have dark, fibrous bark. Remove blossoms and fruits from the vines the first two summers for a good crop the third year. Grapevines are long-lived and may produce for a hundred years. Although they will yield fruit in poor soil, they do better in fertile soil. However, over-fertilization will produce masses of shoots and leaves with inferior fruit. The vines should be heavily mulched or clean-cultivated, since grass and weeds rob grapes of nutrients. Cultivate no deeper than 4 inches to avoid injuring the shallow roots.
Planting and Training Grapes
Grapes grow in a wide variety of soils as long as the organic content is high. They should be planted in spring.
Try to plant your vines on a slope so that cold air and water will drain off. Set new vines 8 to 10 feet apart in holes 12 inches wide and 12 inches deep. Trim the roots to fit the hole and prune off all canes (branches) but one. Prune that cane back to two buds.
----------------

-----------
Layering a grapevine, a simple means of propagation.
Grapes must be trained on supports to keep the fruit off the ground and provide air circulation. A sturdy wire trellis is the most common form of support. Training should begin at planting time: the vine should be trained on a stake to form a straight main stem, or trunk. Training on the wire trellis begins the second year. While grapes can be trained in a myriad of forms, the most used system is the four-arm Kniffin (below). The first year, at pruning time, leave about three buds above the lower wire and two buds below it.
Remove all other buds and side shoots. Head the trunk back a few inches above the lower wire. As the new shoots grow from the buds, select the straightest one above the wire to be the main leader and tie it to the upper wire when it is long enough. Train the shoots from the two lowest buds along the lower wire to become the next year's fruiting arms. Train two shoots along the upper wire as they develop.
The third spring prune back the fruiting arms to 6 to 10 buds each. Remove other lateral canes, but leave two stubs, or spurs, near the fruiting arms to produce next year's fruit. Follow the same procedure each year for steady crops of fruit. Muscadine grapes, however, are treated slightly differently. They should have fruiting spurs of three or four buds left along the fruiting arms, which need to be renewed only every four or five years.

--------------- Newly planted vine (left) should be tied to stake. After
two additional spring times vine will be well established on wire trellis.
Fast, Prolific Bearers: The Bush Fruits
The cultivated bush fruits include raspberries, blackberries (and their relatives), blueberries, currants, and gooseberries. (There are numerous other fruit-bearing bushes, but they are not cultivated on any significant scale.) All are hardy and productive. Most are shallow rooted. All need to be pruned every year to keep them from becoming overgrown. All prefer well-drained humus-rich soil, and all need at least eight hours of sunlight. Although not as long lived as fruit trees, most of the bush fruits can be kept going for several decades with a modest amount of care.
Raspberries are divided into two basic types: red and black. Yellow raspberries are considered a variant of red, and purple raspberries of black. Varieties of differing hardiness grow from Zones 3 to 8.
Raspberries bear fruit the year after planting, and a raspberry bed will generally last for 7 to 10 years before production declines, usually due to one of the many viruses to which raspberries are susceptible. The plants should then be replaced with new ones, preferably in a different bed, and the old bed should not be used for raspberries or blackberries for at least five years.
Spring planting is best for raspberries, except in the South. The soil should be well cultivated and free of sod and weeds. Dig a small hole 4 inches deep for each plant, or plow a 4-inch-deep furrow. Set the plants with the crowns just below soil level. Cover the roots with loose soil and pack it down gently. Fill the remainder of the hole or furrow with loose soil. Space plants 3 feet apart in rows 5 to 8 feet apart.
Raspberries produce their fruit on two-year-old canes, that is, stems that sprouted the previous summer. In most varieties the canes die after one crop. The exceptions are the ever-bearing varieties, which yield a small crop in the fall on the tips of one-year-old canes and a second small crop lower down on the same canes the following summer. Once a cane has borne its full crop of fruit, it should be cut off at ground level and removed as a sanitary measure. Many growers prefer to treat ever-bearers as fall bearers only.
They cut the canes down to soil level after the end of the growing season; the next year's new canes will then produce a heavy fall crop. Some growers use a rotary lawn mower at the lowest setting to cut down their old ever bearing canes. Red and yellow raspberries produce numerous suckers from their roots. Most of these must be pulled out to keep the bed under control, but a few of the strongest from each plant should be saved to become next year's bearing canes. Excess suckers can be dug up with a bit of root and replanted to become new bushes. As the plants fill in, they may be grown in clumps or in hills 3 feet apart, with 6 to 10 canes per hill. They can also be grown in hedgerows 1 to 2 feet wide with no more than five canes per square foot of row. Leave at least a handbreadth of space between canes to permit air circulation. Raspberries are most easily managed when wire trained.
--------------

Black and purple raspberries produce few if any suckers; they increase instead by tip layering. In late summer the bearing canes arch down to the ground and push their tips into the soil. The buried tips produce roots and new shoots that can be clipped free the next spring and replanted if necessary.
Although raspberry roots strike as deep as 4 feet, most of the roots are in the upper 12 inches of soil. Since so much of the root system is shallow, mulching is preferable to cultivation.
Prune red raspberry canes back to 4 or 5 feet in spring.
The canes of black raspberries should be cut back to 18 to 24 inches their first summer. This stimulates them to form the lateral branches on which they will bear their fruit.
Shorten the laterals to 8 to 10 inches the next spring. Black raspberries treated this way will not need a trellis for support.
Since raspberries bloom over a period of several weeks, the harvest season is correspondingly long. By planting successively maturing varieties you can extend the harvest season from midsummer to heavy frost. Raspberries are ready to pick when they separate easily from the stem, leaving the core of the berry behind.
Blackberries that are sold for cultivation are larger, juicier, sweeter cousins of the widespread wild blackberry.
Not as hardy as raspberries, blackberries do best in the South, but there are varieties that are hardy as far north as Zone 3. Boysenberries, loganberries, and youngberries are hybrids of blackberries and either dewberries (another species of bramble fruit) or red raspberries. They are relatively cold tender and prosper best in Zones 7 to 9.
Thornless blackberries are not reliably hardy north of Zone 5. Within their climate range they are a desirable choice because they lack thorns.
There are bush and vine types of blackberries. The bush types, which are hardier, are planted and propagated like red raspberries. Vine types are treated like black raspberries. Like raspberries, blackberries bear fruit on two-year-old canes. Bush-type canes should be pruned back to 5 feet at midsummer during their first year to aid the formation of laterals. The next spring head back the laterals to 12 to 18 inches. Vine-type canes can be prune like black raspberries. Blackberries should not be picked until they are dead ripe, separating from the stem at the slightest touch.
Blueberries thrive wherever their relatives, azaleas or rhododendrons, grow. They demand a very acid soil, ide close to pH 4.8. Blueberries will not survive in alkaline so If your soil has a pH over 6.5, grow your blueberries in containers or raised beds filled with an acid soil mix. Do not plant blueberries in soil that has been limed in the last two years. Two species of blueberries are cultivated in the United States: the highbush blueberry in the Northeast, Midwest, upper South, and Pacific Northwest, and the rabbiteye blueberry in the Deep South. The highbush grow to 10 feet or taller if unpruned; the rabbiteye can reach 20 feet.
Highbush blueberries should be planted 4 to 5 feet apart in rows 8 to 10 feet apart; rabbit eye blueberries should b spaced 5 to 6 feet apart with 10 to 12 feet between rows Dig a hole about 6 inches deep and 10 inches in diameter and set the plants with the crowns at soil level. If the soil i poor in humus, mix in compost. Be sure to keep the soil moist the first year-blueberries are very sensitive to drought. A 6-inch mulch of leaves or rotted sawdust will maintain soil moisture, add to the soil's organic content, and keep down weeds. Cultivation is apt to injure the shallow root systems of blueberries.
Rabbiteye blueberries very seldom need pruning except to remove weak or dead branches. Highbush blueberries should be pruned annually beginning the third year after planting. Remove old canes (stems) by cutting them off at soil level when they become twiggy. New canes arising from the root system will take their place. The desired result is a bush with clean, sparsely branched canes with a few fat buds on each branch. If necessary, head back lateral branches to three buds each.
Commercial growers propagate blueberries by rooting cuttings in sand or sphagnum moss. Better systems for the home gardener are mounding (a form of layering) and division, a technique familiar to flower gardeners. In mounding, pile soil, compost, or a mixture of peat moss and rotted sawdust around the base of the blueberry bush about a foot deep. Keep the mound damp. New roots will form on the covered portions of the canes, which can be severed below the roots and replanted. In division, use a sharp spade to split the bush into two or more parts, each with its own roots and stems. Head back each portion about one-third and replant.
Highbush blueberries are moderately self-fertile but produce better crops if two or more varieties are planted together. In addition, by combining early, midseason, and late varieties, you can stretch out your harvest so that it lasts more than two months. Rabbiteye blueberries require cross-pollination. Blueberries are ready to harvest when they separate from the stem at a light touch and are sweet to the taste.

---- Pruning red raspberries keeps the bushes within manageable size, removes
dead canes, and permits air circulation.
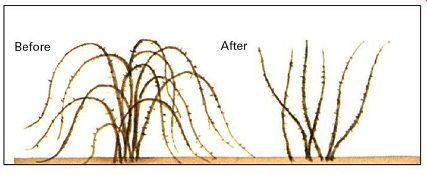
-------------- Black raspberries produce lateral branches where the fruits
are borne. These branches should be headed back in spring.
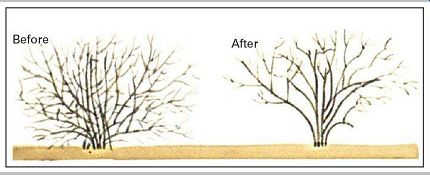
-------------- When pruning highbush blueberries remove old canes and twigs
that interlace. Crowded bushes produce poorly.
Currants and gooseberries, close relatives of each other, are the most cold loving of the bush fruits, thriving as far north as Zone 2 but doing poorly from Zone 7 south.
Unfortunately, both species are hosts to white pine blister rust, and raising them is governed by strict regulations (check your own state's regulations with your county agent).
Some states ban them entirely.
Well-drained soils are best for both currants and gooseberries, although they tolerate damp ground better than other bush fruits. They should be planted in fall in holes 12 inches across and 12 inches deep, with 2 to 4 feet between plants and 8 to 9 feet between rows. Bushes may be propagated by layering branches or by taking 8- to 10 inch cuttings of the current season's shoots in fall and sticking them in the ground, leaving two buds exposed.
Currants form roots in one year; gooseberries can take as long as two years.
Currants and gooseberries bear fruit the year after planting, and production is heaviest on two- and three year old canes. Canes more than three years old can be removed after harvest. The canes darken as they grow older, a clue to their age. Let a few new canes develop each year as replacements. Little pruning is needed except to keep the bushes open and to remove the nonproductive overage canes.
Many people find currants too tart to eat fresh, but they make excellent jelly, jam, and fruit syrup. Gooseberries can be eaten fresh, in pies, or as preserves.
Sources and resources
Books and pamphlets
Clarke, J. Harold. Growing Berries and Grapes at Home. New York: Dover, 1976.
Ferguson, Barbara J. All About Growing Fruits and Berries. San Francisco: Ortho Books, 1982.
Hedrick, U. P. Fruits for the Home Garden. New York: Dover, 1973.
Hessayon, D.G. The Fruit Expert. New York: Sterling Publishing, 1995.
Hill, Lewis. Fruits and Berries for the Home Garden. Pownal, Vt.: Storey Communications, 1992.
Kains, Maurice G. Five Acres and Independence. New York: Dover, 1973.
Seymour, John. The Self-Sufficient Gardener: A Complete Guide to Growing and Preserving All Your Own Food. Garden City, N.Y.: Doubleday, 1979.
Smith, Miranda. Backyard Fruits and Berries. Emmaus, Pa.: Rodale Press, 1994.
Van Atta, Marian, and Wagner, Shirley. Growing Family Fruit and Nut Trees. Sarasota, Fla.: Pineapple Press, 1993.
===