Wilderness Camping--Making Your Way In Nature's Domain
"The only inducements I can think of for making a ten days' journey through a strong wilderness, solitary and alone, were a liking for adventure, intense love of nature in her wildest dress, and a strange fondness for being in deep woods by myself."
-Nessmuk
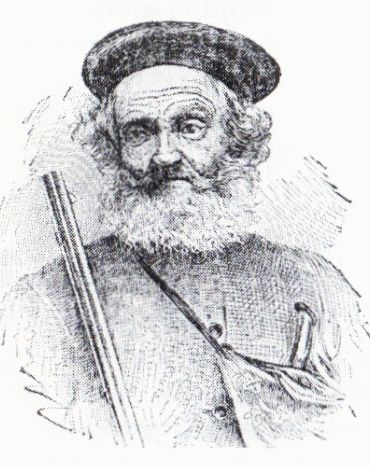
"Nessmuk" was the pen name of George Washington Sears (1821-90), eloquent outdoorsman and author of the classic book Woodcraft. In it he described a 60-mile trek through the wilderness of central Michigan at a time "when the Indians had left and the whites had not yet got in." For meat he shot deer, taking what he could use and "leaving the balance to the wolves, who never failed to take possession before I was out of earshot." He drank from streams and lakes and slept each night before an open fire on a fragrant bed of fresh-cut hemlock browse.
Today the old woodsman's inducements are still strong, but the wilderness has shrunk. (His 10-day trip is now a one-hour drive on U.S. Highway 10.) Millions converge yearly on America's parks and national forests, hiking trails, and wilderness areas for a taste of nature in her wildest dress. Because comparatively few venture from the beaten path, there are still vast areas accessible only on foot, where backpackers can enjoy the beauty and solitude that earlier generations took for granted. Most of these are in rugged country--mountains, deserts, and arctic wastes--where survival takes skill and where nature's balance is precarious. Today's camper must walk more carefully than Nessmuk did.
--------Head for the hills. When backpacking into high
altitude, it pays to take it easy and enjoy the scenery. Thinner air means
less oxygen per lungful; your head gets light, your legs grow heavy, and your
heart works harder--and it takes time to acclimatize. Body moisture is lost
faster than at sea level, so carry plenty of water and drink it often. When
camping, re member that water boils at lower temperatures (-1°F for each 500-ft.
rise in elevation), so cooking takes longer.
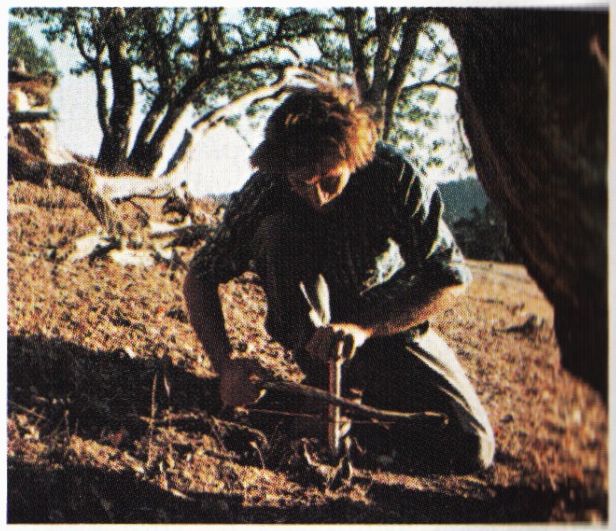
---------- Survival skills, such as starting a fire with
iii matches, gathering and preparing food from the wild, locating water, and
administering first aid, may never be needed. But ,after an emergency has occurred,
it may be too late to begin acquiring such abilities.
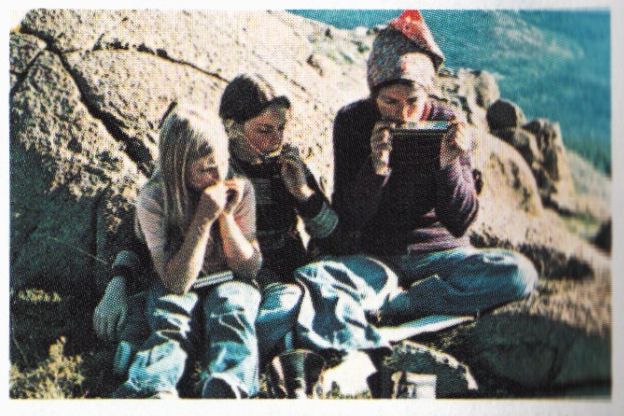
--------- Harmonicas
------------ Coffee and hot biscuits--a nice way to slot
the day. The traditional campfire is now banned in many wilderness areas, but
in places where fallen wood is plentiful and the danger of forest fire minimal,
responsible campers need not forego its comforts,
+++++++++++++++++++++
The Wilderness Has Many Faces: Woodland , Mountain, Desert, and Seashore
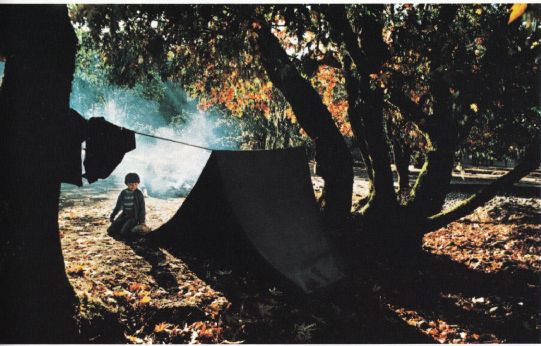
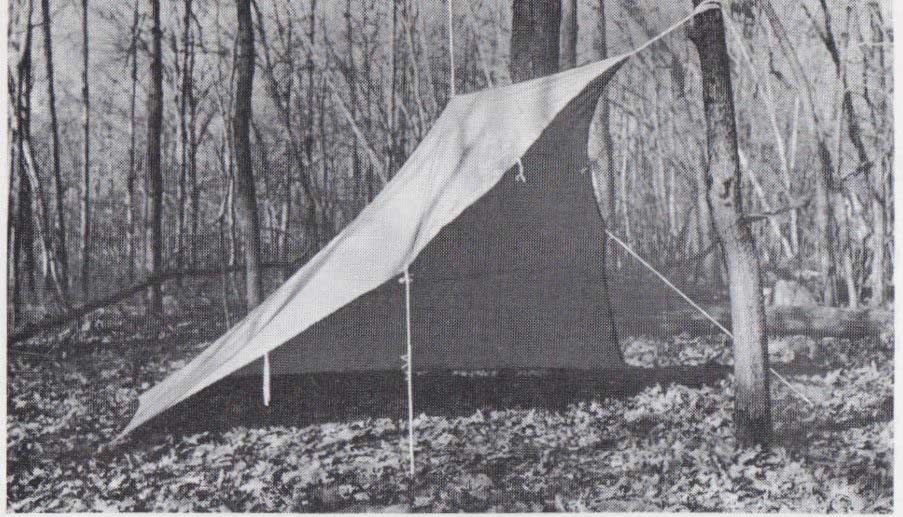
---------- Home for the night. Tarp and stout rope are shelter for this
autumn family outing--not so luxurious as a geodesic dome, perhaps, nor so
weathertight as a mountain tent, but also not so heavy. Making camp early leaves
daylight hours for preparing food and enjoying woodland surroundings, an important
consideration when young children are along. This campsite was chosen for its
level ground where sleep was comfortable and erosion minimal. The stone fireplace
had been left by previous campers. It was used for cooking and left clean in
the morning, true to the backpacker's code: take nothing but pictures, leave
nothing but footprints.
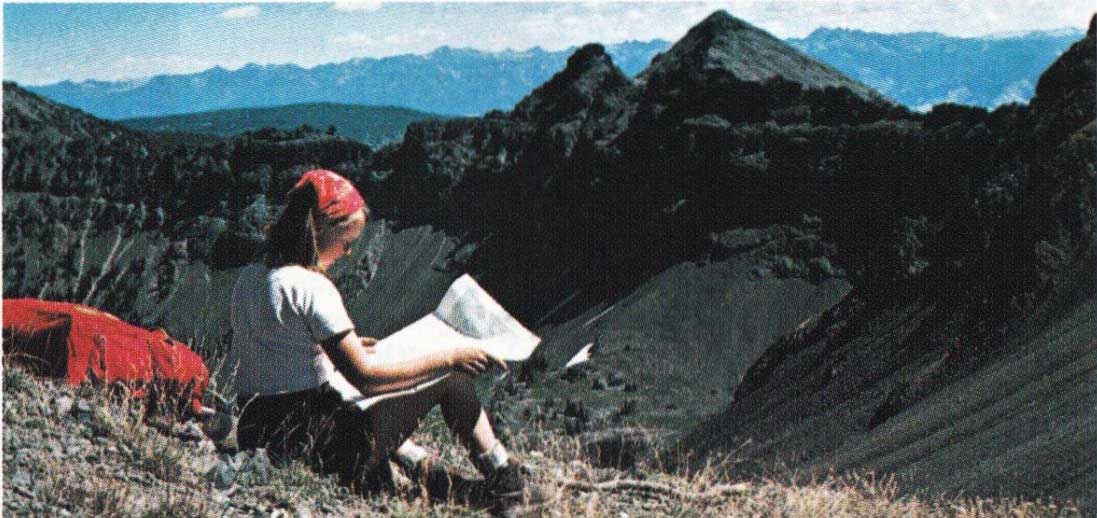
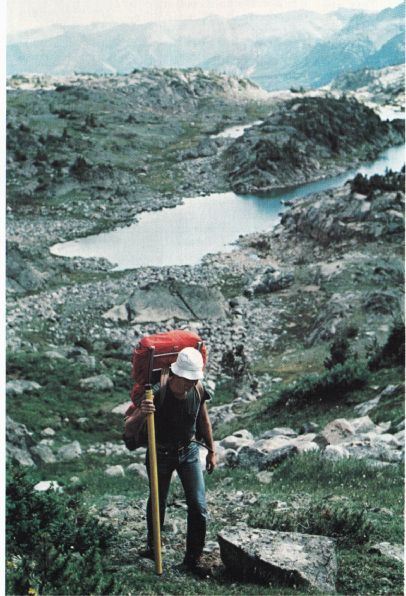
-------------- Break time on a high ridge is among life's sweetest moments
and a golden opportunity to orient your map to the world around-the job can
be a lot more difficult from the bottom of a wooded valley. An hour's hike
may not cover much distance on the map when the contour lines are close together,
but 3,000 ft. is a long way straight up; make sure that you are in good physical
condition before setting out on a backpacking expedition through mountain wilderness.

----------Evening meal in high country.
---------Youngsters shoulder light loads.
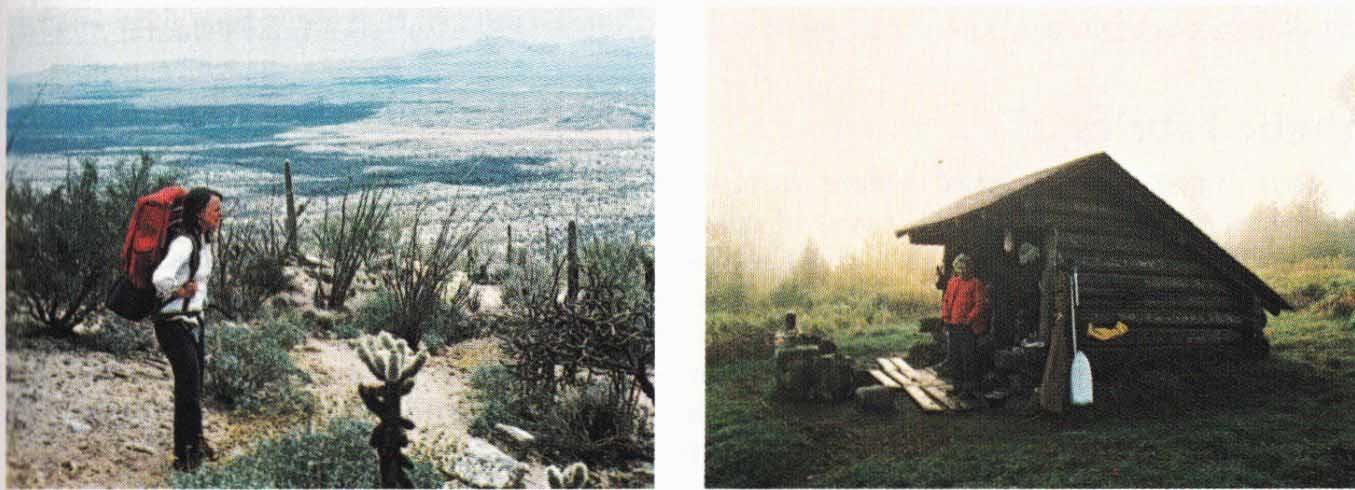
--------- American desert is a harsh world of immense
and delicate beauty. Water is scarce, hut when rain comes it often inundates.
A thunderstorm miles away can turn a dry creek bed into a raging, if short-lived,
torrent. Make desert camps on high ground.
------------Lean-to shelters have been put up in many parks, alongside some waterways, and next to most established hiking trails in forest lands throughout the country. In peak season, hikers arriving at a shelter late in the day can consider themselves fortunate to find it unoccupied.
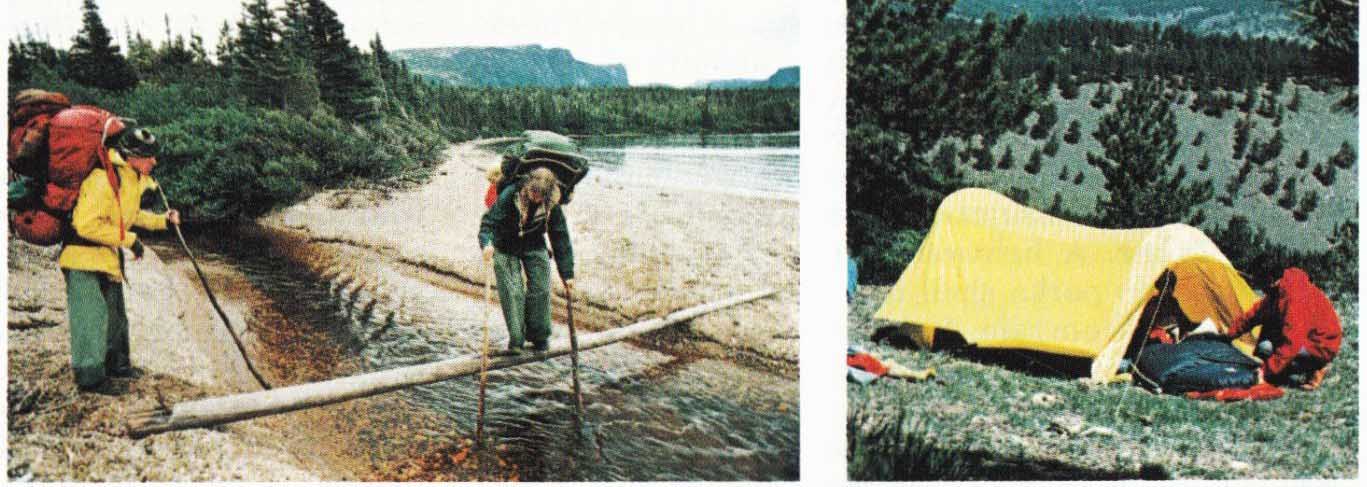
---------Water crossings are common hazards in almost all
terrain. It pays to be careful, even when crossing small streams-a broken leg
can be a killer, so can an icy drenching in cold weather. To keep your balance
when crossing on a high footlog, do not look at the water and do not look at
your feet; concentrate on the log Just ahead.
-------------Homemade equipment, built from a kit or from scratch, makes camping the last word in self-sufficiency. This family knows the strength and limitations of their gear because they made it themselves.
+++++++++++++++++
For Well-Dressed Hikers Fashions Never Change
Being well dressed in the wilderness has nothing to do with how you look but a great deal to (10 with how comfortable you are, how warm, how dry-and perhaps how alive. In general, old clothes are better than new as long as they are in good repair, and loose-fitting garments are preferable to tight ones provided they do riot hunch up. Dress in layers-several lightweight shirts will insulate better than one heavy one. Layering also lets you attune your attire to the changing weather: three layers for a chilly morning, one during a warm after noon, two for a cool evening by the campfire.
Underlayer. Avoid tight straps, elastic bands, and anything that binds or constricts; irritations intensify ( on the trail. Cotton T-shirts prevent sunburn and protect against chafing from pack straps On hot days. Fishnet undershirts are good for all seasons-worn beneath a shirt they trap warm air, worn alone they allow ventilation. Thermal underwear and woolen long johns are warm in winter and comfortable on chilly evenings but can get steamy inside while hiking.
Basic clothing layer. Many backpackers swear by army-style fatigue trousers with large cargo pockets; any loose-fitting cotton or woolen work pants are good. The problem with western-style jeans is that, like cow boy boots, they are designed for horseback riding, not walking-the tight crotch, especially with a new pair, can restrict movement, even to the point of being painful. Avoid bulky belt loops, big buckles, and similar items around the waist-they can be instruments of torture under the waistband of a heavy pack. Bring a long- sleeved, long-tailed cotton or woolen work shirt, de pending on climate. Carry one or two woolen sweaters for extra layers of insulation when needed.
Outer layer. A lightweight (5- to 6-ounce) water- repellent nylon parka shell is a good windbreaker and fair protection from rain. A zippered neck opening allows you to let heat out and fresh air in without removing an entire layer. Down-filled shirts, vests, and jackets are unbeatable insulation as long as the down remains dry. They require the same care as filled sleeping bags (Bulky down-filled parkas are hardly needed except in near-arctic conditions (see Outdoors in Winter). A rain poncho can cover both you and your pack and can double as a tarp. To keep it from flapping in the wind, sew cloth strips on it to tie around your waist.
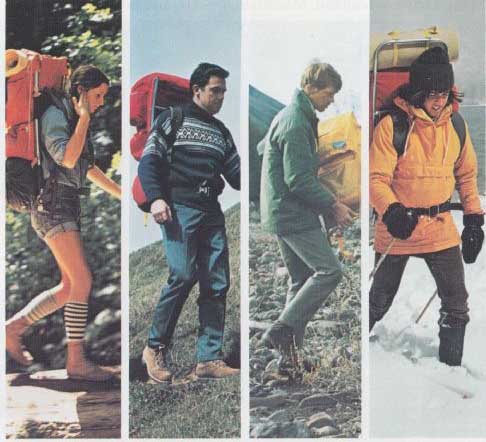
------------- Sequence illustrates the principle of layering,
Summer hiker at left dresses for cool comfort. As temperature drops, more layers
of clothing are added. Warmth is trapped between layers.
------------ Why wear a hat?
Tiny blood vessels on top of the head keep the brain cool by continuously giving off heat. When the sun is beating down-- if the air is cool at higher elevations--this ventilating system can be thwarted.
The body compensates by cutting down the blood supply to the brain.
Mental activity is slowed, and the rest of the body overheats, perhaps resulting in sunstroke.
Guard against this danger by wearing a head scarf or lightweight hat.
In cold weather the body sacrifices the hands and feet for the sake of the brain. When the demand for warmth is great, blood vessels in these extremities constrict, forcing blood up into the head. Because heat continues to be lost from the top of the head, the process can escalate, possibly leading to hypothermia or frostbite (see Outdoors in Winter). When your hands and feet start to get cold, therefore, put on a wool hat to help conserve your body's warmth.
Cotton, Wool, and Synthetic Fabrics
Clothing does not generate heat; it conserves the heat your body produces by surrounding you in dead-air space. Complications arise because the skin also expels al)out a quart of water a day-even more when you are active. If this moisture remains next to the skin, it drains body heat away through conduction and evaporation. Both cotton and wool absorb moisture but in different ways. Cotton fibers swell, eventually closing the spaces between them to form a solid, soggy wall; the wetter cotton becomes, the poorer the insulation it makes. Wool fibers, on the other hand, act like conduits or wicks, carrying water away from the body while preserving their own shape and texture. Even when soaking wet, wool maintains a good insulating air layer. For warmth, wear wool next to your skin. To keep cool, wear a light layer of cotton.
Synthetics, such as nylon, do not absorb moisture, they are of value as insulation only if no water collect. between the fibers. Tightly woven, they may be almost impermeable, making for good protective outer wear. However, a fabric that keeps rain out also keeps water in. Though protected by a rainproof jacket, you can still find yourself and your clothing sopping wet. Attempts to resolve this dilemma have recently produced a "wonder fabric"--sold under a variety of trade names--formed by, laminating a thin resin film between two layers of nylon. Its tiny pores are said to repel liquid while still allowing water vapor to escape.
A Good Boot Is Hard to Find
In Nessmuk's words: "Light boots are best. Not thin, unserviceable affairs, but light as to actual weight." The advice is still good-walking a mile means lifting each boot as many as 1,000 times, and the ounces add up. But ii is hard advice to follow. A cobbler by trade, Nessmuk made his boots to his own specifications and advised others to do the same. The old woodsman never dreamed what a profusion of ready-made footwear would one day confront his readers. To single out the right pair for your feet and your purposes is no small task.
Most people tend to buy boots that are too heavy. Think about how you plan to use yours. For day hiking in summer along an established trail with fairly even terrain, 2- to 3-pound trail or work boots may be sufficient; they are light, their soles are flexible, and they give better support and protection than sneakers. For an assault on a major peak you need rugged mountaineering boots, solid and heavy (5 pounds is the minimum) with rigid lug soles and many layers of insulation. In between there exists a wide range of medium-weight hiking and climbing boots made for backpackers. The good ones have full-grain leather uppers, high enough and tough enough to protect and support your ankles; durable soles that can be replaced when needed; and firm internal support that prevents your arches from breaking down under the extra poundage of a full pack. To make waterproofing more effective, boots should have few seams, none of them sewn through, and the tongue should be gusseted at the sides to keep moisture out. Such niceties as interior padding and scree collars (they seal the top of the boots, making gaiters unnecessary) are matters of personal preference. Each has potential drawbacks: padded boots can become very hot on a long hike, and scree collars sometimes put strain on the Achilles tendons. Good boots do not solve every problem. Whatever boots you wear, keep your feet dry with wool socks, even in summer. If wool irritates you, wear inner socks of silk--never cotton. Two pairs of socks insulate better than one if boots are not tight.
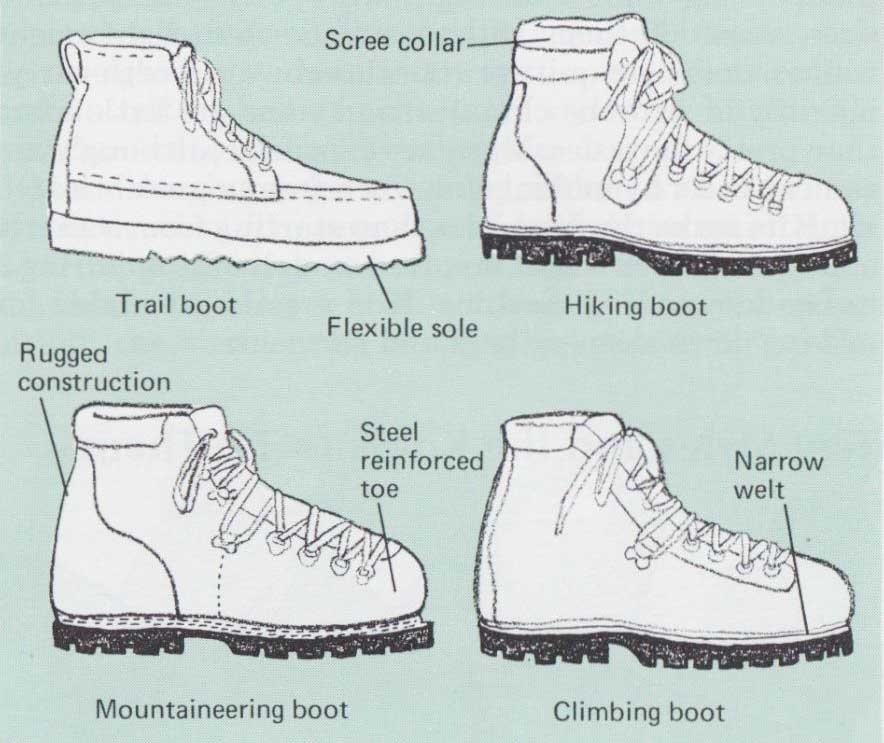
---- Kinds of boots
Shoe-like trail boots have flexible soles but give little support. Hiking boots are tougher and stiffer, a bit heavier. Mountaineering boots are heavy, well insulated, and very rugged. Climbing boots have rigid soles and narrow welts for support on tiny footholds; walking any distance in them can be uncomfortable. Mountaineering boot; Climbing boot.
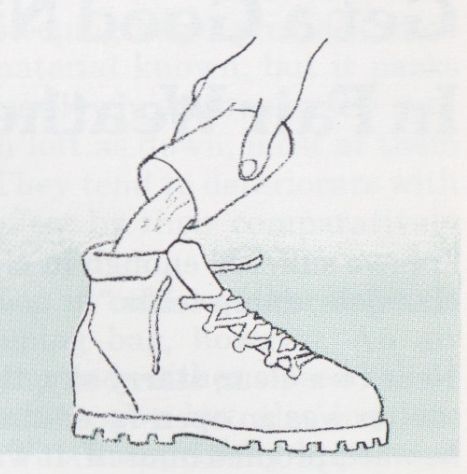
--------- Caring for your boots
New boots are best broken in gradually by walking; for a quick oh, fill boots with water and let them soak for a few minutes. Put them on wet, and walk for an hour or two so that leather will conform to your feet. To dry, stuff boots with paper and put them in a warm--not hot--place.

Welt of boot, where sole joins uppers, is a vulnerable area.
Inside stitching is durable but must be done by hand, so it is expensive. In
Norwegian welt, stitching is exposed and water can seep through; protect the
welt with epoxy sealer. Bonded welts (not shown) are waterproof, but soles
cannot be replaced.
How to buy a pair of boots that fit
Among the many styles of hiking boots made by the dozen or so top manufacturers, there is almost sure to be a pair just right for your feet. Your second day in the wilderness is too late to discover that you failed to find them. The average shoe store does not stock a wide selection of hiking boots, so seek out shops catering to backpackers. Plan to visit several and be ready to make a pest of yourself. Try on as many boots as necessary until you find a proper fit: snug enough to prevent your feet from moving inside (which is how blisters are born) but not tight as to constrict circulation. Try on both boots of each pair over wool hiking socks, and di not buy until you have walked around in them for 15 to 20 minutes.
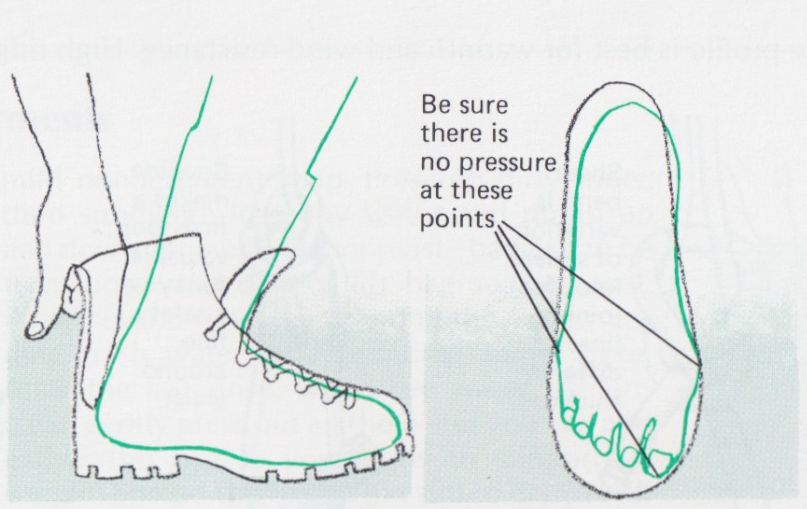
1. Before lacing, push foot forward. One finger should fit behind heel,
2. Lace boots and stand. Wiggle your toes; they must not be cramped.
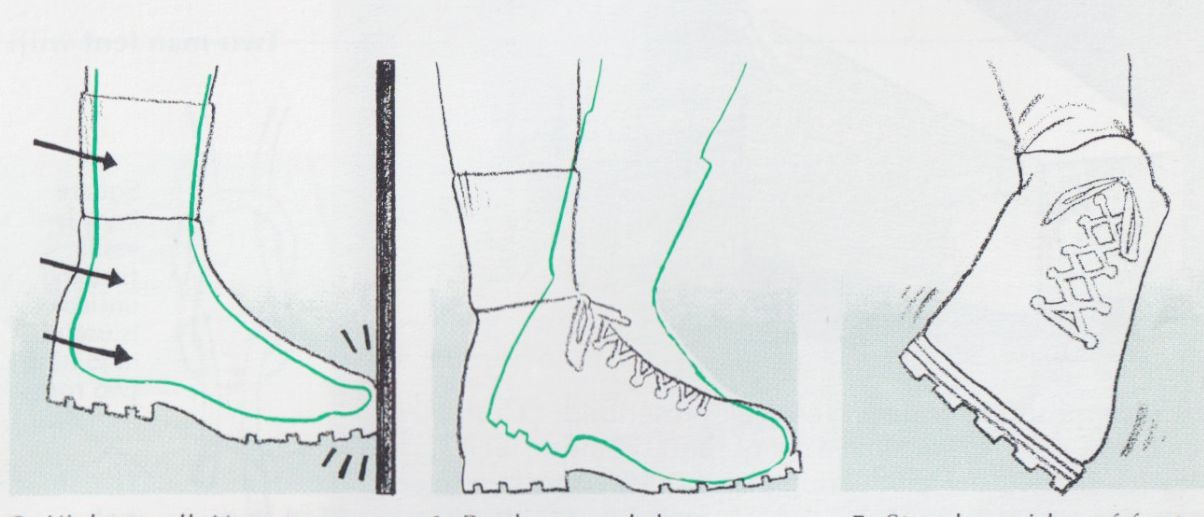
3. Kick a wall. Your toes should not touch the end of the boot.
4. Rock up and down; squat and bounce. Heel should not move in boot.
5. Stand on sides of feet to test for ankle support and painless flexibility.
+++++++++++++++++++++
Get a Good Night's Sleep In Fair Weather or Foul
"I have suffered enough in close, dark, cheerless, damp tents."
–Nessmuk
Next to a clear, starry sky, the old woodsman's favorite shelter was an open-faced shanty made of cotton, which he waterproofed himself. It was stretched over a frame of freshly cut saplings. The front was open "to admit of a bright fire" and the roof slanted "to reflect the fire heat on the bedding below." In his day, cotton and heavy canvas were the only choices for portable shelter. Today's camper has the additional options of lightweight nylon and the some-what heavier and costlier "breathable" resin laminates. The latter keep out rain while allowing water vapor to escape (see Cotton, Wool, and Synthetic Fabrics). You can accomplish the same end by stretching a rainfly over your tent; this is a waterproof tarp fashioned to fit a few inches above the tent's contours, repelling the rain while allowing water vapor to escape.
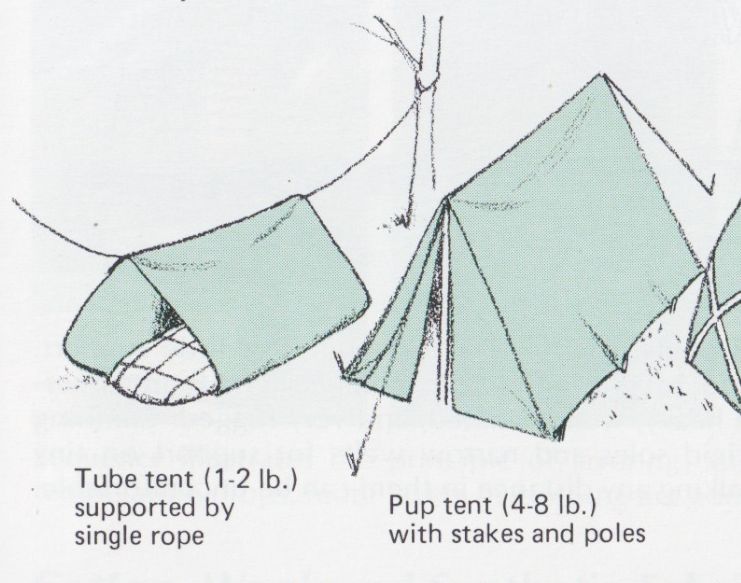
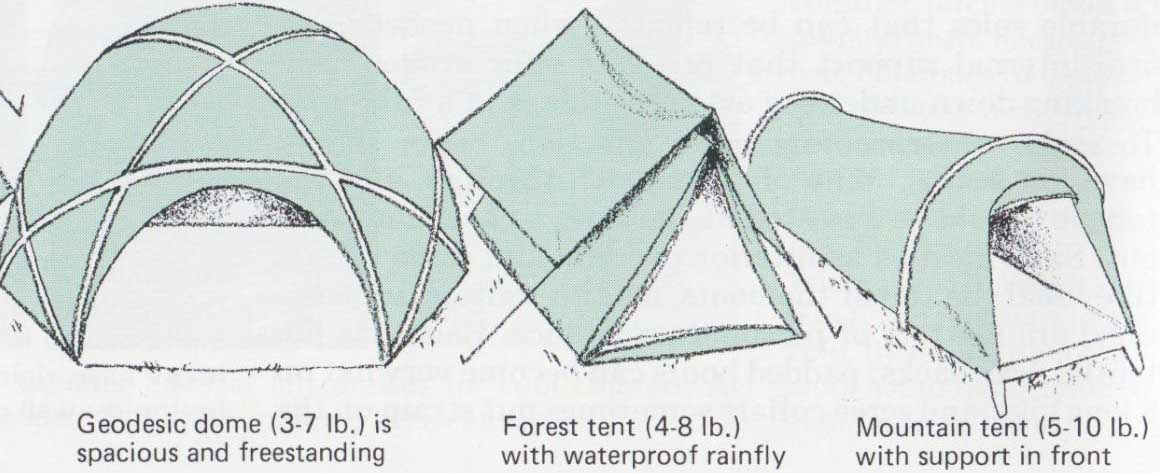
Tent designs have also progressed over the years. Campers can choose among many spacious shapes and sizes, most of them with easily erected, lightweight frames. Some are quite practical, some are worth carrying only in rigorous climates, and some are little more than pretty fantasies. Many are expensive, although you can cut costs by making your own from a prefabricated kit. Kits make the job easier than starting from scratch, but a lot of work is still involved--much of it requiring a heavy-duty sewing machine. Kits are also available for making down sleeping bags and garments.
The first question to ask in choosing a tent is: How much does it weigh? Put the answer on one side of a mental balance sheet. On the other side, consider your needs: Is it waterproof? Is it well ventilated? Is it fire retardant? Does it keep out insects? Is there space enough inside? How sturdy is it? Can it be put up in the dark? In a rainstorm? On a mountain slope? Consider where you will be going and how long you plan to stay. For overnight summer bivouacs along a hiking trail, a tarp or tube tent might be all the shelter you want to carry. Even a tarp could be more than you need for a trek across the Arizona desert, where a poncho may be more valuable for shade than for rain protection. (The American desert is not the Sahara, however; sudden thunderstorms and even rainy weeks do occur.) I the damp Pacific Northwest or in the high Rockies, a warm, dry tent with a closable entrance and a rainfly i well worth its weight.
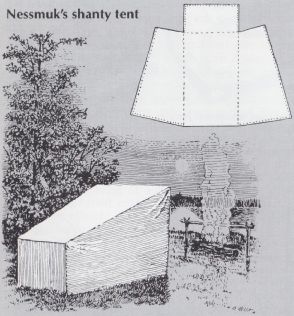
---------- Nessmuk's shanty tent
For waterproofing cotton, Nessmuk prescribed "To 10 qt of water add 10 oz. lime and 4 oz. of [potash] alum, let it stand until clear, fold the cloth snugly and put in another vessel pour the solution on it, let it soak for 12 hr then rinse in lukewarm rainwater, stretch and dry in the sun.”
Tent Styles and the Knots to Tie Them
----------- Two-man tent with low profile is best for warmth and wind resistance.
High ridgeline makes for headroom and ventilation.
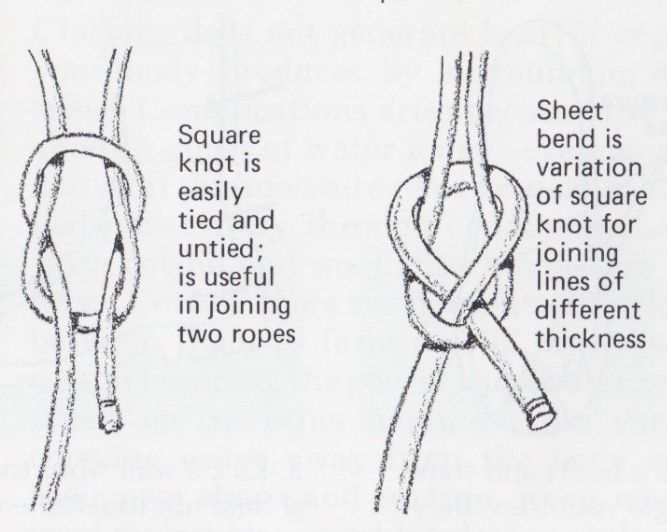
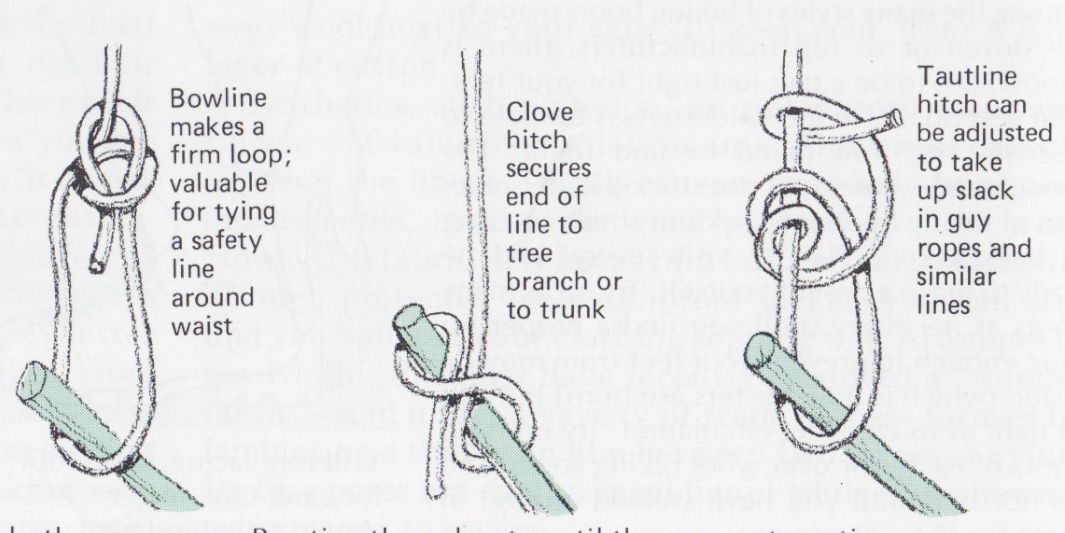
--------- Knot tying is an important skill for erecting tents and other
purposes. Practice these knots until they are automatic.
Bedding for Comfort and Warmth
Sleeping bags are graded according to the lowest temperature at which they will keep you warm. The lower the temperature, the warmer the bag and the more expensive it is likely to be. Try to purchase a bag that matches your anticipated needs-sleeping in an over stuffed bag can be almost as uncomfortable as sleeping in one that is too light. Some campers own several bags for different seasons and climates and use them singly or in combination for various weather conditions. A less expensive solution is the three-layer combination: one lightweight bag with an insert for use in colder weather and an outer shell of waterproof nylon or breathable resin laminate for foul weather use.
Most sleeping bags are filled either with down or synthetic fiber. The purpose of both is to maintain a layer of dead air between you and the outside. The thickness of this layer is called the loft: the more inches of loft, the warmer the sleeping bag. Goose down--the most expensive filling for sleeping bags--provides more loft per pound than any material known, but it packs together when wet and dries slowly. Although the synthetics do not give as much loft as down, most of them hold it better when damp. They tend to deteriorate with time-a drawback that is offset by their comparatively low initial cost.
A comfortable night's sleep in cold weather depends on more than a good sleeping bag, however. An air mattress or, better yet, a foam pad--either closed cell or open cell--will not only cushion you but also insulate you from the cold ground. This is especially important because your body weight squashes the sleeping bag's insulation beneath you, all but eliminating its loft. Other factors influencing nighttime comfort in cold weather are your own metabolic rate (some people are simply warmer than others), the relative humidity, the altitude, and the quality of tent you are using.
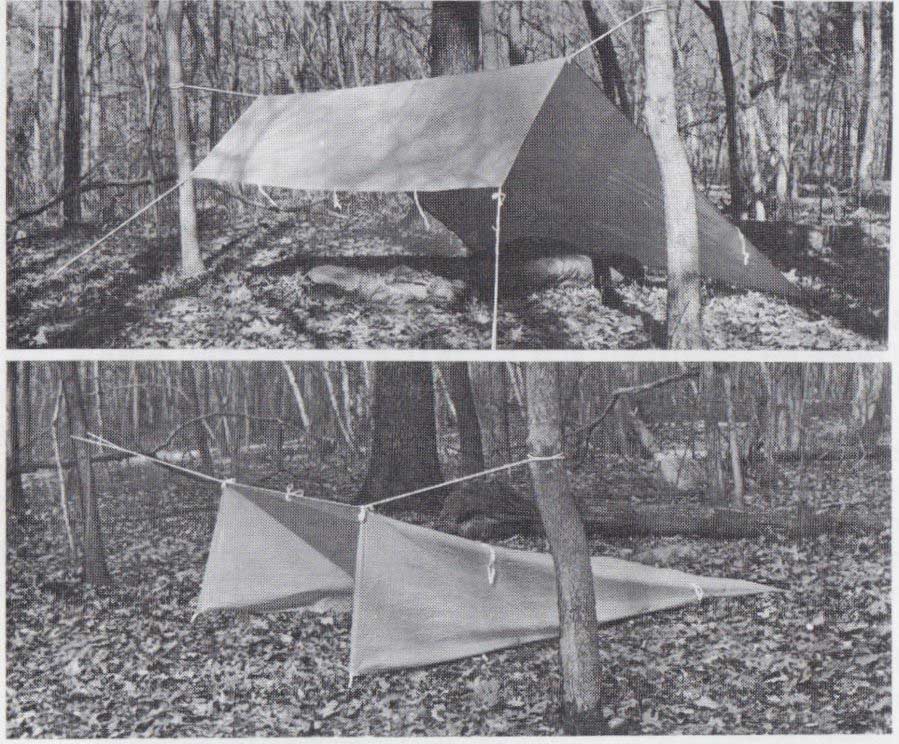
-------- Skillful use of a tarp
Many backpackers carry only a length of 1/8-in, nylon cord and a nylon tarp (total weight about 2 lb.) equipped with a dozen or so strategically placed grommets or tie lines, from which they rig shelter for various situations. Setting up a tarp is harder than it looks; practice before depending on it for survival.
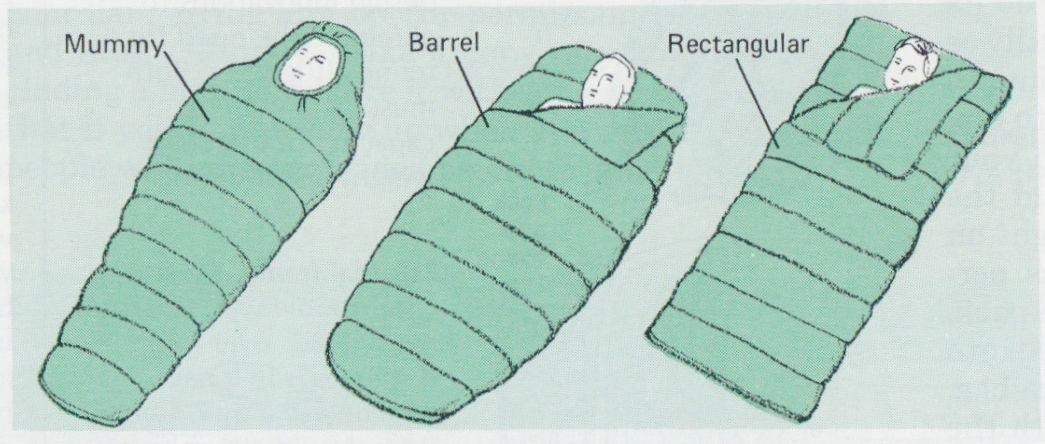
---------- Choose bag for warmth, weight, and to suit
your sleeping style. Mummy bag is warmest for its weight if you do not thrash
about; heat is lost wherever elbows or knees compact filling. Rectangular bag
is least efficient, but two bags can be zipped together tor sharing.
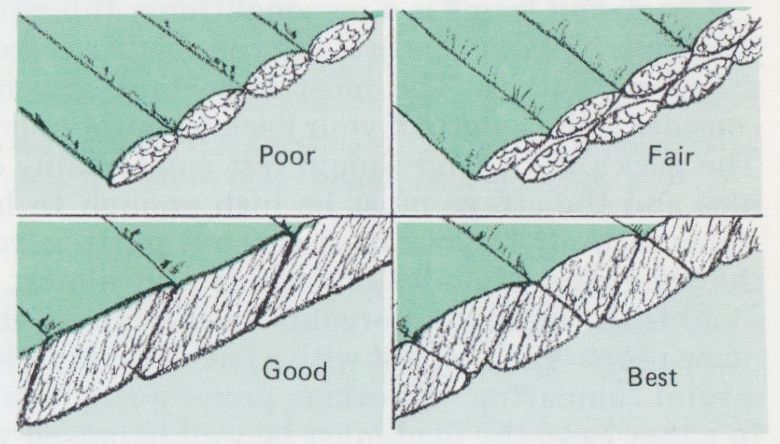
--------------To keep filling in place, sleeping bag walls
are joined to form chambers or tubes. When the stitching goes straight through,
warmth is lost at each seam; for better insulation, baffles between walls are
offset.
Caring for your down-filled bag and garments
Make every effort to keep your sleeping bag clean and dry. Do not roll it for storage, but push it loosely into a waterproof stuff sack. Sleep with your nose and mouth outside the bag so your moisture-laden breath does not condense inside the bag. Let the bag air dry after the trip is over, and repair all rips and holes promptly before filling is lost.
Never dry-clean a sleeping bag or any other filled garment-the cleaning fluids will damage both down and synthetic fillings. Instead, wash by hand in a large tub, using warm water and mild non-detergent soap. Pre-scrub dirty spots, then submerge in soapy water and pump up and down. Do not wring or twist-baffles can be k loose-and do not lift bag soaking wet. Rinse several times by draining the water, ad ding fresh water, and pumping some more. After the last rinse, when the water remains clear, gently press out all the water you can and gather the bag in your arms to support its weight. Spread the bag in the sun to dry (it will take several days), turning and fluffing it occasionally, or use a commercial dryer set at Low.
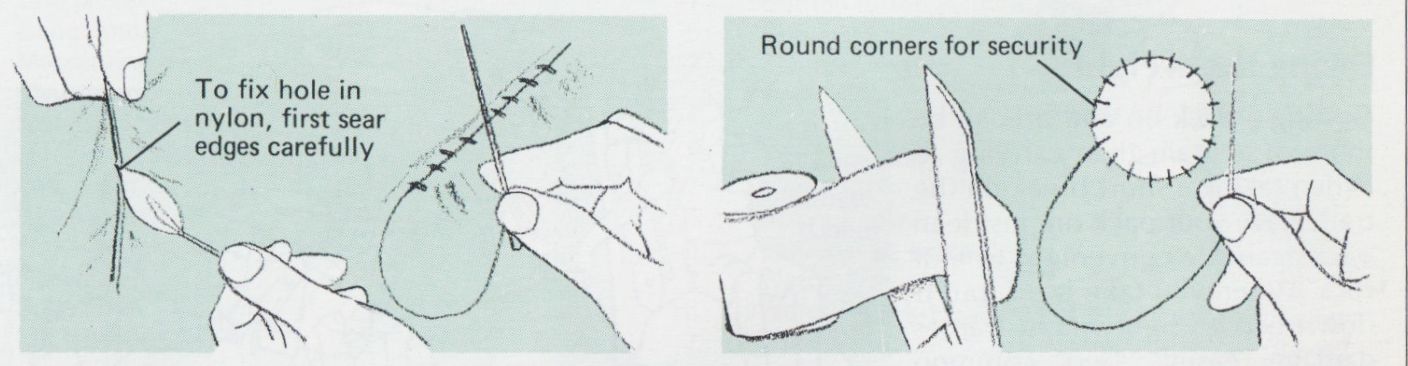
------------ Carefully sear edges of small holes to prevent
unraveling, then sew with nylon thread.
------------ Patch large holes with pressure-sensitive rip stop tape. Press in place and sew around edges.
+++++++++++++++++++++++
All Your Essential Gear Will Fit Into One Pack
"It may he remarked that man is a vertebrate animal and ought to respect his backbone."
–Nessmuk
The human backbone is a remarkable but troublesome part of our anatomy. To use it for standing erect is in itself an amazing feat-hut to hang weights upon it that pull it backward, or even to apply very much weight pushing straight down, is to treat it with disrespect. The best result you can look for is quick exhaustion; the worst, a disabling back problem. That is why pack frames were invented, to transfer as much weight as possible from the shoulders to the hips and to hold the rest as close as possible to the line of the spine.
A pack and frame is a personal thing. If it is to do its job properly, it must be fitted to your body as carefully as a suit of clothes. The most important dimension to consider is the length of your back from shoulder to hip. The pack's waistband should rest comfortably on your hips and the straps must be high enough to hold the frame securely to your back without putting weight on the shoulders. Equally important and almost as personal is the method of organizing gear inside the pack. Some people are happiest with a pack that is divided into several compartments; others prefer a single large bag. In either case, the load must be well balanced with the bulk of the weight held close to the body and fairly high in the pack. Never select a pack based on how it fits when empty-the addition of a 50-pound load will change things considerably. One good way to find the right pack for yourself is to rent a few different kinds from specialty shops so you can make comparisons in the field.
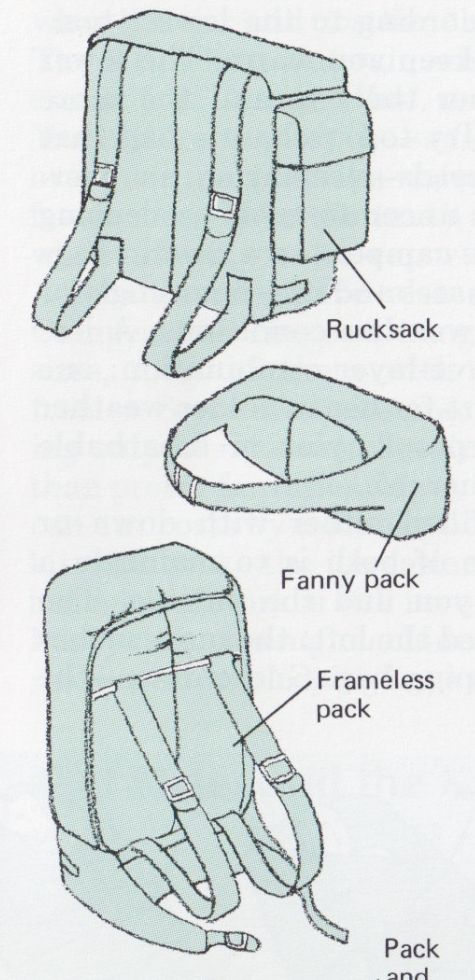
---- Pick the pack that suits your needs
Day packs. For a short hike or side trip with loads up to 2 lb., a rucksack strapped to the shoulders or a fanny pack strapped around the waist may be enough. Look for double stitching where straps join pack and around pack bottom.
Soft packs. Climbing and s( rambling in forest and rough country is easier with frameless pack. Fewer protrusions mean less snagging on underbrush. Some soft packs have internal frames, others feature design innovations to eliminate the need for a frame altogether. Both must carry close to rapacity for effective weight distribution.
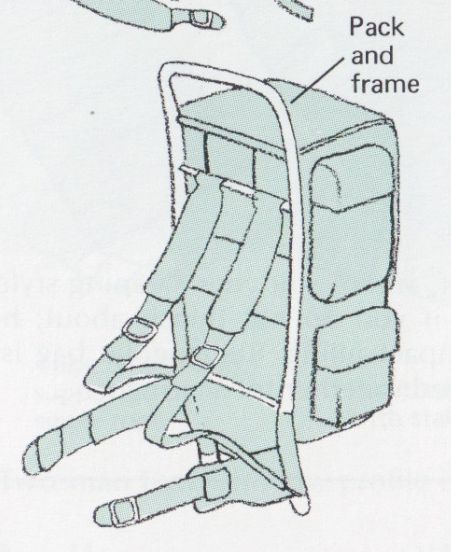
External frame. Most comfortable way to carry heavy loads
over long distances is in a pack attached to a rigid frame. Pack should attach
to at least three prints on each side. Padded straps should be firm, not spongy,
be securely attached to frame, and have adjustable front buckles.
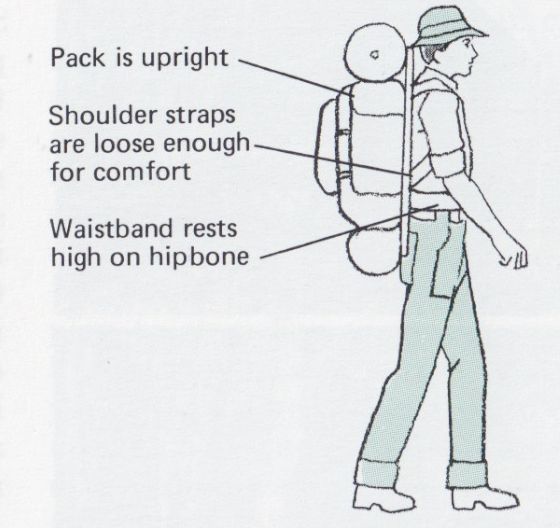
------ Fitting and loading for comfort: Try on pack loaded with
30 to 50 lb. Tighten waistband; it should fit snugly around top of hipbone and
relieve weight from shoulders. Then adjust straps so you can slip two fingers
easily between them and shoulders. Make sure all buckles are secure and that
waistband can be released ( u irk ly in (a s of emergency.
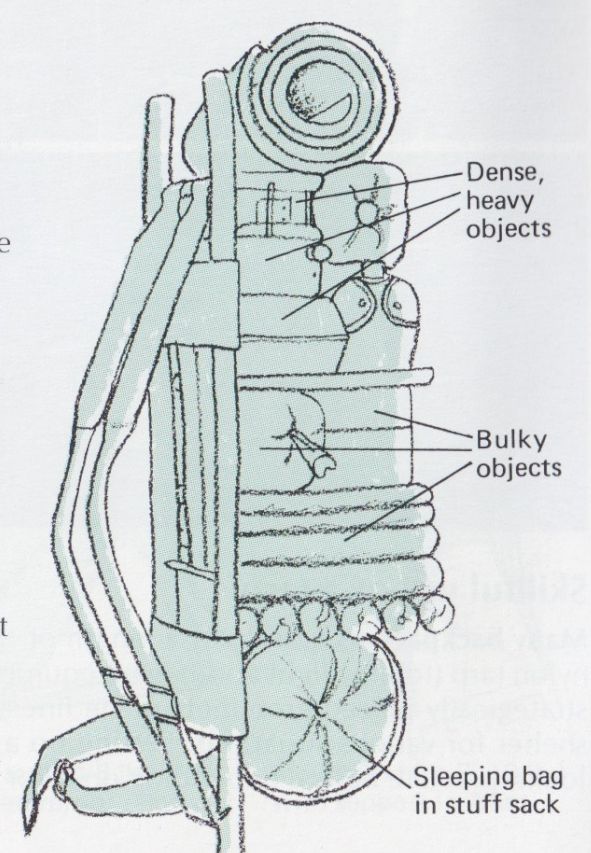
------------Organize your park so everything has its place
and stick to your system. Put dense, heavy objects high in the pack and close
to your spine, with sharp corners padded. Make sure all weight is well balanced.
One way to keep things separated is with plastic bags, making your pack a bag
full of bags; rod i rig the bags by color can help in irlenti fir-at ion. Use
outer pockets for trail food, first aid kit, toilet paper, and other potentially
urgent items. Lash steeping bag in stuff sack to lower part of frame; in some
soft packs waistband doubles as a stuff sack.
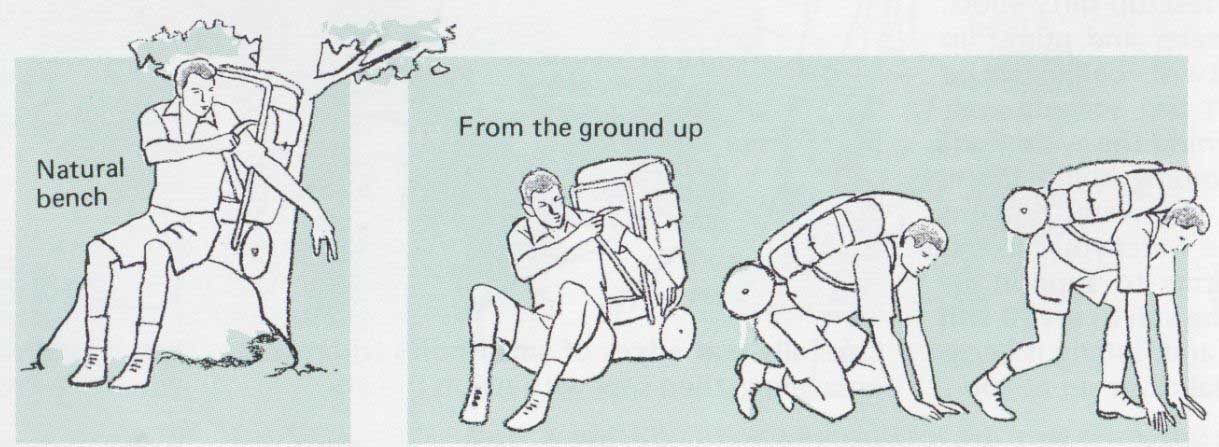
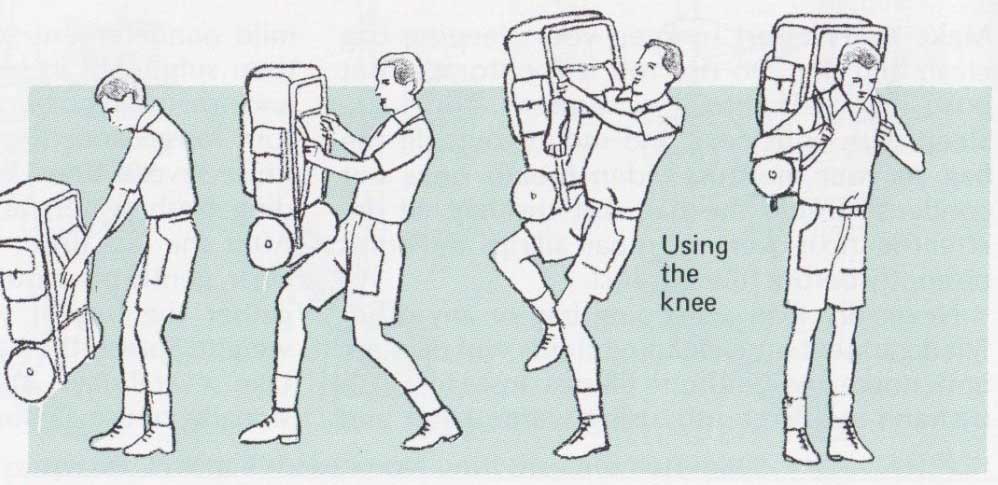
------------- Easing the weight
Getting a pack on and off can he more of a strain than carrying it. When taking a short break on the trail, leave your pack on; just lean back against a convenient tree or rock. When you take it off, put it down gently—lightweight frames damage easily. Two common techniques for putting on a heavy pack are shown at right. You will likely develop your own style.
Hope for the Best and Prepare for the Worst
The best way to cope with an emergency is to anticipate and prevent it; the best time to do that is before you leave. Talk over every detail of the trip with your companions and reach agreements about your route, how fast to travel, what you will eat (meal by meal), what pieces of equipment are worth carrying and which are not, how early you intend to get started, how late in the day to stop. Decide on an equitable division of labor: who cooks, who cleans up, who pitches tents, who builds fires, who carries which piece of shared equipment, who knows about gathering wild food, who fishes, who is the best pathfinder who leads on a rough trail, who has what talent or limitation that may be important later on. Discuss philosophy: Why are you going into the wilderness? For adventure? For peace and quiet? For exercise? How important is comfort? How important is schedule? If you arrive at a particularly attractive campsite, will you stay a day or two, or take a few pictures and keep moving? What happens on a rainy day? If you are not compatible, do not put your lives in each other's hands.
Learn all you can about the area where you are going. If it is a place with which you are unfamiliar talk to people who have been there. Read books and magazine articles about the region. Send for topographical maps and study them carefully (see Sources and resources). Use them to plan your route, selecting a place for each night's campsite-you may not be able to stick to your plans, but they will provide a framework to keep track of your progress. Find out about the climate- average high and low temperatures, precipitation, possible extremes-and check on weather predictions, both short range and long range. Learn about the area's plant and animal life, especially what is edible and what is dangerous during the season when you will be there. Make sure you know about local licensing and conservation laws as well as land-use regulations.
Gather together all your equipment and check it out. Set up the tent and wet it down to see if it leaks. Go over seams on packs, sleeping bags, and clothing, looking for weak spots and signs of wear. Condition and waterproof your boots. Make sure your compass is in working order.
If you or any of your companions is a minor be sure to carry a medical permission slip, signed by a parent or guardian, giving any doctor permission to treat illness and injury. Finally, make a copy of your itinerary, including a map, and leave it with someone dependable so that if you fail to show up when and where you should, people will have some idea where to start looking.
Getting in shape
Wilderness backpacking is a demanding sport, and your life may depend on your strength and endurance. You can build endurance by running long distances with your boots on. ("Running a stadium" is popular among back packing college students--you can see them on spring mornings racing heavy booted up and down the steep aisles of football stadiums.) A daily regimen of sit-ups, push-ups, and pull-ups strengthens the arms and upper body. Climbing a 15-foot rope wearing a full pack is another good exercise. For the torso, try the trunk-twister. Stand with feet apart, arms out, and knees straight; pivot to grasp the right ankle with the left hand; pull a little, release, stand straight, and repeat on the other side. Work up to 50 of these per day.
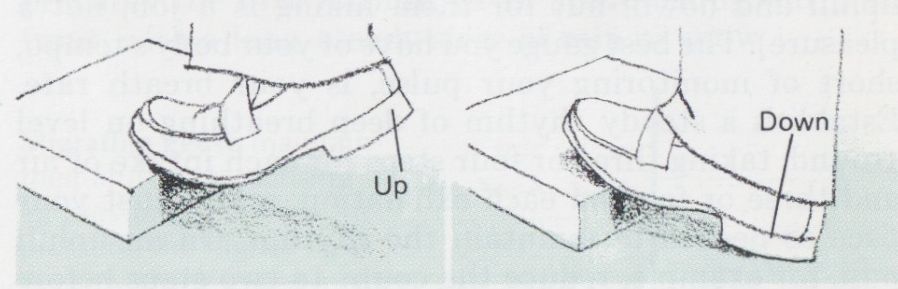
------- To stretch leg muscles, stand on edge of a thick book. Rise upon
toes, then touch heels to floor. Repeat 40 to 50 times.
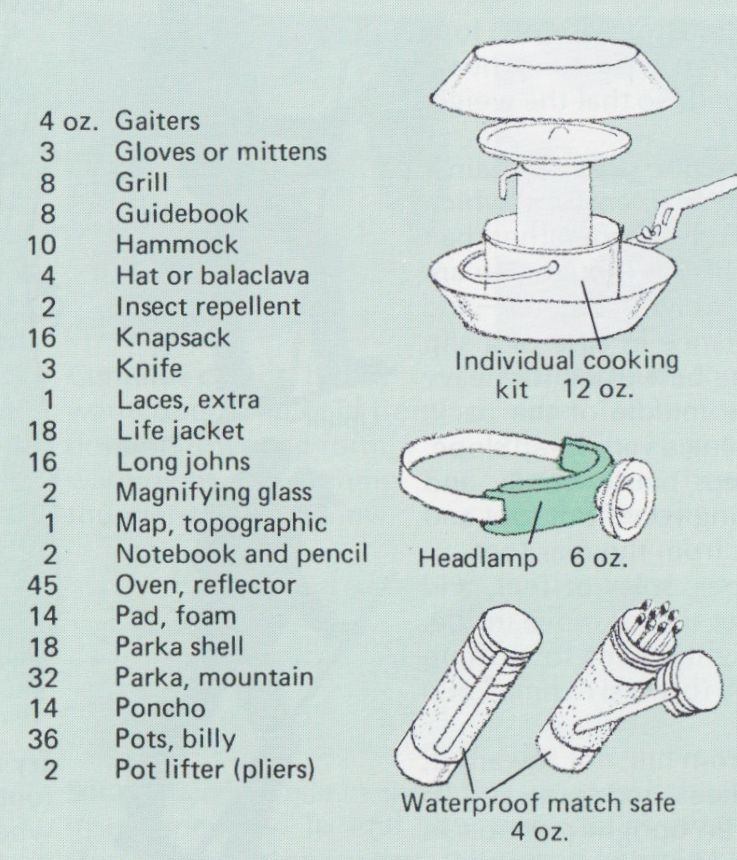
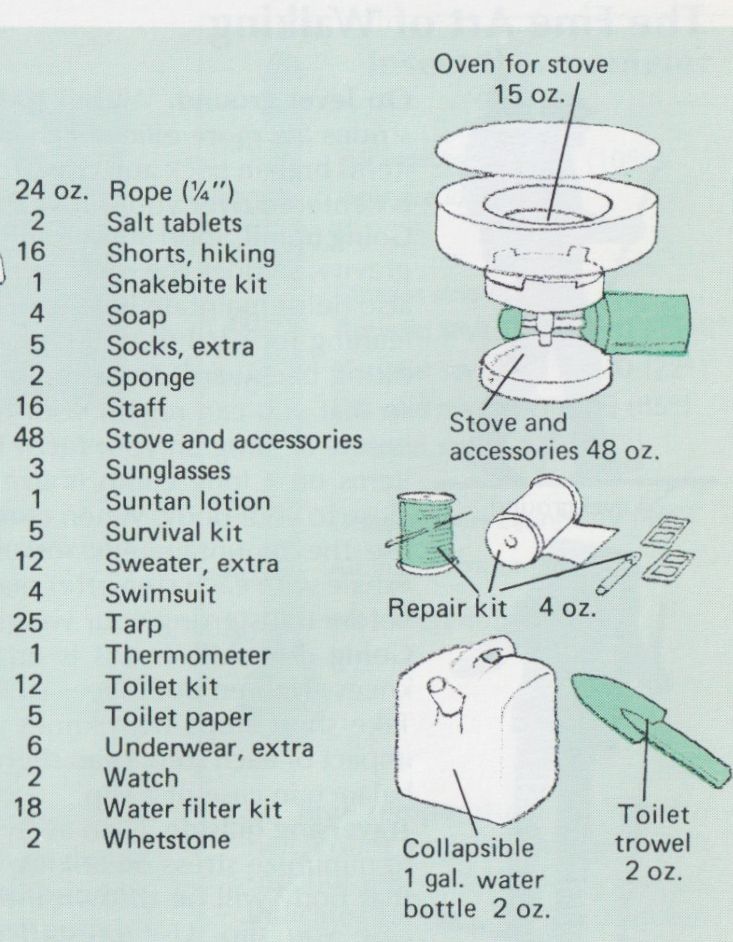
------------ Equipment--the lighter the better
Nessmuk’s key rule in selecting his equipment was "commence by studying to ascertain just how light one can go without especial discomfort.” To follow this rule, first make a list of everything you might need noting the weight of each item; then eliminate, ounce by ounce and item by item, until the list has been honed to essentials. The sample list at right totals about 45 lb if pack tent sleeping bag, boots, clothing, and food are added in, you would have a load worthy of a healthy mule. Some items, however, are redundant- the cook kit, for example, is an alternative to the frying pan, billy pots, and cup. And other supplies and equipment, such as stove, fuel, tent, lantern, repair supplies, and first aid kit, are generally shared by the group as a whole.

+++++++++++++++++++
Getting There on Foot And Enjoying the Trip
"We do not go to the green woods and crystal waters to rough it, we go to smooth it. We get it rough enough at home."
-Nessmuk
The key to walking long distances over rough ground with a pack on your back is maintaining a comfortable, steady body tempo (not to he confused with a steady pace; drill sergeants may march their units in cadence, uphill and down, but for them hiking is a job, not a pleasure). The best gauge you have of your body's tempo, short of monitoring your pulse, is your breath rate. Establish a steady rhythm of deep breathing on level ground, taking three or four steps for each intake of air and three or four on each exhalation, and adjust your pace as needed to maintain the rhythm. On an uphill pull, for example, reduce the count to two steps before you get short of breath; a real climb may dictate one step per breath or less. At first you will probably have to discipline yourself to slow down (beginners tend to go uphill much too quickly). Eventually, a well-established body tempo will tend to take care of itself.
Be economical with your energy; spend it only on necessities. A springy step takes energy, so walk flat footed, using the large thigh muscles. Energy is wasted stepping up onto a rock or log, so step over or go around such obstacles. Energy is depleted by chills or overheating; add or remove a layer of clothing before discomfort demands that you do so (often it is enough to open the top of your jacket in order for trapped air to escape). Make a rest stop every hour or so, but not for too long-getting started is hard once you have cooled off. Eat a little high-energy trail food, such as chocolate "gorp" (see Campfire Cookery), whenever you feel hungry. Prevent dehydration by sipping water often.
Take good care of your feet. They are your only means of transportation. Remove your boots and socks at rest stops to let your feet cool off and air out; when you have the chance to soak your feet in a cool stream or lake, take it. If you feel the beginning of a hot spot--a point of irritation-do not be heroic. Stop and cover the spot with a piece of moleskin or a bit of masking or adhesive tape before it becomes a blister. (For treatment of blisters, see First Aid in Emergencies) When fording a stream, remove your socks and put your boots back on, lacing them tightly. Afterward, drain the boots and replace your socks; if they are wool, they will absorb the remaining moisture in your boots safely.
If you are part of a group (and two or three people is a group), gauge your pace to the slowest and the weakest. If you are the slowest, or if you develop a problem, such as blisters or a muscle pull, do not hesitate to make your needs known--better to slow the group than to be carried out. (But avoid idle complaints; everyone is enduring the same weather and being bitten by the same bugs.) There are courtesies that backpackers observe. If you are following an established trail, stay on it; switchbacks are there to prevent erosion--do not shortcut them. If you find a shortcut developing, block it with brush. On a steep trail, descending hikers have right-of-way; clear the trail for them. Parties with pack animals always have right-of-way; move off trail on the downhill side and stand still (a horse spooked by your presence is easier to control and less likely to be injured if he shies uphill). Do not intrude on other campers unless invited, and then do not stay long. Do not accept food even if it is offered unless your need is very great.
------------ The Fine Art of Walking
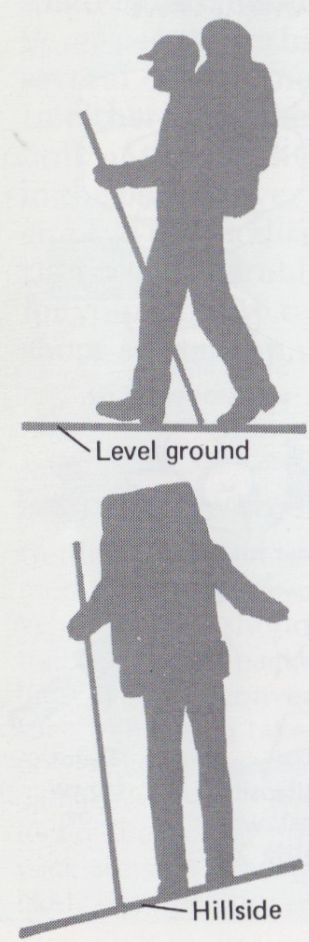
On level ground. Within the limits of comfort, long strides
are more efficient than short ones. Keep heavy items high in pack and close
to body so that the weight is centered over your hips.
Going uphill. Short steps minimize the struggle against gravity, so does the use of a staff or alpenstock, which also helps maintain balance, Stand straight rather than leaning forward (it will feel at first as though you are tilting backward) to keep your weight centered-and so that you can regain your balance in case of a slip before landing on your face. The best place for heavy items on a long climb is in the middle of the pack, close to your body. When climbing a very steep slope, use the mountaineer's rest step: pause briefly and exhale with each step after placing your front foot and before transferring your weight from the rear foot.
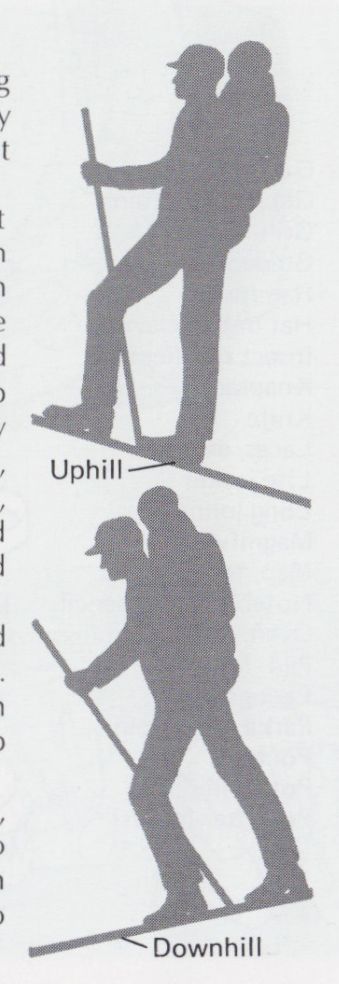
Going downhill. Stress is on toes, soles of feet, and knees, lighten boot laces so feet do not move inside. Take short steps with knees slightly bent to cushion impact of each step. Lean slightly forward to help keep balance in case of a slip. Traversing hillside. Lean away from hill, not toward it, to minimize stress on ankles, knees, and spine and so that body will be thrown into an upright position in case you slip. Use of staff or alpenstock helps to equalize weight and maintain balance.
------------ Water Crossings Are Always Risky
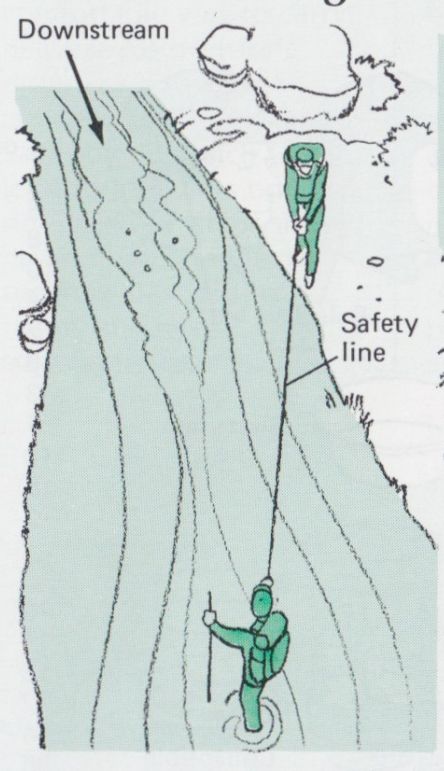
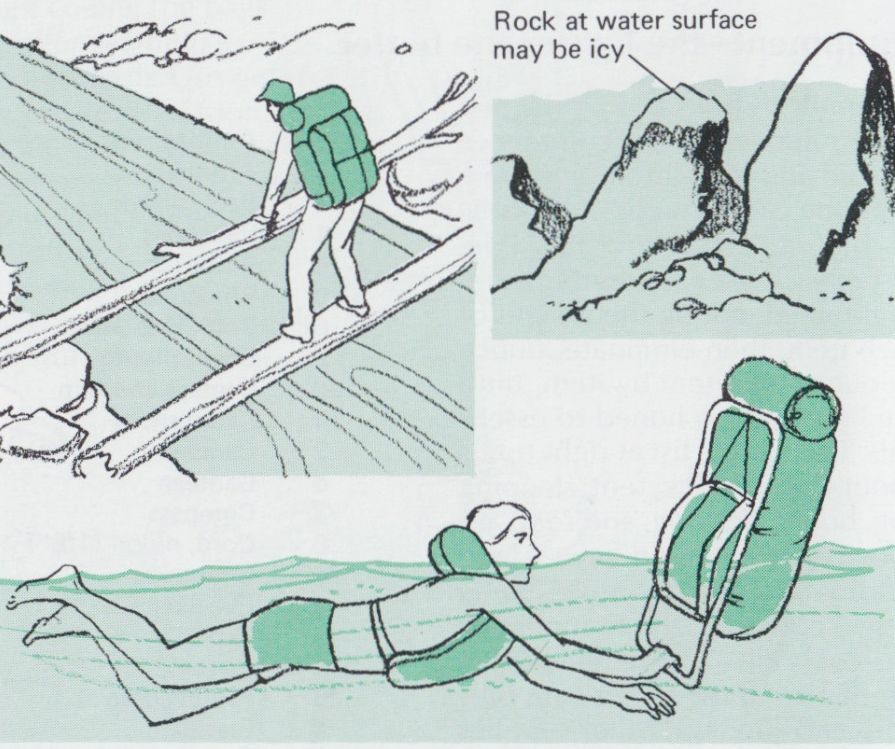
Try to keep dry by boulder hopping or using a foot log. Ford a large stream at a wide spot where water moves slowly; undo waistband so pack can be shed quickly, face upstream, and sidestep across. If stream is deep or if you must swim, use safety line secured upstream; place heavy waterproof items in bottom of pack, the remainder in a plastic bag for buoyancy. Snow fed streams are fullest late in the day, lower and slower in the early morning.
Keeping a Weather Eye
Professional weather forecasters arrive at their predictions with the assistance of such instruments as barometers, hygrometers, and thermometers, each of which measures some aspect of the ever-changing atmosphere: air pressure, humidity, and temperature, respectively. The wilderness is filled with indicators every bit as accurate, if not so nicely calibrated. Knowing how to read them is one of the skills of outdoorsmanship.
Masses of cold and warm air move across the earth from west to east at a rate of about 600 miles a day, propelled into and around pools and eddies of high and low pressure. Air blows clockwise away from the center of a high pressure area and counterclockwise toward the center of a low pressure area, where it escapes upward, cooling as it rises and leaving behind the moisture it contains. Thus a drop in air pressure (a falling barometer) generally indicates the arrival of a pocket of humid air clouds, and, often, rain or snow, particularly when the low pressure area is at the front of an air mass. There are many signs of an approaching low pressure area: smoke hovers and turns downward; birds tend to roost; swallows and bats swoop low; ground odors arise from ditches and marshes; clouds form at low altitudes; the rising humidity makes hair limp, causes distant objects to appear closer (because the usual evaporation haze is missing), and precludes the formation of morning dew. These signs are all prominent among folklore's favorite foul weather warnings.
Other bits of weather lore are also firmly based in fact. Take, for example, the expression "Red sky at night, sailors' delight. Red sky at morning, sailors take warning." (The setting sun shines through tomorrow's air, 500 to 600 miles westward; the laws of light refraction are such that if that air is dry and cloudless, the sky will be red just after sunset. The same laws decree that a red sky before sunrise means the air that has passed to the east is clearer and drier than where you are.) There are three basic cloud types: cirrus (wispy), stratus (layered), and cumulus (puffy). Each is produced by a specific air pattern, and each may presage a particular kind of storm. Learn to read the early steps of these developments. Fluffy white cumulus clouds, for example, are formed by warm updrafts called thermals. They are common on clear days and generally foreshadow more of the same, but they are also the stuff of which thunderstorms are made. When a thermal is intensified by the moist updraft of a low pressure area, the result is a huge, billowing thunderhead (cumulonimbus), bringing strong winds, thunder, lightning, and a downpour of rain. The telltale step in this pattern is when fair weather cumulus clouds begin to puff upward like the turrets of a castle. Such towering cumulus clouds are not always followed by thunderheads; but when they occur in the west or northwest sky, a little darker and lower than other cumulus clouds, the wise camper begins to make preparations for a sudden storm.
Cirrus clouds are made of ice crystals, formed when warm air suddenly meets cooler air (the way your breath forms vapor on a cold day). Often they signify nothing more than a high altitude wind pattern, but when they begin to form a thin, icy layer (cirrostratus)-causing the appearance of a halo around the sun or moon-it is probably the first warning of an approaching warm air front, with a long, steady siege of rain or snow.
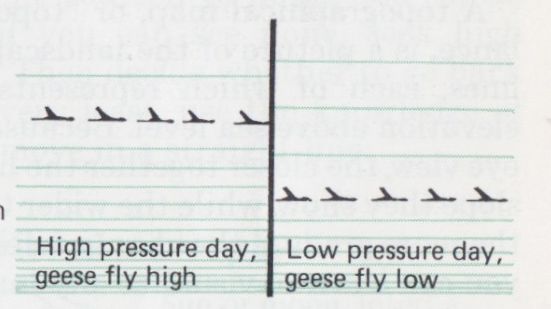
-------- Migrating geese maintain heir altitude by sensing
air pressure; the more the pressure, the higher they fly. Low-flying geese
mean a falling barometer, an omen of bad weather.
Learn to Read the Language of the Clouds
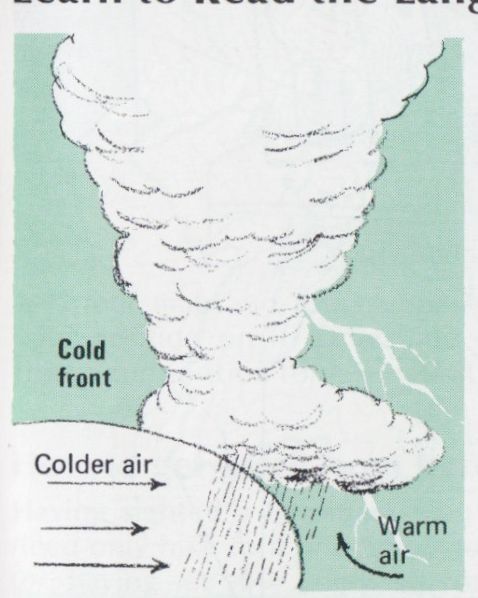
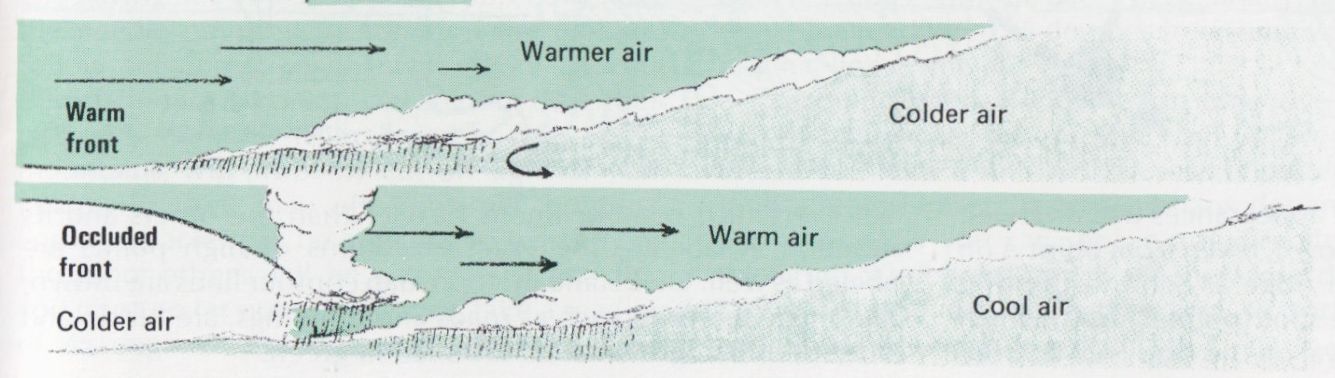
Cold air is heavier than warm, so the front of a cold air mass (left) hugs the ground as it moves eastward, pushing warm air upward like wood shavings before the blade of a chisel. Cold fronts give little warning: winds may change to easterly or northeasterly, often creating a squall line (a band of high winds and short-lived thundershowers) a few minutes before their arrival, Layers of cumulus clouds (cumulo-stratus) or thunderheads may accompany the front itself. Warm fronts (below) move more slowly and give 10 to 15 hours warning. Wispy cirrus clouds accumulate and grow steadily lower, and winds often shift to easterly or southeasterly; long, steady rain from low stratus clouds presage and accompany the front itself. When a cold front overtakes a warm front, the result is called an occluded front; the sky grows dark, and heavy weather, snow, or violent winds often result.
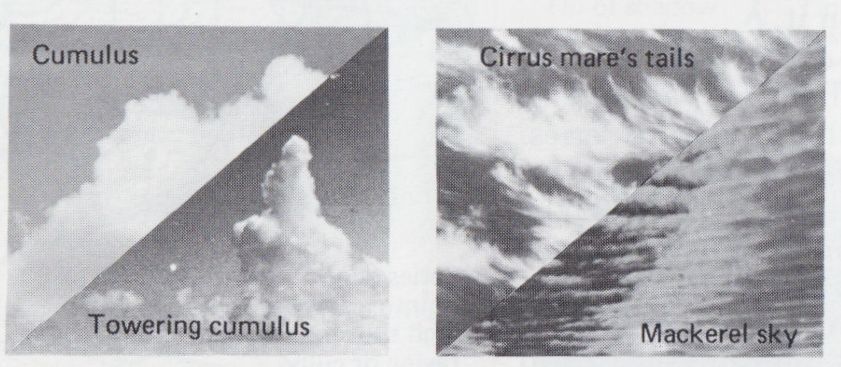
-------Cumulus clouds, fed by warm updraft of cold
front, develop towering form, warning of approaching thunderstorms or snow.
------Cirrus clouds form wispy mares' tails before warm front hits. Next comes cirrostratus, then "mackerel sky," then rain.
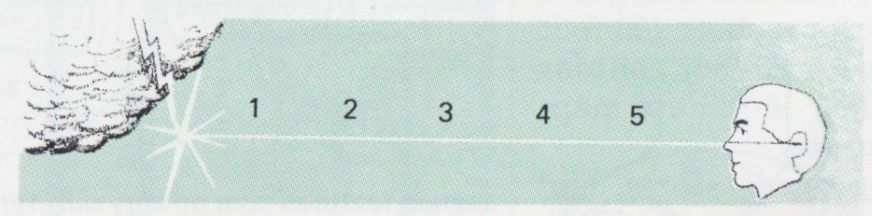
-------------Sound travels a mile in about five seconds;
light arrives almost instantaneously. To find how many miles away a thunder
storm is, count the seconds between a lightning flash and the thunderclap that
follows it, and divide by five.
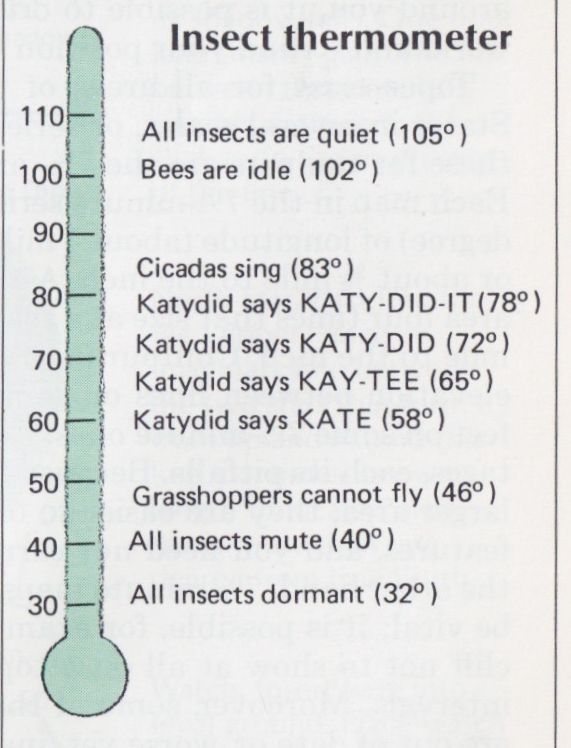
------- Insect thermometer: To find temperature in Fahrenheit,
count a cricket's chirps for 14 seconds and add 40. Other insects indicate readings
as shown above.
+++++++++++++++++++++++
With a Map and Compass You Are Never Lost
Tales abound of frontiersmen plunging into unmapped wilderness and homing in with pinpoint accuracy on some far-off cabin or clearing in the woods. Today's camper, equipped with topographical map and compass, should have an advantage over the old-timers, yet many succeed in getting lost--some permanently. Why? For one thing, not everyone carries these vital tools at all times; for another, many do not know how to use them; and finally, there is more to finding your way than reading a map and knowing which way is north.
A topographical map, or "topo" in backpacker's par lance, is a picture of the landscape drawn with contour lines, each of which represents a constant plane of elevation above sea level. Because the picture is a bird's- eye view, the (loser together the lines are, the steeper the slope they show, while the wider the space between lines, the more gradual the change in elevation. With practice you can learn to visualize any terrain from its depiction on a topo--at least in terms of its larger features. Then if you are in a position to see major landscape features around you, it is possible to orient the map to the real world and to find your position upon it.
Topos exist for all areas of the continental United States in several scales, or series. The most valuable of these for campers are the 7½- and the 15-minute series. Each map in the 7½-minute series covers 7½ minutes ( degree) of longitude (about 7 miles) at a scale of 1:24,000, or about ½ mile to the inch. A 15-minute map covers an area four times that size at a scale of 1:62,500, or about 1 mile to the inch. Contour intervals vary from 80 feet of elevation between lines on some 15-minute maps to 10 feet on some T 2-minute ones. Each series has its advantages, each its pitfalls. Because 15-minute maps depict a larger area, they are easier to orient to large landscape features, and you need not carry so many of them. On the other hand, 7½-minute maps show details that could be vital; it is possible, for example, for a sheer 150-foot cliff not to show at all on a topo with 80-foot contour intervals. Moreover, some of the older 15-minute maps are out of date or, worse yet, inaccurate.
Camping supply stores, sporting goods stores, and some hook shops often carry topos. Or you can write to the U.S. Geological Survey Office for a free index map of any state, from which you can select the topos you need (see Sources and resources, p.429).
The Map

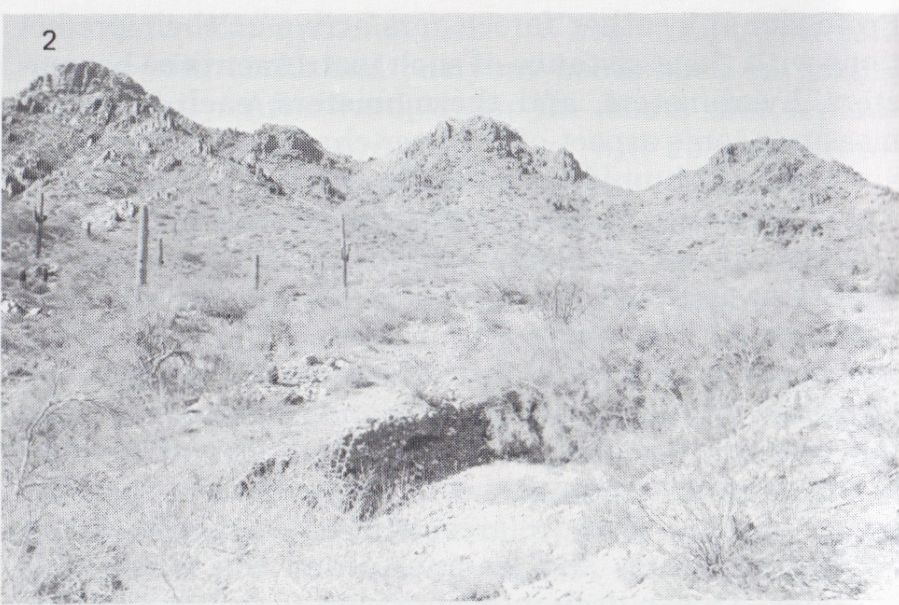
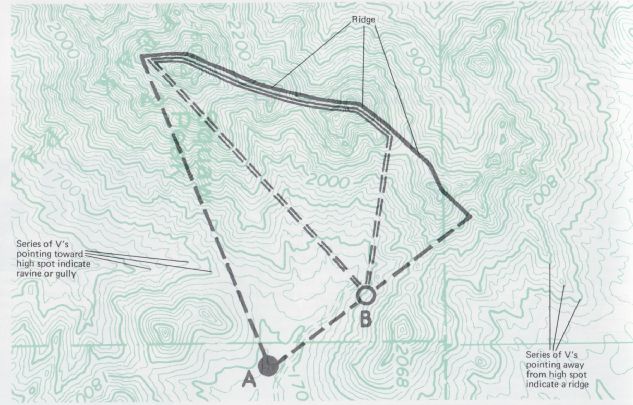
---- Terrain features take on very different appearances when viewed from
different angles. Photo 1 (left above), taken from point A on the map, shows
the same mountain ridge as seen in photo 2 (right above). Photo 1 also shows
the spot (point B) from which photo 2 was taken. the contour interval on the
map is 20 ft. Note that every fifth contour line is heavier than the others
and its elevation is labeled; the exact elevations of high points are labeled
as well. On a standard topo map contour lines are brown; man-made features,
such as roads and buildings, are black; and forested or overgrown areas are
shaded green.
The Compass
The compass needle is a small magnet that points not toward the North Pole but toward magnetic north. The difference between the two, known as the angle of declination, varies with location and changes slowly with time. (There is a line, running more or less through Savannah, Georgia, and Gary, Indiana, along which they are currently the same.) The exact angle of declination for an area is given in the legend of a topo. If your compass has a movable collar, set it to reflect this declination, and align the compass so that the needle points to N on the collar; then move the map so that its north-south axis aligns with the north-south axis of the compass. If your compass has no collar spread the topo out flat and place the compass on it so that its north south axis aligns with true north on the map. Then turn map and compass together until the angle between the needle and true north matches the angle of declination. Next, look for a terrain feature that you can identify on the map. Take a reading on it and draw a line on the map along this bearing. If you cannot locate your position by studying the nearby terrain, sight on another landmark. Where the two lines intersect is your position.
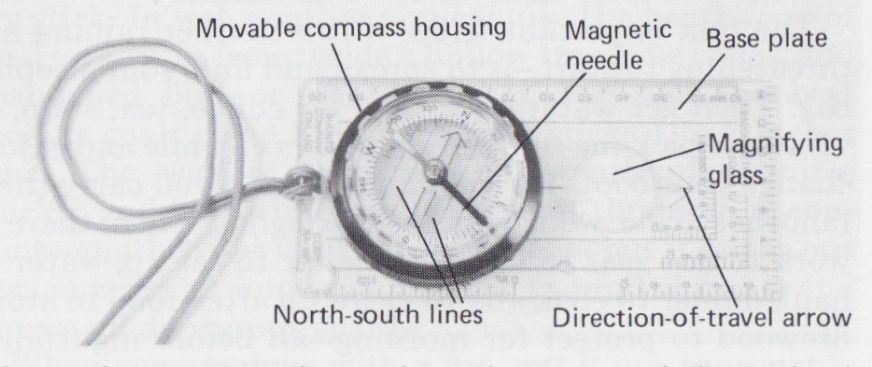
----------- Orienteering compass (shown above) has inner
scale for angle of declination and movable casing br direction finding Another
popular style--the sportman's compass--has a movable inner disk with an arrow
that can he used for either purpose.
Finding Yourself
The best advice about getting lost is: do not. Follow your progress on the topo and use your compass to stay oriented. Be aware of landmarks and their relation to one another; look backward from time to time to memorize the terrain from the other direction.
But suppose you do become disoriented? As Nessmuk observed: "It has a muddling effect on the mind, this getting lost in the woods. But if you can collect and arrange your gray brain matter and suppress all panicky feeling, it is easily got along with." Resist the impulse to panic. Resist all impulses. Stop, relax for a while, and think. You have three choices: you can retrace your steps, stay where you are, or reorient yourself and proceed. If you have become separated from a group, stay where you are, signal your position in some way, and wait to be found. If you are alone, or if the whole group is lost with you, first orient yourself to north and south. Look for landmarks--if you can see none, seek high ground or climb a tree. Then decide whether to go back or go forward. At the very least, use the knowledge of which way is north to move in a straight line.
Deciding which way to go
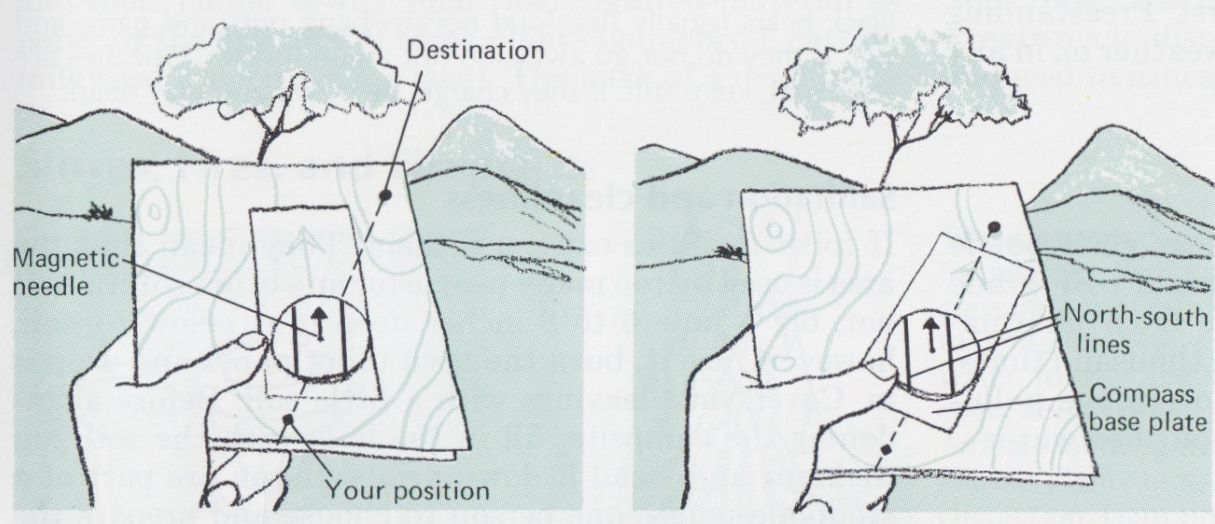
----- 1. Orient map and use compass to find your position on it. Draw line
on map from your position to destination,
2. Place compass base plate on this line. Rotate compass housing so north-south lines match magnetic north on map.
3. Hold compass and map steady, and view along direction-of-travel arrow to
sight a landmark (hill in distance).
How to get there from here

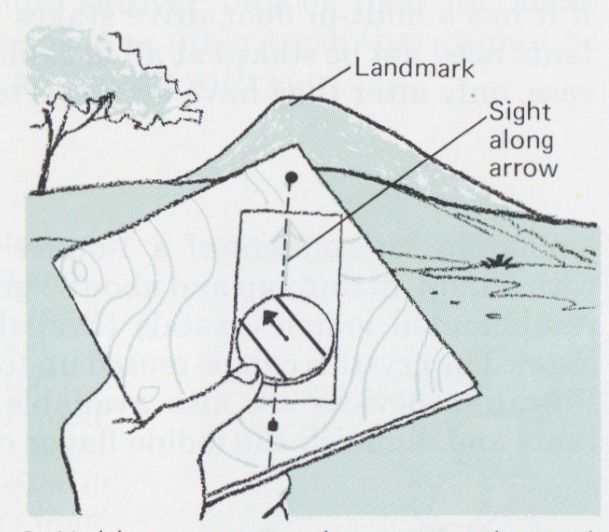
---------- Having sighted a landmark, you theoretically need
only hike to it and lake another reading.
Or, having set your compass, you could keep the needle pointing to north on the dial and follow the direction-of-travel arrow to your destination. In fact, you can seldom do either obstacles, ranging from bramble thickets to mountains, will probably cut off sight of your landmark; they may also obstruct progress.
Some obstacles can be anticipated by studying the topo; others will be surprises. If you find you must go far out of your way, take a reading of 45 degrees and follow it, counting your paces, until you have gone far enough to clear; then take a reading of 90 degrees in the other direction and count the paces back; finally, take one more reading of 45 degrees to resume your original line of travel.
If you find yourself close to an objective-a wooded campsite, for example-but unable to locate it, make a methodical search pattern. Walk a set distance (20 paces, perhaps, depending on how far you can see) in any direction; then turn 90 degrees and walk the same distance. Turn 90 degrees again, and so forth, adding 20 paces every second turn.
Orienting yourself without a compass
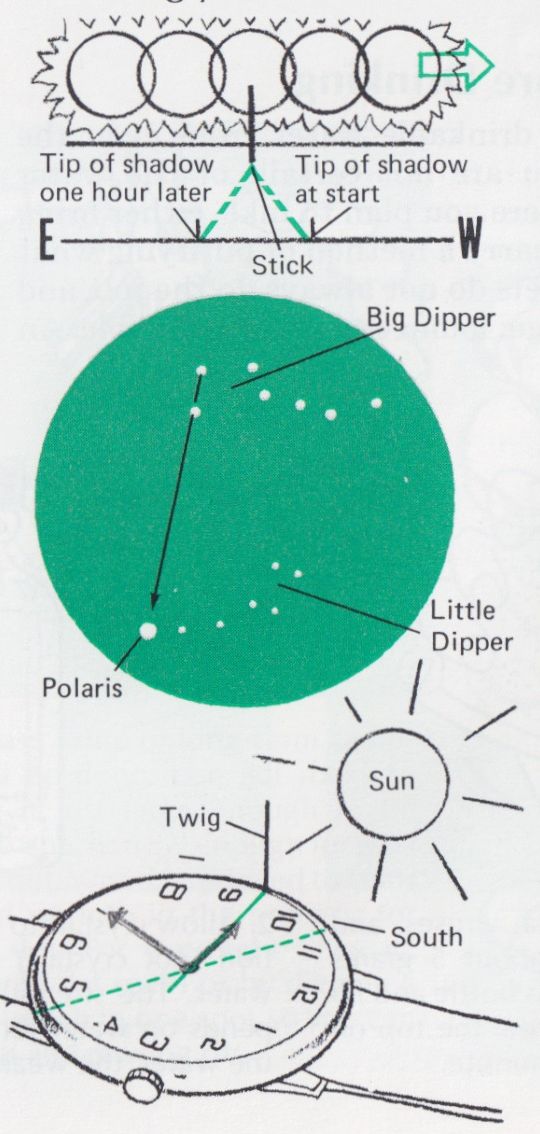
---------- Sun or moon. Insert a short stick in the ground
and mark where the tip of its shadow falls. One hour later, mark again. The
line between these marks is roughly east-west; the stick is on the south side
of the line.
---------North Star. First find the Big Dipper. Trace an imaginary line between the two stars that form its front lip and extend this line five times its own length to locate Polaris- never more than one degree from true north.
----- Watch. Insert twig into level ground. Place watch with hour hand pointing toward twig, aligned with its shadow. If watch is set to standard time, halfway between hour hand and 12 o'clock is -south.
+++++++++++++++++++++++++
Mid-afternoon Is the Time To Pick a Campsite
"If there is a spot on Earth where trifles make up the sum of human enjoyment it is in a woodland camp."
-Nessmuk
Nessmuk's "trifles" were mostly examples of old-time woodcraft--pillows stuffed with hemlock browse or fire pokers and tongs fashioned from green hickory sticks--but the crux of his advice holds true for today's campers who carry their trifles with them.
The ideal campsite is on bare and level ground well off the trail, about 100 feet from fresh water (no closer), with plenty of dry wood scattered handily about. It is sheltered from wind but not in a hollow where damp air collects. It is not in a gully or natural runoff (in case of rain), and it offers esthetic pleasures: a nice view, the fragrance of surrounding pines, the murmur of a stream, the warmth of the rising sun. It is worthwhile to search out such a spot for a long-term campsite. For an over night bivouac you may have to be satisfied with considerably less. To hold out for the perfect campsite can lead to such joyless feats as pitching a tent in the dark on top of what you later discover to be an anthill.
The first important trifle--if it is neither raining nor threatening to start-is to spread and fluff your sleeping bag. Then get water on to boil for coffee, tea, soup, or whatever pick-me-up you fancy. Relax awhile and enjoy; change your boots for soft camp shoes if you carry them (another trifle well worth the weight). Then there is work to do-gear to unpack, shelter to set up, water to haul, dinner to cook and to clean up after, food to store, firewood to protect for morning-all before nightfall if possible. Before turning in, be sure that you have a water bottle handy as well as a flashlight, first aid kit, toilet paper; and shovel or toilet trowel.
In foul weather shelter obviously comes first--a good reason to pack your tent on top. If yours is a floorless pup tent, erect poles, then stake the sides to the ground; if it has a built-in floor, drive stakes first. Freestanding tents need not be staked at all in calm weather or, in any case, only after they have been erected.
Purify Water Before Drinking
You cannot count on drinkable water from even the clearest stream. If you are not certain of the water quality in the place where you plan to hike, either bring the water you need or carry a method of purifying what you find. Halizone tablets do not always do the job, and they deteriorate with age; iodine is more dependable. An iodination kit consists of a 1-ounce clear glass bottle with a tight-fitting cap and about 5 grams of USP-grade re-sublimated iodine crystals (available from pharmacists). The crystals can be reused up to a thousand times. Filtration devices are also available to remove pollutants and diminish the iodine flavor of purified water.
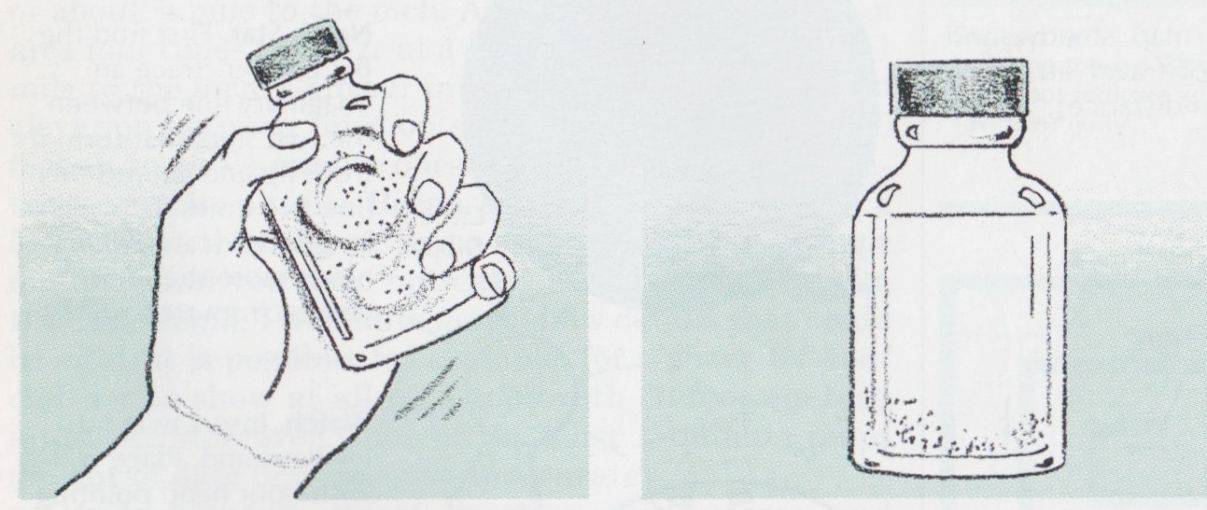
-------1. To kill amoeba, haueria, viruses, and other microbiota, place about
5 grams iodine crystals in t -oz, glass hoti I and fill the bottle with water.
Screw the top on tightly and shake for one minute.
------2. Allow crystals to settle, Saturated solution (not crystals) is added to drinking water. The strength of the solution depends on water temperature: the colder the water, the weaker the solution,
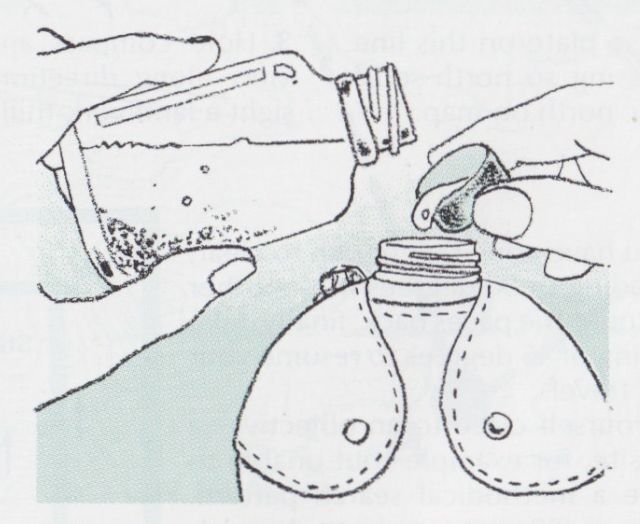
------3. If water is 75° F, add 2 tsp. solution to 1 qt. water; at 40°
F add 3½ tsp. (bottle cap usually holds ½ tsp.). Let stand 5 minutes. For milder
iodine taste use half as much solution; let stand 30 minutes.
Protecting food from animals
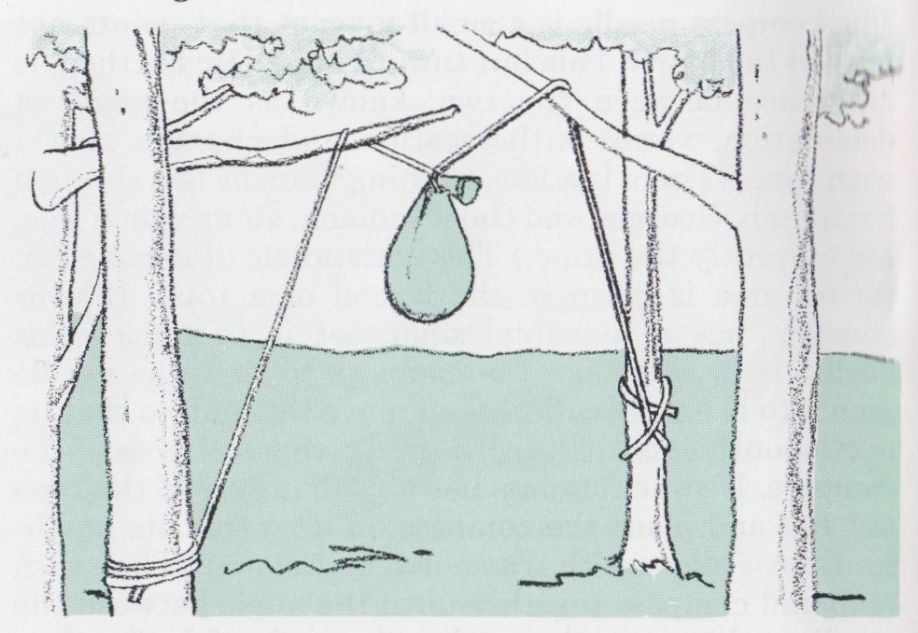
----------Food attracts animals from chipmunks to bears.
Do not keep it i your pack or in the tent overnight. Store food bags in one
large plastic hag suspended from a tree limb or crossbar. In parks and along
trails, where bears are consummate thieves, use two ropes as shown; hags must
be at least 15 ft. high and 6 ft. from tree Black bears usually flee loud noises-bang
pots and pans, and yell. If they do not go away, do not argue further. Gri
are less timid; keep still. If they charge, lie down and play dead.
Sanitation and cleanliness
If toilet facilities exist, use them. They mean that the area is used by too many people for any other solution. If not, dig a hole 6 to 8 inches deep (not below topsoil, however), use it, burn the used toilet paper and drop it in. Cover your leavings with a little soil. Before abandoning the campsite, fill in the hole with the soil you took out and tread it down firmly. If you are part of a group, designate one person to choose and prepare the latrine site-it is as important as any other aspect of camp life. Its distance from camp must be a compromise between convenience and common sense. Do not dig it on rocky ground and never within 100 feet of any water course--even a dry bed. Do not pick a place that might otherwise make a good campsite for someone else.
Do not carry detergents into the wilderness. Wash dishes, clothes, and yourself with soap. (Actually, cleanliness is generally overdone by neophyte campers--in Nessmuk's words: "Don't fool with soap and towels where insects are plenty.") In any case, do not use soap directly in a lake, stream, or other water source. Nor should used wash water be dumped into such a place. Carry water to your campsite, heat it over the fire or stove, then take it farther away from the source before you use it. Dig a sump hole (following the same rules as digging a latrine) in which to dump it.
Making and Managing a Fire
If you are camping in a heavily used area or in a place where trees are scarce, use a portable stove for cooking. But in a lowland forest where deadwood is plentiful and campers are few, there is no good reason to deny yourself the pleasures of a cooking fire.
Gather the wood you need while it is still daylight; foraging is difficult in the dark. Collect fallen wood only. A standing tree, no matter how dead it looks, is not fair game. Locate your fire on bare ground (preferably sand, rock, or gravel)-never on forest duff, humus, grass, or peat, all of which could smolder for days before bursting into flame; and never next to a tree, log, boulder, or rock face. (The tree can be killed, the log may be ignited, and the rocks will be defaced by scorch marks for decades or longer) Clear a circle about 10 feet across of all burnable debris and in the center construct the simplest fireplace that will serve your needs, either by arranging fiat rocks or by digging a shallow hole. If another camper has left behind a fireplace, do not build a new one.
The fire itself has three components: tinder; kindling, and fuel. Tinder is any such easily ignited material as paper or the dry tops of some plants (goldenrod, cattail, milkweed, Queen Anne's lace). The bark of a dead birch or aspen and pitch gathered from bends and knots of pine trees will burn even when wet. The best kindling is small twigs, especially from evergreens, willows, and poplar; its purpose is to generate enough heat to ignite the fuel. In case of difficulty whittle shavings from any dry stick. In wet weather you can use the heartwood of dead logs, litter from inside a hollow tree, pine cones, and abandoned bird or squirrel nests. For fuel the best cooking coals come from hardwood sticks 1 to 2 inches thick. The wood of conifers, pine in particular; ignites quickly and burns brightly because of the pitch it contains-another wet weather stratagem-but it burns out fast, imparts an unpleasant flavor to broiled meat, and throws off dangerous sparks.
When you are done with a fire, put it out thoroughly and completely. Douse the ashes with water, stir them around, and douse them some more. Before you move on, dismantle the fireplace. Put the rocks back where you got them, scorched side down, and scatter the dead ashes far and wide; if you dug a hole, fill it in with the dirt you took out. Distribute leftover bits of food for small creatures to dispose of. Any other trash that cannot be reduced to ashes, carry away with you.
Keeping Food Cool
Picnic coolers and thermos jugs are far too weighty for backpacking, so fresh meat and other perishables are out of the question as regular provisions on a long hike. For the first day or two, however; or for a weekend jaunt, you can improvise a lightweight cooler from three plastic bags and a towel or cotton cloth. Fill one bag with ice and seal it tightly. Place it, along with your perishable goods (a steak, perhaps, or a pound of hamburger), in a second bag; seal it and wrap it in the cloth. Then seal the whole package in yet another plastic bag and place it in the bottom of your pack. At the end of your first day on the trail-a time when morale is often in need of a boost-you will have fresh meat to enjoy and a bag full of cool water. (If you start with frozen meat and do not open the sealed bags, this makeshift thermos should keep the meat fresh for two days on the trail.) To keep foodstuffs cool overnight, seal them in a waterproof bag along with a rock for weight, and immerse it in a stream or lake; attach a safety line with which to retrieve it. If you are not near a body of water; make an evaporative cooler: put perishables in a light- colored cloth bag and hang it in a shady, breezy place. Keep it damp; evaporation will cool the contents.
Stoves, Fires, and Fireplaces
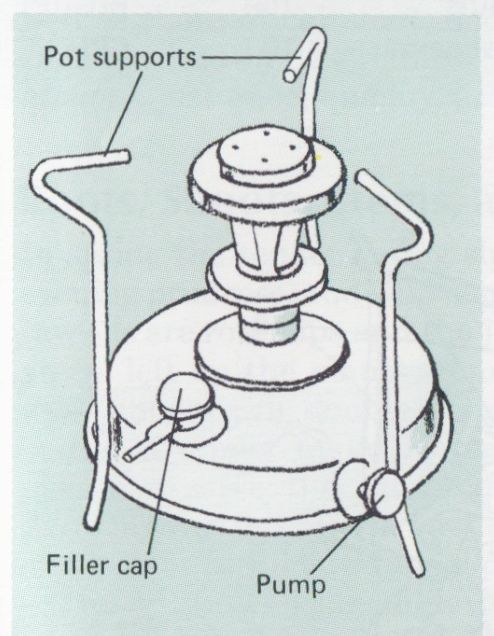
----Most cookstoves are fueled by butane or white gas. Butane cartridges are
safe and convenient but inefficient in very cold weather. White gas gives more
heat per ounce, but it is volatile. Accessories include fuel container, funnel,
and eyedropper for priming.
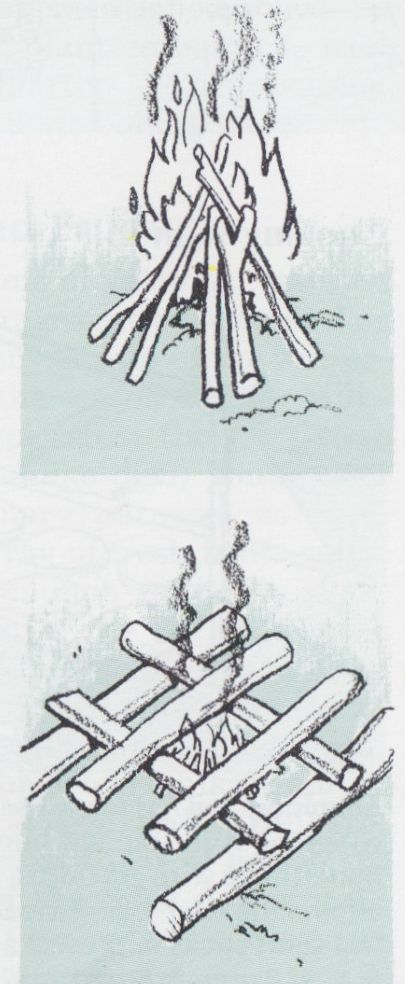
------Tepee
pattern concentrates flame at the high point
and consumes fuel quickly; use it to ignite kindling, to boil water, to heat
a reflector oven, and to dry damp wood. Arrange kindling over tinder, leaving
plenty of space for air circulation. Light tinder from upwind side. When
kindling has begun to burn well, add sticks for fuel until fire is the desired
size.
--------Log cabin pattern burns more evenly; use it to make a bed of coals. Place two large sticks parallel for a base. Between them arrange kindling over tinder in tepee fashion, then place kindling across base. Put several larger sticks across these and continue to build crisscrossed layers, leaving enough space between sticks for air to circulate freely.
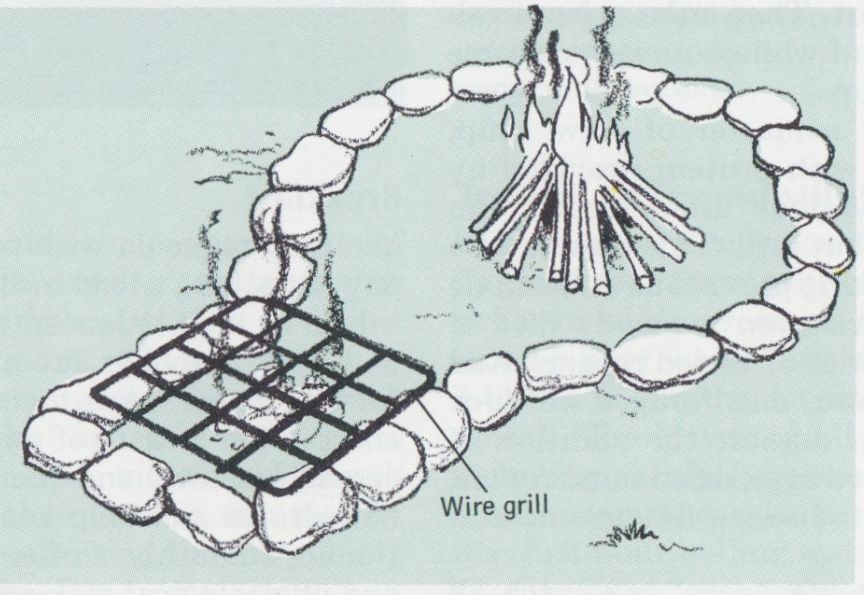
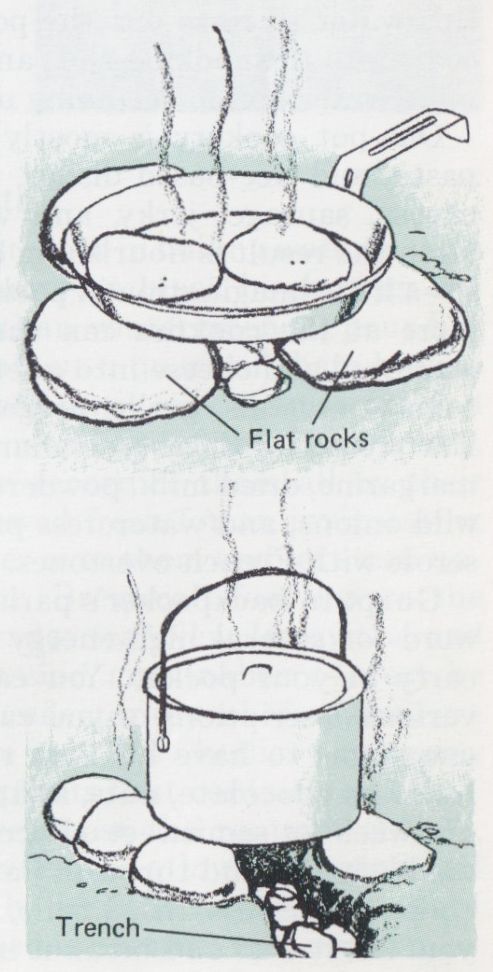
---- Keyhole fireplace is ideal for base camp or long-term
camp site where much cooking will be done. Use t rocks to enclose cooking slot,
making it just large enough to be spanned by wire grill if you have one, narrow
enough for pots and pans to rest across if you do not. Wood is reduced to coals
in round area, giving light and warmth in the process; for cooking, rake the
coals into slot. For overnight bivouac, fireplace can be made from three flat
rocks or by digging a narrow trench. Heap soil from trench in one spot so you
can replace it before breaking camp and moving on.
+++++++++++++++++++++++++
The Joy of Cooking Over an Open Fire
The biggest difference between cooking over a campfire and on a stove is that you can adjust a stove's burner at will, but you must use a fire when the fire itself is ready. The usual beginner's mistake is to immolate a meal by trying to cook over too hot a blaze. Reflector ovens need an open flame, but frying, broiling, stewing, or baking in closed containers calls for a bed of glowing coals. Water boils faster over an open fire, but rigging tripods, trapezes, dingle sticks, or other improvised devices for suspending a pot is a risky business-the odds are good that the whole contraption will collapse about the time the water gets hot. Compromise by putting a pot of water on to boil as soon as you have raked the cooking slot of your keyhole ( full of coals, while tongues of flame still lick upward. Use your largest pot-there are plenty of uses for hot water. Save any hot water that is left over from making coffee, tea, soup, or your preferred end-of-the-trail revivifier. If you need the pot for preparing the meal, pour the water into another container. Then after you have cooked your meal, use this water to rinse out the pot. Then rake a few fresh coals into the cooking slot, and while you eat, let some more water boil for cleaning up.
One-pot cookery is mostly a matter of stew, soup, pasta, and rice-based dishes, with protein provided by cheese, sausage, jerky, and various dried meats. Too often the result is nourishing but dull. This need not be so-a little imagination in packing provisions and a little more at the cookfire can turn even a steady diet of macaroni and cheese into a series of varied repasts. Add tomato crystals, garlic, oregano, and foraged burdock leaf stems for a zesty Italian dinner; the addition of margarine, dried milk, powdered eggs, dried mushrooms, wild onions, and watercress produces a flavorsome casserole with French overtones.
Gorp. In backpacker's parlance, "gorp" is a catch-all word for several high-energy trail foods that you can carry in your pocket. You can buy packaged gorp of various descriptions or you can make your own-every one seems to have his own recipe, most of which are based on chocolate, nuts, and raisins. Start with a block of sweet or semisweet chocolate; melt it down in a double boiler and throw in handfuls of peanuts, raisins, chopped walnuts, dried fruit, berries-whatever pleases you. Let it cool and break it into pieces.
Food to Carry Into the Wilderness
Three basic questions to ask in deciding what food to carry: How much does it weigh? How much energy will it provide? What is its nutritional value? Food energy is measured in calories. Most healthy people burn about 4,000 calories a day on the trail; if you pack 2 lb. of food for each day, it must deliver an average of 125 calories per ounce to replace this expenditure. Only dry foods and oils are so rich.
About 10 percent of the food energy should be in the form of protein (P) to rebuild body tissue, and at least 20 per cent should he fat (F) for long-lasting energy. Carbohydrate energy (C) is readily available but short-lived; that which is not quickly used is stored as body fat--a problem for sedentary dieters but of no concern to a hardworking backpacker. In the listing at right, each food's major nutrients are given according to the order in which they predominate; minor nutrients (less than 25 percent) appear in parentheses. Seasonings and spices have little or no food value, but do not ignore them; flavorful food can be a great morale booster.
Most camping supply stores stock a variety of freeze-dried meals in foil packets. They are lightweight, nutritious, and easy to prepare but quite expensive.


---------- table
Breakfast
You may make do with toast and coffee at home, but a day of packing a load in the wilderness should start with a hearty, well-balanced meal. The old standby, bacon and eggs, provides fat and protein. Stewed fruit and foraged berries are for vitamins, quick carbohydrate energy, and a taste of sweetness. Oatmeal or other hot cereal, biscuits, and pancakes provide additional carbohydrates and help keep your digestive system functioning smoothly. Coffee or tea serve as psychological and physiological pick-me-ups to get you started.
For buckwheat pancakes for two mix:
1 cup buckwheat flour
½ cup wheat flour
½ cup cornmeal
½ cup wheat germ
½ cup whole dry milk
2 tbsp. powdered egg
2 tsp. baking powder
1 tsp. salt
For convenience, premix the ingredients at home and pack in a labeled plastic hag. Add 2 tbsp. of oil and 2 to 3 cups cool water; then heat to a thin hatter cook in a hot, oiled pan.
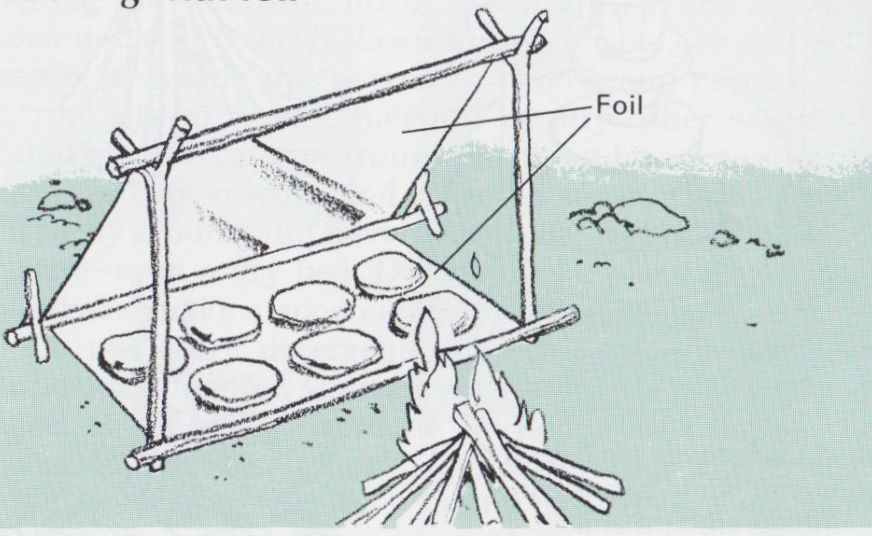
---- Cooking with foil
Aluminum foil has many uses. Bake a potato, yam, or wild root by wrapping it in foil and burying it among hot coals for half an hour. Turn a wire grill into a griddle with a sheet of foil turned up around the edges. Line a leaky pot with foil, or with the help of a few short sticks improvise a reflector oven. (For use of oven, see Baking Bannock Bread)
Spark Your Diet With a Free Feast of Wild Greens
To pack a head of lettuce into the wilderness is inefficient and unnecessary. Not only is there an abundance of edible wild greenery, hut much of it is tastier and more nutritious than its cultivated counterparts. You need not become a field botanist to recognize such common place delicacies as dandelions, chickweed, and clover, but the more you know the wider your choice will be. And be sure to carry a clearly illustrated plant identification guide, since some plants are poisonous.
Among the raw greens that are savory in salads or refreshing to munch on the trail are the young leaves of chicory, mint, mustard, orach, purslane, rock cress, several kinds of sedum (especially Sedum rosea, known as roseroot for the odor of its thick root), sheep sorrel, shepherd's purse, spring beauty, watercress, wild lettuce, and any of the several plants known as scurvy grass because of their high vitamin C content. Each has its own special flavor and texture. The older leaves of many of these plants are equally appetizing when cooked and served like spinach. Some-such as shepherd's purse, chicory, and mustard-become tough and bitter with age; to correct this fault, boil the leaves until tender, drain, and boil again in fresh water. Other plants whose leaves need this double cooking include burdock, jewel- weed, marsh marigold, milkweed, and pokeweed. Cook the leaves of the remaining plants mentioned above-as well as those of coltsfoot, dock, plantain, and the wild spinach known as lamb's quarters (Chenopodium album,)-just once, quickly, in a little boiling water.
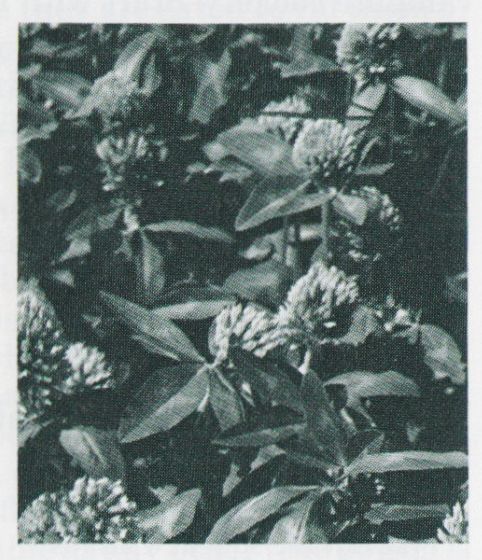
-------Clover is protein-rich but difficult to digest
raw. Indians dipped its leaves and flowers in salted water to prevent flatulence;
boiling is a surer way. To make a tasty clover dish for four, melt 4 tbsp.
margarine or butter in a frying pan; stir in 6 cups clover greens and flowers;
arid /i crop water; cover an cook until wilted, stirring occasionally. For
a chewy texture include sweetish clover roots as well.
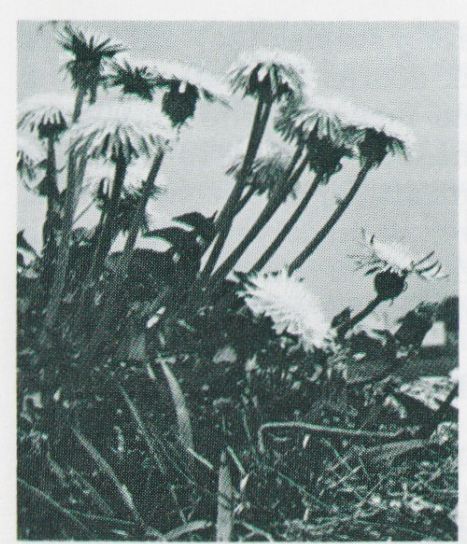
--------Dandelions grow almost everywhere. The tender
young leaves and unopened buds, delicious raw or steamed, are among the richest
sources of vitamins A and C. Older leaves, boiled twice to remove bitterness,
taste like Swiss chard but are somewhat more flavorful. to make a delicate
tea, drop only the petals from 10 flowers into a cup ol boiling water; let
them steep until he tea's flavor pleases you.
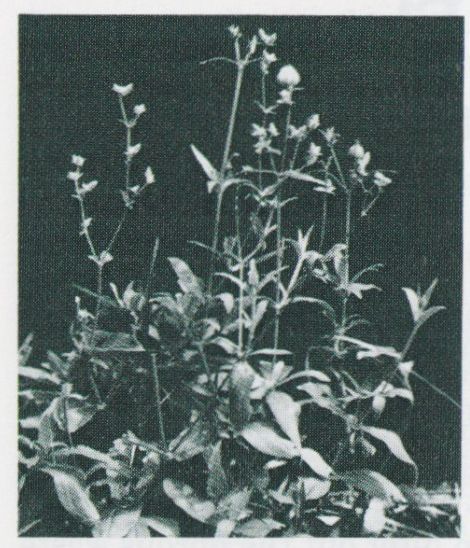
-------Wild onions--including leeks, chives, and garlic--can
be prepared and eaten in all the same ways as their civilized cousins. Flavor
and potency vary tremendously; sample a small amount before deciding whether
to use a plant as food or for seasoning.
Caution: Eat nothing that looks like a wild onion but does not smell like one-it could be either of two very poisonous plants, death camas or fly poison.
----------Common chickweed is found in moist meadows,
fields., and woods throughout North America. Its small, sharp-pointed leaves,
rich in iron and vitamin C, stay fresh and green beneath winter snow. These
leaves and the tender tips of the plant's long, sprawling stems are year-round
food sources They may he eaten raw or steamed--do not overcook or the delicate
flavor may vanish completely.
Roots, Shoots, Stems, and Fruits
In spring the tender young shoots of calamus, catbrier, evening primrose, and wild asparagus are good cooked or raw-as are rose hips and the juicy berries of the winter- green, left on the plants from the season before. Milk weed shoots can double for asparagus; the fat flower buds of summer make a broccoli-like dish; young seed pods can serve the same culinary purposes as okra. Summer and fall offer a vast array of fresh fruits, nuts, and berries to fill out a meal or munch on the trail.
The only totally inedible part of the burdock is the familiar brown burr that sticks to your clothes, although most of the rest is enclosed in a bitter husk. Peel and cook first-year roots (those without flower stalks) as you would parsnips. Peel the rhubarb-like leaf stalks in spring and eat them like celery, raw or stewed; unlike rhubarb, the leaves can also be eaten without fear of poison. In summer the white inner pith of the thick flower stalk makes an excellent replacement for potatoes. Slice the stalk crossways and bake, fry, boil, or roast.
Other potato substitutes include the peppery roots of the evening primrose, turnip-flavored ground nuts, the tiny chestnut-like tubers of spring beauty, and the giant wild potato (actually a wild yam), whose tuber may weigh 20 pounds or more. The starchy roots of such aquatic plants as arrowhead, bulrush, and water lilies are best gathered during the colder months, although Indians harvested them with their toes in summer by wading among the plants and collecting the firm young tubers that bobbed to the surface.
----- Salsify roots taste surprisingly like oysters. For
a landlubber oyster stew, scrub and scrape several tender first -year roots
and slice them crosswise into ¼-in, pieces. Barely cover with milk or soy milk;
add salt and seasoning; cover and stew until tender.
Tea and coffee substitutes
Fresh wintergreen leaves steeped in boiling water make a fragrant tea. Strangely, however, black birch twigs are richer in wintergreen oil than wintergreen is; pour hot (not boiling) water over about a quart of them broken into 1-inch lengths, let steep until cool, then strain and reheat. The leaves of all members of the mint family, including catnip (you can recognize them all by their square stems), can be brewed fresh for an invigorating tea; just pour boiling water over them and let steep until the flavor pleases you. Brew coltsfoot leaves the same way. Leaves of Labrador tea, New Jersey tea, and two evergreen hollies--cassina and inkberry--must be dried before a fire or in a reflector oven before they are crumbled and brewed like tea. (The hollies are among the few North American plants that contain caffeine.) For a caffeineless coffee, roast the roots of chicory, chufa, dandelions, or salsify over a low fire; grind and brew. Sunflower seeds can be used too, as can the fruits of cleavers, picked and roasted in early to midsummer.
++++++++++++++++++++
Foraging for Flour and Emergency Rations
'It takes time and energy to prepare flour from any wild source except cattail pollen. If you are in no rush, it is time well spent, both for the unusual flavors of foraged flour and to save packing pounds of processed flour. Easiest to prepare is flour made from the tubers of such plants as arrowhead and chufa. For immediate use, crush them and put the pulp in a container of cold water. Seal it and shake vigorously, then filter out the fibrous waste and allow the starchy residue to settle. Pour off the water; add more cold water, and repeat the process. Continue until the water no longer feels slimy. You can drain and use the flour as is (allowing for the water it contains) or dry and grind it for future use.
To make a flavorful meal--and simultaneously obtain cooking oil--from walnuts, butternuts, hickory nuts, or others, smash them with a rock and boil slowly, shell and all. A mixture of meats and oil will rise to the top; skim it off and filter or pick out the meats. Dry the meats before a fire and grind them to the consistency of cornmeal. (For nut butter; crush the meats into the oil.) To grind flour from seeds is a hard job even with a mortar and pestle. Doing it between two rocks leads one to marvel that primitive peoples ever got around to baking at all. The result, however; is the closest wild approximation to conventional flout; in texture if not taste. For a hint of wild flavor; grind just a handful of bulrush, dock, or Iamb's quarters seeds, and mix with wheat flout First thresh the seeds to remove them from their husks; then winnow to get rid of the chaff. Threshing methods vary. Some seeds, such as green amaranth, require nothing more than rubbing them briskly be tween your hands. Others, including purslane and shepherd's purse, must be treated more roughly, up to and including beating them with sticks and treading them underfoot. In order to winnow the threshed seeds, pour them back and forth between two containers and let the breeze carry off the chaff.
------ To grind flour from seeds, nuts, or roots, look
near running water for a large, nonporous rock that has been hollowed out to
the shape of a bowl. For a pest choose a smooth, round stone that fits your
hand comfortably.
Using the Fruit of the Bountiful Oak
The plentiful acorn was a dietary staple of several native American cultures. To shuck acorns for use, crack the thin shells lengthwise (pliers facilitate the job), then squeeze the tips to pop the meat out whole. To leach out the bitter tannin, boil the meats for about two hours, changing the water whenever it turns yellowish; then dry and pound into fine meal. Or you can dry and pound the meats first, place the meal in a porous cloth bag, and pour boiling water through it. Use as you would corn meal, or mix into any flour for a nutty flavor.
Bannock Bread
Nothing is more welcome at a fireside meal than fresh bread. Happily, baking it is one of the easiest jobs of campfire cookery. Start with the following ingredients:
1 cup flour (wheat or foraged)
1 tsp. baking powder
1 tbsp. whole dry milk
½ tsp. Salt
1 tsp. sugar or honey
2 tbsp. cooking oil
Mix the ingredients gently with enough water (about ¾ cup) to form a firm dough. Mold quickly and with as little handling as possible into a loaf 1 in. thick. Dust the loaf with flour, then cook it by any of the three following methods.
Covered pot. Place loaf in pan. Put a few stones in bottom of large pot and set loaf on stones. Cover pot and place on hot coals; heap more coals onto lid. Bake 30 minutes or until done. Test by inserting a twig; if dough adheres, hake longer. Frying pan. Place loaf in pre-warmed, greased pan. Hold over fire until crust forms on bottom; then flip and brown the other side. Place over coolest part of cooking slot and turn loaf from time to time until done.
Reflector oven. Put loaf on foil sheet and set on base or shelf of oven; place oven about 8 in. from fire. Maintain steady flame for 20 to 30 minutes, turning loaf occasionally until it is brown all around and done inside.
Easy Acorn Cakes
2 cups acorn meal
¾ cup water
4 tsp. salt
Combine ingredients and beat to stiff batter. Let stand one hour; then heat 3 tbsp. cooking oil in frying pan. Drop batter into pan to form cakes about 3 in. across. Reduce heat (or put pan at edge of cooking slot), and brown cakes slowly on both sides. Eat hot or cold. Acorn cakes will keep for days.
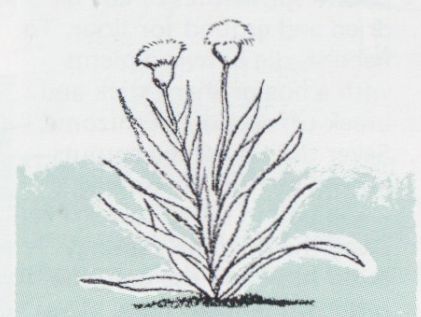
The cornucopious cattail
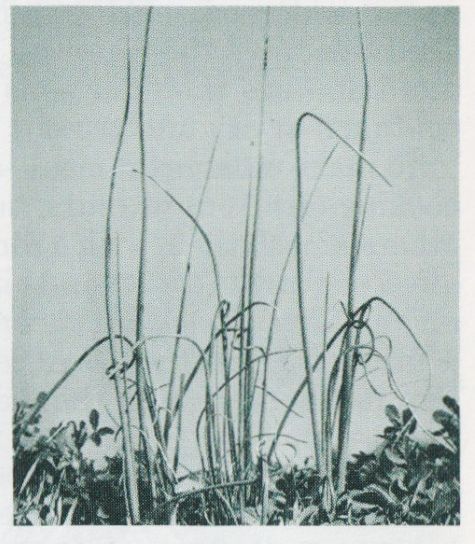
There is an old saying that you can use every part of a pig but the squeal. Cattails are even less wasteful--they have no squeal. All four native American cattail species are edible, and all were regularly used by Indians and early settlers as year-round sources of food and fiber. They are easily recognized by their tall, stiff flower stalks, which arise among clusters of sword-shaped leaves. The flowers at the tops of these stalks form two sausage-like sections--pollen-bearing male flowers above and seed-producing female flowers below. Cattails grow in marshes and in the shallows of lakes, rivers, and estuaries throughout the country.
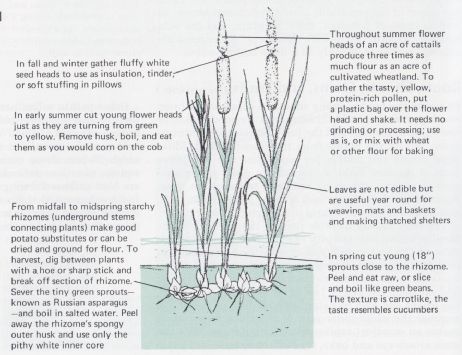
-------- From mid-fall to mid-spring starchy rhizomes (underground stems
connecting plants) make good potato substitutes or can be dried and ground
for flour. To harvest, dig between plants with a hoe or sharp stick and break
off section of rhizome. Sever the tiny green sprouts--known as Russian asparagus--and
boil in salted water. Peel away the rhizome's spongy outer husk and use only
the pithy white inner core.
In fall and winter gather fluffy white seed heads to use as insulation, or soft stuffing in pillows In early summer cut young flower heads just as they are turning from green to yellow. Remove husk, boil, and eat them as you would corn on the cob
Throughout summer flower heads of an acre of cattails produce three times as much flour as an acre of cultivated wheatland. To gather the tasty, yellow, protein-rich pollen, put a plastic bag over the flower head and shake. It needs no grinding or processing; use as is, or mix with wheat or other flour for baking Leaves are not edible but are useful year round for weaving mats and baskets and making thatched shelters. In spring cut young (18 inch) sprouts close to the rhizome. Peel and eat raw, or slice and boil like green beans. The texture is carrot-like, the taste resembles cucumbers.
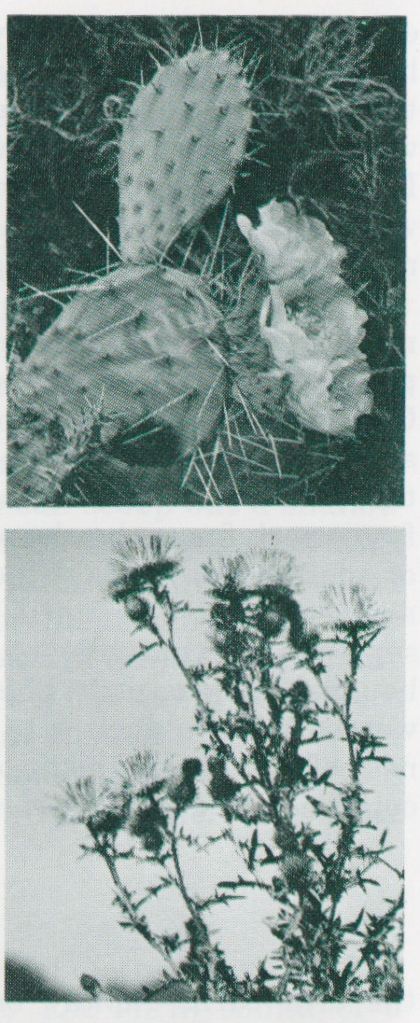
In Case of Need
Cactus. All fruits and fleshy parts of all cacti are edible; some are quite tasty. The best part is the fruit, or tuna, that grows from be tween the pads of prickly pears (Opuntia). Slice off ends, open husk lengthwise, and scoop out pulp. Protect your hands from the spines while working. To eat pads themselves, first burn off spines, then slice through husk; pulpy core is good raw or cooked. Get water from cactus with the aid of a solar still.
Thistle. This common biennial is a fine source of food from spring through fall. In its first year the Plant forms a rosette of tender but spiny leaves; trim the spines and eat the leaves raw or steamed. During the second year a purple flower appears on the plants atop a spiny stem that tastes rather like an artichoke; peel, slice, and boil it. The root is more nutritious than tasty; eat it raw or cooked. First year roots are best.
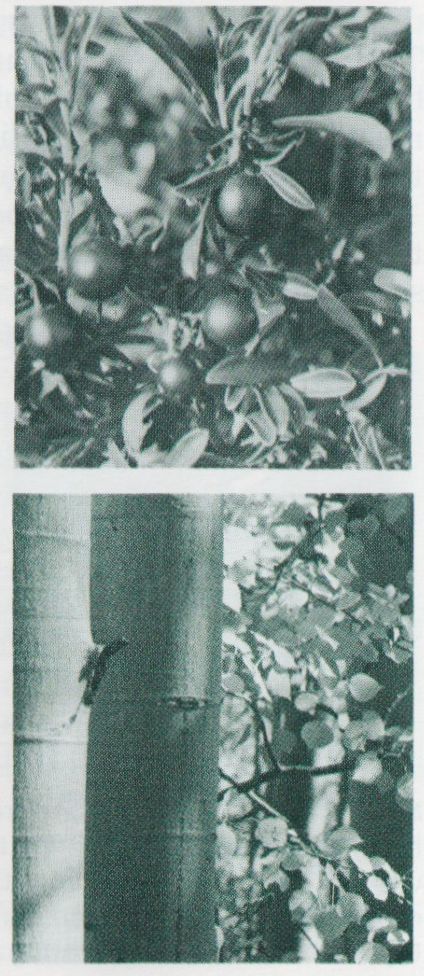
Kinnikinic. This vine-like arctic evergreen, known more as a backwoods tobacco substitute than as a food source, grows in mountains and north woods. Its reddish berries are important to survival when other food is scarce; they form in autumn and hang on all winter under the snow. They are bland but nourishing. The leaves can he dried and brewed into an astringent, vitamin-rich tea.
Poplar. The inner bark of poplars--including trembling aspens of the Rocky Mountains and cottonwoods of the South and Mid west-kept many a frontiersman alive for weeks at a time. It can be eaten fresh, brewed into tea, cut into strips and cooked like noodles, or dried and ground into flour. All are nourishing, as is t he inner bark of the willow, a close relative. Pines, birch, and juniper also have edible inner bark.
Sources of Meat When Survival Is in Doubt
The meat of all healthy birds, insects, and mammals is edible. So is that of most reptiles and amphibians. The fat and protein they contain could mean the difference between life and death for one who is lost or stranded in the wilderness for a long time. If you are proficient in the use of a throwing stick, bob, sling, spear or bow and arrow, you will probably have little trouble improvising your weapon from natural materials and hunting with it. If not, it is too late to start practicing-you will do better to spend your energy gathering insects and grubs, fishing, or trapping reptiles, birds, and small game.
Grasshoppers, locusts, katydids, crickets, and cicadas are all excellent protein sources and good fish bait. It is easiest to catch them in early morning, while they are still sluggish from the nighttime chill. Like all insects they must be cooked before they are eaten to rid them of parasites. Pull off the wings, legs, and head and roast or steam the bodies. To gather a meal of ants, sink a steep-walled container such as a cup or jar, into the top of an anthill so its rim is level with the surface of the mound, then use a stick to stir up the den. Hundreds of ants will fall into the container. Grubs and caterpillars are also rich food sources, but avoid caterpillars bearing hair or fuzz-many are poisonous.
Lizards are hard to catch, and few are meaty enough to be worth the effort. Snakes, however are almost all meat and are easily clubbed or caught with a long stick. Cut off the head; skin and eviscerate the body. Cook by roasting or boiling-the flavor is not unlike catfish. Poisonous snakes are as edible as any other (the poison is all in their heads), but unless you are an experienced snake hunter the danger can be greater than the reward.
Frogs are easily caught with a long, sharp stick (notch a barb onto the end) or even with your bare hands, particularly if you hunt at night using a headlamp or flashlight. (Note, however, that light-hunting is illegal except in case of a real emergency.) Skin the frogs before cooking them. Avoid toads; their irritating skin secretions can easily spread into the meat.
It is also illegal to hunt with snares or traps except in emergencies. You may be able to club such slow-moving animals as porcupines, opossums, or groundhogs, but if your life hangs in the balance it is permissible to set traps. The simplest of these are deadfalls, in which a flat rock, large enough to kill a small animal, is supported by a baited trigger mechanism made from sticks. Snares made from wire or cord can be set for rabbits, squirrels, or other small game along paths that they normally follow in the course of their day-to-day lives. (For the finest source of protein, see Fishing.)
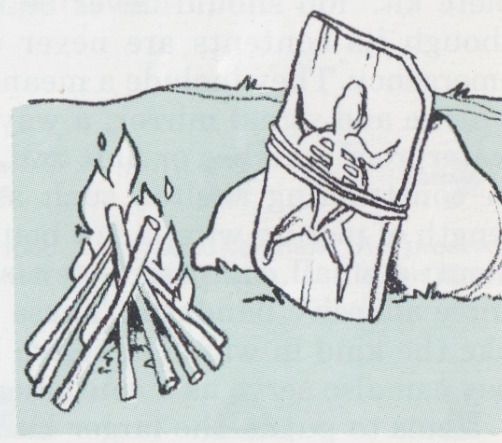
--------To cook small game, such as rabbits or squirrels,
first skin and eviscerate animal. Spread the carcass flat on a large rock or
piece of hardwood, lash it in place with wire or green vines, and prop it up
before an open fire. Another method is to pack the carcass in clay and bury
it in hot coals to bake for an hour or so.
Traps and snares
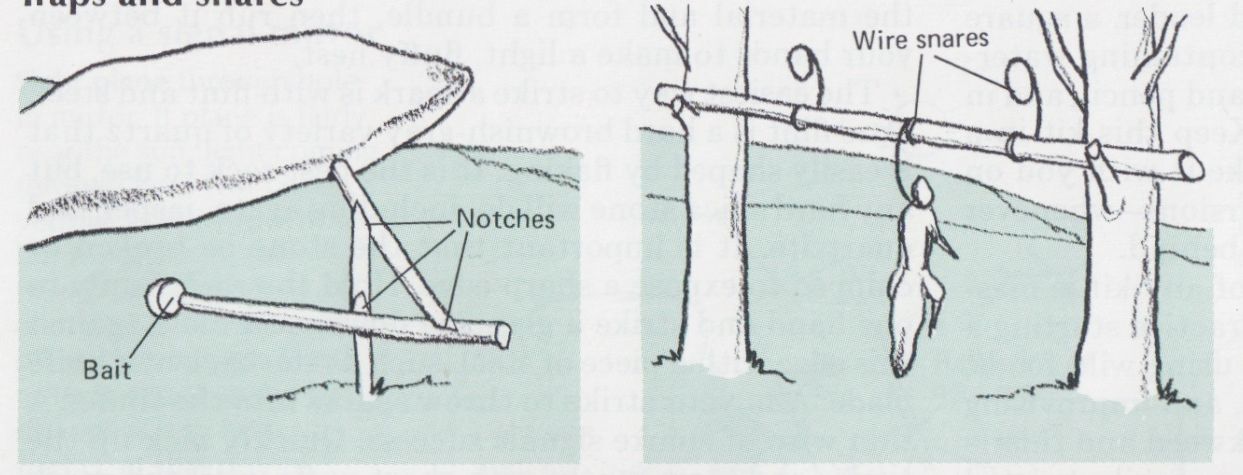
---------- Figure-4 deadfall is a good trap for such
foragers as ground squirrels and other large rodents. Use a flat rock or log
heavy enough to kill prey. Be sure bait is securely attached to trigger.
----------Squirrels are adventuresome. Rig up wire noose snares firmly along pole and place between two trees where you have seen Squirrels at play. Always remove traps when you no longer need them.
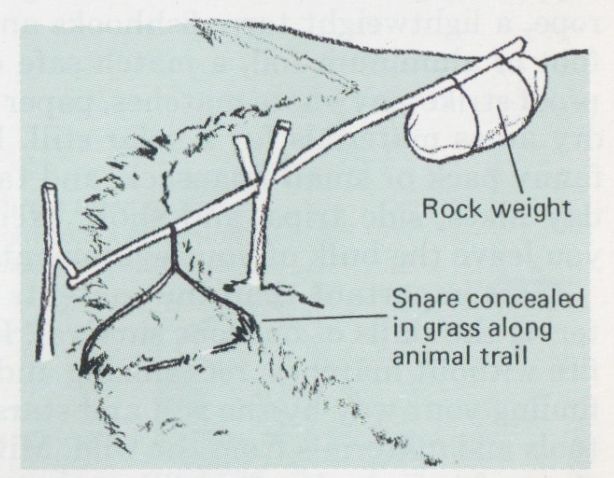
---------- Rabbits tend to follow the same route daily.
Rig a lift snare along their customary path. Fashion a noose from wire, cord,
green vines, or twine made by twisting tough fiber of thistle stems or milkweed.
+++++++++++++++++++
How to Survive The Unexpected
"Nature is stern, hard, immovable, and terrible in unrelenting cruelty [but] she has in store food, fuel, and shelter which the skillful, self-reliant woodsman can wring from her savage hand with ax and rifle."
-Nessmuk
If by some mischance you are separated from your equipment in the wilderness, you may find nature as terrible as the old woodsman did. Moreover, lacking his ax and rifle, your tools will be those of Stone Age man. One way to give yourself better odds of living through such an emergency is to carry your own survival kit.
Two kits, in fact, are better than one: a basic kit small enough to fit in a shirt pocket and a larger, more complete kit. You should never be without the small one, though its contents are never used except in case of emergency. They include a means of signaling, such as a whistle and signal mirror; a way to start a fire, such as waterproof matches or flint and steel; something to use in constructing shelter, such as a pocketknife and a length of picture wire; a few bouillon cubes for nourishment; a small compass; a few safety pins; and two or three adhesive bandages. These all fit into a metal box like the kind in which adhesive bandages are sold. The box can also serve as a container for boiling water.
Items to put in the larger kit include a sweater, such emergency rations as dried meat bars and rice, first aid supplies, signal flares, a 50-foot length of 1/8" nylon rope, a lightweight tarp, flsh-hooks and leader, a square foot of aluminum foil, a match safe containing water proof strike-anywhere matches, paper and pencil, and in dry areas materials for a solar still. Keep this kit in a fanny pack or small knapsack, and take it with you on day hikes, side trips, and short excursions-whenever you leave the hulk of your equipment behind.
More important than the contents of any kit is mastering the skills of outdoor survival. Practice starting a fire without matches, recognizing and using wild foods, finding your way by the sun and stars, and improvising tools and materials from the wild. Milkweed and thistle stems, for example, yield fibers that are easily twisted into strong twine, hut proficiency at this skill, like most skills, comes as a result of trial and error. Take the time to learn how to do it before you find yourself in a position where an error might be fatal.
Warmth and Shelter
To survive in the wilderness you need three things: food, water, and protection from the elements. You can live for weeks without food and many days without water, but death from exposure to wind, rain, and cold can happen overnight. In a survival situation your most urgent concerns must be shelter and a fire.
Look for a site that is naturally shielded from prevailing nighttime winds. A shallow cave with a southern exposure beneath a rock overhang is ideal; the rock will hold the sun's warmth long into the night. Build a fire at the mouth of the cave, not against the rock face-the warmest place to be is between a fire and a nearby wall. In other situations a stand of shrubs may serve as a windbreak, or the drooping boughs of a lone evergreen might offer a place of refuge.
The simplest shelter to construct is a lean-to. This might be nothing more than a few evergreen branches propped against a fallen tree, adequate for a night's rest. Or it could be a more elaborate structure in the shape of a tepee or of Nessmuk's shanty tent, enclosed on three sides and open to the warmth of a fire. Make the framework for such a lean-to by lashing together three or more stout poles. Stack more poles and branches against this frame until you have a wall capable of supporting a thatching of grass, leaves, bark, evergreen boughs, or even dirt. The decision of how sturdy and weatherproof a shelter to build depends on the harshness of the environment. (For instructions on building cold weather shelters, see Outdoors in Winter.)
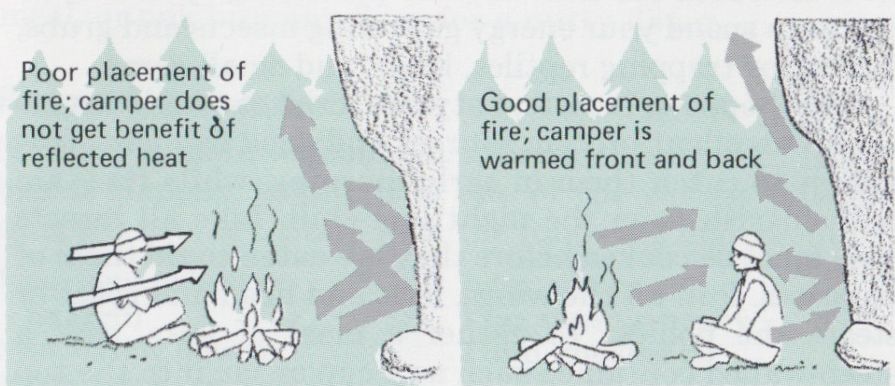
------ A fire's warmth rises along a rock face, drawing
cold air from the open side. Later, the rock itself radiates extra warmth.
Starting a Fire Without Matches
There are two skills requisite for starting a fire without matches: preparing a nest of fluffy tinder and striking a spark to ignite it. Excellent tinder can be made from the downy seed heads of cattail, thistle, and milkweed or by pounding the stalks of these plants or those of nettle, yucca, and dogbane. Other sources of tinder include dead leaves; blades of dead grass; the outer bark of birch, juniper and sagebrush; and the cambium layer (just beneath the bark) of aspen, poplar willow, or pine. Shred the material and form a bundle, then rub it between your hands to make a light, fluffy nest.
The easiest way to strike a spark is with flint and steel. True flint is a hard brownish-gray variety of quartz that is easily shaped by flaking. It is the best rock to use, but any hard silica stone will do, including agate, jaspez and quartzite. It is important that the stone be broken or chipped to expose a sharp edge. Hold the rock firmly in one hand and strike a glancing downward blow against this edge with a piece of steel, such as the back of a knife blade. Aim your strike to throw sparks into the tinder. A thin wisp of smoke signals success. Quickly, pick up the tinder and blow gently with short puffs until the spark spreads and bursts into flame.
Another way to obtain a spark is with a bow drill. This tool can be made from hardwood and a strip of twine or leather thong. Heat is generated by friction as the tip of the drill turns rapidly hack and forth in a notched depression in a piece of dry wood, called the fireboard. The notch fills up with charred dust, which eventually begins to smoke. At this point, the spark within the dust must be lightly fanned to life, then quickly placed in the tinder and blown into flame.
Tinder can sometimes be ignited by focusing the sun through a lens. Strong glasses with convex lenses can serve this purpose, as can a convex watch crystal.
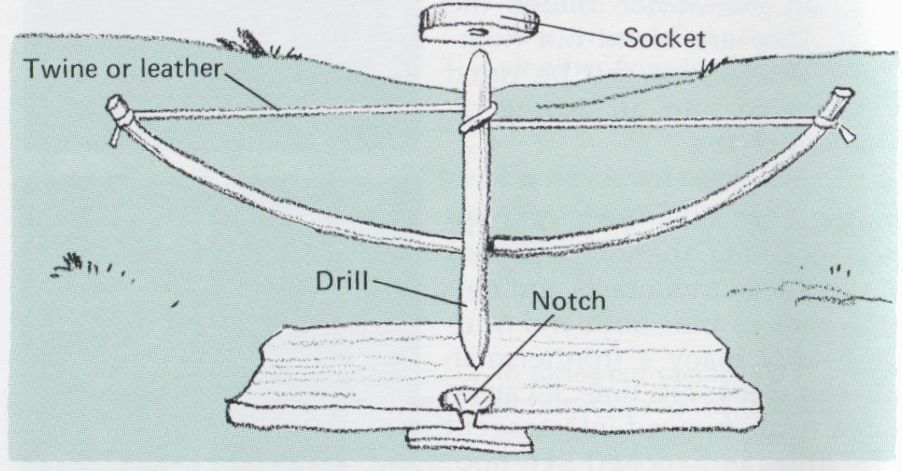
-------- Make the drill and fireboard from a single type
of dry, seasoned hardwood, such as aspen, cottonwood, or poplar. for the how
use a strong green branch; for the socket, any piece of hardwood or stone that
fits your hand. lubricate the socket by rubbing the top of the (frill through
your hair or along the side of your nose).
Obtaining Fresh Water
Water exists everywhere on the surface of the earth, even in places where it does not run freely. It is in the air, beneath the ground, part of every living thing. With skill you can obtain it in drinkable form. To get clear water from a muddy river or lake, dig a hole a few feet from the bank and let water filter in. If you are close to an ocean beach, try using the first water that seeps into such a hole; it may only become salty later. Purify all questionable water by boiling for 10 to 15 minutes--longer at high altitudes--or with iodine crystals.
Early morning dew is a good water source. Use a cloth to soak it up from grass and other vegetation, then wring it out into a container. Or you can scoop out a shallow hole, cover it with a tarp, and fill the depression with stones. After dawn, dew will form on the stones and collect in the tarp. In hills or mountains follow dry gulleys to the source. There you will often find a trickle of water that disappears within a few feet. Use a sluice made from a hollowed-out plant stem or stick to divert this trickle into a container. Sometimes you may find only a clump of greenery; the roots are deriving water from beneath the soil. Dig for it. Water can often be found near the surface of dry river beds, at the base of cliffs, on the shady sides of sand dunes, and any place where willows or elderberries grow.
In the desert look for sandstone ridges along which pockets form where water can remain for months. The pulp of some large cacti yield water, but you have to work for it; cut off the top, mash and stir the pulp with a stick, then wring water from it. A better way to get water from cactus is to make a solar still from an unperforated piece of thin, transparent plastic. Whenever you camp in arid regions, include the materials for such a still in your basic survival kit. With it you can draw pure water not only from plant material but also from polluted or salty water-including your own body wastes-and from the soil itself. Conserving water is as important in the desert as finding it. Travel at night and rest in shade during the day. Eat only if you have water; digestion uses up moisture. Do not put faith in such fabled tricks as buttons or pebbles in the mouth--they alleviate thirst but do nothing to stop dehydration.
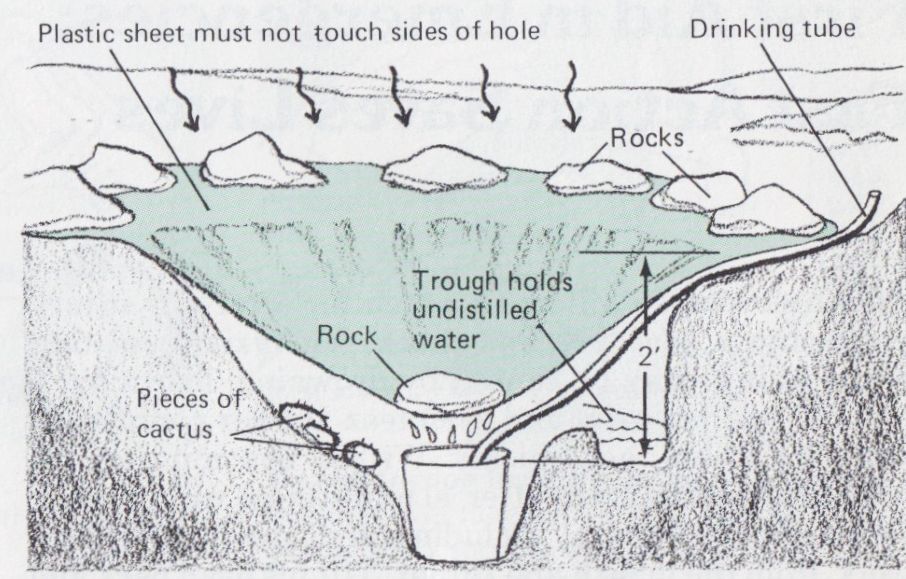
------ Solar still can extract about 1 qt. of water per
day from soil alone--up to 3 qt. if plants or polluted water are added. Dig
hole in low, sunny spot. Tape end of tube inside container. Spread 6 ft-square
sheet of clear plastic over hole, weight down edges, and seal with dirt. Put
a stone in the center so that condensing water will run down into container.
Water will begin to collect in about an hour: drink it through the tube.
Signaling for Help
Three of anything is the universal distress signal: whistles, gunshots, flares, or fires. The shrill sound of a whistle carries further than the human voice and indicates direction more clearly. It is wise to carry a whistle at all times. To call for help, give three long blasts at regular intervals. Two answering blasts mean that someone has heard you; stay where you are and repeat the signal to guide the search.
Fire is an effective signal. Lay out three tepee-style fires in the form of a triangle 50 to 100 feet across, and wait for an opportune moment to light them. A clear, still day is such a moment; throw green wood, wet leaves, or grass on the flames to make columns of smoke. At night listen for the sound of a plane, then use dry wood to make bright flames. Other ways to catch the attention of someone in a passing plane include flashing with a mirror and constructing huge signs or markers. Make signals from brightly colored strips of material, brush piles, or anything that contrasts with the surrounding terrain. If snow is on the ground, tramp trenches and line them with ashes, bark, or pieces of dark wood. The best signal mirrors are of highly polished metal, reflective on both sides, with a hole in the middle for sighting. Any reflective surface can be made to serve, including aluminum foil. Flash at any airplane, no matter how high, and occasionally flash toward different points on the horizon, even if a plane cannot be seen or heard.
International ground-to-air symbols
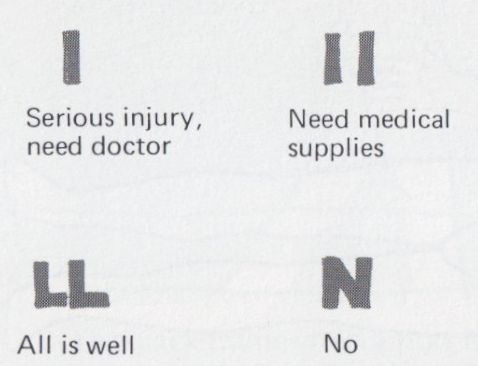

----------- Carry a copy of these symbols when venturing into the wilderness.
Make the marks at least 10 ft. across-SO ft. would be better-from material
that contrasts sharply with the ground. If brush is used, pile it high enough
to cast a shadow.
--------Using a signal mirror

Sight plane through hole in mirror. If plane is fairly near the sun, light coming through hole will fall on your face and you will see the reflection in the mirror (left). While continuing to sight on plane, adjust mirror until reflected spot seems to disappear into hole (right); at that point, mirror will flash sunlight at plane. (If plane is far from sun, move your free hand so spot falls on it, then adjust mirror.)
++++++++++++++++++++++
First Aid in Emergencies: Fast Action Saves Lives
The three sudden killers to watch for alter any injury are asphyxia, bleeding, and shock. Asphyxia-cessation of breathing-may be caused by drowning, lightning, a bad fall, sudden pain, and even fear. If your companion stops breathing, act quickly. Within five minutes his brain will be damaged; after 10 minutes he will be dead. Remove obstructions, including dentures and bridge work, from the mouth and throat. Tilt his head back and raise the back of his neck with one hand to open the air passage. (If you suspect a neck injury, simply pull the lower jaw forward.) If this alone does not restore breathing, administer mouth-to-mouth resuscitation.
The only way to stop bleeding is to cut off the flow of blood in the severed vessel until clotting happens. Direct pressure on the wound is usually enough. Elevate the wound if possible to reduce blood pressure; then apply sterile pads or the cleanest cloth you have, and press hard for about five minutes. If severe bleeding persists, pack the wound with sterile gauze and wrap it tightly with a bandage. (Sanitary napkins make good packing.) If arterial bleeding continues despite direct pressure, the next step is to apply force at a pressure point (see below). A tourniquet is a last resort, since it will probably lead to gangrene and then to amputation. To make a tourniquet, wrap a broad cloth around the affected limb above the wound. Use a short stick to wind the tourniquet only tight enough to stop bleeding. Tie or tape the stick in place. Do not loosen the tourniquet; to do so is to risk sending a blood clot into the victim's heart or lungs.
Shock often follows an injury. Its symptoms, caused by constricted blood vessels and reduced flow of blood to the brain, include pale and clammy skin, cold sweat, trembling, thirst, dizziness, disorientation, and some times unconsciousness. The best treatment is prevention. After any injury to yourself or others assume that shock will ensue and treat it as described below until you are certain that the danger has passed.
Treating Common Injuries and Illness
Altitude sickness. At higher elevations the blood carries less oxygen. Your body requires several days to adjust to this deprivation. Drowsiness and yawning are common, but sleep may be sporadic. You may suffer headaches, nausea, shortness of breath, and flulike aches. Forgetfulness, anxiety, and hallucinations may occur, and physical coordination may suffer. To push on despite these symptoms is to risk serious damage, including pulmonary edema and retinal hemorrhage. The treatment is gradual acclimatization: avoid exertion, drink extra fluid, eat a light diet of carbohydrates, and do not use any drug except aspirin.
Blisters. Do not open a blister. Wash the area and cover the blister with moleskin, tape, or a donut-shaped piece of felt. Treat a broken blister as an abrasion.
Burns. To stop and perhaps reverse tissue damage, quickly immerse burn in cold water until the sensation of heat has passed. For first-degree burns (red skin) or second degree (blisters), keep the skin cool and wet until it stiffens; then lubricate with petroleum jelly or anti septic cream. Clean third-degree burns (cooked flesh) gently, using boiled water that has been allowed to cool, soft soap, and sterile cotton. Cover lightly with gauze. Drink liquids and increase salt intake.
Cuts and abrasions. Infection is a danger when any break in the skin occurs. Wash the wound with soap and clean water and cover with a sterile dressing until a protective scab forms. To avoid destroying healthy tissue, use only the mildest antiseptic, such as highly diluted hydrogen peroxide, in open wounds; apply stronger antiseptic, such as iodine, to surrounding skin. Close a large gash with a butterfly closure or adhesive bandage. Cover abrasions with a single sheet of gauze impregnated with petroleum jelly or antiseptic cream, then bandage with several layers of sterile gauze.
Heat exhaustion. Exertion in hot weather may cause the tiny blood vessels in the skin to dilate to the point that the brain's blood supply is diminished. The result is dizziness, nausea, rapid heartbeat, and sometimes fainting. The skin feels cool to the touch; there may be cold sweat. Treatment involves resting in the shade, drinking nonalcoholic fluids, and increasing salt intake.
Heat or sun stroke. It is possible for the sweat glands to exhaust themselves. When this happens, body heat builds up quickly to 104°F or more. The victim may collapse or become delirious; his skin will be hot to the touch. Without quick action brain damage is imminent. Immerse the entire body in tepid (not cold) water, or cover the body with soaking cloth and fan the victim to promote evaporation. Massage the hands and feet at the same time to encourage circulation of cooled blood.

----------Mouth-to-mouth technique can help asphyxia victim.
Thrust the jaw forward and pinch the nose. Take a deep breath and exhale into
victim's mouth until his chest rises Repeat at 12 to 14 breaths per minute
until the victim can breathe on his own,
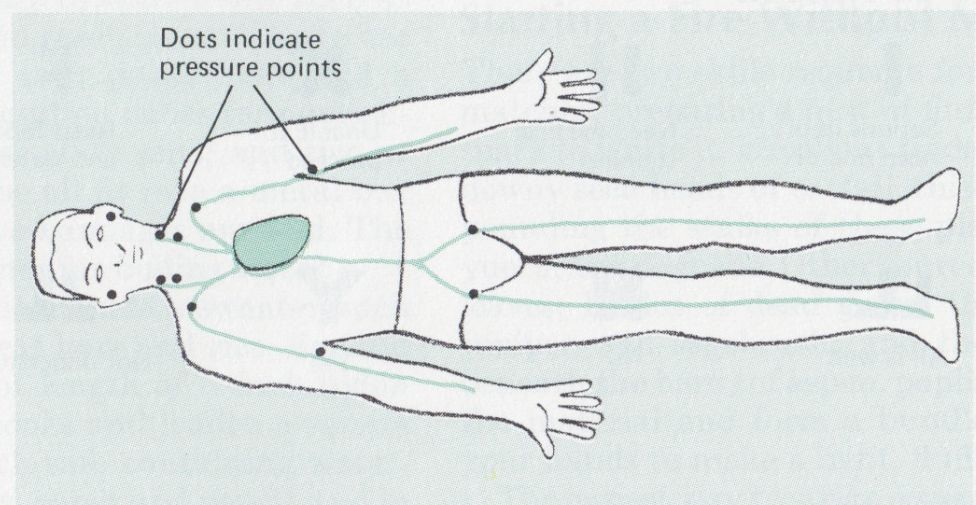
------------Pressure points are spots where an artery passes
close to the skin and can easily be squeezed shut. If arterial bleeding (recognizable
because it squirts in rhythm with the heartbeat) is not stopped by direct pressure,
locate the nearest pressure point between the wound and the heart and push
the artery shut until clotting takes place.
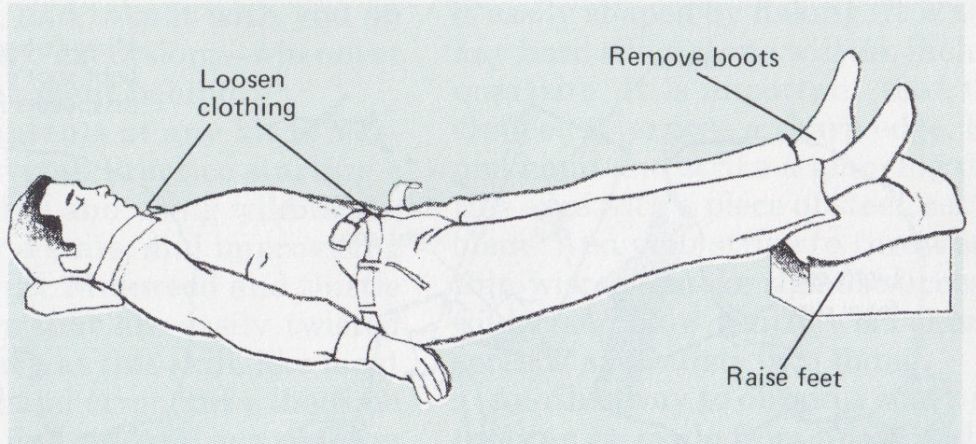
---------- Treat for shock after any injury, particularly
if burns, fractures, or loss of blood are involved. Lay the victim on his ha
k, his feet higher than his head (unless there is a head injury). Remove hoots
and loosen all constrictive clothing Keep the victim warm with blankets, sleeping
bag, or your own body. Give plenty of warm, salty fluids.
============
Checklist for a first aid kit
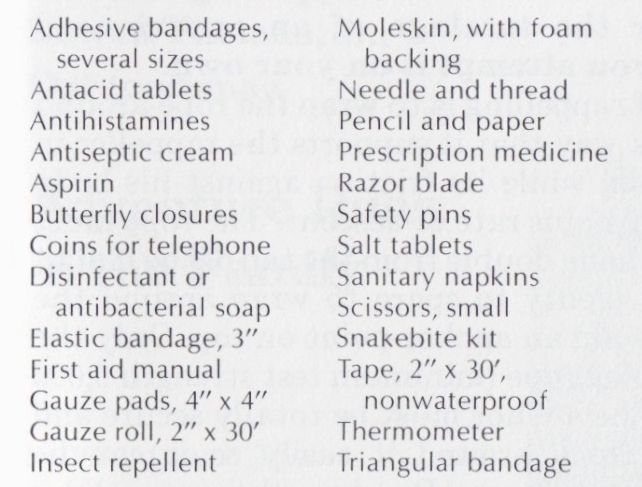
Adhesive bandages, several sizes; Antacid tablets; Antihistamines; Antiseptic cream; Asprin; Butterfly closures; Coins for telephone; Disinfectant or anti bacterial soap; Elastic bandage, 3"; First aid manual; Gauze pads 4" x 4"; Gauze roll 2" x 10'; Insect repelent; Moleskin, with foam backing; Needle and thread; Pencil and paper; Prescription medicine; Razor blade; Safety pins; Salt tablets; Sanitary napkins; Scissor, small; Snakebite kit; Tape, 2" x 30', non-waterproof; Thermometer; triangular bandage.
============
Choking
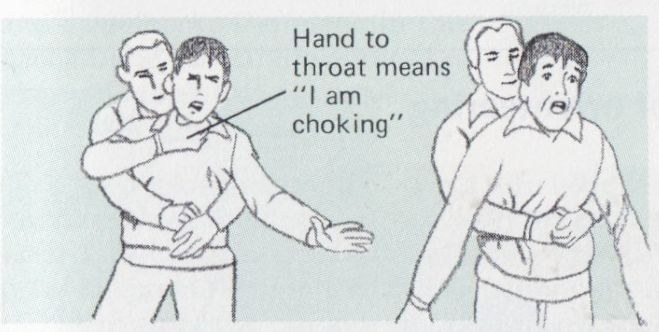
--------If a piece of food lodges in someone's throat, the victim may be unable to speak or even to cough. Do not pound his back. Grab him from behind with both arms, make a list and use tour other hand to pull your fist sharply upward into the victim's diaphragm, just below the breast bone, to torte the food out of the throat.
Treating fractures and sprains
Fractures and sprains both cause swelling, discoloration, arid pain. When the symptoms occur in a joint, it may be difficult to tell which injury is the cause. If in doubt, treat the problem as a fracture. Do not attempt to set a broken bone; its jagged ends can do great dam age to soft tissue. Instead, immobilize the fracture with a splint or by binding it to the body. A broken leg can be lashed to the other leg. If the lagged end of a broken bone protrudes through the skin, do not try to push it in--stop the bleeding, dress the wound, treat for shock, and immobilize the fracture just as it is. A sprain is a torn tendon; it is painful but not as liable to further damage as a fracture is Use cold water or ice to reduce swelling for the lust day or two; then wrap tightly and keep warm.
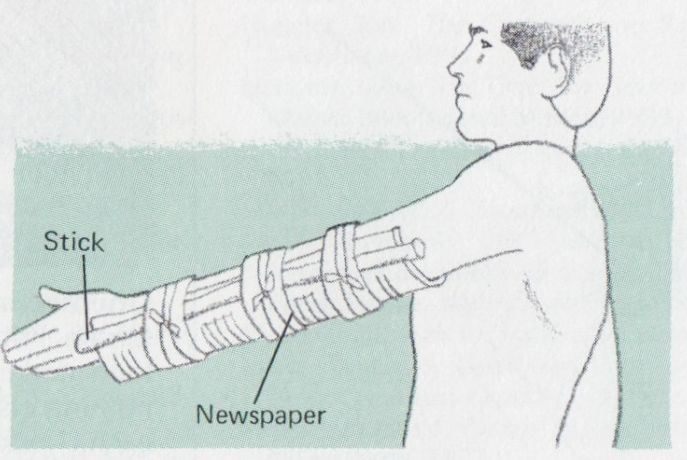
----------Use splints to immobilize fractured arm or leg;
include the joints below and above the break. Improvise splints from wood or
any rigid material, or use rolled-up blankets or newspapers.
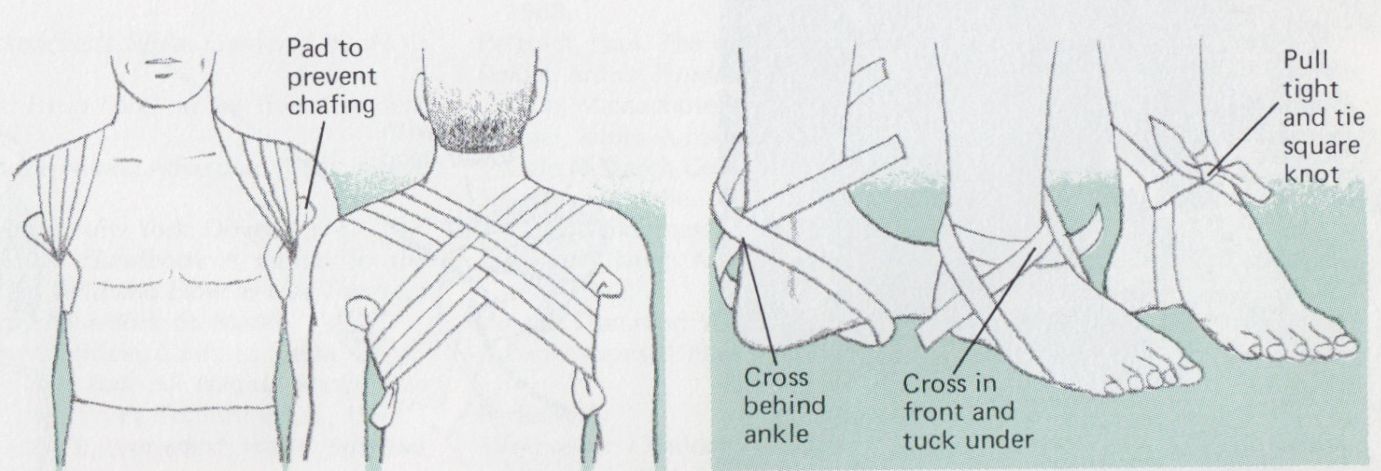
---------Figure-eight splint supports shoulders to immobilize
a broken collarbone. Pass ripe or bandage around the shoulder, across the back,
then around the other shoulder.
-----------Sprained ankle can be walked on insofar as pain permits. Immobilize the joint b looping bandana or rope around heel, crossing the ends in front, and pulling the loop tight.
In case of snakebite
If bitten by a poisonous snake, try to stay calm and motionless-activity and panic increase the rate at which the venom spreads. Tie a narrow constriction band around the limb 6 in. or so above the bite; snake venom spreads through the lymph system just beneath the skin, so the band need not be so tight as to cut off blood circulation. With a sharp, sterile blade make a straight incision about 1/4 in. deep across both fang marks. Apply suction to these incisions for about one hour. Use suction cups if possible, since using your mouth risks infecting the wound. There is also the chance that venom may enter your system via cold sores, chapped lips, or a bad tooth. Get the victim to a medical facility as soon as possible.
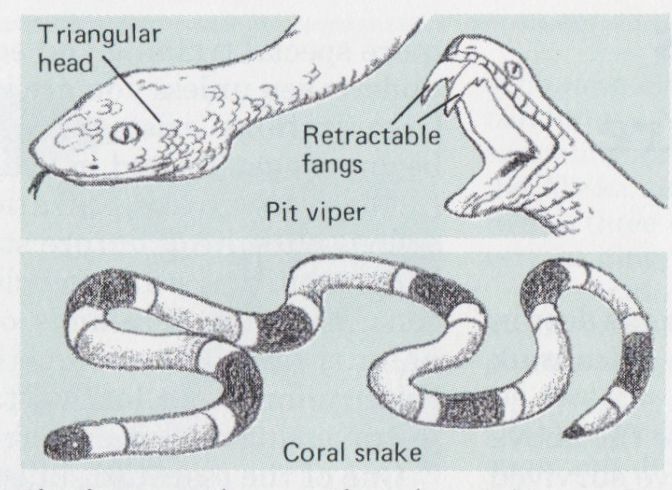
-----------Pit vipers, such as rattlesnakes, inject venom through retractable tangs Coral snakes chew with tiny needle sharp teeth.
--------- Tie constriction band above the bite, and make incisions over fang marks or across bite of coral snake. Apply suction for one hour.
Transporting an injured person
Move a seriously injured person only if absolutely necessary and then only alter breathing is stable, bleeding is under control, shock is past, wounds have been treated, and fractures have been immobilized. It is generally best to leave the victim where he is. Make him as comfortable as possible and signal for medical aid or evaluation. If you must evacuate the victim yourself, do so with extreme care. Stretcher-type litters improvised from two poles and a blanket or sleeping bag are only satisfactory if strong stiffeners, such as pack frames, are lashed between the poles to make a firm base Pad the base and place the victim on it; lash him down to prevent him from being jostled. Use padding such as rolled-up clothing, to cushion and immobilize his head.
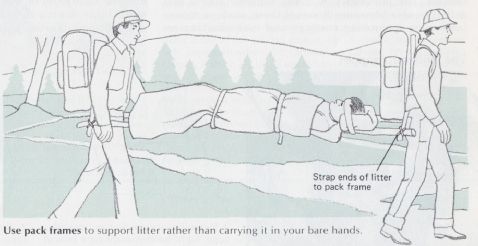
-----------Use pack frames to support litter rather than carrying it in your bare hands.
++++++++++++++
Sports and Activities For Outdoor Adventure
"In these days there are quite as many hunters as deer in the woods."
-Nessmuk
Between 1867 (18 years before Nessmuk wrote the above words) and 1946, 57 people are known to have survived the run down the raging Colorado River Rapids. In the decade between 1970 and 1980 the number was about 150,000. As the wilderness becomes more and more accessible, the popularity of many outdoor sports and activities also blossoms. Some of these, such as mountaineering, spelunking (caving), and rock climbing require special training and equipment and should not be undertaken unless you are in superb physical condition. Organizations exist throughout the country to help beginners get started in these sports.
There are also organizations devoted to the less hazardous pursuits of nature study and conservation. They range from bird watching clubs to volunteer labor corps that maintain thousands of miles of hiking trails. Finally, there are the competitive outdoor sports such as ridge running-for long-distance runners who specialize in traversing mountain terrain-and orienteering.
One of the essential skills of rock climbers and mountaineers is rappelling-the technique of descending a cliff or steep slope by sliding down a rope. The skill can be of equal value to a backpacker. A hiker with a good rope and the knowledge of how to use it will often find the direct route down a cliff to be fasten easier, and a great deal more exhilarating than spending hours in the bush finding a way around.
Caution: Rappelling must be mastered under the tutelage of an experienced climber before you attempt it on your own.
The principle of rappelling is to wrap the rope around the body in such a way that it supports the rappeller in an upright position, while its friction against his body allows him to control his rate of descent. The rope must be long enough to hang double from the top of the cliff to the bottom, with plenty to spare to wrap around the body and loop around an anchor point on top. Only the best-quality climbing rope (minimum test strength 5,000 pounds) is used. The anchor must be totally secure and the rope should track around it easily so it can In retrieved from the bottom. Because the rope slides through the rappeller's hands and around his body as l descends, gloves and padding are important--it is not for nothing that the popular Dulfersitz technique is also known as the "hot-seat rappel."
The Dülfersitz rappel
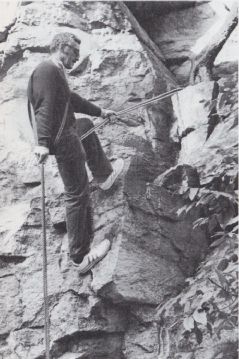
----------Lower hand supports weight, releasing rope a little at a time Upper hand holds the rope loosely, serving only br balance.
-------
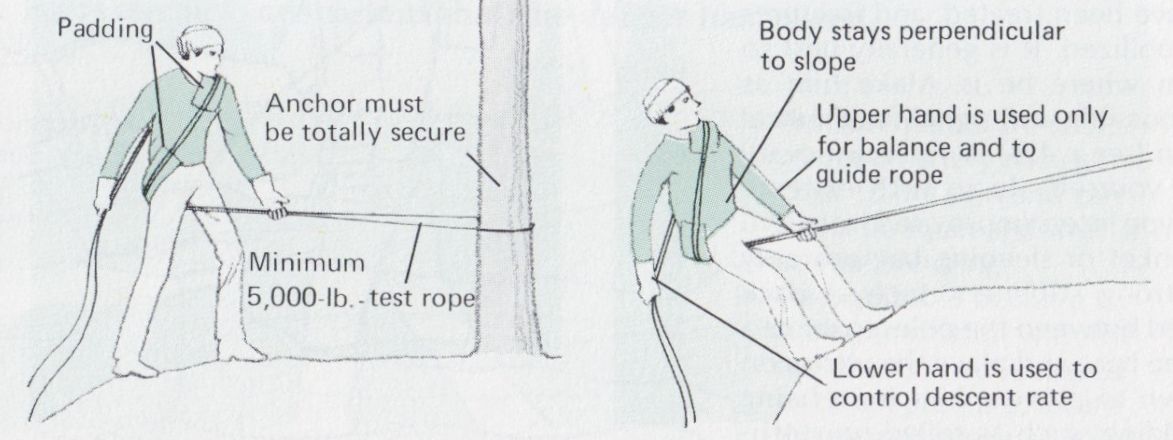
-------- 1. Rappeller faces anchor and straddles rope. Right-hander wraps rope around right hip and over left shoulder.
-------- 2. Rappeller leans backward against rope, gripping with lower, stronger hand as he steps back over the edge.
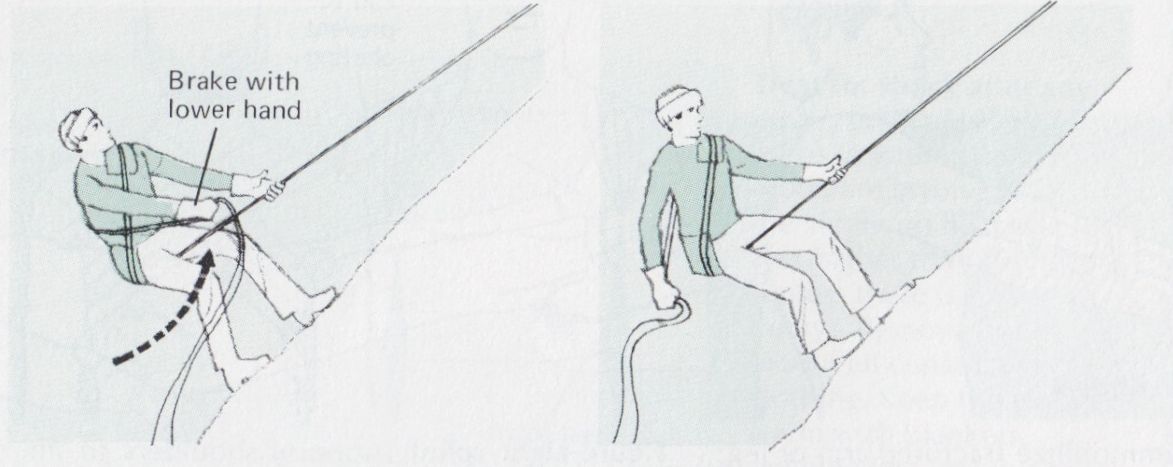
------ 3. To slow descent, rope is brought up across the surface of the hack; at the same time lower hand squeezes rope.
------ 4. To speed des cot, rope is moved outward and behind with lower hand, reducing friction against hack.
The sport of Orienteering
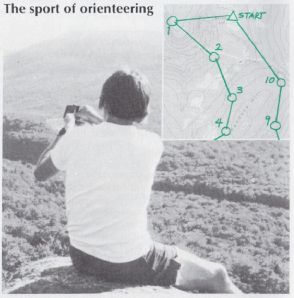
--------- Orienteering is like a cross-country race through unfamiliar terrain. Prior to a meet, checkpoints are set up along a route, then marked on topographic maps. Armed with the maps and nothing else except compasses, the contestants must reach each checkpoint in sequence and return to the start. Orienteering is more than a test of speed and stamina. In rugged country the shortest distance between two points is seldom a straight line; so map reading, direction finding, and woodsmanship are the true keys to excellence in the sport.
++++++++++++++
Lowell Thomas, Jr., Outdoorsman
Adventure Runs In the Family
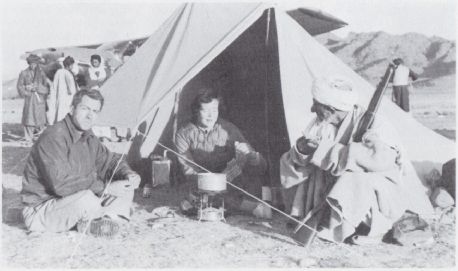
--------In 1954, Lowell Thomas, Jr., and his wife, Tay, lived and traveled with a nomadic tribe during the tribe's autumn migration from the mountains of Afghanistan to Pakistan's Indus River Valley, covering 1010 15 miles per day on foot and camelback. The plane in the background carried the photographer who took this picture.
"I've been hiking ever since I was a wee little fellow. I remember my dad taking me out camping with my own sleeping bag and what a thrill that was but I don't think there was any particular parental pressure, even with my father's reputation as an explorer, to enjoy the outdoors just because it was expected of me. Of course, exploring has given me some really exciting moments.
In the summer of 1949, my dad and I made what still has to be the most exciting trip of my life-an expedition across the Himalayas to visit the Dalai Lama in Tibet. It took so long to get there, over the mountains on little ponies, that it was really like arriving on another planet. I've also spent a good bit of time in Arctic exploration, on ice floes, and even living in ice houses. My wife and I have also spent some lime living with pygmies in African rain forests. Now I do a fair amount of what we call ski mountaineering. I usually fly my own plane and we land on a glacier in the Alaska range. Then we get onto our skis, and we're off for two or three clays. We pitch our tents right in the snow and it's very exciting, but it does take quite a hit of preparation.
"Preparation is really the most important thing for newcomers to the wilderness To start off with, you ought to be in good physical shape, and then you should have the right gear, including footgear that protects the ankle. You also need the right clothing, medic inc. and food, If you are really leaving the beaten track, you should leave information on where you're going and when you'll be back, 1 like a pilot's flight plan.
"Hordes of people pose a great threat to the wilderness. Up here in Alaska I people cut down trees for firewood and use motorized equipment to tear up the tundra. But people don't have because destruction. They can ski or snowshoe into the Woods or just walk in good weather. And it's important to respect the wildlife-not to frighten animals or shoot at them, particularly in the calving season. Up in Alaska, that is particularly important when the caribou are calving. It's a good idea though, if there are bears around, to make a little noise to let t he animals know you're coming, whistle or rattle some branches every once in a while. The one thing you never want to do is sneak up on a bear. A friend of mine was once going along very quietly and he stepped on a sleeping bear. Well, the bear rose up, but then he turned and ran. Believe me, if he had heard the man coming, the bear would have been long gone before the man got there. It's always a good idea to let a bear know you're in the neighborhood."
+++++++++++++++++++++++++
Sources and resources
Books:

===