Earth's Private Star Holds Bright Promise for Abundant Energy
If you ever stepped barefoot on a sun-baked rock on a July afternoon, you know what solar energy is all about. Heat generated by the sun would melt a sphere of ice the size of the earth in 16.6 minutes. While only a small portion of that energy is intercepted by the earth, there is still enough to provide 646,000 horsepower for every square mile of its surface.
People have been trying to capture and use this enormous reservoir of free solar power since the dawn of history. The Greeks designed their houses around central sun-gathering courtyards 3,000 years ago. In pre Columbian America, Indians of the Southwest carefully oriented their cliff pueblos to trap the warmth of the winter sun. During colonial times prudent homeowners built their homes with stove-warmed kitchens on the north side so that living areas would have sunny south walls. Thomas Jefferson, in designing Monticello, was keenly aware of the sun's potential for providing heat and used special windows to help trap its warmth.
Some of our most modern solar technology has its roots in the past. Functional solar systems were producing domestic hot water in 30 percent of the homes in Pasadena, California, before 1900, and by 1940 Miami had 60,000 of them. A flat-plate solar collector array built in 1907 used a sheet-iron absorber plate topped by glass. By 1914 solar collectors using copper tubes soldered to copper sheets were heating homes in California.
Today, solar systems for home heating are working almost everywhere in the country, not only in the Sun Belt but in the North too. Wherever local codes permit, you can save money and fuel with a do-it-yourself solar installation.
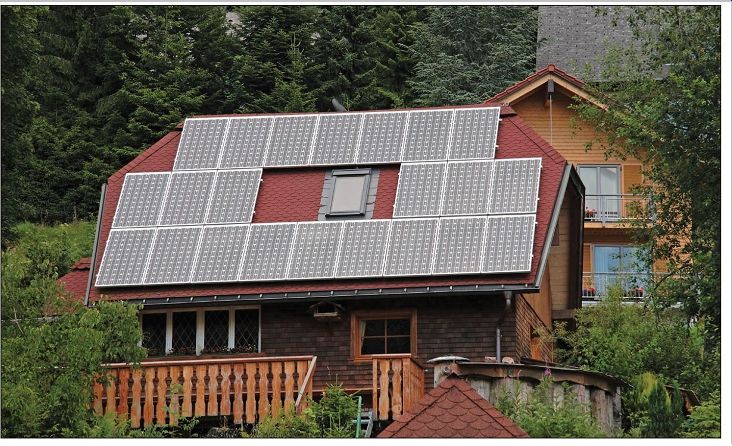
------- Solar collectors are becoming more and more common as their
prices go down and oil prices go up.
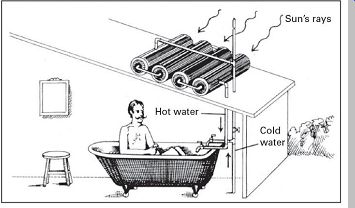
----- Climax solar collector, patented in 1891, consisted of a series
of black tanks in a glazed box. Sun-heated water moved through tanks by convection
for use in bath or kitchen below.
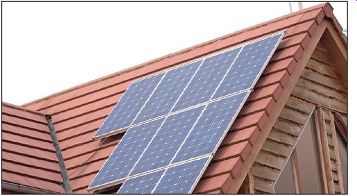
---- Solar panels on this south-facing roof and large window s on the east
side allow the sun to warm the house during the day and provide consistent
power. Costs for solar electric cells like these have dropped dramatically
the last few decades and continue to become more affordable.
Where Solar Stands Today
The energy crisis of the 1970s spawned a kaleidoscope of dreams and schemes in solar home design. Some are solidly practical, some are innovative and radical, and a few resemble Rube Goldberg contraptions.
Among the most simple contrivances is a hot water system for a beach house. Tap water is run through 100 feet of black plastic hose coiled on the roof. The sun warmed water feeds into an attic tank that is tapped as needed for showers or dishwashing. Almost as simple is a supplementary heating system that is not much more than a box sloping from the ground to the bottom of a south-facing first floor window. A black-painted divider of foam insulation suspended down the box's center permits cool air from the house to slip down the channel beneath the foam panel and up its sun-warmed topside.
At the other end of the technological scale are houses with towering glass walls and ingenious devices for trapping and storing the sun's heat. One New Hampshire home has two-story double-glazed plastic panels covering a black foot-thick concrete wall. During the day sun pouring through the panels heats the concrete. Ports at floor and ceiling allow cool interior air to circulate by convection up the wall and then reenter the building at the top after being warmed. At night and on cloudy days bushels of tiny plastic beads are blown into the space between the double glazing to prevent escape of stored heat. Come morning, the beads are sucked out by a vacuum pump to canisters in the garage until needed again. Another unique solar home in New Mexico has south-facing walls of water-filled drums stacked in racks like wine bottles. Ends facing outward are black to soak up sun and warm the water. At night windowless walls of insulating material hinge upward to seal in the heat.
Many technological improvements are on the way, including vacuum insulated collectors and cells that can convert sunlight into electricity. Engineers in New Mexico have built a "power tower," topped by a boiler located at the focus of almost 2,000 mirrors, which has produced temperatures of 3000°F.
Will It Work in Your Home?
Solar water heaters have long been competitive with electricity, fuel oil, and natural gas in many parts of the country. Solar space heat is usually competitive wherever there is moderate to high solar radiation (see map). Even in low radiation locales, solar home heating can be a big money saver if fuel and utility costs are high.
Most successful systems take over part, not all, of the heating load. Such systems are cheaper to build and will usually pay for themselves sooner than those that rely exclusively on the sun.
For solar heating to be effective a house must have a large surface-typically a roof-facing within 10 degrees of true south. The building should also be well insulated (10 or more inches of high quality insulation in the attic and six inches in the walls for northern parts of the nation). Heating ducts or pipes should be wrapped with insulation. Storm doors and storm windows are important. All outside joints should be caulked and fireplace dampers snugly fitted and closed when not in use.
As a rule of thumb, solar heating makes good economic sense if it amortizes, or pays for itself, within 10 years. In other words, your 10-year savings in home fuel consumption should equal or exceed the cost of installing a solar system. Generally speaking, solar heating will provide the biggest savings in homes with high fuel bills: if your fuel bills run more than $3,000 a year, a $15,000 solar system can be amortized in 10 years by cutting fuel consumption in half; but if you only spend $500 to heat your home, it is doubtful that solar heating will pay. Another consideration is the relative cost-effectiveness of a switch to solar versus a simple modernization of your present heating system. For example, you can often save more money by installing a fuel-efficient oil burner in place of an old one than you can by going solar.
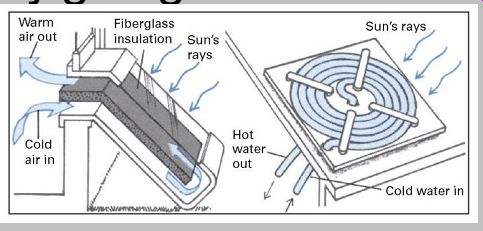
----------- Window box collector (left) and simple hose water heater.
Solar radiation in the United States
-----------
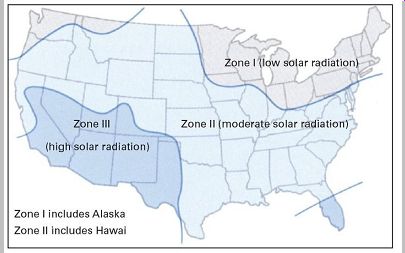
United States is divided into three main radiation areas.
The chart on this page can help you determine if solar energy is for you. However, a complete analysis of heating loads, site location, fuel consumption, house size, thermal efficiency, government tax incentives, and other variables is needed to make a precise appraisal. Information needed to determine the size, cost, and amortization time of a home hot water system may be available from your state energy office or public utility.
===========
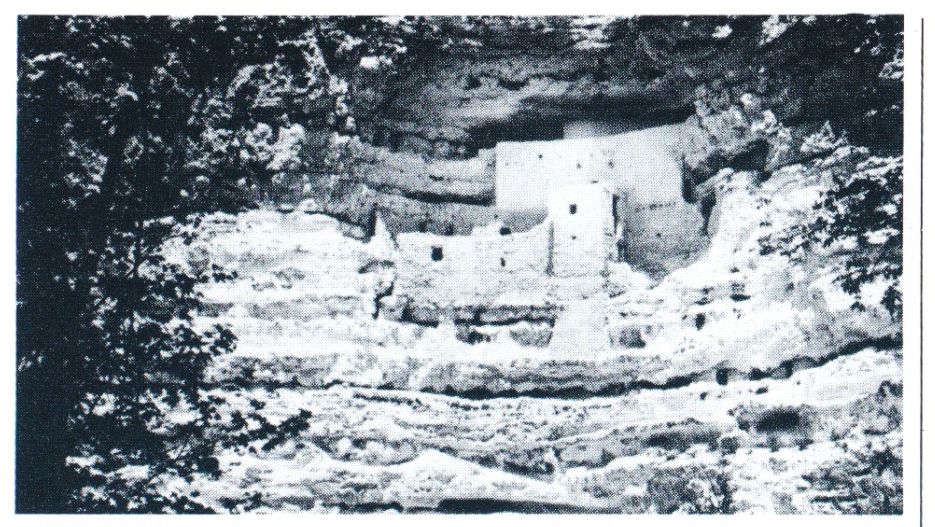
----- Montezuma’s Castle
---------Climax solar collector, patented in 1891,
-----Homan house
Solar heating cost compared with conventional fuels
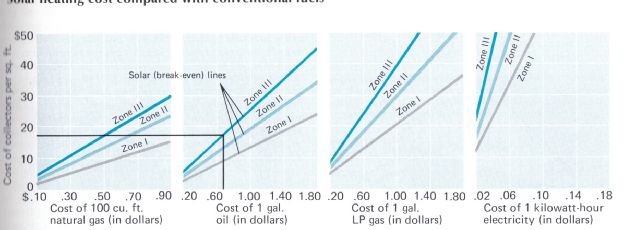
------- To use these charts, first find the one or responding to your hone
Heating lni'l (natural gas, oil, LP gas, des tric it Inn draw a vertical line
representing i unit cost of sour fuel. If you do not know tho unit cost, C
he k your old fuel lulls or call the tuel 5 ornpany. Next, draw a horizontal
line through the point at vs lot h the s ertical line meets the solar Inn'
tor your area (see map tor the area in stantially cheaper than the break esen
figure In the example (shovsn by hlac k lines) fuel oil is 70 cents a gallon
and the system is to he instal le in Arizona (an area with ver high solar radiation);
the break-even figure is 519 per sq ft A similar approximation can be obtained
for solar hot vs ater systems by simply mult p sing the break even figure,
oh tai nec I hs the a hove met Ii od, by 1.5.
vs his h you lis e). The pstint where I hs' horizontal line intersects ths' ertical scale tells you how much an as tis e solar heating system should cost if the system is to break esen. System cost is given in c per square toot of collector area, since the size of your solar collector will c Itq sent] In our heating riced s. A syst cot lite of 15 ears is assumed. Solar heating will be cc csticsmisal for you if it is sub-
============
Passive Systems: The Soft Side of Solar Heating
There are two basic types of solar heating systems: active and passive. Active systems use liquid or air to absorb and transfer the heat to its destination. They require pumps and piping or fans and ducts to do the job but are relatively easy to install in existing buildings as well as new ones. An active system is the type most often used when an older home is being remodeled and upgraded with energy saving features.
Passive solar systems, sometimes referred to as the soft approach because they require little in the way of hardware, let nature do most of the work. They do not need pumps, blowers, or plumbing and usually have no leakage or winter freeze-up problems. They use large, heat-absorbing masses, such as concrete walls and water-filled drums, to trap solar heat as it passes through south-facing windows.
Heat transfer can be by natural radiation or convection, or warmed air can be channeled to where it is needed with the help of vanes, dampers, and blowers. Because a passive system is a basic element of the house, it works best when planned as part of a new construction. However, there are many features of passive systems that can be incorporated to advantage in any house. Large glass areas on a south wall (shaded by arbors in the summer) can cut heating bills substantially in locations with moderate solar radiation. A simple greenhouse (see image on following page) can be an effective solar supplement to the home-heating system.
Another passive heat collector is the thermosiphon air panel. Heat absorbed by a black metal sheet under insulated glass vents through a duct at the top. Cool room air enters the panel through a bottom duct.
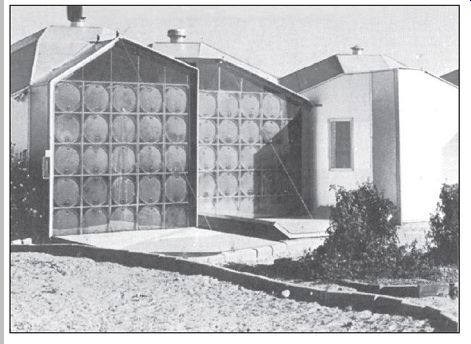
----- Water-filled oil drums and large pulley-operated shutters of lightweight insulating material form south wall of solar pioneer Steve Baer's house in Corrales, New Mexico.
Instead of a Furnace Try a Greenhouse
Greenhouses are among the oldest and most familiar solar heating devices, but because they warm vegetables and flowers rather than men and women, most people do not think of them as replacements for a conventional home heating device. However, what warms a plant can also warm a house, and lean-to greenhouses are being used more and more as passive solar collectors in homes with unobstructed south walls. In a typical design, such as the one shown at right, the original frame wall has been replaced by a cinder block collector wall, painted black to improve heat absorption.
The greenhouse, made with double-glazed panels of transparent plastic, is butted directly against the wall. Vents cut through the cinder blocks allow the circulation of heated air. The vents have dampers, but under most conditions the dampers are left open: the small amount of heat that escapes from the main house on cloudy days or at night helps to keep the greenhouse-and the plants growing in it--at the proper temperature. During an excessively warm day the vents would be closed and the greenhouse itself shielded from the sun.
Trapping and Storing the Sun
The simplest passive systems use double transparent glazing to admit sunlight, wall and floor masses to soak it up, and some sort of drapery or shutter arrangement to prevent the trapped heat from escaping through the glass at night or on cloudy days. Temperatures produced by such systems are relatively low, but heat builds up significantly in good storage materials, such as concrete, adobe, and ceramics, which release it slowly to the building's interior during nights and sunless days.
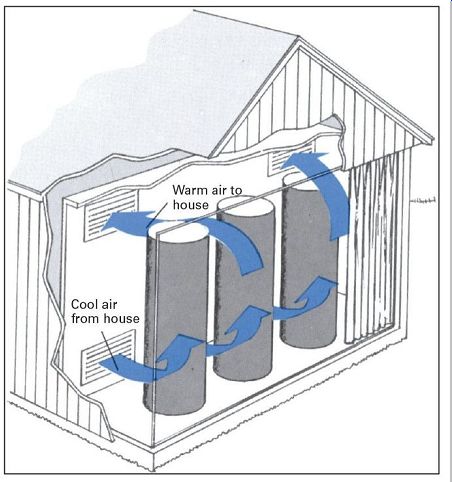
-------- Black plastic columns filled with water collect and store heat.
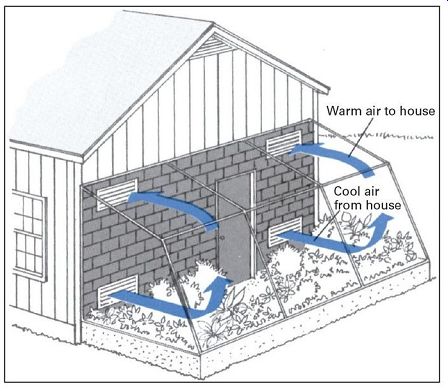
-------- Greenhouse plus cinder block wall makes a collector and garden.
In more sophisticated passive systems the sun does not penetrate the deep interior of a building but is intercepted by a heat collecting-absorbing structure located behind large double-glazed window panels and backed up inside by an interior partition. Vents at top and bottom of the partition allow natural convection of house air to pick up the stored heat from the collector and move it to the living area.
In the system shown below, low-powered fans blow cooled house air through a bank of water-filled black plastic columns that serve as the solar collectors. At night sliding foam panels are moved between the columns and the windows to prevent stored heat from escaping.
Making the System Fit the Environment
A passive solar heating system must be carefully tailored to local conditions so that the best use is made of available sunlight. The key element in any passive system is the collector wall. The generally accepted rule is that the wall should face directly south, although some experts recommend angling it slightly to the east to catch more sun in the early morning when outside temperatures are lowest.
The ideal collector should be aligned so that the rays of the sun strike it perpendicularly. At 40°N, which is roughly the latitude of New York, Philadelphia, Indianapolis, Chicago, Kansas City, Des Moines, Denver, and Salt Lake City, a solar wall sloping at an angle of 60 degrees to the horizontal comes close to the ideal. Farther north, the ideal angle is greater; farther south, it is smaller. Nevertheless, considerations involving snow accumulation, summer shading, high initial cost, and structural integrity generally lead solar architects to specify vertical walls despite the loss of about 10 percent in efficiency.
Collector walls are almost always sheathed in double layered glass with an insulating airspace between the layers. This type of glass provides the best combination of transparency to sunlight plus the ability to insulate against the loss of house heat. Reflecting glass and heat-absorbing glass both provide relief from overheating in the summer but only at the cost of reduced heating ability in the winter.
Intelligent landscaping and carefully designed top and side shading surfaces solve the problem even more efficiently and effectively. Proper planting can moderate summer and winter temperatures by as much as 20°F. A curving row of evergreens bracketing the north and northeast quadrants of a building will serve as a windbreak against winter gales.
Tall deciduous shade trees with high canopies placed on the south and southwest sides of the house will form a parasol against searing afternoon sun in summer. During winter, when the leaves have fallen, the rays of the sun can penetrate to bathe the south wall.
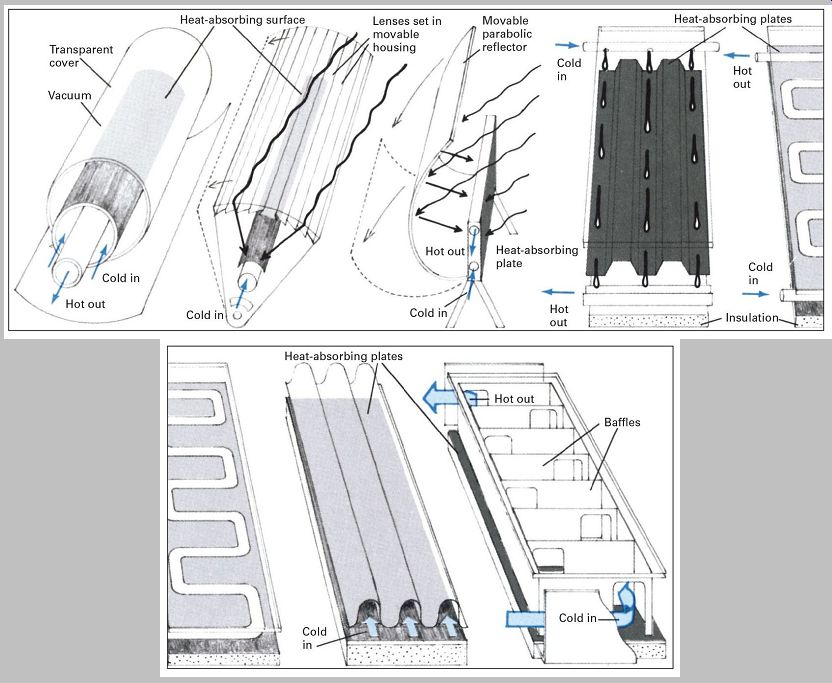
------------ Vacuum collector is like a thermos bottle. Fluid-carrying pipes are surrounded by an evacuated insulating cylinder. Collectors can be placed on roof or against south wall.
Focusing collector is a trough, capped by lenses that bend the sun's rays so they concentrate on a water carrying pipe along the trough's bottom. Unit swivels to track the sun.
Reflector-type solar collector has a curved mirrored surface that concentrates solar rays onto an absorber plate. The plate contains pipes that enclose liquid for heat transfer.
Trickle-type flat-plate collectors have channeled or corrugated absorber plates. Water is heated as it trickles from a pipe over the absorber to a trough at the bottom.
Another flat design uses water flowing through pipes either welded to the absorber plate or extruded as an integral part of it. As in other collectors, insulation forms the bottom.
Air is the medium of heat transfer in this flat-plate collector. Cool house air entering at the bottom warms as it passes through channels above a panel of black foam plastic.
Air transfer design of a different type warms cool house air by feeding it through a maze of baffled passages, such baffled air systems can be driven either by a blower or by convection.
Reverse Flow: Controlling It and Putting It to Use
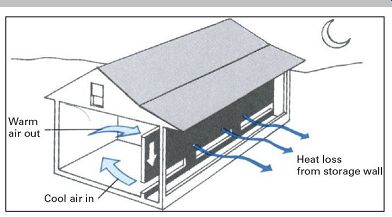
----------- Storage walls of passive systems are often subject to an annoying
reverse flow that causes cool night air to spill into the house through the
floor vent while warm house air circulates out the top vent, radiating its
heat to the outside.
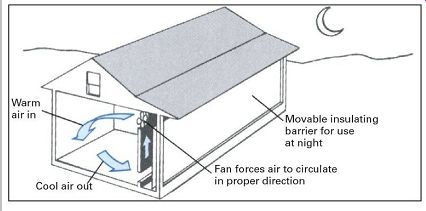
------- Most common way to prevent reverse flow is to install a fan in the top vent that blow s air into the house, thus maintaining positive flow.
Insulating curtains or shutters behind double paned window s further cut down on heat loss.
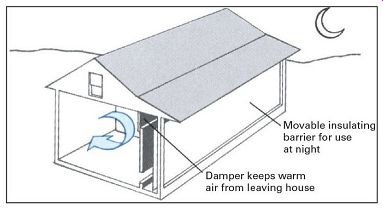
--------- Reverse flow can also be controlled with a damper over the top
vent. The damper is closed at night to prevent any circulation from behind
the solar wall. This system is not as effective as a fan, since less heat is
picked up from the storage wall.
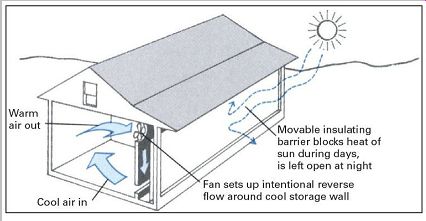
------- Where summer nights are cool, a passive system can double as an
air conditioner. The collectors are exposed at night so they can cool off.
During the day a deliberate reverse flow is set up that pulls house air over
the cool collectors.
In addition to the collector wall, the shape and design of the house are significant factors in passive solar heating.
Not surprisingly, it has been found that a house that is elongated in the east-west direction is best for collecting solar energy, since this shape permits maximum exposure to the sun's radiation from the south. An intelligent choice of roofing and siding materials will also contribute to heating efficiency. The roof and outside walls, like the collector wall, should absorb the sun's radiation easily but reradiate little of the thermal energy from the home. Galvanized steel, black roofing material, and siding finished with flat black paint are among the most effective surfacing materials.
Shading the Solar Window
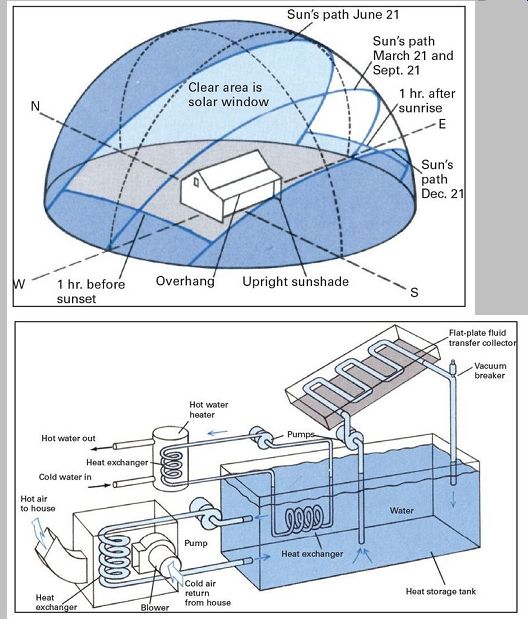
----------- Water is the medium of heat exchange and storage in this active
solar heating system. An automatic drain-down device removes water from collectors
when there is danger of freeze-up. Another type of system circulates antifreeze
solution instead of water through collectors.
--------- Concept of a "solar window" is important when designing shading for a collector wall. The window is shown at right on an imaginary dome around a house.
Outlines of the window are the sun's path on December 21 and June 21, the winter and summer solstice respectively.
As illustrated above, the roof overhang should block the midsummer sun but let the low slanting rays of the winter sun through. Upright sunshades contribute additional shading in early morning and late afternoon. During winter the solar window should be free from obstructions from one hour after sunrise to one hour before sunset.

----------- Air-type system eliminates problems of freeze-up. Key to system
is the central air control unit. It contains a blower and dampers that enable
it to direct air flow through collectors, storage reservoir, or hot water heater
according to heating needs and sun conditions.
Active Solar Movers: Complex but Convenient
Active solar heating is an indirect process. Radiation from the sun warms an intermediate medium (either liquid or air) rather than heating the house directly. The medium is then piped into the house where its heat is extracted by heat exchangers. Excess heat is generally stored in a water- or rock-filled reservoir from which the house system draws as needed. Active solar systems are almost always paired with a conventional system that switches on automatically to tide the house through spells of cold, overcast weather.
Typically, a forced hot air system is used as the backup.
The operating temperature of a typical active system is in the 120°F to 160°F range-twice as high as most passive systems. As a result, active systems can easily be put to use to produce hot water. They are also preferred by many engineers for space heating because they perform better than passive systems in areas with low to moderate solar radiation. Their adaptability to existing homes and compatibility with forced air heating systems are added advantages. On the debit side are their relative complexity and high initial cost, medium, the heat storage facility, a circulating pump, flow controls, and heat exchangers.
Storage of sun-warmed water to supply heat at night and on sunless days requires a tank big enough to hold at least 1 1/2 gallons for each square foot of collector area plus an additional 2 percent allowance for expansion when the water heats up. The tank can be located in the basement, the garage, or behind a fence in the backyard. It can be aboveground or buried. It must, however, be well insulated against heat loss. If the system is to be used for domestic hot water heating only, an insulated 80-gallon tank will do the job for a family of four or five.
The Collectors Are the Key
The prime components of any active system are the collectors. These are the devices that trap the sun's heat and carry it into the building in a stream of moving air or water. There are three basic types of collectors: vacuum, focusing, and flat plate.
Vacuum collectors consist of three concentric tubes. The two inner tubes carry the transfer liquid. A vacuum between them and a transparent outer tube insulates the fluid against heat loss. The tubes are highly efficient, producing fluid temperatures over 300°F in commercial use. For domestic application, an automatic drain-back system prevents overheating. The collectors work well in overcast, and are seeing increasing use in the far north where their superior fuel-saving capabilities compensate for their high initial cost.
Focusing collectors use lenses or mirrored surfaces to concentrate sunlight on fluid-carrying pipes. Such collectors can produce temperatures of several thousand degrees Fahrenheit. They are more efficient per square foot than flat-plate collectors but require a complex tracking system to keep them pointed at the sun. Not only is the tracking system expensive, but the reflectors themselves are two or three times as costly per square foot as most flat-plate types. If they drift off the sun, or if skies are overcast, they stop working completely.
Flat-plate collectors are simple, inexpensive, and can be mounted on the roof or walls of an existing home or on the ground in angled frames. Most will collect some heat in light overcast.
For maximum heat production the surface area of an array of flat-plate collectors should be equal to about one half the floor area of the house. However, a collector array with only one-third the area of the floor will handle 40 to 60 percent of the heat load in most regions, provided the house is well insulated and has a south-facing roof on which the collectors can be mounted. Most homeowners settle for such a system, since its lower cost results in faster payback of the investment.
The pitch, or slope, at which collectors are mounted depends on how far north the house is located. Ideally, the pitch should equal the latitude plus 15 degrees. Experience has shown, however, that tilts between 20 degrees and vertical are acceptable, provided the collectors face south.
Flat-plate collectors are generally fastened directly to the roof rather than mounted on frames that can rip off in a severe storm.
What Happens in Freezing Weather?
Whenever water is used as the heat transfer medium, provision must be made to prevent it from freezing and bursting the pipes on cold winter nights or dark, frigid, snowy days. In regions where there is any chance of freeze up, active systems using a water medium incorporate what is known as a draindown, or drainback, feature. At night or when ultralow temperatures are forecast, a valve opens that drains all the water out of the collector loop. Generally, the drained water is channeled into the main heat storage tank so that neither water nor warmth is wasted. The draindown feature can be made automatic by installing a temperature sensitive device known as a thermistor inside the piping.
The thermistor triggers the draindown valve when water temperature drops too low.
With the collector loop drained, heat from the sun is no longer delivered to the house, and the storage tank comes into play. A second loop, isolated from the collectors, begins to circulate warm water from the storage tank to the heat exchanger in the return air duct. In most systems the storage tank will hold enough heat to maintain moderate indoor temperatures for two or three days. After that, the backup furnace must take over.
==========

Vacuum collector is like I liernios boll I I luid-carryi ng pipes are 'cucounded by an ' uated insulating is linder. Collectors can Ii' placed on roof or ig,iinsl souih wall.
Focusing collector is a trough, capped by lenses that bend the sun's rays so they t onrenl rate on a water-carrying pipe al oil g I he trough's bottom. Unit swivels to track the sun.
Reflector-type solar collector has a curved mirrored surface that onr en I rat c's solar rays onto an absorber plate. fhe plate contains pipes that enclose liquid for heat transter.
Trickle-type flat-plate collectors have channelc'd or corrugated absorber plates. Water is healed as it trickles from a pipe over the absorber to a irough at the botto
Another flat design uses water flowing through pipes either vs dried to the absorhc'r plate or extruded as an integral part of it. As in other roller trirs, insulation forins the bottdlni.
Air is the medium of heat transfer in this t collector. Cool house air entering at the bottom warms as it passes through channels above a panel of black loam plastic.
Air transfer design of a dittc'rent type warms cool house air by feuding it through a maze of bafllecl passages. Such baffled air systems can be driven either by a blower or by convection.
===========
Underground Residences and Backyard Cookery
Underground architecture is attracting more and more attention from solar heating experts and others interested in squeezing the last drop of heating potential from the sun's output. The temperature at a depth of 10 feet or more is a nearly constant 55°F summer and winter, day and night, in the cold north and the warm south. As a result, only enough energy is needed to raise indoor temperatures by 10 or 15 degrees in order to have a comfortable year-round living climate-a requirement that is well within the reach of even the simplest solar heating systems.
Architects employ a wide variety of techniques aimed at eliminating any dampness or a cave-like atmosphere in their underground dwellings. Skylights, dropped gardens, solaria, and light wells are common features. Two particularly successful approaches are illustrated on the next page: a hillside house and an atrium-type house.
Solar homes that are built into a hillside almost always feature an exposed south side that accommodates, at the very least, double-glazed conventional windows or sliding glass doors. These south-facing expanses of glass serve as large passive solar collectors. Buried walls on the north, east, and west sides act as storage masses, soaking up solar heat during the day and releasing it to the house interior at night and on cloudy days, much as in any passive solar home. The more sophisticated and elaborate in-hill design shown at right, below, includes a broad sweep of south-facing glass along the roofline, windows backed by a concrete heat storage structure along the south-facing side of the second floor, and a solar greenhouse stretched out along the first floor's south wall. Concrete floors and walls inside the home store part of the sun's warmth; the excess is fanned through ducts to a bed of stone rubble beneath the ground floor. At night or on sunless days the same system of fans and ducts pulls stored heat from the rubble for use in warming the house. Shutters of insulating material hinge down from ceilings to prevent the loss of heat through the glass at night.
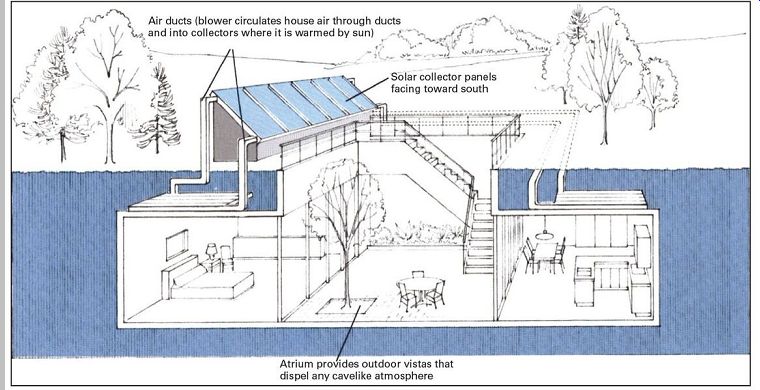
-------- All rooms face the garden in John Barnard, Jr.'s, subterranean
house in Marstons Mills, Massachusetts (top). Aboveground solar collectors
feed sun-w armed air into ducts penetrating concrete ceiling panels. Large
underground complex (bottom), known as Raven Rocks, was designed by architect
Malcolm Wells. Located in east-central Ohio, the house backs directly into
a hill.
South-facing glass walls trap heat, which is stored in rock bed under slab.
Cutaway view at top shows an atrium-type house on Cape Cod, where fuel savings of up to 85 percent are said to have been achieved. More than half the savings are attributed to the in-ground construction, the rest to 150 square feet of air-type solar collectors that circulate warmed air through tunnels in the concrete ceilings.
Constructing a Solar Cooker
The backyard solar cooker described here is simple in concept and easy to build; all it takes is a sheet of reflective material mounted so that it focuses the rays of the sun on a spit. You will need the following materials:
2 feet of 1 × 3 clear pine for uprights 2 1/2 feet of 1 × 6 clear pine for side pieces 2 feet of 1 × 10 clear pine for base two 2 1/2-inch bolts with wing nuts four washers to fit the bolts one 16- by 18-inch piece of reflective sheet aluminum two dozen 1/2-inch aluminum brads.
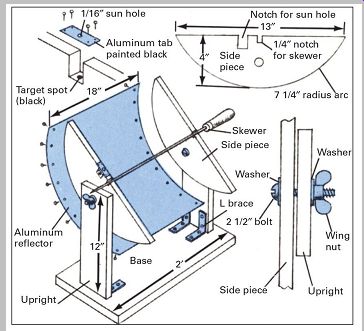
------- Solar oven, based on the focusing reflector principle, is easily
constructed with common materials and is fun to use.
The reflector is designed so that the sun's rays will focus along a line where the cooking spit is located. For proper focus it is important that the shape of the side pieces and positioning of the spit holes follow the given dimensions very precisely. Also take care to protect the mirror finish on the aluminum by taping tissue paper over it during assembly.
To construct the reflector unit, first mark and cut out the curved side pieces and plane and sand them to shape.
Clamp the pieces together when shaping so that they will be identical. Next, bend the aluminum to fit the curve of the side pieces. Work carefully to avoid creasing the sheet and be sure that the shiny side is on the inner side of the curve.
Clamp the side pieces 18 inches apart on a level surface with the curved edges up. Then use the brads to tack the aluminum to the side pieces.
Assemble the rest of the cooker as indicated in the diagram. An old rotisserie skewer or a 1/4-inch-square steel rod filed to a point at one end will make a serviceable spit. Note that the notches in the side pieces should be square to hold the spit in position.
While in use, the reflector must point directly at the sun.
To maintain this orientation, the tilt of the reflector and the position of the cooker should be adjusted from time to time.
A small sun alignment hole is built into one of the side pieces as an aid in aiming the reflector. When rays of the sun impinge directly on the target spot, the cooker is in alignment. After the entire cooker is assembled, test it on a sunny day to make sure the alignment hole is properly located. It can be adjusted by shifting the aluminum tab.
Choose a clear, sunny day for cooking (a strong sun is more important than outside temperature). Wrap the food in aluminum foil, dull side out, and turn the spit occasionally.
The foil keeps grease from dripping and enhances heat buildup.
=============

Malcom Wells, Architect and Author
It's Not Just How You Build It But What You Believe In Too
Malcolm Wells designs solar-heated sinic lUrt's from small homes to urban complexes. He is a spec ialist in what tic' (aIls gentle archite( ture. He wouki like to give the earth back to nature inst cad of cosering it v'. ith scil )d visions and blacktop.
When it comes to designing a solar home, the amount ol southern e arid insulation quality are what ount. We See solar domes, ir ular houses, capes, rari hes, and so on. The best are simple rectangles, elongated east to-west for southern cx- poscire, with sriiall ssiridows on the north and large ones on the south. With insulating indoor shutters you can hardly miss, VVinler periorrnarice 01 underground buildings is amazing the experts. Passive or active is a matter of choice, but it the basics are not right, you might as well gic e up.
[ a few 'don'ts,' though. Stay away from L's, angles, and ott sets, the more su rfa( e, t he in ore 11 eat loss. And let the landscape do double-duty, enhancing design and (onserving enemg Planting windbreaks on the ((>1(1 side and ( learing branches on the south side will pay dividends. As for what type of s is best for an existing conventional home, well, assiim ng the house is already properly insulated and has a correctly oriented rool, I'd probahl vote for rooftop dOll br panels using air or water. But now solar greenhouses covering south walls are produc rig heat pius vegetables I have yet to see a split level behind a greenhouse, but I know I will soon, and the idea will sj ) read. Then i ( e thing about passive-wi rid 0555 or green houses instead of fans, pumps, ma hrnery, and controls-is that I herc''s nothing to hrc'ak (loss'n.
"Assuming a flat roof, t ssould sote for the solar greenhouse. Rooftop collc tors will work but I don't like pun hing holes in an existing root and installing devices that expand and contract ses ere I y in ,ero degree weal her. If the house has a large south wall, solar collectors can he installed there.
Here's some more tips for people going solar. Safety. Don't create a hazard with a solar installation; conform to building odes. Second, inform yourself. Most libraries have good solar hooks. Talk to people who've built solar houses. I he solar installation racket feeds on ignorance; your delense is good information. Also do as much as you can yourself. You'll makc' up for lack of experienl e by the tart' you put into the work. An outsider won't take the pains you will to prevent rain, water, heat, and air leaks.
"Of course, therc' arc' places you can't use solar heat. If your house is in the shadow of a high rise or under a ( liIf or in a primeval torest, you'rc' out of luck for solar heat. Usually, on the roof, in lb e yard, 0 ni the walls, there's at least room for a solar water heating panel. Remember, when you check on a summer day for sunlight exposure, the sun will he in a diIferenl place in winter. Remember, too, solar is simple.
"But, you know, the real secret to successful soldr hc'at i rig is your own attitude about things like nuclear power, pollution, and even the future of the human race. Unless you are what t call a solar family, any solar system will disappoint you. We are a nat ion ol wasters. If wc' make token hanges, wc"ll get token rc'sults the successful solar houses sse studied had c oric ernr'd people living in t hc'in. Thc' link betwc'en one way hott Ic's and fuel waste is stronger than you think."
=============
=======
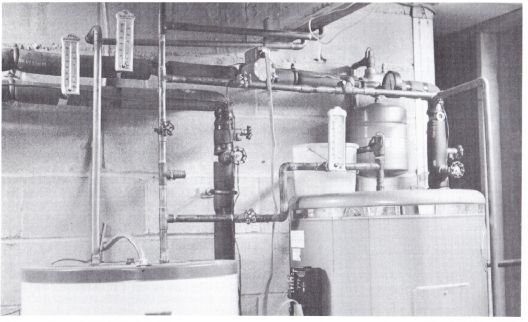
-----Plumbing for solar hot water is easily integrated into standard home plumbing system. Tall tank at right stores solar-heated water, which is later transferred to ordinary electric water healer at left. Insulated pipes along hack wall carry anti-freeze to and from collectors; thermometers monitor entire system.
-----Solar water heaters will save energy all year round and are well suited fur installation in existing houses. The panels can be mounted flush on the roof, provided the roof laces south and has a pitch of about 40 deg or more. Otherwise they must be mounted on raised metal brackets so that the sun will strike them directly. Sturdy bracing and positive anchorage is vital in case of high winds; root mounting may even require that rafters beneath the panels be reinforced by doubling them. The panels can also be mounted on the ground. Generally, panels mounted on the ground are securely fastened to concrete piles sunk below the frost line.
=========
Solar Water Systems: A Simple Design for Year-round Use
Solar-powered hot water systems are the most practical way for the average homeowner to take advantage of the sun's energy. They are easier to build and far less expensive than complete solar home-heating units.
Moreover, since there is a year-round need for hot water, maximum use can be made of available sunlight. Complete solar water heating kits, ready to install in a new home or incorporate into an existing one, have been available for several years, and various designs have been developed to accommodate diverse conditions of weather, sunlight, and the amount of hot water needed by the user.
For families living in regions where freezing weather occurs frequently each winter, a system such as the one shown here is the best choice. It is an active system with a small electric pump to circulate the heat-transfer fluid.
Instead of water, a nontoxic antifreeze solution is used for heat transfer, eliminating the need for drain-down during freezing weather. To install the system yourself, you should have a sound knowledge of basic plumbing techniques and an understanding of how the system works. If your plumbing skills and technical expertise are limited, seek professional assistance.
Theoretically, it is possible to put together a solar water heating system that will completely supply your hot water needs no matter where you live. In practice, however, the amount of solar collector area required to achieve this goal is usually so great that total reliance on solar-heated hot water would be uneconomical. The solution for most families-unless they use very little hot water or live in a particularly sunny region-is a system that produces a large percentage of their hot water needs, the rest being supplied by a conventional backup heater. During the summer such a system may provide totally solar-heated water; at other times of the year the equipment will act as an economical preheating unit for a conventional hot water system. In this latter mode the solar collectors raise the temperature of the cold water part of the way, and a standard gas, oil, or electric heater finishes the job. In many cases, the secondary system is simply the hot water heater already present in an existing home. For new homes it is likely to be a built-in feature of a water storage tank that has been specifically designed for solar heating.
As a rule of thumb, a solar hot water heater should supply about 50 to 75 percent of your yearly hot water needs in order to make it worthwhile. The collector area required to achieve this depends on the amount of sunlight in your area and the amount of hot water your household uses-80 gallons a day for a typical family of four. Assuming 24 square-foot flat-plate collectors (a standard size) and a family of four, you will need the following number of collectors: Region I , five to six collectors; Region II , three to four collectors; Region III , two collectors. (See the map on page 89 to find the region in which you live.) These are rough approximations, since even adjoining areas can differ widely due to differences in cloud cover, topography, and wind patterns. Many references carry more precise figures (see Sources and resources, page 99), or consult a manufacturer of solar equipment.
How the System Works
The cutaway drawing on following page shows the layout of a typical solar water heating system. All the parts can be purchased off the shelf: solar equipment manufacturers carry the collector panels, antifreeze, and the special stone lined water storage tank with a built-in heat exchanger; the other units are standard fixtures available from plumbing suppliers. Copper piping is used throughout. Three primary subsystems constitute the overall system: the heat transfer loop, the hot water loop, and the electrical control loop.
Heat transfer loop circulates the antifreeze fluid through the solar collector panels and heat exchanger coil. Heat picked up by the fluid at the collectors is given off at the coil to warm the water in the storage tank. The loop contains an expansion tank with an air purger, plus an air vent at the highest point in the system. The expansion tank cushions pressure changes in the loop; the purger and vent bleed off any air bubbles that develop. Reverse flow of antifreeze is prevented by a check valve, and a relief valve guards against pressure buildup by providing an escape port for the fluid. A boiler drain located at the lowest point in the system is used for filling or draining the loop; gate valves at various points permit isolation of individual components for maintenance. A pressure gauge and two thermometers, one mounted on a pipe to the collectors and the other on the pipe from the storage tank, monitor the system.

------- Solar water heaters will save energy all year round and are well
suited for installation in existing houses. The panels can be mounted flush
on the roof, provided the roof faces south and has a pitch of about 40° or
more.
Otherwise they must be mounted on raised metal brackets so that the sun will strike them directly. Sturdy bracing and positive anchorage is vital in case of high winds; roof mounting may even require that rafters beneath the panels be reinforced by doubling them. The panels can also be mounted on the ground. Generally, panels mounted on the ground are securely fastened to concrete piles sunk below the frost line.
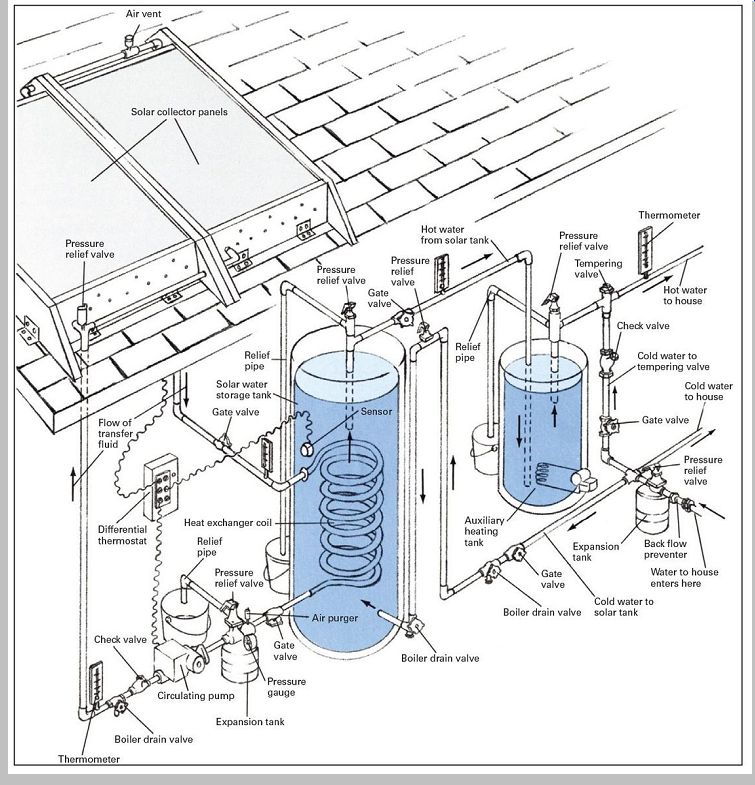
------------ Solar heating system layout should be simple and provide easy
access to components. For efficient performance minimize distances pipes must
travel between collector panels and water tanks. Pipes should be insulated
and routed indoors wherever possible.
Consult a licensed plumber or building authority before attempting do-it-yourself installations.
Hot water loop starts at the point where the cold water enters the house from outside. A backflow preventer, expansion tank, and vacuum relief valve (positioned above the level of the water storage tank) are code requirements common to all home water systems, whether or not they are solar. Cold water feeds into the storage tank, is warmed by the heat exchanger, rises to the top of the tank, and is passed on to the auxiliary heating tank, usually a conventional water heater. For safety, a tempering valve and crossover pipe (fitted with a check valve) are installed beyond the second tank. If water should accidentally be heated above a safe temperature on a particularly sunny day, the tempering valve automatically mixes in cool water.
Electrical control loop automatically turns on the system whenever the sun is shining and shuts it off at night or on overcast days. The loop consists of a differential thermostat, plus two sensors, one that measures fluid temperature in the collector and one that measures water temperature in the storage tank. The thermostat compares the readings of the two sensors and automatically switches on the pump in the heat transfer loop whenever the water in the storage tank is more than a few degrees cooler than the collector fluid.
Assembling the Units Into a Working System
Factory-built collector panels are available as complete units. However, you can save money by making your own either by assembling them from components or by making them from scratch with ordinary building supplies and hardware. The absorber plate is the most important and the most difficult part to build. Prefabricated plates are available from firms specializing in solar heating equipment, and their efficiency and durability make them well worth the investment. If you choose to construct your own, use 7-ounce (.01-inch-thick) copper sheeting and flexible copper tubing with 3/8-inch outside diameter. Form the tubing into a grid and attach it to the sheet with a high temperature solder (plate temperatures can reach 400°F on a sunny day). Coat the finished plate with high-carbon flat black paint.
The plate rests unanchored in the collector box on a rigid, resin-free duct insulation board (available at heating-supply outlets). A layer of soft fiberglass insulation is usually installed beneath the board. Allow a 3/4-inch airspace above the plate, then cover the collector box with one or two sheets of glass, polyester reinforced fiberglass, or plastic film. The most effective glazing is tempered iron-free glass.
In most regions a single pane 3/16 inch thick is sufficient. In very cold areas use two 1/8-inch-thick panes with a 1/2-inch airspace between. A less expensive alternative is a sheet of .040-inch-thick polyester reinforced fiberglass above an inner glazing of 1-mil.-thick Teflon film, separated by an airspace of 1/2 inch. Drill 1/8-inch-diameter holes in the lower end of the collector box between the absorber plate and the glazing panel to prevent condensation. If double glazing is used, also drill holes in the space between panes.
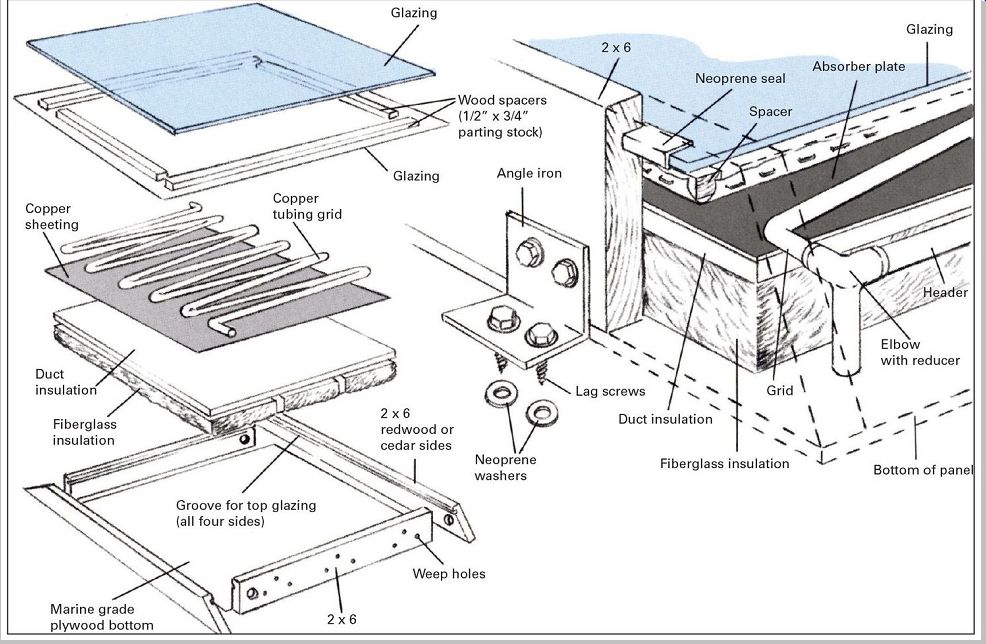
------ Seal edges of glazing (either glass or synthetic) with a neoprene
strip to keep out moisture while allowing leeway for expansion. Caulk all other
seams with silicone sealant.
Header pipes linking panels are made from rigid copper tubing with 1 1/8-in. outside diameter. Sweat-solder them in place after panels are attached to roof. Use torch carefully near combustible material.
Installing the Panels
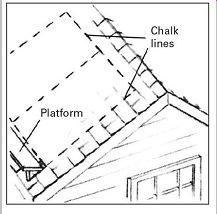
1. Lay out positions of panels using chalk line. Panel ends should be parallel to roof peak. sides should lie along inside edges of rafters (usually spaced 16 or 24 in. apart center to center) so that they can be anchored with lag screw s and angle brackets. Note platform is roof mounted to provide a safe working area.
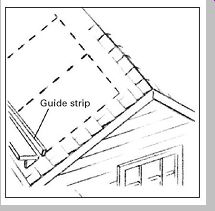
2. Nail temporary 2 × 4 guide strip below the bottom chalk line to align the lower ends of the beveled collector box sides. Raise the panels onto the roof and position them so that they rest along the upper edge of the strip. The horizontal end pieces of the boxes should cover the top and bottom chalk lines.
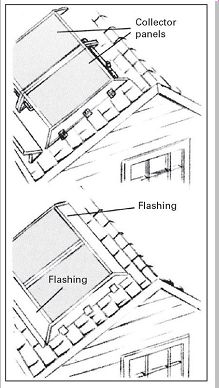
------- 3. Attach the panels directly to the roof. Use 1/4-in. lag screw
s that are long enough to penetrate at least 2 in. into the rafters. Mount
panels on 1/2-in.-thick neoprene washers to provide air circulation beneath
collectors.
Wrap screws with Teflon tape; coat heads with silicone sealant.
4. solder headers to plate connections using high temperature solder. Test and insulate plumbing (see p.120), then install aluminum flashing over headers to prevent debris accumulation. Flashing need not be weathertight. screw or nail metal to sides and ends of box; fasten edges under shingles or with tar.
Pipes and Plumbing
Use copper tubing-either flexible or rigid-for the plumbing in the solar water heating system. Rigid tubing is somewhat more durable; flexible (soft-tempered) tubbing is easier to work with, less expensive, and can be connected with flare fittings or by sweat-solder fittings. Both kinds of tubing are available in type K (thick wall) and type L (medium wall), but only rigid tubing is sold in type M (thin wall). The two kinds of tubing can be used together in a single installation. Employ the rigid style for long horizontal runs and in locations where the plumbing might be subject to denting; go to the flexible tubing in places where soldering is awkward, presents a fire hazard, or where complex situations would require an excessive number of connections and fittings if a rigid pipe were used. Drain the water from existing plumbing before soldering on additional piping-pipes containing water cannot be soldered.
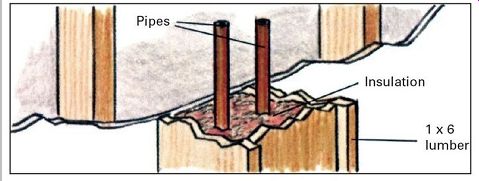
------------- Exposed pipes can be enclosed within hollow columns built
of 1 × 6 lumber filled with fiberglass insulation.
After the plumbing has been connected, but before the system is put into operation, the entire assembly must be pressure-tested for leaks by the procedure described below. To avoid damage to air vents, expansion tanks, valves, and other components that are sensitive to excessive pressure, omit them when first installing the plumbing. Screw in a Schrader-type valve-the kind used in automobile and bicycle tires-in the opening where the pressure gauge would normally go, and insert plugs (available from plumbing suppliers) into all the other openings. When testing is completed, remove the valve and plugs and install the final components in their place.
Then cover the pipes with closed-cell foam pipe insulation, available from air conditioning, refrigeration, and solar equipment suppliers. Use 3/4-inch-thick out-door-grade foam for pipes exposed to weather and 1/2-inch-thick foam indoors.
------------
Testing the system
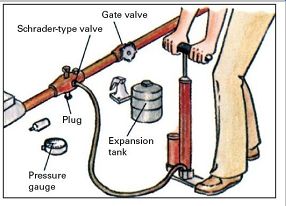
----- Locate leaks in finished plumbing by filling pipes with water, then
raising pressure to 100 psi (pounds per square inch). With schrader-type valve
installed instead of pressure gauge, connect garden hose from main water supply
to boiler drain located in heat transfer loop piping,
and fill entire loop with water. Next, use high pressure hand pump to pressurize the system; it should be able to hold the pressure for one hour.
Check all connections and mark defective joints.
Afterward, drain water and repair leaks. Measure water drained to determine amount of antifreeze needed.
-------------------------------
Joining Techniques
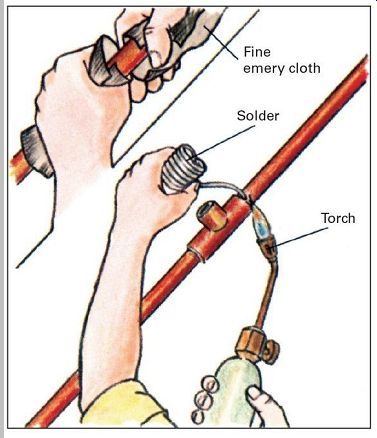
--------- Sweat-soldering. Use 95-5 tin/antimony (high
temperature) solder throughout, especially at the collectors, to reduce lead
leaching into the potable water.
Scour parts to be joined with fine emery cloth until shiny, then apply thin coat of paste flux to each piece. Assemble joint, place asbestos pad behind for fire safety, and wrap nearby soldered joints with wet cloths to keep them from melting accidentally. Heat joint with propane torch until flux bubbles, then apply solder to the seam between fitting and pipe. The solder will flow into the fitting.
The final step is to connect the differential thermostat and temperature sensors. Follow the manufacturer's instructions and be sure to locate the thermostat in a convenient spot (it serves as the system's control box). Add the antifreeze to the heat transfer loop and the system is ready to go.
Adding the antifreeze
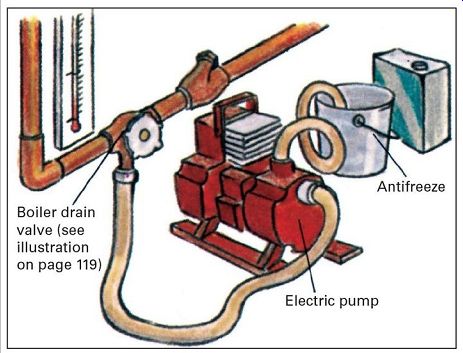
--------- Rent a portable electric pump to force antifreeze
into heat transfer loop. Pressure inside loop should be 20 to 30 psi. Check
operating pressure periodically against this initial figure; any drop in pressure
may indicate a leak in the loop. To avoid water contamination, only non-toxic
antifreeze should be used. solar equipment dealers carry a safe blend containing
propylene glycol, distilled water, a corrosion inhibitor to protect pipes,
and a colored dye that helps in the detection of an accidental leakage of antifreeze
into the water supply. Manufacturer's instructions usually suggest draining
loop and replacing fluid every three years.
Joining techniques
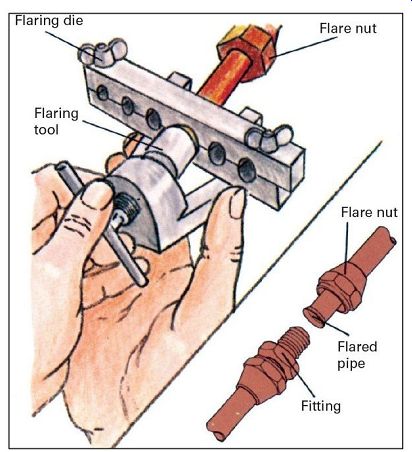
----------- Flare fittings. These can be used only with
flexible copper piping. Begin by cutting pipe ends square and removing any
burrs. slide flare nut onto pipe, and insert pipe into proper size hole in
flaring die. Position pipe end even with face of die, then screw pointed flaring
tool into pipe end, making certain tool is centered. Tighten tool until pipe
end is flared to 45° angle. insert fitting into flare and slide flare nut up.
Tighten the nut to the fitting using two wrenches worked in opposition. Flare
second pipe and attach to other end of fitting.
==============