Tanning and Leatherwork: A Sensible Craft--Whether for Necessity Or Just as a Hobby
Tanning and leatherwork call for a comparatively small investment in tools but can yield a great amount of satisfaction. There is a real sense of achievement in converting a rabbit skin, which a hunter might otherwise throw away, into a soft, lustrous fur and then into warm mittens or a fine hat. With experience, tanning and leatherwork can also become profitable sidelines. Hunters are frequently glad to pay to have the pelt of an animal made into pliable leather, a fur rug, or a trophy to hang on the wall.
The craft of tanning is older than civilization itself. Chemical tanning, as it is practiced today, existed at least 5,000 years ago-there are Egyptian wall paintings showing tanners at work with their tubs and mixing vats.
Long before that, our prehistoric ancestors used the hides of animals to clothe themselves. At first, they must have worn the skins just as they came from the animal. Untreated hides, however, are stiff, crack easily, decompose rapidly, and, in addition, may emit an obnoxious odor. Eventually it was discovered that a hide could be treated to make it durable as well as comfortable. The earliest leather conditioning methods probably involved nothing more than scraping off all the flesh and hair from the hide. The result must have been close to rawhide, a material the American Indians used to make drumheads, lashings, saddles, knife handles, sandals, and snowshoe thongs. The next development probably involved the application of animal fat or other substance-the Indians used animal brains-to soften the leather and make it more water resistant. Other skin-dressing procedures included smoking, soaking in urine, and rubbing with plant or animal oil.
Different Leathers and Where to Get Them
Hunting, trapping, or raising your own livestock are the most direct ways of obtaining the hides you need to make fur or leather. Remember, however, that there are strict regulations governing where, when, and how you may hunt and trap game. There are also endangered species that must not be taken at any time of the year.
Another potential source of hides, especially for rabbit skins, is your local butcher. He may also be able to obtain cow, goat, sheep, and pig hides from a local slaughterhouse, or you can try the slaughterhouse yourself.
Some hunters and trappers will sell animal pelts at relatively low prices; a hunter may even let you have them for free, since many hunters are more interested in an animal for sport or food than for its hide. A farm that slaughters its own animals can be another economical source of untanned leather. If you do not care to do the tanning yourself, you can obtain leather from stores listed in the classified telephone directory. Many of these stores cater to the hobbyist and carry a wide variety of hides. Generally, they will also stock a complete line of leatherworking equipment, such as needles, heavy thread, awls, and punches, as well as buckles, lacing, snaps, dyes, leather lubricants, and varnishes.
The First Step Is to Remove the Hide
The object of skinning is to remove the animal's pelt cleanly, neatly, and with minimum damage to either hide or fur. To skin an animal perfectly requires experience. The first time, you are almost certain to damage the hide by slicing too close or else by cutting too cautiously and leaving large chunks of flesh that will mean extra work during the fleshing operation.
Practice skinning a few times with an inexpensive hide before trying your hand on more costly leather. A chipmunk, or even a mouse, is suitable for your first attempts, especially since they are more difficult to skin than larger specimens and so help attune you to the fine points of the skinner's craft. Another good choice for a first attempt would be a freshly killed rabbit from the butcher; if you slash through the hide, you can at least console yourself with a rabbit dinner.
The best tool to use is a skinning knife, an implement with a thin, curved blade specially designed for the job.
However, good results can be obtained with almost any blade, provided it is razor sharp. For this reason, keep a sharpening stone handy, particularly since even the best edge will dull during the skinning operation. Note that while a single-edge razor blade can be used for making the first incisions, it should not be employed for the actual skinning: there is too much risk that the blade will slip, cutting either you or the hide.
Once the incisions are made, pull the skin gently away until you run into resistance. When this happens, it means the skin is being held by a membrane or other tissue. Use the knife to cut restricting tissue loose, then resume pulling.
Throughout the skinning operation the animal must be held tightly to keep it from shifting.
All animals are skinned in much the same fashion. Generally, the skin on the animal's head and paws is not removed. Instead, incisions are made around the neck and feet, and the rest of the pelt is pulled off. Large animals, such as a bear whose skin is to be made into a rug, may have the head and paws left on the hide.
Once the skin is off the animal, the next step is to flesh it; that is, to remove bits of fat and meat that still adhere to the underside. To make fleshing easier, first soak the unfleshed skin in a solution of either salt or borax to loosen the clinging bits of flesh. Instructions for pre-soaking as well as for fleshing are given at the right. To make a salt solution, dissolve 1 pound of ordinary table salt per 2 gallons of soft water. For a borax solution dissolve 1 ounce of borax per gallon of water. Use hot water when dissolving the borax, but let it cool off before immersing the skin. An agitator-type washing machine will speed the soaking process and also help reduce hair loss from the pelt by avoiding oversoaking.
Animal | Use | Comments
Bear | Rugs | Hard, durable
Beaver | Coats | Wears well
Calf | slippers, purses, wallets | soft, durable
Cow | Jackets, gloves, belts, luggage, shoes | Rough, wears well soft, pliable
Deer | Gloves, moccasins | soft, pliable, wears very well
Fox | Fur coats, jackets | Fairly durable, warm
Goat | Purses, wallets, gloves | Very fine leather
Muskrat | Fur coats Wears well
Pig | Wallets, gloves| Wears well
Rabbit | Gloves | Delicate fur
Raccoon | Hats, coats | Fairly delicate
sheep | Gloves, slippers, rugs | soft, warm
squirrel | Fur coats | Wears well
Wolf | Coat trimming | Warm, sheds snow
Woodchuck | Gloves | Delicate
Converting a Hide Into Leather
---------------
There are almost as many formulas for tanning solutions as there are tanners, each one swearing by his own mixture. The recipe given here has two advantages: it will not over-tan and it has no dangerous acids or toxic vapors.
Nevertheless, when working with this tanning solution, as with all others, always use rubber gloves; tanning chemicals are not good for the skin. Use a large plastic or wooden container or nonmetallic washbasin for both mixing and tanning. To make the tanning solution, add 5 lb. of ordinary salt to 10 gal. of warm water. The water should be soft--rainwater will do. Next, mix 2 lb. of alum in enough hot water to dissolve it, then combine both solutions, stirring with a wooden paddle until the ingredients are thoroughly mixed.
The solution can be used cold or warm but not hot.
immerse the hide into the tanning solution and stir gently about twice a day with a wooden paddle. For a perfectly tanned piece of fur or leather make certain the tanning solution reaches every cranny and wrinkle in the hide. The larger the hide, the longer it takes to tan it. A rabbit skin will take about two days, a raccoon about three days. A deer may take from six to eight days, while a sheepskin may take a little less.
The ABCs of Tanning
Tanning converts an animal hide, which would otherwise decompose rapidly, into fur or leather that will stay soft and odor free for years. Originally, tanning was accomplished using tannic acid obtained from trees and vegetables, but most tanners today employ alum. To do a professional job, you must take time to tan the hide thoroughly and to work it until it is pliable.
After the hide has been soaked in the tanning solution for several days, cut off a tiny piece near one edge. If the color is uniform all the way through, then the hide is tanned. But if there is a difference in color between the center and edges, return the skin to the solution for an extra day or two. The most common mistake is to take a pelt out before tanning is complete.
Tanning procedures are the same whether you are processing leather or a fur. However, if the hair is to be removed, it must be removed from the hide before tanning takes place. The easiest way to get the hair off is to start by soaking the hide in a de-hairing solution. Use 1 pound of hydrated lime per 8 gallons of soft water and soak for about five days (longer in cool weather) in a wooden container.
Move the hide around occasionally with a wooden paddle.
(Lime is caustic, so avoid contact with it.) When the hair is loose, rinse the hide, then place it fur side up on a smooth log, and scrape off the hair and loose surface skin with the dull edge of your fleshing knife. Use the same log or type of log that was employed for fleshing (see "Fleshing the hide").
Rawhide: A Material for All Seasons
Rawhide is untanned leather-usually dehaired-that has been cured by being stretched and dried. To the Plains Indians, buffalo rawhide was a vital all-purpose material, serving as lumber, nails, cord, and cloth. Nowadays rawhide is commonly made from deer or cow skin and can be used for moccasin soles, knife handle grips, boxes, construction lashing, lacing for snowshoes, and drumheads for tom-toms. A special quality of rawhide is that it shrinks as it dries, tightening and forming itself around any object to which it is attached.
Use a fresh pelt when making rawhide. Skin and flesh the animal in the usual fashion, but do not salt the pelt. The next step is dehairing. You can use a dehairing solution of lime and water (see "The ABCs of Tanning") or one of wood ash and water, which combine to form lye. For the latter method make a paste of hardwood ashes and water, spread it on the hair side, then roll the skin up over the paste and place the roll, weighted down with a rock, in an ash and water solution. Wear rubber gloves as you work, since the water and ash mixture is caustic. Leave the hide in the dehairing bath until the hair can be pulled out easily--usually several days--then scrape off the hair with a blunt knife. Finally, rinse the hide thoroughly, wring it out, stretch it on a frame, and set it out to dry in a shady spot. It will dry into a hard, flat, platelike sheet.
-------------
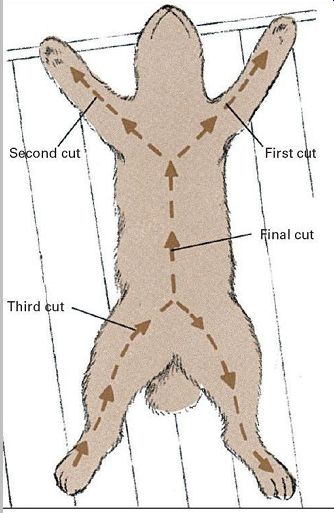
Make the first incision at the breastbone. starting at this point, cut to the heel of one front leg and then to the heel of the other front leg. Next, cut from the heel of one back leg to the other. Now make one long incision joining both leg cuts as indicated in the drawing. Be sure to use a knife that is razor sharp.
-------------
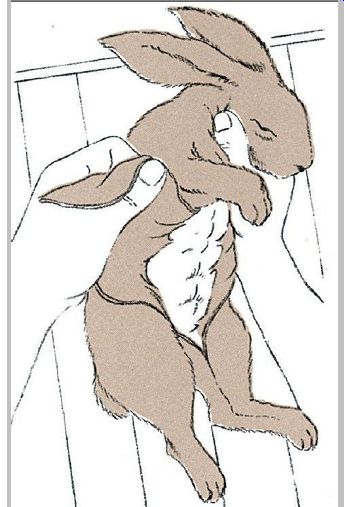
Skin can be pulled off a rabbit with little additional cutting. How ever, with most other animals the skin must be pulled off a bit at a time, as though it were a very tight glove, until the hide resists further pulling; then use the knife to free the hide. Cut close to the skin, but be careful not to cut into the hide.
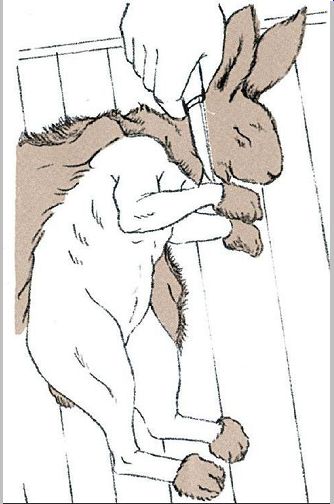
------------ Last step in skinning is to free the pelt by incising a circle around
the neck and around each leg near the paw .
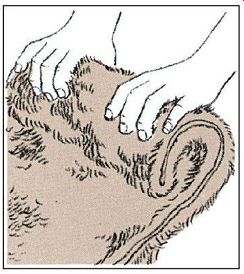
After the skin is off, use a dull knife or the back of the skinning knife to scrape off any flesh or fat that can be removed easily. Leave on pieces that adhere tightly; they will be removed in the fleshing operation.
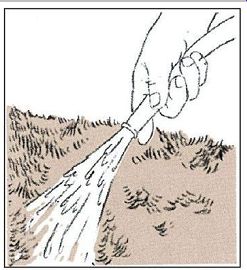
------------ 1. After the hide is tanned, remove it from the solution; then
rinse it with a garden hose or in a sink with many changes of water.
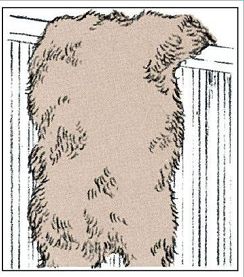
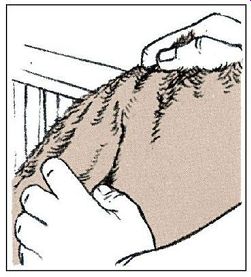
------------ 2. Hang the hide fur side up over a railing. it should be out
of direct sunlight, and air should be able to circulate around the hide.
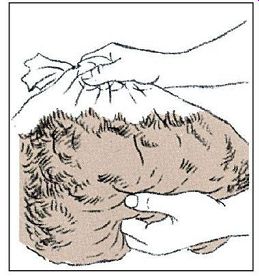
--------- 3. After several days, while the hair and hide are still slightly damp,
fold the hide flesh side to flesh side, roll it up, and leave it overnight.
------------ 4. if the hide has dried before you are able to roll it up, use
a wet sponge to dampen the flesh side. Then fold it as described in step 3.
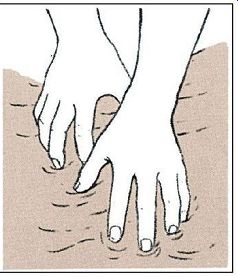
------------5. Work the hide by stretching it, pulling it over a smooth edge,
and twisting it with your hands. Continue working until it is pliable.
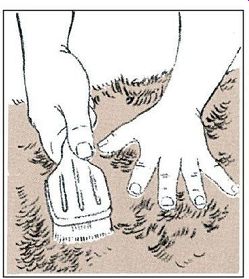
--------- 6. Use the tips of your fingers to rub in neat's-foot, cottonseed,
corn, or leather lubricating oil. Warm the oil to speed up the work.
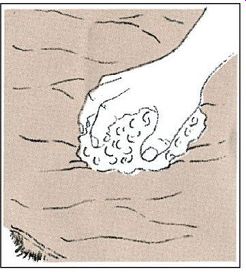
---------- 7. To clean the matted fur, fill plastic bag with dry oatmeal or
hardwood saw dust. Then place hide in bag and shake until fur is clean.
------- 8. Brush and comb fur until it is entirely fluffed up. Go over rough
spots on underside of leather with coarse sandpaper wrapped around a block.
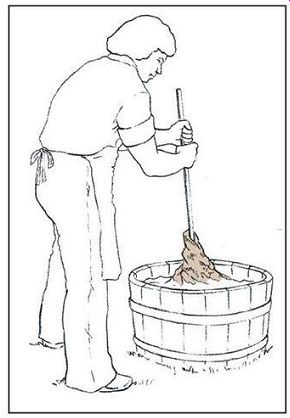
Fleshing the hide
Before you flesh the hide, soak it in a brine or borax solution to make the flesh easier to remove. Let the hide soak about 12 hours-overnight will do. The next morning, rinse the hide in fresh water and let it drain.
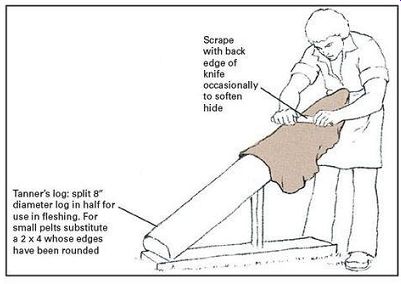
Then, while it is still moist, rub in salt until the flesh side is completely covered (avoid getting salt into the fur side). When the first application of salt has been absorbed, apply a second. Fold the hide in half lengthwise, flesh side to flesh side, roll it up, and place it on a slanting surface so that it can drain. Begin fleshing the next day. Place the hide on a smooth log, fur side down, and scrape away fat and gristle with a fleshing knife, butcher's knife, or drawknife. The log should be about 4 ft. long and 8 in. in diameter. split it so one side is flat and work on the other side, which should be very smooth. scrape carefully and evenly.
The membrane on the hide's inner surface must be removed for tanning to be successful. scrape with the blunt edge of the knife blade occasionally to help soften the leather. After fleshing is complete, wash the hide in a soapy solution, then rinse quickly and thoroughly.

-----------
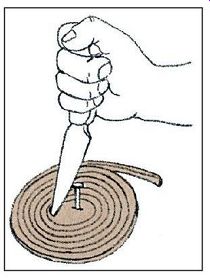
Rawhide lacing--or any type of leather lacing--is made by cutting a spiral in the hide. Place the leather on a board and drive a nail through, near the center, pinning the leather to the board. With a very sharp knife held vertically, cut a circular spiral. start from the outside and work in toward the nail. When the nail is reached, remove the leather strip and stretch it out.
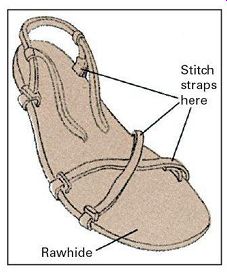
------------- Moccasins with soles made of raw hide rather
than tanned leather were used by some High Plains tribes. An equivalent contemporary
use would be sandals-some believe raw hide to be the best sandal material.
The width of the sandal should be 1/2 in. wider than the foot all the way around.
straps can be sew n, stapled, riveted, or simply laced through slots. Make
them of soft leather.
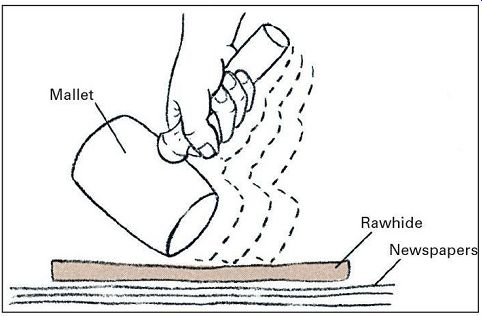
Drying frame for rawhide should be built of stout branches lashed solidly together. Make the frame considerably larger than the hide. Use an aw l or leather punch to make holes around the edge of the skin, then lash the skin to the frame by lacing raw hide strips or 3/16 in. cord through one hole, around the frame, and back through the next hole until the hide is stretched taut. After it is dry, raw hide can be lightened in color and made pliable by pounding it over its entire surface with a heavy, smooth implement, such as an ax, small sledgehammer, or mallet. Lay the hide on a thick mat of newspapers over a hard, smooth surface and strike it with short, glancing blows.
Sources and resources
Books and pamphlets:
Farnham, Albert B. Home Tanning and Leathermaking Guide. Columbus, Ohio: A. R. Harding, 1950.
Hobson, Phyllis. Tan Your Hide . Charlotte, Vt.: Garden Way Publishing, 1977.
Hunt, W.B. The Complete How -to Book of Indian Craft. New York: Collier Books, 1973.
Ickis, Marguerite, and Reba S. Esh. The Book of Arts and Crafts. New York: Dover, 1965.
Seymour, John. The Forgotten Crafts. New York: Knopf, 1984.
===