The Old Methods Survive--Not Just for Practicality But for Unsurpassed Flavor
The problem of storing meat and fish for use the year round is as old as mankind. Most of the traditional methods involve processing with salt, smoke, and spices that not only preserve but add flavor as well. Although modern refrigeration has made food storage simpler, many of the old ways are still popular, primarily because they make meat and fish taste so good.
Curing and smoking were once the standard ways of preserving, and many popular products--Smithfield hams, corned beef, lox, pastrami--are still made by one or both of these techniques. Sausages, too, were and are popular.
The recipes by which sausages are made vary according to climate. In warm areas traditional recipes call for cured meat laced with plenty of herbs and spices; the result is sausages that tend to be hard and dry. In colder climates, where storage is less of a problem, sausages are generally milder and are made from fresh, uncured meat.
Some old-time methods of preservation are now all but forgotten. Poultry, cooked and deboned, was stored for months beneath a covering of lard or butter. Roasts were kept fresh for up to a week by immersing them in cold running water--when the meat began to float, it was time for it to go into the oven. Charcoal, a strong antibacterial agent, was often ground and rubbed into the surface of meat; fish would be kept fresh by replacing the innards with a lump of charcoal. American Plains Indians perfected the art of drying, or jerking, meat and then grinding the jerky to make pemmican; modern outdoorsmen have rediscovered this ancient food, and today a small jerky-making industry flourishes, catering to the needs of hikers, campers, and skiers.
---------
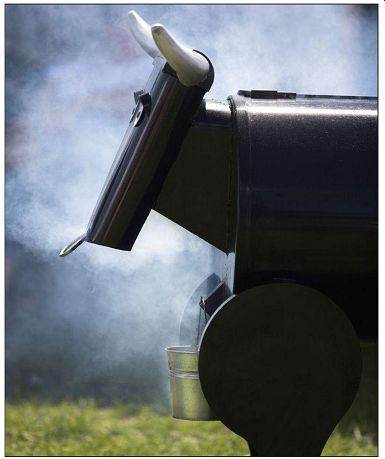
Smoking meat, fish, and poultry is much easier than it might seem. This unique smoker is crafted to look like a bull, but really no specialized equipment is required beyond a firepit, where the hardwood smolders, and a ventilated smoke chamber (a wooden crate or even a cardboard box could serve). The smoke helps to preserve meat, partly by coating it with smoke-borne preservative chemicals. Thoroughly cured and smoked meats, such as the south's famous smithfield hams, can be kept for years. (smithfields have reputedly been stored for as long as 25 years--from a girl's christening until her wedding.) Nowadays, many people use smokers to add a delicious woodsy flavor to a piece of fresh meat or fish.
Short-term Storage, Hanging, and Sanitation
Fresh meat (including poultry) deteriorates rapidly in temperatures above 40°F, so it is important to refrigerate it as soon as possible and to keep it under refrigeration until it is cooked or processed. In addition, a period of chilling, or hanging, can improve the flavor and texture of most meats by giving natural enzymes time to break down tough muscle fibers. The temperature range for hanging is 33°F to 40°F. Freshly killed poultry should be hung for 12 to 48 hours, depending on the size of the bird. Pork and veal should hang for one or two days; beef, mutton, and lamb for as long as a week. Game should be gutted first, and any scent glands should be removed. If you cannot maintain a temperature at or below 40°F, do not attempt to hang meat.
Instead, cure it, freeze it, or otherwise process it for preservation immediately. Fish rots very quickly, so it should never be hung; process it immediately or else freeze it.
When handling meat and fish, make sure your hands are clean, as well as all your tools and utensils. Scrub or scrape wooden cutting boards, wash them with hot, soapy water, and scald them with boiling water before and after each use. You will probably need several different knives for preparing different cuts of meat. The knives should be not only clean but sharp. High carbon blades are the best; use a butcher's steel to give them a final edge after sharpening.
Special precautions are required when processing or preparing pork, since fresh pork may contain trichinae worms, which cause the disease trichinosis. These worms can be killed by heat or by cold. Always cook pork to a minimum of 137°F throughout. (To be safe, cook it to 145°F to 150°F.) For cuts of pork less than 6 inches thick the worms can also be destroyed by freezing at -10°F for 10 to 12 days or at 0°F for three to four weeks.
Freezing In Fresh Flavor
Since World War II freezing has become the most popular way to store meat and fish; it is quick and easy, and preserves both the nutritional value and flavor of the fresh food. The only drawback is that freezing is dependent on a consistent supply of electrical power. The best way to freeze meat and fish is to flash-freeze at-15°F, then store at 0°F. Most chest-style freezers have the capability of reaching-15°F, but some uprights may not. Set your freezer's control to its coldest setting several hours before using it as a flash-freezer. Shift the food that is already in the freezer to one side; try to leave about 1 cubic foot of freezer space for every 2 pounds of meat or fish to be flash frozen.
Chill meat or fish before you freeze it to make it easier to cut and package and to decrease the chance of spoiling other food in the freezer. Wrap all pieces securely in individual moisture-proof packages to prevent freezer burn (caused by dehydration) and to avoid contaminating one meat with the odors of another. There are many brands of freezer wrap available that give durable protection for frozen goods. Label each package with the type and cut of meat or fish it contains and the date it was frozen. Then load the packages into the freezer. To protect the frozen food, be sure to keep the unfrozen packages from touching any of the already frozen food. When all the food is hard frozen, return the control to normal (0°F). In the event of freezer breakdown or power failure, do not open the freezer--it will maintain its temperature for several hours. During longer breakdowns keep the empty space in the freezer packed with dry ice. Once meat is thawed, it should not be refrozen.
All meats begin to deteriorate if they are left in the freezer too long. Cured meats, such as ham and bacon, and very fatty meats, such as sausage, do not keep well under refrigeration and should not be kept frozen for more than a month. Ground meat, stewing meat, pork chops, liver, and kidneys can generally be left frozen for up to three months.
Steak, chops, fish, and roasts will last as long as six months. The best way to thaw frozen food when you are ready to use it is to place it in the refrigerator, still in its sealed package, and let it warm gradually. For quick thawing run cold water over the package. You can cook frozen meat without thawing by allowing extra cooking time.
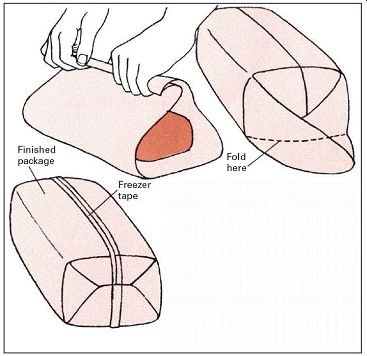
Wrapping meat for the freezer
Freezer wrap is the best material for protecting frozen meat and fish from moisture loss. Place food in center of enough wrap to extend around it 1 1/2 times. Join sides of wrapper at top, and fold over tightly against meat. Press out any air pockets, shape the ends into points, and fold back over meat. seal with freezer tape.
Canning for Convenience
Canning is convenient and economical. Canned foods are not endangered by power failures, they are easy to transport, and they keep a long time. Both meat and fish can be safely preserved either in glass jars or in tin cans, but jars are generally recommended because they cost less, are more convenient, and do not require a mechanical sealing device.
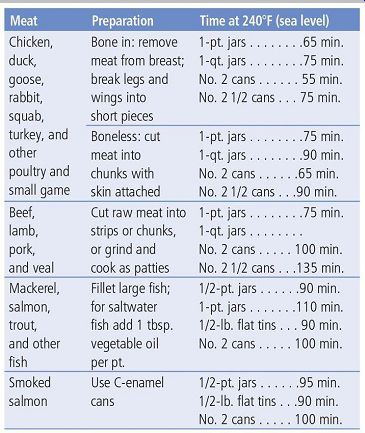
The greatest danger in canning is botulism, a severe and often fatal form of food poisoning caused by bacteria that thrive in dark, airless conditions. To be sure of killing the bacteria, you must treat the food and containers for an extended time at 240°F. To reach this temperature requires a pressure canner with its control set for at least 10 pounds.
(For instructions on pressure canning, canning terminology, and canning equipment, see "Preserving Produce") Meat, fish, and poultry can be canned by either the raw pack or hot-pack method. Raw-packed food is put into containers before it is cooked; hot-packed food is cooked first. In both cases the presence of fat on the rim of the jar may spoil the canning seal, so it is safest to trim off as much fat as possible before packing. For raw packing cut the food into pieces, pack it loosely in sterilized jars, and add 1/2 teaspoon of salt per pint but no liquid. Place the uncovered jars in an open saucepan of water, and heat gently until a thermometer inserted in the middle of the meat reads 170°F--the temperature at which air is driven out and all yeast and mold spores are killed. This process, known as exhausting, may take an hour or longer. Cap the jars immediately according to the manufacturer's directions; then process them in a pressure canner.
To hot pack, cook the food thoroughly in salted water, and pack it loosely into jars, leaving 1-inch headspace.
Next, fill the jars to within 1 inch of the top with boiling water or cooking broth. Make sure the rims of the jars are clean and free of fat before putting the caps on, then carry out the standard pressure canning procedure.
After the jars have been pressure processed and allowed to cool, check for a perfect seal. Metal lids should be slightly concave and should give a clear metallic ring when you tap them. If one fails to do so, either discard it or open it and reprocess the contents from the beginning.
After they are checked, label all jars with the contents and date. Store them in a cool, dry, dark location (direct light can discolor the contents).
If a lid bulges during storage, or if the contents spurt or show any sign of being under pressure when the jar is opened, do not use the food. Botulism is extremely virulent, yet affected food may not show the usual signs of spoilage.
When disposing of the food, be sure it will not be eaten by an animal or other person.
------------
A guide for canning
Curing and Smoking For Lasting Flavor
Curing, the first step in the smoking process, is essential for good flavor. In the old days a strong brine cure was the rule-pioneer women judged that there was enough salt and other ingredients in the brine when a raw potato floated. Such a powerful mixture resulted in meat that had excellent keeping qualities but was extremely salty. Before the meat was eaten it was generally desalted by soaking in cold water. Modern refrigeration has opened the way for mild, sweet cures in which flavor is more important than long-term preservation.
------------
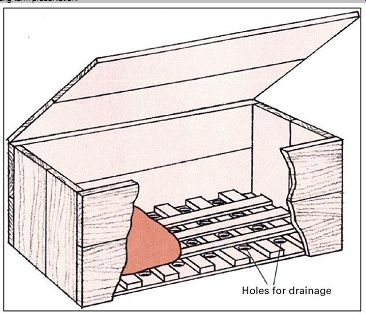
Hardwood box for dry-curing has a wooden rack at bottom for drainage space. Holes drilled in the bottom allow the escape of juices draw n from the meat or fish by the salt.
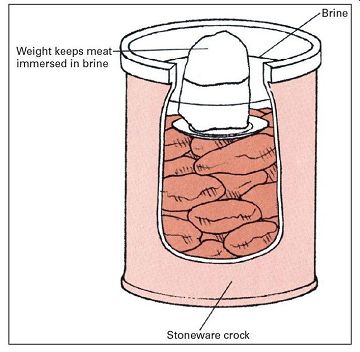
--------- Traditional crock made out of stoneware is ideal for brine-curing,
but any large container of pottery, plastic, or glass-even a sterile plastic
garbage can-w ill serve the purpose. Do not use a metal container: salt water
is highly corrosive, and the meat or fish can be contaminated. A seasoned hardwood
barrel is also good for the job; avoid barrels made of softwood, such as pine,
because the resins in the wood will leach into the brine and impart a bitter
flavor to the meat or fish.
Not only curing methods but smoking methods as well have changed over the years. In former times meat was kept for days or even weeks in chambers filled with cool, dense smoke (the temperature rarely topped 110°F). The result was strongly flavored meat that would keep for a very long period. Modern methods of hot smoking require temperatures of at least 170°F in the smoke chamber. In this heat the meat cooks as it smokes, and to prevent dehydration it must be removed from the smoke chamber after a relatively short time. The only purpose of hot smoking is to add flavor-hot-smoked meat does not keep significantly better than other cooked meat.
Nitrites and Nitrates
Sodium and potassium nitrite, and to a lesser extent sodium and potassium nitrate (saltpeter)-ingredients that have been used for many centuries in curing meats-have recently come under suspicion as possible cancer-causing agents. These additives have several purposes: they preserve the red color of meat, they are partly responsible for the distinctive flavor of many smoked foods, and they reduce the risk of botulism and other types of food poisoning. Meat that is cured without the use of either nitrites or nitrates must either be kept under refrigeration like any nonsmoked product or else cured with enough salt so that the fluids in the meat contain at least 10 percent salt.
Hot smoking can be done all year round, but lengthy curing and cold smoking are best accomplished when the weather is cool enough to prevent the meat from spoiling but not so cold that the meat freezes. For these reasons the best time to start a cold-smoking project is in the autumn, when nighttime temperatures approach freezing and the days are consistently cool.
How to Cure: Two Methods
Salt is the only essential ingredient for curing. It retards spoilage by drawing water out of meat or fish while simultaneously killing decay-causing microorganisms. Meat cured with salt alone will store well but will be tough and dry.
Sugar or honey is often added for flavor as well as to keep the meat moist and tender. Herbs and spices can be included in the curing mixture according to personal taste, but do so cautiously; some combinations give unsatisfactory results. Garlic and pepper, for example, can overpower the flavor of a cure.
There are two curing methods: brine-curing and dry curing. Dry-curing is faster, but many people prefer brine curing because the results are more consistent and the flavor milder. In either case do not use ordinary table salt;
the iodine it contains can discolor meat and fish. Pickling salt is the best type for curing. It has no additives, it is inexpensive, and since it is finely ground, it dissolves readily in brine cures and is quickly absorbed by the meat in dry cures. Other acceptable salts include rock salt, kosher salt, dairy salt, and canning salt.
Brine-curing. For a brine cure the curing mixture is dissolved in pure water. Boil questionable water first to kill bacteria and diminish chlorine, then let it cool. Lay larger pieces of meat or fish, skin side down, on the bottom of a watertight, nonmetal container, such as a stoneware crock, then pack smaller pieces on top. Fill the container with brine until the pieces start to shift. To keep the meat or fish submerged, cover it with a plate on which several weights have been placed; make sure no air pockets are trapped under the plate. Maintain the brine at 36°F to 40°F. After three to five days remove the meat from the brine, spoon off any scum, stir the brine up, and repack the crock. This procedure need be done only once for most cuts of meat; but if the pieces are large (a whole ham, for example), it should be repeated once a week until the cure is complete.
To check progress, cut off a small piece of meat, wash it, cook it thoroughly, and taste it. When the meat is cured to your taste, remove each piece from the crock and rinse it first in warm water, then in cold. Use a scrubbing brush to remove any encrustations of salt, and hang the pieces in a warm place to dry. When dry, red meats will generally have a glossy film of dissolved protein that helps to preserve them.
Dry-curing. In this process the meat or fish is packed directly in a mixture of salt and seasoning. Start by coating each piece; rub it in well and press extra mix into the crannies on the cut ends, especially around projecting bones. Cover the bottom of the curing box with a thick layer of curing mix and place the pieces of meat (or fish) on it.
Pack more mix on and between the pieces, making sure each piece is well covered, especially where chunks touch, then put down another layer of meat. Continue until the final layer of meat is packed and covered. After three days remove the pieces of meat and recoat any surfaces that are not well coated. This process of checking and replenishing should be repeated every five days thereafter.
Making and Using a Smokehouse
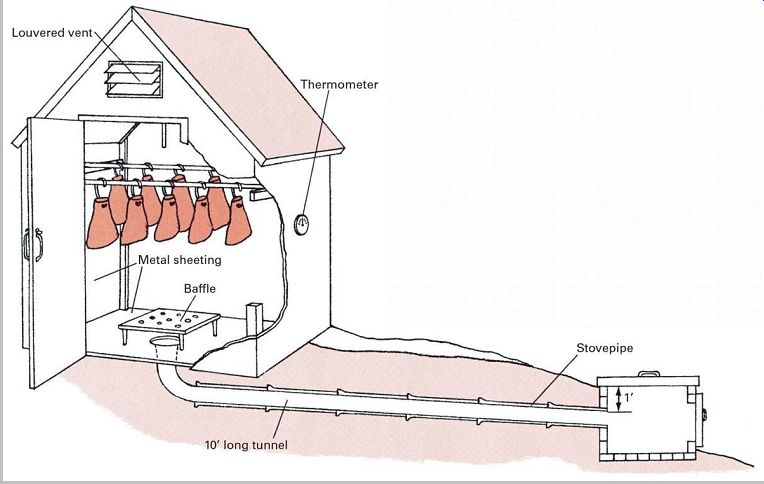
The difference between a smokehouse designed for hot smoking and one designed for cold smoking is largely a matter of the distance between the smoke chamber and the fire: the greater the distance, the cooler the smoke. Proper ventilation is important with either smoking method, since smoke that is trapped in the chamber too long becomes stale and gives food a bitter taste. Too much ventilation, however, dissipates the smoke. Your best guide is the temperature inside the chamber; install a thermometer that can be read from outside, then open or close the vents as needed.
Meats are cold smoked for flavor or for long-term preservation. When the aim is preservation, the temperature should be between 70°F and 90°F; the maximum is 110°F, although large hams are sometimes smoked at higher temperatures. Locate the fire pit about 10 feet from the smoke chamber on the side from which the prevailing winds blow. The top of the pit should be about a foot lower than the bottom of the chamber with a stovepipe or tile-lined tunnel between.
Hot smoking requires temperatures of 170°F to 210°F, so the smoke chamber should be insulated. Smoke is produced inside or directly beneath the chamber. If you use an electric burner to produce smoke and heat, the job of maintaining a proper temperature is made easier.
The flavor that smoke adds depends on the wood being burned. Softwoods should not be used-their resins are ruinous to smoked food-but almost any hardwood is usable. The best smoke is produced from hickory, apple, or cherry. To use an electric burner, fill a 1-pound coffee can with damp shavings or chips, and place it on the top of a burner set to low ; you will need to replenish the fuel about once an hour. Otherwise, start a fire with dry hardwood and let it burn to a bed of glowing coals before adding damp chips or shavings. Do not use a chemical fire starter-the odor will linger in the smoke.
-------------

When the chamber is filled with smoke and the temperature is right, load in the meat or fish. The best method is to hang the food from crossbars near the top. It can also be placed on mesh shelves of stainless steel or aluminum-not brass, copper, or galvanized steel. During smoking, continue to add damp fuel to maintain dense white smoke; should the smoke turn blue, it means the fuel supply is running low. If your smoke chamber is lined with metal, it is important to avoid the buildup of smoky deposits that will make new batches of smoked food bitter; clean and scrub the walls of the smoke chamber after every third or fourth use. Wooden walls are more difficult to clean, but they absorb much of the deposits and need not be scrubbed as often.
How to build a smokehouse
Permanent smokehouse for cold smoking can be constructed out of cinder blocks, bricks, stones, or seasoned tongue-and-groove lumber. Line the structure with tin or aluminum sheeting to reduce heat loss and to make cleaning easier. A small hinged door or louvered vents near the roof provide ventilation. Put up one or two row s of strong bars inside the smokehouse; they will be used to hang meat or fish. For easier temperature checks install a thermometer that can be read from the outside.
About 10 ft. upwind from the smokehouse itself dig a fire pit 2 1/2 to 3 ft. deep and 2 1/2 ft. wide, and line it with firebrick. Fit it with a removable cover, or, if it can be built into a hillside, with a metal side door. About a foot from the top of the fire pit install a fitting from a metal stovepipe. The stovepipe should slant upward slightly so that it is 6 to 12 in. higher at the smokehouse than at the fire pit. To help distribute the smoke and prevent meat drippings from falling into the pipe, place a baffle over the opening in the smokehouse floor.
-------------
Recipes and Techniques For Curing Poultry, Pork, Beef, and Game
Curing and smoking are inexact arts, and any attempt at precise instruction concerning the strength and duration of the cure, or the time spent in the smokehouse, will be frustrated by variables. The type of meat and its weight, size, and quality are considerations. So are temperature and the density of the smoke, both of which vary with humidity and air pressure. The way the salt is ground makes a difference, as does the kind of wood burned for smoke. The greatest variables of all are the tastes and intentions of the person doing the smoking.
If your purpose in curing and smoking a piece of meat is to preserve it, use a strong, salty brine cure, and cold smoke for the full recommended time. If you are not interested in long-term storage but merely wish to add tenderness and flavor, soak the meat in a marinade, or dry cure it briefly in seasoned salt before hot smoking. The length of time a piece of meat should be hot smoked.
Country-Style Ham and Other Pork Cures
The majority of traditional curing recipes are designed for pork. One reason is that the meat's rich taste is ideally complemented by curing and smoking. Another is that pork was the staple meat among early settlers, and smoking was the most practical way to store hams, pork shoulders, sides of bacon, and other large cuts.
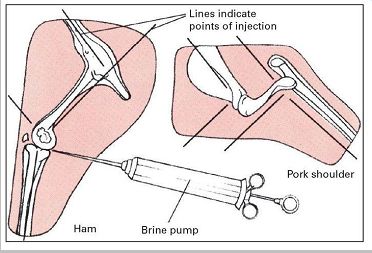
Pumping a ham. To prevent rot at the heart of a large piece of pork, inject brine cure close to the bone. A brine pump to do the job can be bought at most agricultural supply stores. sterilize the pump and fill it with 1 oz. of brine for each pound of meat. Thrust the needle deep into the meat; then press the plunger gently and steadily as you withdraw it. Pinch the opening closed to prevent brine from oozing out. Make four or five separate injections to distribute the cure evenly.
------------
Protection from insects

------------ Insect infestation is a major enemy of stored meat.
To protect a ham after it has been cured and smoked, first wrap it in heavy brow n paper according to the numbered sequence shown above. Place the wrapped ham in a fitted bag of strong sackcloth, tie the top with string or wire, and suspend the sack in a cool place. inspect regularly for signs of insects, such as greasy spots or holes in the sackcloth. if the meat has been attacked, trim away all affected parts and use the remainder as soon as possible. Remove all meat from the storage area and spray room surfaces with a methoxychlor solution (1/2 lb. powder per gallon of water). When you replace the meat, do not allow it to contact sprayed surfaces.
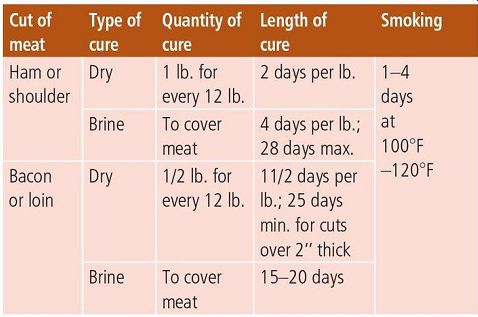
Long-term preservation of large pieces of pork calls for thorough curing and cold smoking. The process, known as hard-curing, can take from 10 to 90 days, depending on the size and cut of meat. The result is the familiar, rich flavor of country-style ham, pork shoulder, and bacon. Of the many old-time methods of preservation with all their regional variations, this is still the most popular. The chart at right gives curing and smoking times.
You can also cure and smoke pork for flavor alone rather than for preservation. Cut the meat into pieces of no more than 4 pounds. Dry-cure up to a week or brine-cure up to nine days, then rinse and scrub the pieces, and hang them to dry. Smoke for one to four hours at 110°F to 120°F.
The cure recipes given at right can be used for either type of smoking. Always cook pork well before eating it, varies with temperature. The best guide is a reliable meat thermometer stuck deep into the meat.
Meat that has been cured and cold smoked for long-term preservation keeps best at 55°F to 60°F. It should be suspended to allow good air circulation, and pieces should not touch each other. Before storing smoked meat, clean the storage area thoroughly, and seal all cracks where dirt can collect or insects might breed.
The following basic curing recipes can be used with a variety of meats:
Sweet Pickle Brine
4 oz. pickling spices
2 1/2 gal. water
2 1/2 lb. salt
3 cloves crushed garlic
1 lb. sugar
Simmer spices in a cup of boiling water for 10 minutes, then mix with remaining water and other ingredients. Chill brine to 35°F, and add meat. Maintain temperature throughout curing.
Spicy Seasoned Salt
1 cup salt 4 tbsp. sugar 4 tbsp. black pepper 4 tbsp. white pepper 1 tbsp. celery salt 2 tsp. onion powder 2 tsp. garlic powder 1 tsp. sage
Mix all ingredients and store for several days in an airtight jar to allow the flavors to blend before applying to meat.
Curing Beef
Any cut of beef can be cured and smoked for preservation, but only the cheaper cuts, such as rump, chuck, and brisket, are really improved by the process. To give a smoky flavor to steaks and other good cuts without losing too much moisture, cook them first, then cold smoke them for a short time to taste. In curing beef for preservation, avoid dry cures; use a brine cure that is rich in sugar or molasses.
Corned Beef
2 1/2 lb. salt 10 lb. brisket of beef 1 gal. Water 1 lb. brown sugar 4 cloves garlic 4 tbsp. pickling spices Rub 2 lb. of the salt into the meat, then place meat in a clean container for 24 hours. Boil water, and mix in sugar and remaining salt. Let cool, then pour brine over meat.
Add garlic and spices, weight meat down, and cure for 30 days in refrigerator at 38°F to 40°F, turning meat every five days. Remove meat as needed; rinse in fresh water for a few hours before cooking. Keep remaining meat submerged in brine at 38°F to 40°F.
Pastrami
1 1/2 gal. water 3 lb. salt 3 cups brown sugar 4 tbsp. pickling spices 8 crushed cloves 6 crushed garlic cloves 2 tsp. black pepper 1 tsp. onion powder 1/2 tsp. cayenne Whole brisket of beef Mix all ingredients except brisket. submerge brisket in brine and cure three to four days for each pound. Rinse and dry. Cold smoke for four hours, then finish by cooking in slow oven until center of meat reaches 140°F. store in refrigerator.
The Ancient Art of Jerking
The word "jerky" is an Anglicized version of the Spanish charqui, which itself comes from the Peruvian ch'arki, meaning "dried meat." Jerky is a product that is so hard as to be nearly indestructible. It was a staple of American Indians as well as the Incas, and frontiersmen were quick to learn jerking for their own survival. Today, jerky and its derivative, pemmican, are popular among campers and backpackers. The meat is nutritious, lightweight, and compact, and will remain edible for months or even years if stored in containers that have a bit of ventilation. Any meat can be jerked, but lean beef and venison produce the best results.
---------
Brine Cure for Pork
2 gal. water 3 lb. salt 1 lb. brown sugar 2 tbsp. black pepper 5 crushed cloves 1 tbsp. white pepper Dry Cure for Pork 3 lb. salt 1 1/2 lb. brown sugar 5 crushed cloves 2 tbsp. black pepper 3 crushed bay leaves 1 tbsp. cinnamon
Brine-cured jerky. Cut lean meat into long, wide slabs about 1 inch thick, and cure for three to six days in the sweet pickle brine described on the opposite page. Then rinse and dry in a cool place. Use a very sharp knife to slice the meat lengthwise into 1/4-inch-wide slices (it will help to chill the meat to near freezing first). Hang the slices on racks and cold smoke at 75°F to 85°F for 12 to 36 hours. If the jerky snaps when it is bent rather than merely folding, it is ready.
Quick-cured jerky. Cut lean raw meat into very thin slices.
Dip into a dry-curing mix (pure pickling salt will do) and suspend from racks. Smoke at 100°F to 120°F for two to four hours. Rinse off any encrustation of salt, and dry the meat between paper towels; then lay flat in baking trays and place in a cool oven (175° to 200°F) until meat is stiff and dry. Leave the oven door open to allow moisture to escape.
Pemmican. Pound some jerky into a powder or run it through a meat grinder. Add nuts, seeds, or dried fruit that have been finely chopped or ground. Bind the whole mixture together with melted beef fat and roll it into balls.
Store in a lidded container in a cool, dry place.
Curing Poultry
Large birds with a high fat content, such as ducks, geese, and capons, respond well to smoking. Turkeys and large chickens can also be smoked but tend to become dry and tough unless they are basted frequently either with cooking oil or with their own juices. Because dry cures tend to make the problem worse, they are seldom used with any poultry- and never with chicken or turkey. For flavor the bird can be rubbed with a basic seasoning mixture, such as the spicy seasoned salt on this page. The more usual method is to brine-cure before smoking. Prepare the bird by cutting off its lower legs, head, and neck. Then remove the entrails and internal organs and wash the central cavity to remove all blood clots.
After brine-curing the bird, hot smoke it at 200°F to 225°F to taste, basting often to prevent drying. Alternatively, cold smoke until the skin turns a golden brown or deep reddish brown, then cook in oven. While cooking, keep the bird moist by wrapping it in tightly sealed aluminum foil along with a few tablespoons of water. Once the bird is smoked, use it immediately, since neither procedure contributes to preservation.
Brine Cure for Poultry
6 cloves 3 gal. water 3 lb. salt 3 1/2 cups brown sugar 2 tbsp. dill salt 1 tbsp. onion powder 1 tbsp. sage Ginger, nutmeg, paprika to taste (optional) Crush the cloves, and mix the ingredients in a crock.
Submerge the bird in the mixture, and let it cure at 38°F to 40°F for 24 to 36 hours per pound. Rinse and dry the bird.
Dressing and Curing Game
All wild game should be field dressed as soon as it is killed. Start by removing any musk glands from the legs.
Next, open the body cavity from the base of the tail to breastbone, cutting around the anus to free it. Remove the entrails, cut around the diaphragm and through the windpipe and gullet, and remove the heart and lungs. Roll the animal facedown to let the blood drain, then clean the body cavity by rubbing it with grass, paper, or cloth--do not wash it, since moisture speeds spoilage. Keep the carcass chilled if possible.
Bear. Use the same recipes and smoking techniques for bear as for pork. Bear meat, like pork, must be thoroughly cooked as a precaution against trichinosis.
Deer, elk, moose. Venison is even less fatty than beef.
Use the sweet brine cure given below before smoking large pieces, or cut the meat into strips for jerky.
Sweet Brine Cure
3 gal. water 5 1/2 lb. salt 3 1/2 cups brown sugar 6 crushed bay leaves 3 tbsp. black pepper
Small Game Marinade
1 cup wine 1 cup vinegar 1/2 cup olive oil or vegetable oil 1 medium onion, chopped 3 bay leaves 1 tbsp. oregano 1 tsp. nutmeg 2 cups water 3 tbsp. sugar (optional) small game animals, such as rabbits and squirrels, are too lean to smoke well, but their flavor is enhanced by soaking in this marinade before cooking.
Smoking and Drying Food From the Sea
Almost every type of fish responds well to curing and smoking. The flavor of oilier fish, such as salmon and eel, is particularly enhanced by the process. Less juicy fish, such as pike, should be basted often while they are smoking to prevent them from becoming dried out.
Because fish rot quickly, they should be cleaned and dressed as soon as they are caught, then kept on ice until they are processed. The processes of curing and smoking are quicker and easier with fish than with most meats. Only a brief period in the cure followed by a few hours in the smokehouse is sufficient to add a delicious flavor; with slightly extended treatment you can achieve long-term preservation.
Jerking meat the American Indian way
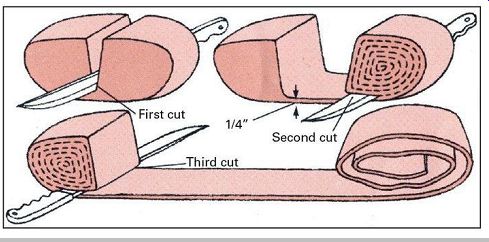
-------------- Indian women could produce a sheet of meat 1/4 in. thick
by several yards long from a single chunk of lean meat. The technique was to
cut down through the center to within 1/4 in. of the bottom, then outward in
one direction, unwrapping the meat as the cutting proceeded until half the
chunk was sliced. The chunk was then reversed and the other half cut the same
way.
A fish that is to be cold smoked should first be cured to extract surplus moisture. Removing water firms the flesh and helps preserve the fish during smoking. First soak the dressed fish in a solution of 1 cup of salt per gallon of water for half an hour, then either dry-cure for up to 12 hours or else brine-cure for two to four hours. After curing, rinse the fish in fresh water, removing any lumps of salt with a stiff brush, then hang it to dry in a warm, shaded, well-ventilated place.
When the surface of the fish is absolutely dry, put it in the smokehouse. How long you smoke the fish depends on your personal taste and on how long you intend to store it. If you plan to eat the fish within a week, 24 hours of cold smoking should be sufficient. If you intend to keep it for several weeks, smoke the fish for up to five days, depending on its size and thickness: fillets will be ready the soonest, but steaks may require a few extra days. In either case expose the fish to light smoke by keeping the vent open for the first third of the total smoking period, then increase the density of the smoke, but keep the temperature in the chamber below 90°F.
Fish that is to be hot smoked need not be cured first; in fact, the combination of curing and smoke cooking will probably make it dry and tough. If you wish to add flavor, soak the fish briefly in a marinade or rub it with seasoned salt before moving it into the smoke chamber. Smoke it at a temperature of about 100°F for the first two to four hours, then gradually increase the temperature in the chamber to 140°F until the flesh is flaky. Eat the fish immediately, or let it cool, wrap it in wax paper, and refrigerate it.
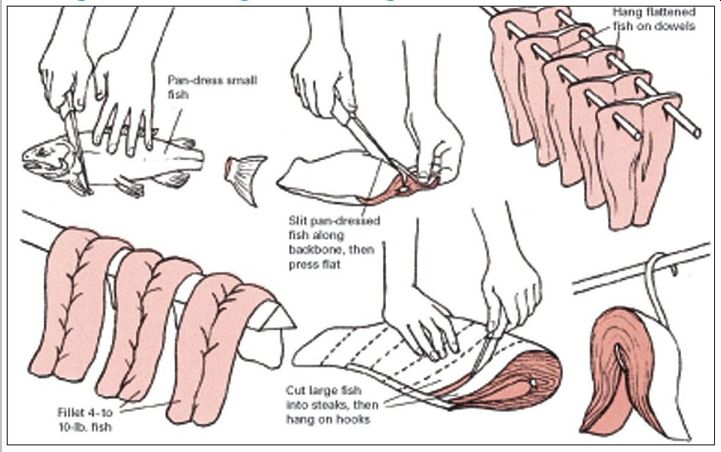
Dressing Fish for Curing and Smoking
----------------
Prepare small fish (up to 4 lb.) for smoking by splitting and pressing. start by pan-dressing the fish; then carefully cut down the length of the backbone, and press the fish flat. Pierce the flattened body through the upper corners with dowels, and hang it for smoking.
Fillets and steaks. Fillet a 4- to 10-lb. fish and hang the fillets over wooden bars in the smoke chamber.
Cut larger fish into 1- to 2-in.-thick steaks. First, pan dress; then use a sharp knife to slice the body crosswise. Hang on hooks or place on mesh grills as with red meat.
Two Cures and a Marinade
The three recipes given below are good, basic formulas for curing almost any type of fish. For more tang you can add dried mustard, bay leaf, or other spices. The marinade only adds flavor but does not aid in preserving. After either cure, the fish should be left to dry until a glossy layer, called the pellicle, appears on its skin.
Dry Cure for Fish
1 lb. salt 1 lb. dark brown sugar 1 tbsp. garlic powder 2 tbsp. white pepper 1 tbsp. onion powder
Combine ingredients 24 hours before cure is needed, and store in airtight container to allow flavors to blend.
Fish Marinade
1 cup pineapple juice 8 tbsp. lemon juice 4 tsp. soy sauce 1/2 tsp. black pepper 1 crushed garlic clove
Brine Cure for Fish
5 qt. water 3 lb. salt 2 cups brown sugar 2 tbsp. onion powder 2 tbsp. oregano
Smoked Salmon
A salmon's large size and oily flesh make it a prime candidate for smoking, and there are nearly as many recipes for smoked salmon as there are for smoked ham.
Lox, a traditional favorite, is thoroughly cured and cold smoked and eaten raw. Other recipes use hot smoking.
Dress the salmon by removing the strip of fat near the dorsal fin but not the rest of the skin. Clean the central cavity, then fillet the fish, or-if the salmon is large-cut it into thick steaks. The salmon can be dry-cured in the spicy mixture described below or brine-cured by submerging the fillets or steaks in a very salty brine for one to two hours, then letting them drain.
Spicy Dry Cure for Salmon
1 lb. salt 2 lb. sugar 2 oz. allspice 2 oz. crushed cloves 2 oz. mace 2 oz. white pepper 2 oz. crushed bay leaves
Mix ingredients thoroughly. Pack salmon fillets or steaks in mixture and cure for 8 to 12 hours. Rinse and dry fish. Smoke at 90°F for eight hours in light smoke, then increase density of smoke for 18 to 48 hours, depending on the flavor you like. (Or you can hot smoke the fish at 170°F until the flesh becomes flaky.) store the salmon in a refrigerator.
Drying Fish in the Open Air
In an area where warm sun and low humidity can be relied on for at least a week at a time, the flesh of lean fish can be preserved without smoking by air drying it. Properly dried, a fish will keep without refrigeration for a year or longer, provided it is protected from moisture.
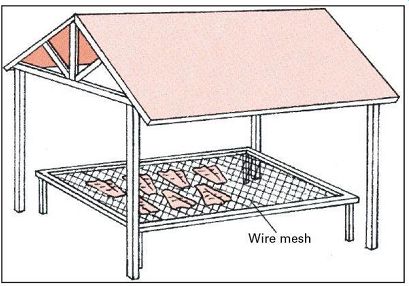
----------- Fish should be dried in open air but shaded from direct sun.
Ensure ventilation by spacing fish well apart on racks of wire mesh.
Small fish can be hung to dry under the eaves of a house or barn. suspend each fish on its own metal hook. Bring fish inside at night and stack in a location that is dry and well ventilated.

----------- Drying is not practical for salmon, catfish, and other species
whose oil content exceeds 5 percent.
The only cure that is needed before drying is packing in salt. Finely ground pickling salt is best for the job. Clean and dress the fish as soon as it is caught; split and press fish that weigh less than 2 pounds and fillet larger fish; if the fish is large enough to require steaking, it is probably too fatty to be dried. Rinse the meat in a brine made from 1 cup of salt per gallon of water, towel it dry, then coat in salt, allowing about 1 pound of salt for every 4 pounds of dressed fish. Spread a layer of salt on the bottom of a dry curing box , and place a layer of fish, skin side down, on it. Cover with more salt, then add more layers of fish in the same manner. The last layer of fish should be placed skin side up. A small batch of fish may cure in 48 hours in warm weather; allow up to seven days for a large batch in cool temperatures.
When the weather is right--warm and dry but not too hot--take the fish from the curing box, rinse them, and clean off all salt, scrubbing with a stiff brush to remove any visible salt encrustations. Hang the fish or lay them on racks in a shady, well-ventilated place (direct sun will cause spoilage).
Bring the fish inside every evening and stack them one atop another, head to tail, with the skin side down, except for the top fish, which should be placed skin side up. Then cover them, and press them with a weight about equal to the weight of the stacked fish.
Six warm days are usually required for thorough drying.
To test for dryness, push on the flesh with your finger; if the impression remains, the fish is not yet dry. Should the weather turn before drying is complete, take the fish inside and wait for another good day. They can be kept for up to two weeks in a cool, dry place, provided that every second day you restack them, putting the bottom fish on top and putting a little salt on each layer.
Preserving Fish in Brine
Oily fish that are not suitable for drying can be preserved without smoking by using their own juices to produce a strong brine. About 25 pounds of fish can be preserved in this manner in a 2-gallon stone crock.
Dress the fish according to size and score the flesh so the salt will penetrate faster. Soak them for an hour or two in a mild brine (1/2 cup salt to 1 gallon water). After draining, coat the fish with dry salt (allow about 1 pound for every 3 pounds of fish). Next, sprinkle a layer of salt in the bottom of the crock and place a layer of fish on top of it.
Cover with another layer of salt, then another layer of fish.
Continue in this way until the container is full. Weight the fish down. Within 2 to 10 days, depending on the size of the cuts, the salt and fish juices will have combined to make a thick brine. At this point remove the fish, rinse and brush them. Scrub the crock and replace the fish; then cover with strong brine (2 2/3 pounds of salt to 1 gallon of water).
Store in a cool, dark place. Change the brine at least once every three months. If the weather is hot, change the brine more often.
Sausages and Scrapple: Delicious Techniques For Avoiding Waste
Autumn was the traditional time for slaughtering and putting up meat: the animals had been fattened during the summer, and cooler fall temperatures helped keep just-slaughtered meat fresh. Almost no part of a carcass was allowed to go to waste. Large joints of meat were carefully cured and smoked; organ meats were consumed immediately, and fat was rendered into lard for soap, candles, and shortening.
Hides were fleshed and tanned, large bones used for broth, heads were boiled down to make headcheese, and the feet, or trotters, of pigs were stewed, jellied, or pickled.
With all this accomplished, there were still many scraps of meat, fat, and innards that remained, waiting to be put to good use. Nowadays, such bits and pieces are discarded or ground up for pet food. In the old days, however, they were converted into sausage or scrapple with the intestine of a freshly slaughtered animal serving as casing.
Although sausages, scrapple, and headcheese are still produced commercially, traditional recipes and ingredients are seldom used. If you want to enjoy their special flavors, you will probably have to make them yourself-and when you make your own, you can include just the right blend of meats and spices to suit your own taste. The only special tool you will need is a meat grinder.
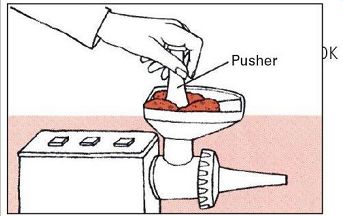
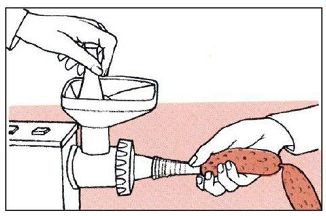
--------------- 1. Meat grinder ensures that the meat is cut into fine ribbons
rather than pulped. Use pusher, not your fingers, to press meat into the grinder.
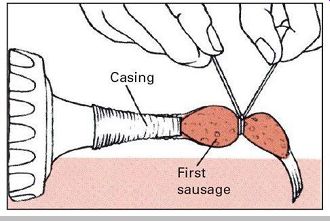
--------------- 2. Rinse casing thoroughly. Place it over nozzle, stuff
a small section, and tie off tightly in the middle in order to give an airtight
seal to the first sausage.
--------------- 3. Continue stuffing, supporting casing with free hand
to prevent kinks and bends. Tie off or twist each link. Tie off end, leaving
a little meat outside.
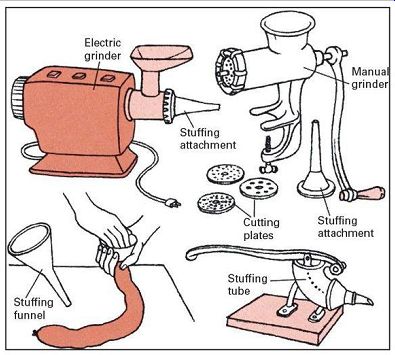
Electric grinders do the job quickly and effortlessly but are expensive and, in general, designed for the processing of larger quantities of meat than you are likely to need. Food processors can be used to grind meat but have only limited value, since they will only produce a fine grind. Old fashioned hand-cranked meat grinders call for a bit of elbow grease but are still best for home use; they will not overheat the meat while it is being ground, and they come with several cutter plates for finer or coarser grinds plus an attachment for stuffing sausages.
Plastic casings and other types of artificial casings are available in various sizes but are difficult to use. For the home sausage maker the best casings are probably those made from the small intestine of a hog or sheep. They can usually be bought from a butcher who makes his own sausages. If you want to try making your own casings, you will need the intestine from a freshly slaughtered animal.
Clean it thoroughly, scraping both sides to remove all traces of fat and mucus (this is a time-consuming job).
Rinse the intestine in several changes of water, and store it in brine until it is needed. Hog casings can be used for sausages up to 11/2 inches in diameter; larger casings are commonly made of light weight muslin.
Any kind of meat, poultry, or game can be used for sausage, from the cheapest to the most expensive. The lower the quality of the meat, however, the poorer the sausage is likely to be. Although pork and beef are commonly used, lamb, veal, and poultry will also serve the purpose--and venison sausage is a rare treat. No matter what type of meat is employed, it is important to strike a balance between fat and lean meat: about two parts lean meat to one part fat is satisfactory in most cases. Too little fat results in hard, dry sausages; too much fat results in greasy sausages that shrink when they are cooked. When stuffing the sausage casings, it is important to avoid air bubbles, since they can become pockets of spoilage; if any exist in the finished sausage, prick them with a needle. To give a soft texture and consistency to the meat so that it will fill the casings easily, it is a good idea to add a little water
Manual and electric grinders usually come with a stuffing attachment. A variety of other sausage-stuffing devices are available, including a stuffing tube with matching wooden plunger and a funnel through which the meat is pressed by hand.
------------ Many types of sausage and scrapple must be eaten soon after they are prepared or else stored in a freezer.
Other types, such as hard sausages, benefit from aging and will keep unrefrigerated for considerable periods of time. If you plan to preserve your sausages by freezing there are certain seasonings to avoid: garlic loses its flavor, sage produces an off flavor if it is kept frozen too long, and salt may cause a rancid taste after about a month of freezing.
Old-fashioned Pork Sausage
4 lb. lean pork 2 lb. pork fat 3 1/2 tsp. salt tsp. sage 3 tsp. pepper 1 1/2 tsp. sugar 3/4 tsp. ground clove 6 2/3 cup cold water Thoroughly chill meat and fat and put them separately through grinder with 1/2-in. cutting plate. Chill meat again.
Combine all seasonings and mix into meat, then put through grinder with 1/8-in. cutting plate. Mix meat and fat in a bowl and add just enough water to make a soft dough.
stuff into casings of muslin or hog intestine, taking care to avoid air bubbles. Hang sausages in a cool, dry place (or in the refrigerator) for one to two days. These sausages gain from being cold smoked at about 80°F for 10 to 14 hours until they turn a deep, dark brown. store under refrigeration. Cook before serving.
Traditional Recipes for Sausage, Scrapple, and Headcheese
The different regions of America developed sausage recipes tailored to local food resources and ethnic traditions. Another influence was weather: sausages that are stuffed with cured meat and then smoked afterward have superior keeping qualities in warm climates. Many sausages are made with uncooked pork; they must be thoroughly cooked before they are eaten.
Indiana Farm Sausage
This herb-flavored sausage is delicious fried for breakfast, especially with eggs or pancakes and syrup.
4 lb. lean pork 1 lb pork fat 2 cloves garlic, minced 2 tsp. black pepper 2 tsp. chili powder 2 tsp. thyme 2 tsp. basil 4 tsp. salt 2 tbsp. sage 2 tbsp. parsley 2 tsp. cayenne 2 tsp. marjoram 2 onions 6 tbsp. iced water Cut meat and fat into chunks, add seasonings, and grind with medium cutting plate. Grind onions. Knead ground meat and onion in bowl and add iced water to give a soft dough consistency. stuff into hog casings. store in refrigerator.
Southwestern Sausage
Although well-flavored and spicy, this spanish-indian sausage is not quite as hot as the Mexican chorizo.
2 1/4 lb lean pork 3/4 lb. kidney suet or fat 5 cloves garlic, minced 4-6 chili peppers, chopped 1/2 cup onion, finely chopped 1/4 cup brandy 1/3 cup chili powder 1 tsp. black pepper 1 tsp. ground coriander 1 1/2 tsp. cumin salt to taste 1/2 tsp. Tabasco 1/2 cup vinegar
Grind lean pork and fat together with coarse cutting plate.
Combine garlic, peppers, onion, brandy, and seasonings.
Mix into meat along with Tabasco and vinegar. stuff into casings, lying off each link at 4 in. Hang in a warm, breezy, insect-free place to dry for 24 hours. store in refrigerator.
Summer Sausage
Although the traditional recipe contains some pork, beef and beef fat can be used throughout.
6 lb. lean beef sweet Pickle Brine
4 tbsp. salt 4 tsp. garlic powder
3 tbsp. white pepper
2 lb. lean pork
2 lb. pork fat
8 whole black peppercorns
2 tbsp. coriander seed
Pinch mustard seed
2 1/2 cups dry red wine
Cut the beef into 2-in. chunks and place in a crock. Cover with brine; use weight to keep meat submerged. Remove the meat and stir the brine every four days. After 8 to 12 days remove beef, rinse it, and place it in the refrigerator to drain for 24 hours; then cut it into smaller chunks, and mix with the salt, garlic powder, and white pepper. Grind the beef, pork, and pork fat twice through 3/16-in. plate, and mix. Mix in other seasonings and wine; let stand for 48 hours in refrigerator. stuff into muslin casings. Cold smoke at 80°F for 12 to 14 hours until the skin turns dark brown (the sausage will dry and shrink by as much as one-third). Hang the sausage in a refrigerator or other cool place for at least two weeks. Use in salads and for snacks. store in refrigerator.
For a faster recipe grind pork and beef through coarse cutting plate and mix in 14 oz. of Dry Cure for Pork. Regrind through same plate, knead meat in a glass or plastic bowl, and place in the refrigerator for 48 hours. Then mix in salt and other ingredients and continue as with brine-cure recipe.
------------
Old-Style Frankfurters
Making a muslin sausage casing

To case extra-large sausages (more than 4 in. in diameter), fold and sew a piece of muslin into a tubular shape, turn it inside out, and dampen with water just before stuffing.
Turn of the century cartoonist Tad Dorgan deserves credit for the name "hot dog"; his drawing of a frankfurter as a dachshund encased in a bun inspired the term. Store frankfurters under refrigeration.
1 1/2 lb. pork loin or shoulder 1 lb. pork fat 2 tbsp. salt 1 tsp. white pepper 1/2 tsp. coriander 1/2 tsp. nutmeg 1/2 tsp. cinnamon
Cure the meat for three days in the Brine Cure for Pork ; then grind it two times, along with the fat, through a coarse cutting plate. Mix in salt and seasonings, and grind again through a medium-fine cutting plate. slowly add 1 cup of iced water and mix thoroughly. stuff into hog casings about 18 in. long. secure at both ends and twist in the middle to make two long, thin sausages from each length of casing. Hang to dry for 24 hours; then cold smoke for eight hours or until sausages turn deep brown. To cook, simmer in boiling water for 10 minutes.
Scrapple
This Pennsylvania Dutch delicacy, once popular in many parts of America, has slowly lost favor; a shame because it is tasty, economical, and easy to make.
5 lb. pork scraps, including bony meat, liver, kidneys, and heart gal. Water 3 cups cornmeal Freshly ground pepper, sage, thyme, 1 and salt to taste Boil liver, kidney, and heart in salted water until tender.
Remove from pot and cut into small pieces. Mix with other meat and return to water. Boil until meat shreds when tested with two forks (there should now be about 3 qt. of broth). Remove any bones, then slowly add cornmeal to pot, stirring constantly until the mixture starts to thicken.
Continue to cook until the scrapple has a thick, mushy consistency. season with plenty of pepper plus sage, thyme, and salt. Pour into greased molds and allow to cool.
To cook, cut into 1/4 to 1/2-in. slabs, coat in flour, and fry in butter. serve with eggs for breakfast or as a tasty trimming with roast game birds. Philadelphia scrapple is made the same way but only shoulder and neck meat is used. store in refrigerator.
Sources and resources
Books and pamphlets:
Ashbrook, Frank G. Butchering, Processing and Preservation of Meat. New York: Chapman & Hall, 1973.
Dubbs, Chris, and Dave Heberle. The Easy Art of Smoking Food. New York: Winchester Press, 1978.
Eastman, Wilbur F., Jr. The Canning, Freezing, Curing & Smoking of Meat, Fish & Game. Charlotte, Vt.: Garden Way Publishing, 1975.
Sleight, Jack, and Raymond Hull. Home Book of Smoke Cooking Meat, Fish and Game. Harrisburg, Pa.: Stackpole Books, 1982.
Stoner, Carol Hupping, ed. Stocking Up III. New York: Fine Communications, 1995.
U.S. Department of Agriculture Staff. Complete Guide to Home Canning, Preserving and Freezing. New York: Dover, 1994.
===