
Timber-Frame Method, Now Centuries Old, Still Means Quality
Farm families have long valued a sturdy barn as much as a comfortable home. Barns are a symbol of the farmer's relationship with the land and of his personal goals and values. Eric Sloane, the noted historian and artist of Americana, describes the sturdy old barns of New England as the "shrines of a good life." Their simple, honest lines and lasting strength seem to reflect the farmer's steadfast love of the soil and enduring belief in a secure and bountiful future.
Care, pride, and dedication go into the construction of a good barn. Very often details of craftsmanship hidden high in the hayloft are likely to be of finer quality than those displayed in the parlor of the family house. Old-fashioned barns had massive, carefully fitted frameworks of hand hewn timbers, joined together with stout wooden pegs instead of nails. This construction method, called timber frame, or post and beam, had its roots in medieval European architecture. In spite of the time, labor, and skill necessary, the great-grandfathers of today's farmers built in this style because of its proven ability to last, even though the faster, cheaper, and easier method called stud framing -building as we do today with 2 × 4 s and nails-was available to them as early as the 1830's.
=========

--------Old-time raising bee took place in Ohio in 1888. Hard work and festivity at such occasions helped foster community spirit.
=======
Stud framing requires the additional strength provided by wall sheathing and siding. A timber frame, however, is self supporting. The heavy posts and beams-the principal frame members-are joined together at right angles, then braced with additional diagonal timbers notched into them.
The result is a strong and stable triangular support. Barn siding, necessary only to enclose the structure, is usually made of low-cost lumber, such as rough-cut 1-inch pine boards, nailed vertically to the frame.
Sections of a barn frame are generally built on the ground in units called bents. When all the bents are completed, they are raised upright and joined together to form the completed frame. Because the bents are so massive, community effort is usually required when the barn is ready to be erected. In fact, part of the beauty of an old fashioned barn lies in the spirit of community friendship it reflects. A hundred years ago an entire town might turn out on the "raisin' day" of a barn like the one shown on previous page; to raise a small barn, such as the one described on page 41, a dozen or so friends should suffice.
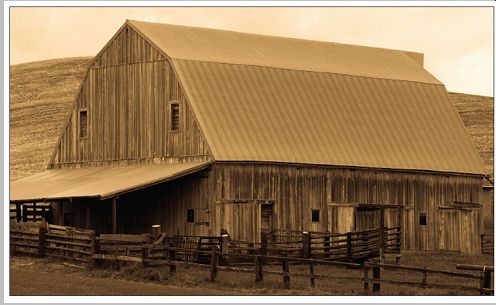
------- This sturdy old barn is a testament to old-time craftsmanship.
Gambriel roof was a favorite style among thrifty farmers because of the increased
interior space it provided. The original shingles have been replaced with more
modern roofing, but the frame remains sturdy, largely due to the amazing durability
of post-and-beam construction.
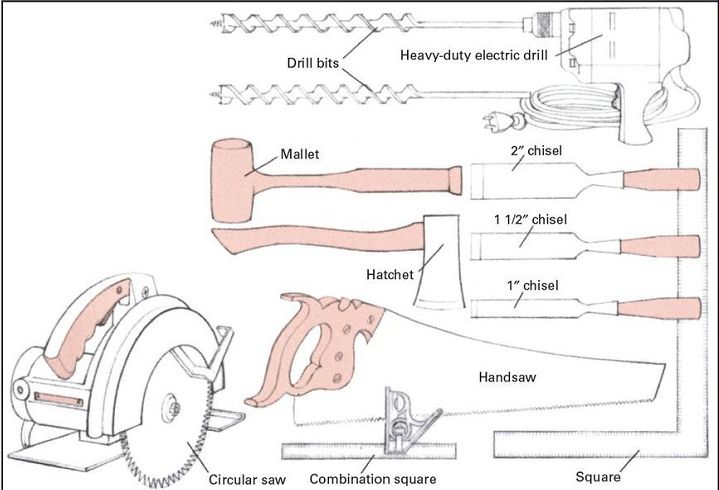
--------- A minimum kit:
Barn-framing tools shown here can be obtained at most quality hardware stores. in addition, you will need several standard carpentry tools, including a claw hammer, pry bar, and jack plane.
Old-fashioned specialties:
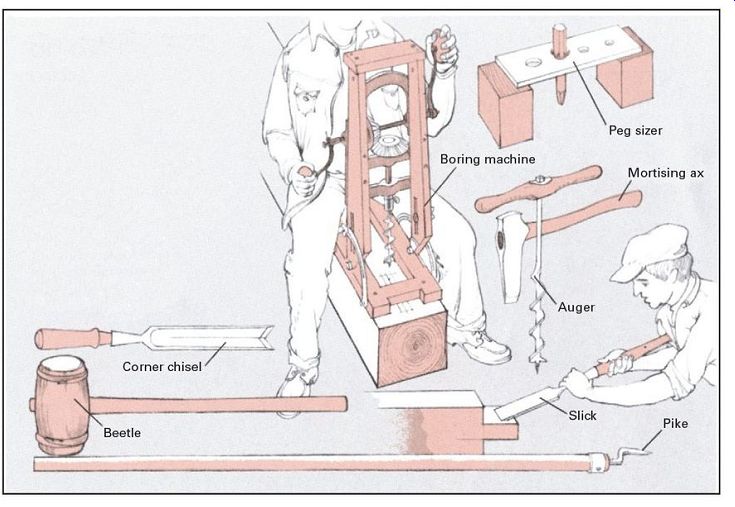
------Old-timers had a tool for every job. Mortising was done with a special ax or with a combination of boring machine, corner chisel, and slick (for smoothing). Frames were pounded together with a 40-lb. beetle. Pegs were shaped by driving them through a steel sizer. Pikes helped in raising the barn sides upright.
Tools Should Be Big and Sturdy
Timber-frame construction requires heavy-duty tools. Chisels should be the strongest type available, with socket ends to prevent the handles from splitting under repeated malleting. Three blade widths are helpful: 1 inch, 1 1/2 inch, and 2 inch; the overall length of the chisels should be at least 15 inches. You will also need a six- or eight-point crosscut saw, a 1 1/2 to 2-inch auger (or brace and bit), a mallet, a sledgehammer, a hatchet, measuring tools, and a level. A chain saw is valuable, and if electricity is available, a great deal of sweat can be saved with a sturdy power saw and a rugged electric drill. Keep edged tools sharp for safety, accuracy, and ease of use.
In the 19th century, carpenters had special tools designed expressly for timber framing. As a result, framing a barn back then was easier in many ways than it is now.
You may be fortunate enough to locate some of these valuable old tools at specialty tool stores, farm auctions, or through advertisements in collectors' magazines.
Some Tips on Timber
Seasoned hardwoods--usually oak or chestnut--are the traditional timbers for frames. Pine, hemlock, fir, or spruce can also be used, provided that all vertical posts made of these weaker woods are at least 6 inches square and that horizontal beams measure at least 6 inches by 8 inches.
Seasoned wood is best, but framing timbers can be green if allowances are made for later shrinkage. Try to obtain the timber from trees felled during the winter months. Winter-cut wood contains less sap, so seasoning is faster, shrinkage is less, and the wood is more resistant to decay. You may choose to hew your own beams (see Converting Trees Into Lumber, pp.16-21), or you can order them from a sawmill. Stack lumber off the ground and protect it from wet weather. Insert 1 × 2 boards between layers to allow air circulation.
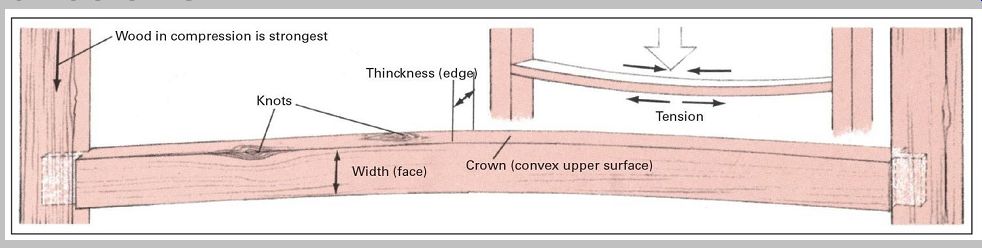
----- Wooden members can support the greatest loads when stress is along the direction of the grain, as in the vertical post at far left. Horizontal beams sag because stress crosses grain. Compression, which forces wood together along beam's top surface, creates tension along the bottom, stretching wood apart. For maximum horizontal strength, place beam on edge with its natural arc, or crown, facing upward, like an arch. However, if large knots are present on the concave edge rather than the crowned edge, place that edge up instead so that the knots will be pressed into the wood, not loosened and forced out by tension.
Timber-Frame Joinery: Like Giant Furniture
Timber framing is cabinetmaking on a grand scale. Except for size, the frame of an old-fashioned barn hardly differs from that of a traditional blanket chest, cabinet, or bureau of drawers; each is basically the framework of a box. Even the individual elements of construction are the same.
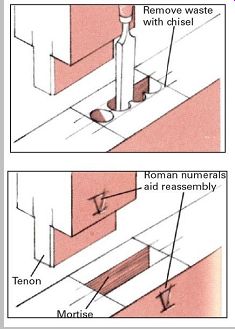
The principal joint used in both barn framing and furniture framing is the mortise and tenon. This joint has been used by carpenters and cabinetmakers since ancient times because of its great strength and simple construction.
When accurately cut, fitted, and pegged together, a mortise-and-tenon joint will be virtually as strong as the wood from which it is made. The technique of making mortise-and-tenon joints for timber-frame structures differs from that used when working on a piece of furniture. The tools are larger, the timbers are harder to maneuver, and the entire process must take into account the greater physical forces at work as well as the sheer weight of the materials involved.
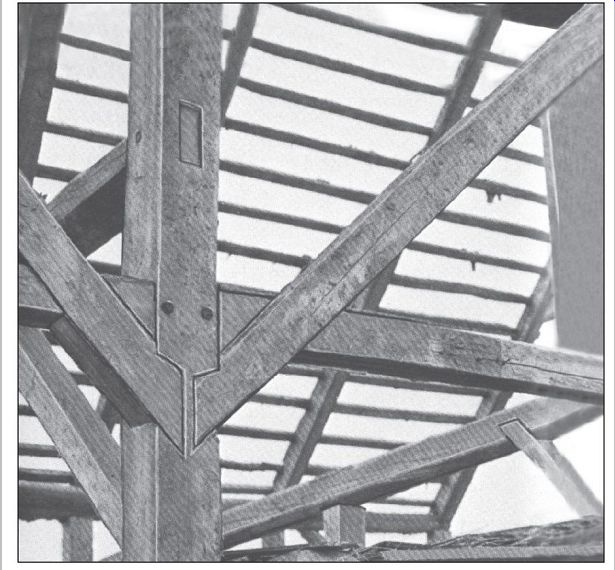
---- Wooden pegs and well-made joints hold frame of barn
together.
Old-timers recognized that a tight fit was the key to a sound, long-lasting joint and summed it up in the motto "Measure twice, cut once." They made and fitted each joint individually, paring the sizes to the last sliver of wood, then took the joint apart until the barn was ready for assembly.
Since no two joints were quite alike, the pieces were marked to avoid mistakes on raising day. Roman numerals were used as labels because they were easy to cut with a chisel; they can often be seen inscribed in the sturdy timbers of 19th-century barns.
Making a Mortise-and-Tenon Joint
--------
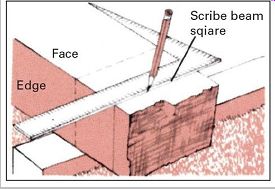
1. Make tenon first. scribe rough end of beam square on all sides, then measure off tenon length and scribe it on all sides. Tenon length should be half thickness of receiving timber.
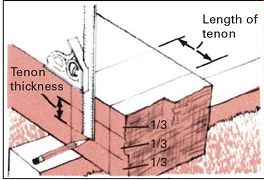
2. Place beam on its side. Use combination square as gauge to mark tenon thickness on both edges of the beam. Tenon thickness should be one-third the width of the receiving timber.
3. Saw off the rough end of the beam, being careful to cut along all four
squaring-off lines.
Then connect the ends of the tenon-thickness lines with a combination square.
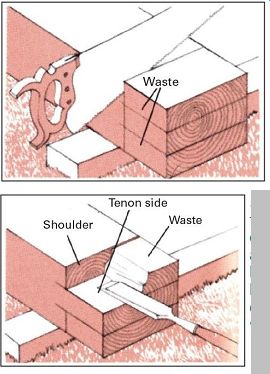
---------
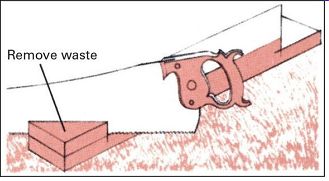
4. Saw the tenon shoulders next. Cut must be square. For accuracy, score line with chisel, and begin cutting with saw tilted back. Rock saw forward as rear thickness line is reached.
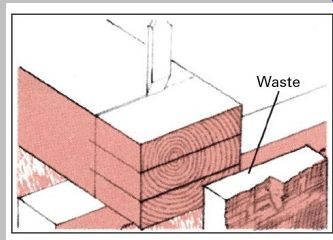
5. Remove waste from tenon sides. Use either ripsaw, chisel and mallet, or a sharp hatchet. To use hatchet, begin chopping at end of beam near surface; work along grain.
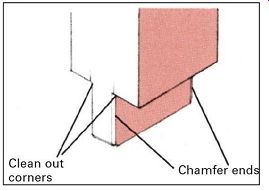
6. smooth tenon and shoulder with an extra sharp wide-bladed chisel or a block
plane. Take special care to clean out corners. Chamfer (bevel) ends to ease
final assembly.
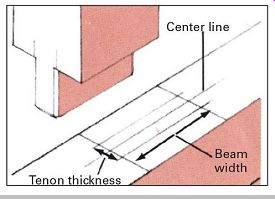
---------- 7. To lay out mortise, place tenoned piece across timber and scribe
width of beam.
Remove, then scribe center line, adding tenon thickness dimensions on either side as show n.
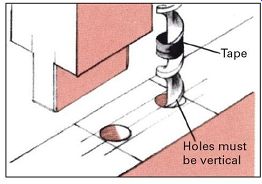
8. Bore out waste with bit slightly smaller than mortise width. Use tape on
bit for depth gauge, and hold drill at precise 90° angle to work. Bore the
two end holes first.
9. Smooth mortise sides with wide-bladed chisel and mallet, and carefully square corners. Use exact-sized chisel to trim mortise ends. Be sure walls remain square and vertical.
10. Check final fit by measuring both mortise and tenon; some trimming is usually necessary.
Mark each piece to aid later assembly (chiseled Roman numerals are traditional).
-------
From Beams to Bents
Before a barn raising can begin, mortised posts and tenoned beams must be fastened together and then braced with diagonal timbers to form bents, the basic units of barn construction. Styles of bents vary; in all cases, however, they consist of combinations of posts, beams, and braces--nothing else.
Each joint should be pegged, not nailed. Wooden pegs are stronger and longer lasting than nails, screws, or bolts, and, unlike metal fasteners, they will never rust. In addition, the pegs shrink and swell in harmony with the surrounding timbers, producing very tight joints with little or no splitting during moisture changes. Pegs should always be made of harder wood than the timbers that they join; oak and black locust are best. They must be made of completely seasoned wood; otherwise they can shrink and loosen in their holes. Ideally, a peg will tighten with age as the wood around it shrinks.
Braces, which make the framing rigid, must be installed carefully so that the structure remains square. The best way to ensure precision is to fit the braces after the main timbers have been joined and pegged.

------------ Timber-frame barn is less complicated than it appears. it is basically
a series of bents joined together.
Making pegs
Stock can be driven through steel peg sizer instead. Notches in sides of finished pegs give tighter fit.
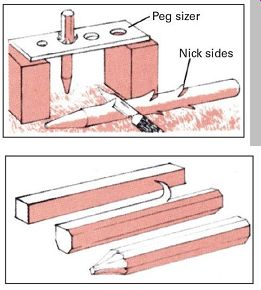
Whittle hardwood pegs by shaving corners to form rough octagon. Diameter is one-third tenon length.
Fitting braces
1. Mark 45° angle at one end of timber and scribe across ends. Mark length of brace, then scribe second 45° angle.
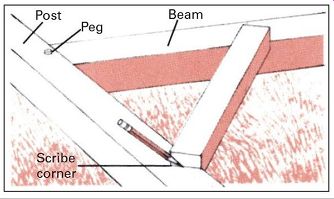
2. Measure, then saw halfway through brace by cutting along angle lines. Remove
triangular waste sections with chisel.
3. With post and beam pegged at 90° angle, hold brace in place and scribe outline of corner on each timber.
4. Scribe depth of notch on inside edge of timbers, then remove waste with
chisel. Fit the brace; drill and peg securely.
Drawboring
1. Driving pegs through offset holes draw s joints tight. Begin with joint assembled; bore through one side of mortise only.
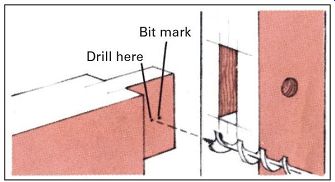
2. Remove tenon and locate bit mark. Drill hole through tenon, centered a
fraction of an inch closer to its shoulder.
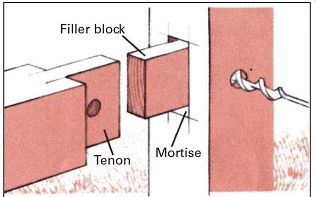
3. Replace the drill in the mortised timber and continue boring through the
other side. Use filler block to steady bit.
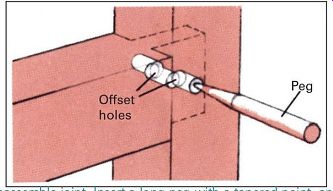
4. Reassemble joint. insert a long peg with a tapered point, and drive it
in until full thickness of peg travels through both timbers.
Construction Plans
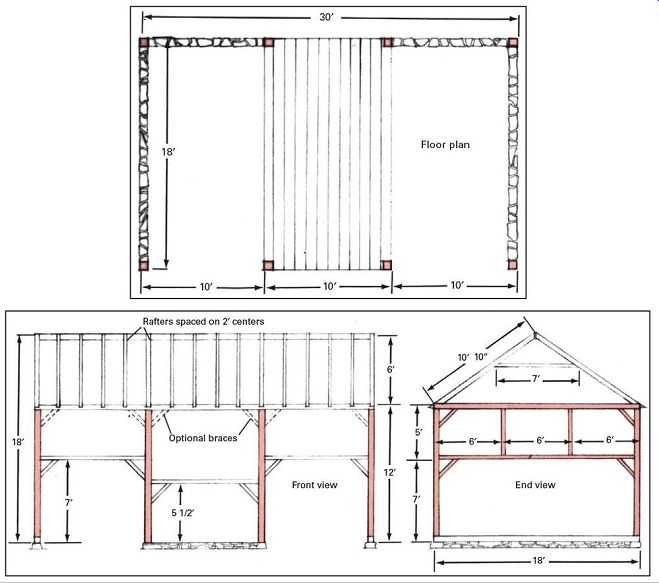
Specifications can be adjusted to suit individual needs, especially if you hew the timbers yourself, as the builder of the barn pictured here did. Before building this or any barn, seek professional advice to be sure that timber sizes and span lengths are correct for the conditions and Specifications can be adjusted to suit individual needs, especially if you hew the timbers yourself, as the builder of the barn pictured here did. Before building this or any barn, seek professional advice to be sure that timber sizes and span lengths are correct for the conditions and type of wood being used. Braces are especially important.
For extra strength include as many as possible.
=============
NOT-included section added below....
Building Your Own Old-fashioned Barn

----------- Authentic four-bent barn complete with handmade hardware.
Even if you are not a farmer, a small barn has dozens of practical uses. The handsome four-bent barn shown here serves a Connecticut family as a two-car garage; it could also be a workshop or studio, and the two lofts overhead provide a generous bonus of storage space. The barn was built in the old-fashioned way, with timber-frame construction and a minimum of effort and expense. 'Trees suitable for use as framing timbers may be available on your own property. If they are, you can try your hand at hewing them square yourself (see Converting Trees Into Lumber, pp.22-25). If you have a chain-saw mill for making boards, you can also saw out your own dimension lumber for the roof and siding. Otherwise have the beams and boards cut to your specifications at a sawmill. Before you begin to build, take time for careful planning and site preparation. Barns that are designed only for storage and farm use seldom come under building code restrictions, but those that are modified for living usually do, so check with the building inspector. In any case, you will want to be certain of the terrain and drainage characteristics of the building site, and you should also consider the changing angle of the sun throughout the seasons as well as any tendency of the site to harbor extra cold or dampness. Barns need plenty of ventilation, so look for an area that receives a con stant breeze, such as the windward side of a hill. A traditional spot for hay and livestock barns is just beyond the crest; not only does this location provide good ventilation, but the rise forms a natural ramp that allows the hay to be easily unloaded at either the main floor or loft-level. At feeding time the farmer can take advantage of gravity by pitching the hay down, out a rear door to animals sheltered below in the protected barnyard at the base of the hill. Observe the locations of barns in your own area; you may discover unique and useful building customs that are based on local ingenuity. Also, several books given in the sources and resources section on page 48 contain useful photographs and information about siting.
Barn foundations are traditionally made of fieldstone and are laid dry (without mortar). Mortared stone, reinforced concrete, or concrete block can also be used. The foundation wall should reach below frost level for protection against damage from repeated freezing and thawing and should rise at least 18 inches above grade. After the foundation is laid, anchor the sill beams to it. When the major framing timbers have been notched and numbered for joining, the barn is ready to raise.
If you want to raise the barn the traditional way, hold a raising bee. Invite friends, neighbors, and their families to share the work, then celebrate afterward with food and drink. In bygone days a raising bee was the only way to get the barn up, since most barns were too big for one family to raise, and machinery was not available.
Construction Plans for a Small Barn


------ Specifications can be adjusted to suit individual needs, especially if you hew the timbers yourself, as the builder of the barn pictured here did. Before building this or any barn, seek professional advice, be sure that timber sizes and span lengths are correct for the conditions and type of wood being used, graces arc especially important. For extra strength include as many as possible.
Raising Day

1.Preservative treated sills, already in place, are mortared to a fieldstone foundation wall. Base of wall must be below frost level.
2. Bents are assembled on raising day. Pre-notched, numbered timbers are first pegged together, then braces are Cut and fitted.

3. Assembled bents are moved to their proper locations and laid flat, ready
to be lid into place by the raising crew.
4. Everyone works together to raise the bent into place. Two people check to see that the posts are seated properly.

5. The first bent propped, a second bent is raised while several people guide
the fitting of the horizontal beams between.
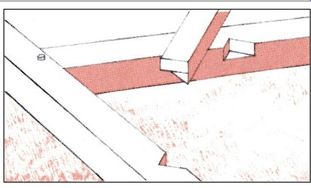
6. Photograph shows how tenons on horizontal beams fit into mortises in posts. Joints will be pegged later.
Installing the plate

-------- Hoisting each of the top plate beams is a two stage task. First a beam is raised to crew members stationed partway up; they in turn raise the beam to a group on top. Several block and-tackle devices slung from the bents (an also be used. Be careful when working aloft with heavy timbers.
The finished barn

---------
Rafters and siding are final steps. Conventional roof with ridgepole is easy to erect and economical. Use 1-in, rough-cut pine for siding.
Completing the roof sheathing and putting down shingles are the only jobs remaining. Two coats of barn red give finished structure traditional look.
============