An American Symbol, Whether Pioneer Shack Or Kit-Built Mansion
Log cabins have long symbolized the American pioneering spirit and love of independence—and with good reason. Made from inexpensive, locally available materials, they are well suited to homesteaders of any era. For the early settlers, most of whom were neither woodsmen nor carpenters, they provided sturdy, economical housing that did not demand expert skills or require scarce materials and tools. In colonial days trees were plentiful and free. A rough cabin of logs and split lumber shakes or shingles could be put up quickly by one or two people using little more than an ax. Such a structure would last a lifetime; some survive after more than two centuries. Nowadays, cabins are still comparatively economical to build, and with the help of modern techniques and materials they can be made to last even longer. When putting up a log cabin from scratch, the greatest investment remains time and labor rather than trees and tools. But another option also exists: instead of cutting and peeling your own logs, you can buy an entire log cabin kit complete with precut logs.
Traditional log-building methods were brought here from Scandinavia. The first American log cabins were probably built by Finnish colonists at New Sweden, near the mouth of the Delaware River, in 1638. By the 1800’s log cabins were common from the Atlantic to California and from Alaska to the Southwest. Only a few decades ago cabins were still being built by traditional methods in backwoods areas of the United States and Canada. The chain saw, however, has ended the need for many centuries-old skills, and few men exist today who can notch logs with an ax as skillfully as their grandfathers once did.
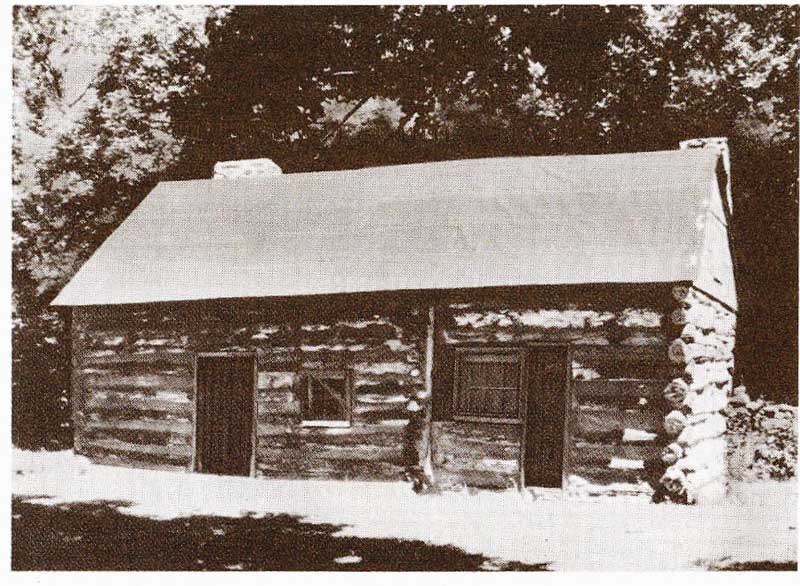
------- This log cabin near Philadelphia was
built about 1650, initially it consisted of only one room. The original roof
of thatch or shingles has been replaced. Ease of construction plus availability
of timber contributed to the enormous popularity of log cabins. In turn, log
cabins helped make possible the settlement of lands from New England west to
the Great Plains.

----- Hewn-beam cabins are a refinement of the round-log
style. Many display the highest degree of craftsmanship. Flush notches permitted
installation of exterior siding. The interior was often plastered over as well,
hiding the log work completely. Note that the ends of the ceiling joists in
this cabin are notched over the plate log, indicating the location of the second
floor.
Choosing Trees and Preparing logs
Evergreens—pine, fir, cedar, spruce, and larch—make the best cabin logs. You will need about 80 logs for r average one-room cabin. Should you decide to cut your own, be sure of your logging skills and your ability 1 transport the logs out of the forest. Select trees that a: about equal in age, thickness, and height. Look fi stands that are dense but not crowded and are locate on level land. Avoid trees with low limbs. Good building logs should be between 8 and 14 inches in diameter. Once you select a size, all should be approximately the same. Logs should be straight and free of structural or insect damage. Allow at least 4 feet extra per log so that the ends can project beyond the corner notches.
Cutting is best done in winter when the sap is out the wood: the logs weigh less, season faster, and resist decay better. In addition, hauling is easier and le: damage will be done to the environment, since the ground will be frozen and foliage will be at a minimum.

------ Peeling logs with a drawknife or spud helps prevent
insect damage and speeds drying. Job is easiest when logs are fresh cut. Stack
logs off the ground to prevent warpage and decay. Let them season three to
six months.
A note on safety: Working with logs requires you to be alert and safety conscious The building site is likely to be uneven and b materials and equipment are heavy and awkward to hand Tools such as axes and chain saws are dangerous especial in inexperienced hands. Wear protective clothing, boots, and safety glasses. Do not take chances.
The Tools You Will Need
Proper tools make the job of building a log cabin much easier and help achieve a high level of craftsmanship. Shown at right are some of the tools needed. In addition, you should have an assortment of basic carpenter’s tools, including a handsaw, chisels, measuring tools, and sharpening equipment. A small winch can save a good deal of sweat and strain, and you will also need a chain or a stout rope. Traditional log-building tools are usually hard to find and expensive if bought new or from antique dealers. Begin collecting the ones you will need well in advance. Farm auctions, flea markets, and tag sales are possible sources. If you are buying a chain saw; get one with an instant chain brake and a 16- to 20-inch bar. Learn how to use it safely, keep it sharp at all times, and always wear protection for your ears and eyes.
Foundation and Siting
Although the pioneers often built their cabins directly on the ground, it is better to build on a raised foundation for protection against both termites and damp rot. The crawl space beneath the floor can be used for storage, wiring, plumbing, and under-the-floor insulation. One type of foundation, shown at right, consists of reinforced concrete piers strategically placed around the perimeter of the building and beneath important floor girders. Other possibilities are the concrete slab foundation or stone masonry block foundations of the type shown on page 38 (Building With Adobe) and on page 46 (Building a Stone House). Stone is the traditional foundation material. Piers can be of wood rather then concrete. Use log posts of black locust or treated cedar set into the ground on stone or concrete pads.
Locate your cabin in a sheltered, well-drained area, and design it to take advantage of the sun’s changing angle throughout the seasons. Make batter boards to mark the corners of the site and stretch string between them to form the exact outline of the foundation. Consult standard building texts for complete advice.

----- Sill logs are notched flat and drilled so tops of
piers will seat firmly and take rebar anchors. Compensate for log taper by
alternating wide and narrow ends when building walls. Termite flashing should
also be inserted in any area where this insect poses a problem. Concrete piers
can be faced with stone to make them attractive; leave wooden piers exposed.

------- Piers are set in holes dug below frost line. If
ground is firm, a 6-in, thick pad of concrete can be poured directly into hole
bottoms without use of a form. Piers themselves require forms. Tubular cardboard
forms can be purchased from building suppliers. Tops of all piers should be
even with each other and rise at least ‘18 in. above grade.

-------- Ordinary garden hose with 6 in. of clear tubing
in each end can be used to find equal heights above grade level at widely separated
points. Attach one end of hose to reference point, the other to new location.
Fill end near reference point with water until water reaches mark. Water level
at the other end will then be at same height.

--------- Log builders’ tools: a basic kit includes such
old-fashioned tools as a broadax as well as modern implements.
Tight-Fitting Notches Mean Sturdy Walls
Well-made notches lock wall logs in place and prevent water from collecting inside the joints. They involve as little cutting away of wood as possible to avoid weakening the logs. Many builders spike the logs together at the joints, but spiking is not necessary for the types of joints shown here. Except in chinkless construction, shown on page 33, notches are generally cut so that a 1- to 2-inch gap remains between parallel logs. This makes chinking easier and more durable.
Round notch is easy to make and very effective, especially when combined with the chink-less construction method. It is a Scandinavian technique and represents one of the earliest notching styles. A sturdy pair of wing dividers with a pencil attached to one leg is essential for scribing a perfect joint. To make the notch, follow the step-by-step procedure shown at right.
V-notch is one of the favorite styles in the Appalachian Mountains. It can be cut with only an ax—the fit is accomplished by trial and error. By adding a carpenter’s square to your tools, perfect first-try joints can be made.
Chamfer and notch, probably of German origin, is a more complex notching style but has the advantage of holding the logs in two directions. It is often found on hewn-beam cabins. Since there is no projection beyond the notches, the logs form a flush corner that can be easily covered with clapboard siding. In many parts of the country this notch is called the half-dovetail.
Scribing and cutting a round notch:

1. Place log at corner. Set dividers to space between logs. Scribe top log on both sides by drawing dividers over surface of lower log.
2. Roll log over and pin in place with log dogs. If you are unable to buy log dogs, you c an fashion your own from rebar (reinforcing bar)
3. Rough out notch with chain saw or ax. Deepen center and trim edges to scribed line with chisel. Roll log hack into place.
4. Finished notches shed water, since they are cut only in underside of logs. Ends of logs should project about 1½ ft beyond corners.
Hewing a V-notch with ax and square:

1. Mark 90° angle on butt of log, then hew peak with ax or chain saw by removing wood outside of lines. Keep sides straight. Check accuracy of cut with carpenter’s square.
2. Place next log on peak and mark notch width by extending vertical lines upward. Then roll log 180° toward center of wall and pin in place with log dogs.
3. Cut V notch by hewing s-se) id from between side marks. Maintain 90° cut, and roll log into proper position occasionally to check notch for solid fit.
4. V on underside of one log fits over peak of log below. Experienced woodsmen can cut the joint by eve, but using a square improves accuracy.
Cutting a chamfer and notch:

1. Hew sides of log parallel. Then mark slope to angle top to one side, about one-third of way down other side. Remove wood with ax.
2. Place second log on top of first as shoe, n its end lush with side. Hold ruler along bottom log and scribe slope line on both sides of top log.
3. Hold ruler against vertical face of lower log and scribe line on upper log so that it intersects slope line. Scribe both sides, and end of log.
4. Hew or saw wood from scribed area. Avoid too deep a cut. Carefully trim for a snug fit, then scribe and cut new slope in top log as before.
5. Chamfer and notch style is intricate—careful measuring and skillful cutting are required. Results, how ever, are attractive and durable.
Raising the Walls
After the foundation has been laid and the sill logs and end logs that form the base of the cabin have been set in place, the next step is to raise the walls. Decide before starting how the floor will be built (see p.30), whether or not to use the chinkless method of stacking the logs described on page 33, and also whether you will use short precut logs to frame the window and door openings as lie walls go up, or saw out these openings later from the solid walls as builders of traditional cabins usually do. The basic steps in constructing the walls are hoisting the logs into position, aligning them so that they are vertical and at right angles to each other at the corners, and notching them so that they lock permanently in place. Since logs weigh several hundred pounds each, lifting is best done with mechanical assistance. Two traditional methods are shown below Plenty of man power helps too—not just to make the job easier but to make it safer as well. Once a log is up it should be carefully positioned for notching with the help of care fully aligned sighting poles driven into the ground a short distance from each corner. Sight along the log’s length to make sure its center is lined up with the poles.
After a log is in place for notching, scribe it at both ends, roll it over, and use log dogs to fasten it to neighboring logs while you cut the notch. For safety, always roll logs toward the center of the wall. Most logs have a crown, or slight bow along their length. This should face upward on the finished log so that as the cabin settles the logs will flatten and their fit will improve. To keel) walls level, alternate the wide and narrow ends of the logs as shown. Use a plumb bob to check verticals and an oversized square made from 2 x 4 lumber to make sure corners form right angles.
Hoisting logs into place

Hauling logs to the top of the wall is a major undertaking. One common system uses a block and tackle hung from the top of a gin-pole tripod. Another combines block and tackle for mechanical advantage wit I poles for leverage. Instead of a block and tackle, a so-called come-along ratchet hoist can also be used. It is slow but can be operated safely by one person. A come-along can also be used to draw wall logs tightly together.

Inclined skids, a pioneer device, can be used to roll logs
upward. Skids should form a 30-degree angle and be notched at ends to hold
them in place on the wall. Tie ends of rope to a wall log already in place;
pass center of rope under the log being raised. Tie another rope to center
of first rope, and haul on free end to roll log up ramp. Have two persons guide
the log, and never stand between the skids when hauling the log upward.
Alternate courses to keep the walls level

Precise leveling of log walls is not necessary. Compensate for the natural taper of logs and prevent the accumulation of large errors by laying each course of logs so that the thick ends join the thin ends. Alternate the (hick and thin ends vertically as well to avoid high corners when (he walls are completed.
-----------
Working with short logs:

Short logs can be lapped and spiked together end to end (left above) provided the bunt does not occur over a wall opening or beneath a joist or beam requiring support. Many kit homes make use of this joint. The French-Canadian pioneers introduced the pièce—en—piece construction method (left below). Slotted vertical posts are used to anchor short horizontal logs notched to fit the grooves. Pièce-en-pièce construction is excellent for building long walls, even with small diameter logs. Be sure to provide a firm foundation. Horizontals may be pegged after settling is completed.
------------
Windows and Doors, Then Roof and Floors
The initial step in building a cabin is to prepare the site. Construction of the foundation, walls, and roof comes next. One of the final jobs is to install the windows and doors. Although windows and doors are among the last items completed, they must be planned from the first to ensure that the rules of sound building design are followed. One rule is that wall openings for doors and windows should be located away from corners. Another is that the openings must not penetrate either the sill log or the top plate. Normally at least two logs should span the space above a doorway or window, although in a small cabin with no upper loft the log below the plate can be partially cut away.
Cut out door and window openings after the walls are completed or prepare them for cutting during the building process. Kit homes save on lumber by using logs that have been pre-cut to conform to the precise window and door openings specified in the plans. Once the wall is up and the openings are made, use rough-cut commercial lumber to build the frames. Since the bottom of a door frame serves as a threshold, it should be made of hardwood, such as oak. Notch and flatten the top are bottom logs, and then fit in the frame by one of the methods shown below. Be sure to slope the flattened surface of the bottom log toward the outside so that water can drain away Allow several inches for settling between the frame and the top log, and chink the gap with fiberglass insulation protected by metal flashing shown below It is best to have the doors and windows on hand when the wall openings are cut.
Installing a splined frame

Flatten log that will be at bottom of window, and mark width of frame on it. As each log is laid in place, bore 1½-in, holes through it (left). Bore outside of the mark on both sides of the opening. When top of frame is reached, attach 2 x 6 guides and saw down through each log (right), cutting through the edge of the holes nearest the opening to form vertical grooves.
Splined frame fits in grooved opening. Chisel groove square or trim with tip of chain saw, Assemble frames and nail 1½- in-sq. strips along outside edges. Work frame into place before attaching top log. Caulk gaps with sealer.
Log walls may settle up to 4 in., so provide an extra space allowance above openings. Fill the gap with fiberglass insulation that compresses as logs descend. Install protective copper flashing on the top log above the insulation for weather seal.
Fitting a nailed frame:

Nailed frame can be fitted after wall completed. Saw out opening to match the frame dimensions. Allow extra room top. Assemble frame and nail it onto log ends through slotted frame sides to allow settling. Caulk with sealer.
Putting a Floor in Your Cabin
Unless your cabin is set directly on the ground, the floor must be supported by joists. These are beams spanning the distance between sill logs or between sills and a center floor girder if the distance between sills is more than 10 feet. The girder, like the sills, must be supported by the foundation. Notch the sills (and girder) to take the joist ends after the second round of logs is in place. All notches must be carefully cut to the same depth.
Logs for joists should be 6 to 8 inches in diameter and be hewn flat on top. Joists of 2 x 10 commercial lumber can also be used. They generally produce a more level floor and are just as strong as logs. Space joists at even intervals, between 16 inches and 2 feet apart center to center. The flooring itself consists of two layers: a sub-floor and a finish floor. The subfloor can be made of 1 x 8 tongue-and-groove lumber ¾-inch plywood, or particle board. “traditionally, the finish floor is made of wide pine planks; hardwood, such as oak or maple, will wear better, however. Fasten the finish floor with cut nails for an authentic appearance. Or simulate a pegged floor by countersinking screws and concealing them beneath dowel plugs. Tar paper is often placed on the subfloor to prevent dampness. Insulation beneath the subfloor will cut down on heat loss.

Notch joists carefully into sill logs for a level floor. Use string and a
line level to ensure that bearing surfaces of all sill notches are at the same
height. When cutting the ends of joists, hew top surfaces flat, then measure
down from the top and trim excess from beneath. Commercial 2 x 10’s can also
be used as joists.
Raising the Roof Beams
Two traditional roof styles—rafter and purlin—are illusrated at right. Rafter-style roofs require ceiling joists or I-beams to prevent the walls from spreading outward, since the vertical load of the roof exerts downward pressure at an angle on the cabin sides. Purlin roofs produce no spreading even under tremendous snow loads because vertical pressure is not transferred at an angle hut instead is supported directly beneath by long horizontal logs resting on the end walls of the cabin. Al- (bough tie beams are not required for the walls when a purlin roof is used, they are generally installed anyway as parts of the trusses that support the purlins them selves. Without trusses the purlins of any but small cabins may sag under their own weight.
The first step in making either style of roof is to install plates—large logs similar to sills that are notched to take I he ceiling joists, tie beams, or truss supports. The plates should also be notched to take the rafter ends unless extra courses of wall logs are to be added to form a second-story loft.
Gable ends rise to a peak at each end of the cabin. In a rafter-style roof they can be built after the rest of the roof is completed. One type of gable consists of horizontal or vertical log sections spiked together and trimmed to the angle of the roof pitch. Another kind, shown at right, is built like an ordinary exterior frame wall. Panel the exterior of the gables with lumber siding or log slabs. Gables for a purlin roof (also illustrated at right) are made of horizontal log sections spiked one on top of another and notched to take each purlin as it is set in place during the building sequence. Afterward, the angle of the roof pitch is marked and the log ends are trimmed off with a saw as illustrated on page 35.
Details of rafter installation:

Traditional angle of roof pitch is 45°, steep enough to shed snow from roofing. To determine rafter length (A), divide length of end wall (B) by 1.4, then add additional 18 in. for trimming (more if an eave overhang is desired).
Cut right-angle notch in each rafter where it attaches to the plate. Vary the depth of the notches to compensate for variations in rafter thicknesses. If the plate is uneven, notch it to equalize depths, using level line as guide.

To match rafter ends at peak when ridgepole is not used,
overlap each pair and saw both at once. Before cutting, make sure plate-notched
ends are set correct distance apart. Nail 1 x 6 collar tie across joint for
extra strength.
Raise preassembled rafter pairs by resting ends on plate logs, then pushing peak upright with pole. Spike rafters to plate at notches; brace until decking is installed. Permanent braces are required in windy or heavy snow areas.
Rafter-style roof with framed gable ends:

In rafter-style roofs, plates are spiked or pegged in place (far left). Install tie beams in plate notches cut on 2-ft. centers. For rafters use logs or 2 x 8 lumber spaced 2 ft. apart. Notch rafters and spike to plate. Nail tops to ridgepole, or assemble rafter pairs on ground and erect as units. Logs can be added above plates (near left) to increase attic space.
Purlin roof with log gable ends:

Roof pitch determines purlin location. Cut vertical posts to height of roof peak and set them against center of end walls (far left). Stretch wire from posts to wall sides as a guide when installing purlins and trimming final angle of gable ends. Allow for the fact that purlins w II be set in notches that are half their diameters. Support purlins with trusses every 12 ft. (near left).
-------------------
The Finishing Touches: Shakes and Chinking
Rafters stand a few inches above the sills they rest upon, with the result that there are narrow spaces between the top of the wall and the underside of the roof. These spaces are generally filled with short segments of lumber known as snow blocks, or bird stops. Fit them as shown in the illustration at upper right, either between rafters or on each side of the plates. In warm areas the gaps are often screened without being plugged in order to provide increased ventilation.
Most cabin roofs are surfaced with wooden shakes or shingles, materials that can either be purchased in a lumberyard or made by hand (see Converting Trees Into Lumber, p.25). Standing-seam sheet-metal roofing or asphalt shingles may also be used; both are long-lasting, durable, and attractive. Shakes are slabs of wood split from straight-grained, knot-free sections of logs. They should be about ½ inch thick and 18 to 30 inches long.
Shingles are thinner and less rough-hewn than shakes. Both are traditionally made from cedar, oak, or cypress and must be completely seasoned before use; otherwise splitting will occur at the nailing points as the wood shrinks. Shakes and shingles are sold in lots called squares. Each lot contains four bundles, and each bundle will cover 25 square feet of roof Nail shakes and shingles along the roof in overlapping rows.
Old-fashioned roofs were not insulated. The shakes or shingles were nailed directly to the purlins running the length of the roof or fastened to rows of furring strips nailed horizontally across the rafters. Skins or rugs were sometimes placed on the floor of a full loft to retain heat in the lower room; the upper story remained cold. Modern roofs are decked over, sealed with a moisture barrier to prevent condensation, and completely insulated with urethane, styrofoam, rock wool, or fiberglass. Openings for the chimney, stovepipe, and vent stack should be flashed with aluminum or copper to prevent leaks. There are several methods of constructing insulated roofs; two of the most common are shown below. Insulation requirements vary according to climate zones (see Making Your House Energy Efficient, pp.76-81).
Covering the Roof:

Snowblocks, also called birdstops, seal gaps between rafters, along the wall tops along sections or lumber to size; bevel to match roof pitch. Insulation can be placed as shown. In warm climates screening is often installed instead of snow-blocks.

Start roof with double row of shakes (or shingles) at bottom
Overlap each row, leaving exposed only a third of length it shakes beneath.
Space shakes 2 in. apart and use only two nails per shake. Tar paper between
rows reduces leakage.

Use galvanized nails to fasten shingles at ridge cap. Alternate the butt joints of top course shingles and blind nail them as shown. For added moisture protection install metal flashing over roof peak beneath final row of shingles.
Two Ways to Insulate:
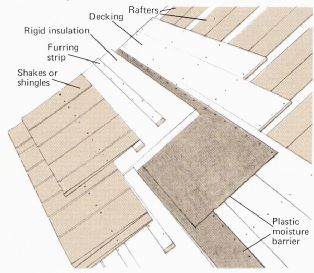
Rigid insulation is more expensive than the soft type hut requires less lumber when it is being installed. Nail pine decking boards across rafters. Cover with plastic moisture barrier. Lay insulation hoard over plastic. Nail 1 x 1 furring strips through insulation to rafters. Cover with shakes, shingles, or metal.

Soft insulation is laid in channels between spacers and is protected by plywood sheathing. Allow airspace as shown. Lay plastic moisture barrier atop decking and toenail 2-in. thick spacers through decking to beams. Install insulation and sheathing, and cover with shakes, shingles, or other roofing.
------------------------
Chinking the Gaps
Unless you have used the chinkless construction technique shown at right, your most important finishing-up job will be to chink the gaps between logs. Traditionally, clunking was done with clay and had to be repeated frequently until the logs were completely settled. Fiberglass insulation, temporarily covered with strips of plastic and later chinked permanently with mortar, saves labor and requires little additional maintenance.
Once the cabin is weathertight, other finishing projects may be completed at leisure. These include wiring, plumbing, any interior partitions, wood stoves, fire places, and chimneys. Interior log walls can be covered with two coats of clear urethane varnish for a durable, washable finish. Spray the exterior of the cabin with preservative every two to three years.

----- First step in chinking is to pack insulation between
logs, cover it with metal lath, and seal it temporarily with strips of mortar
over lath. Use one part sand, three parts portland cement, plus a handful of
clay or lime for a stickier mix. Repair chinking periodically as logs settle.
Tips on wiring:

Plan ahead for wiring. Chinkless construction and wiring that runs beneath floors or Imps from above may require boring holes bough logs during assembly. Wiring can also run behind baseboards and between logs. Bevel log ends to run wires vertically behind a doorframe molding. Check local codes and have electrician supervise.
Chinkless construction

--- Chinkless notching eliminates gaps between logs,
making periodic chinking with clay or mortar unnecessary. Extra building time
is needed, however, since each log must he grooved and filled as it is laid
in place. First, cut round notches in ends of top log 10 approximate fit, allowing
a gap of about 2 in. between it and lower log. Then, with dividers or log scribing
tool, scribe both sides of log, transferring contours of hot tom log to under
side of top log. Finish cutting the round notches to the newly scribed lines,
then make V notch and channel along the length of the log, using the scribed
lines as a guide. Pack channel with fiberglass insulation, and roll log into
place on wall.
-----------------------
Mrs. Dolores Hutchinson, Cabin Builder
A Husband-and-Wile Team Takes On Alaska Challenge

The Hutchinsons built their log cabin from scratch in Fairbanks, Alaska, where weathertight walls realty count in the winter. Full heating needs for the entire cabin are supplied by a single wood burning stove.
“My husband has lived outdoors a lot and has built log cabins before, but this one was my first, and when we began it I was a little bit afraid because I didn’t know much about carpentry. I wondered whether I would be strong enough or disciplined enough to finish the job. My biggest fear, as funny as it may seem, was that the cabin would fall down Thank goodness it never did. In fact, once you get the feel of working with logs, building a cabin is a lot like building with the little toy log sets that kids have.
“It took us about three years to build the cabin because the building season up here is so short. We had no unforeseen disasters and no injuries, except for a cut finger. I peeled logs and did anything else I could to help. Let me tell you there really were a lot of logs I got Sc) I hated the sight of them. The hardest task for my husband, I guess was installing the ridgepoles for the roof. That was very tricky.
“We had a few arguments, mostly over some of his building ideas. He wanted to cut vents close to the ceiling to let out moisture, and he also wanted to leave space above anti below the interior partition walls so that heat from our single wood stove would circulate throughout the cabin. In spite of the way I felt then, I have to say now that his ideas really turned out well. The vents work fine and the stove keeps the entire cabin warm even in the coldest weather.
“A log cabin really has a 101 of charisma. It’s very warm and mellow and feels like a home right from the start. I’m very proud of what we’ve done. People stop by to look at the cabin and ask us questions about how we made it, and I get a feeling that we’ve accomplished something. I believe it’s like a work of art, at least that’s the way I like to think about something we’ve worked so hard on—a real work of art.”
------------
Cabins in Kit Form Ready to Assemble
If you want to build a log cabin but lack the manpower, skills, or time needed to start from scratch, your answer may be a log cabin kit. Seasoned logs, already peeled, notched, and cut to sizes that conform to standard designs or to your own custom plans, are available from a growing number of commercial log-home manufacturers in this country and Canada. These kits are available in varying degrees of completeness, from a simple shell of precut wall logs and roof beams to an entire house in packaged form. Prehung windows and doors, finished flooring, roofing materials, heating, plumbing, and even kitchen fixtures may be included.
Arrange to have your kit delivered after the foundation is completed, but place your order well in advance. Manufacturers usually suggest that you leave at least six months between your order and the delivery date. All pieces come individually marked to correspond with a coded set of plans and step-by-step building instructions that are included with the kit. The logs are uniform in diameter and are usually milled flat on two sides to make construction easier. Most manufacturers peel the logs by machine, but a few provide hand-peeled logs for greater authenticity. Logs are notched and spiked together as in traditional cabin building, and some manufacturers also include special steel rods for strengthening the corners. Modern caulking or spline material is often used for weather sealing between the logs and around door and window frames. Floors and roofs generally incorporate standard-sized commercial lumber to simplify the construction job. If the design of your cabin calls for exposed roof beams, however, log rafters and purlins are available as well. These are usually supplied uncut; final notching and trimming are done at the site.
Compared with a conventionally framed house, the major potential savings in a log cabin kit are in labor costs, since the buyer can do much of the work himself. Though the cost of materials for both types of construction is about the same, log buildings require less finishing work—such as insulation, paneling, and painting—and less upkeep than equivalent frame houses.

----- A sense of warmth, comfort, and security is part
of the rustic charm that radiates from the interior of this kit log home.
Taking Delivery and Getting Started

1. Be on hand when your kit arrives; delivery date is usually guaranteed. Give driver complete directions to the site beforehand and make sure access road can handle trailer truck. Have extra help on hand to unload logs. Stack logs near the site in piles according to size or as plans direct. Protect logs from weather.

2. Set center girder and sill logs in place first, anchoring them to top of
foundation wall according to building instructions. Note that flat side of
sill log faces in. Strip of 1-in-thick fiberglass insulation acts as sill sealer.
Sills and girder must be level in order for floor joists to be accurately installed.

3. Floor joists and framing follow standard building practices. Subfloor of
¾-in, plywood is installed with grain of outer plies running at right angle
to joists. Use 3d common or 3d threaded nails spaced 6 to 7 in. apart. Stagger
adjacent panels so that butt joints occur over separate joists to distribute
load evenly.

4. Mechanical aids make light, last work of raising wall logs. Here, manufacturer-supplied
hoisting equipment is being used by a professional building crew. Logs can
also be placed by hand or with the aid of a block and tackle. Most kits make
us of many small logs that are easier to handle.
Walls and Partitions:

Pull logs in toward the center to ensure a square fit. Use a come along ratchet hoist for extra pulling power. Steel rods with special coupling nuts included with kit add strength to corners by binding logs vertically.

Spike logs together at 8-ft. intervals, using 8- to 10-in, spikes and a 6-lb.
sledgehammer. Begin spiking at one corner, and work all the way around the
house, laying up one course of logs at a time before proceeding higher.

Plastic splines installed between logs as walls are raised eliminate the need
for further chinking. Some kit manufacturers supply caulking compound instead
of splines. Grooves to fit the splines are cut beforehand by machine.
Interior walls are standard stud frame type, useful for enclosing wiring and plumbing. For ease of construction assemble frames on the ground, then tilt into place and nail directly to log walls and subfloor.
Ceiling and Roof:

Ceiling joists are precut and pre-notched; hoist ii hem into place usually requires assistance. Joists are then spiked in place.

Gable logs are spiked in place but left untrimmed. Scrap lumber nailed along the gable serves as saw guide for correct roof pitch.

Short lap-jointed logs are sometimes used as Joists. These
are supported at the joint by a double-framed interior wall.

Trim log ends flush with saw guides, using chain saw. For
safety, saw through one log at a time; discard waste end before continuing.
The finished cabin:

Rafters may be supplied in log form or as dimension lumber. Most manufacturers precut the angle of the peak ends but leave notching and cutting the final length of each rafter up to the builder. The rafters are either spiked to a ridgepole erected between the gable ends or are assembled in pairs on the ground and then spiked to the top of the wall. Usually a minimum of 18 in. is left below the rafter notches. The extra length is needed to form overhanging eaves.

With the roofing on and doors and windows hung, the house is virtually complete. Other finishing jobs can be done alter you move in. Inside walls may be left untreated, or coat them with clear urethane to make them washable. Spray the exterior with preservative every few years to retard decay. A new cabin takes a year or more to fully season. Expect to have to caulk or chink seams occasionally as logs continue to dry and settle.