Normal operation can cause sprinklers to clog, jam, leak, or spray improperly. And, of course, they can be easily damaged by lawn mowers, car tires, foot traffic, and the like. Faulty sprinklers can not only damage plants but also waste huge amounts of water. That’s why it’s important to inspect them at least once a month during the watering season, more often if they’re exposed to hazards.
Fixing or replacing broken or dam aged parts is usually easy: few special tools are required, and replacement parts are readily available in stores that specialize in irrigation equipment. To find dealers, Google “Irrigation Systems and Equipment” and “Sprinklers—Garden and Lawn.”
Because many different manufacturers make sprinkler equipment, take the defective part with you to the dealer so you can get a correct replacement. Difficult repairs, such as problems with automatic controllers or electronic components, usually require the help of a specialist. For instructions on fixing leaking pipes, see earlier section.
Replacing sprinkler heads and risers
If water streams or gushes from heads or risers (the vertical pipes below the heads) when you turn on the system, a head or riser may be loose, dam aged, or broken.
If the problem is simply a loose head or nozzle, tighten it (be sure to point a directional head in the right direction). Instructions for fixing dam aged or broken heads and risers follow. As you work, be careful to avoid getting dirt into the pipes, as it can clog the system.
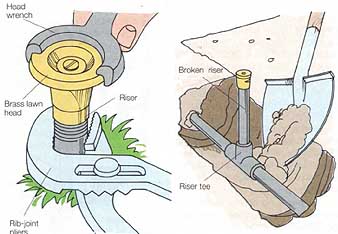
Repairing damaged heads. The first step is to remove the head. Some heads are easily removed: with a shrub head, just unscrew the head counterclock wise; if it’s too tight to turn by hand, use an adjustable-end wrench while holding the riser in place with a pipe wrench or rib-joint pliers.
To remove brass lawn heads, you may need a head wrench (see Ill. 10). Purchase one that’s the same brand as your sprinklers or buy an adjustable universal head wrench. Old brass heads are sometimes difficult to remove. For more leverage, slip a pipe over the handle of the head wrench.
When you unscrew the head, try not to remove the threaded nipple riser that sits underground between the head and the water supply line. If you sense the riser is turning as you unscrew the head, remove enough soil so you can hold the riser with pliers or a pipe wrench. If the head has rusted onto the riser and you can’t separate them, you’ll have to replace both parts.
Replace the damaged head with the same type. If the new head sprays unevenly, remove and clean it; then flush the line to get rid of any dirt that might be clogging the system.
Fixing broken risers. If a riser is difficult to extract, carefully dig down to the threaded tee or elbow into which it’s screwed (see Ill. 11), clearing away the surrounding soil. Unscrew the broken riser from the line. Wrap the threads of a replacement with fluorocarbon (pipe-wrap) tape and screw it in place.
Sometimes, a plastic riser will break off inside the threaded tee or elbow in the water pipe, leaving a piece that’s difficult to remove. Use a stub wrench to remove a plastic riser piece, or try to unscrew the piece with a chisel, wedging it against one edge of the piece and twisting in a counterclock wise direction. Be careful not to damage the threads of the tee or elbow. Attach a new riser.
If you suspect that some dirt may have fallen into the pipe while you were working, remove all the heads on the circuit and turn on the water briefly to flush the pipes.

Ill. 10. To remove a damaged brass lawn head, hold the riser
with rib-joint pliers and use a head wrench or a second pair of rib-joint
pliers to turn the head. Ill. 11. To replace a broken riser,
first dig down to the tee or elbow fitting, taking care not to damage the
pipe. Clear soil away from the fitting; carefully unscrew the riser.
Unclogging sprinkler heads
When a sprinkler is clogged, it will usually force water out at odd angles, or the spray will be greatly reduced. Brass sprinkler heads clog frequently, since they don’t have filters. Any head can become clogged if soil, mineral deposits, insects, or debris collects in the slit or holes where water emerges.
Several times during the season, check heads for uneven spray pat terns while the system is on. Clean slits or holes with a knife or a piece of small, stiff wire. If the spray is weak on several heads near one another, you may have too many sprinklers on the line, or the water pressure may be too low to lift them (brass pop-up heads, which need high water pressure, are especially susceptible). You may want to replace the brass heads with low- pressure plastic heads.
Flood and stream bubbler heads have small openings that can’t be cleared with a knife blade. Try cleaning flood bubblers by opening the adjusting screw to full flow. If this doesn’t work, unscrew the heads and flush them under running water. If plastic heads are spraying erratically, unscrew the cap or nozzle and clean the filters.
With pop-up brass heads, debris can collect around the wiper seal on the stem, preventing the head from sealing; water will then squirt or bubble out from the base, and the spray will be weak. Clean around the seal.
Adjusting sprinkler throw, pattern and direction
Because water pressure varies during the day, it’s important to inspect your system at the time it’s normally in use. Turn the system on and look at all the sprinkler heads in your system, checking them for the correct throw, pattern, and direction. Make sure that the spray from each head isn’t blocked by tall grass or plants, and keep grass clipped low around heads.
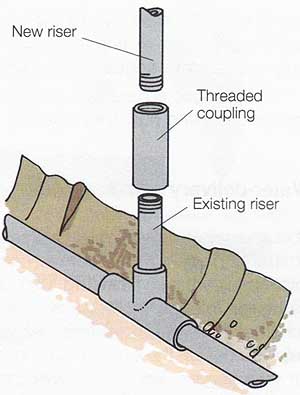
Old lawns often gain several inches of height from built-up thatch. If any lawn or shrub head sits so low that the spray is blocked, change the head to a pop-up type, replace the riser with a longer one, or add a coupling and another riser (see Ill. 12).

Ill. 12. To raise a sprinkler head, add a coupling and another riser to the existing one.
Sprinkler throw. It’s important for complete coverage that the spray patterns of your sprinklers overlap. When over lap isn’t sufficient, your lawn may develop brown patches, and plants may wither and die. Don’t try to compensate by running the sprinklers longer than necessary; this wastes water. In stead, adjust or change your heads.
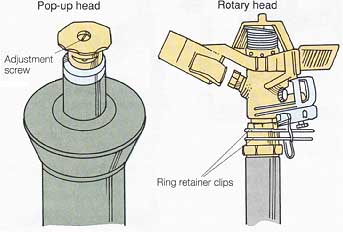
Most pop-up and spray heads have a small screw on top that allows you to adjust the flow of water (see Ill. 13). To increase the radius, use a small screwdriver and turn the screw counterclockwise. If the screw is already fully open, try increasing the flow at the valve, or replace the head with one that has a larger radius.
When a sprinkler is overshooting an area, reduce the flow of water by turning the screw clockwise. But don’t try to reduce the radius by more than 25 percent (from fully open). Instead, replace the head with a lower-flow sprinkler model.
Sprinkler patterns. The pattern of the head is identified on the head itself by letters (“H” for half, “0” for quarter, and so on) or numbers (for example, “1/4” for a quarter-circle spray pattern). Plastic heads may also have score marks on them.
To prevent lawn browning and plant die-back, you need to have the correct spray pattern for the area you’re irrigating. If a quarter-circle sprinkler head isn’t fully covering the area around it, for example, try changing it to a half-circle head (with pop-up brass and plastic sprinkler heads, you only have to change the nozzle, not replace the entire head). Rotary heads have adjustable ring retainer clips that lock in the head sweep (see Ill. 13).
 Ill. 13. To adjust a pop-up sprinkler head’s distance of
throw, use a screw driver to turn the small screw on top. A rotary head
has ring retainer clips that are used to set the sweep of the head.
Direction of throw. Check the heads along the perimeter of the lawn and planting beds to make sure they’re aimed in the right direction. If any of them are spraying off center, gently turn the heads or nozzles, or adjust the ring retainer clips on rotary sprinklers, until they cover the desired area.