The most efficient way to water a lawn is with an underground sprinkler sys tem. If you’re putting in a new lawn or reseeding an old one, this is a good time to install such a system. You can also add an in-ground system to an existing landscape, but you’ll have a lot of repair work to do on your lawn afterwards. Keep in mind that for watering plants, drip irrigation is more efficient; for information on drip systems, see “Installing Drip Irrigation”.
System components
The components you’ll need to install a system include anti-siphon control valves, essential for preventing tainted water from flowing back into your home’s water supply; pipes and pipe fittings, usually made of PVC (polyvinyl chloride); risers; sprinkler heads; and a controller, or timer. (Typical components are illustrated in Ill. 6.)
The system begins at a cold water supply pipe, where you connect the new supply line with a tee or compression tee fitting. Locate a shutoff valve on the new supply pipe so you can shut off the sprinkler system with out turning off the water to your house.
The new supply pipe carries water to control valves with integral antisiphon devices. Each valve operates a circuit, or a separate set of sprinklers. Place the valves in a convenient, inconspicuous place, grouping them into what’s called a manifold to make operation easier and avoid extra digging.
In an automated system, low-volt age wires run from the manifold to a controller, which can be anything from a simple mechanical timer to a complex digital system. The controller directs the watering cycle by automatically activating the control valves for the different circuits so they turn on when and for how long you wish.
Installation
Plumbing with PVC pipes and fittings is not difficult; for help working with plastic pipe, see earlier discussion. Make sure that your scale drawing shows the location of the manifold and all pipes and sprinkler heads.
Trenching. The first task is to dig V-shaped, 8-inch-deep trenches for burying the pipe. To locate the trenches, lay the pipes on the ground according to your plan and , using a shovel, mark their location on the ground. You can dig the trenches with a flat spade or with a rented trenching machine. To salvage any sod, gently work the spade beneath the sod layer and peel the sod away before digging deeper.
Connecting to the supply pipe. Begin pipe installation where you will tie into the cold water supply pipe. If that pipe is 1-inch diameter or larger, you’ll need to run 1-inch pipe to the valves; if it’s only ¾-inch diameter, run ¾-inch pipe.
CAUTION: Before doing any work on the supply pipe, shut off the water at the main shutoff valve. Open a faucet at the low end to drain the pipes.

Ill. 6. Typical sprinkler system components: compression
tee; Shutoff valve; Pop-up head; Retractable rotary head; Slip cap; Anti-siphon
control valve to circuit B
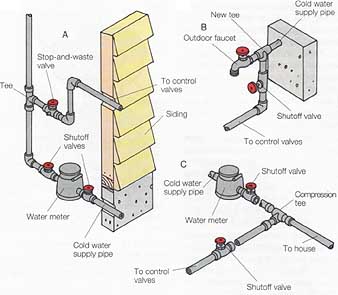
In cold-winter areas, you’ll need to tap into the cold water supply pipe inside the house (see Ill. 7A). Tie into the pipe with a tee fitting and install a shutoff valve beyond the tee (choose a stop-and-waste valve so you can drain the system at this point). To run the new line to the manifold, drill a hole through the siding above the foundation.
In milder climates, you can tap into an outdoor faucet (see Ill. 7B). Simply remove the existing faucet, add a tee, and then attach a new faucet to the tee. Install a shutoff valve, as shown.
If there is no nearby faucet, tap into the main supply pipe (see Ill. 7C) before it enters the house (using a compression tee makes this job solder-free).
Once you’ve installed the shutoff valve, you can turn the gate valve at the water meter back on (leave the new shutoff valve turned off).
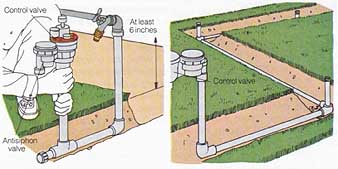
Adding the control valves. Run pipe from the shutoff valve to the manifold; flush out any dirt. To install each control valve, you’ll generally need two 3/4 inch male-threaded adapters; wrap the threads with fluorocarbon (pipe-wrap) tape and screw the adapters into the valve; hand-tighten. Cement the plastic-pipe riser into the tee or elbow in the line and into the adapter (see Ill. 8). Most codes require that control valves be at least 6 inches above the ground and above the highest head in the circuit.
Laying out piping. From the control valves, run the pipes for each circuit (see Ill. 9). Before cementing each threaded riser tee or elbow in place, screw in a riser so you can align the fitting properly with the surface of the ground—risers should always be at a 900 angle to the ground. Don’t add the sprinkler heads yet.
Finishing up. When all piping is assembled, allow the solvent-cement to cure for at least an hour. Open the shutoff valve that supplies the sprinklers. Next, briefly open the control valves to purge any dirt from the pipes. Wrap riser threads with fluorocarbon (pipe-wrap) tape, screw on the sprinkler heads, and adjust their positions. Turn the water on again to check for proper operation and any leaks.
To hook up the controller, run low- voltage cable (typically direct-burial AWG-14) from the valves through the trenches to the controller’s location (normally a garage or other place where you can plug it into a 120-volt circuit). To program the controller, follow the manufacturer’s instructions.
When the system is working properly, backfill the trenches.

Ill. 7. Tap into the cold water supply pipe inside the house in
cold-winter areas (A) In milder climates, tap in at an outdoor faucet (B)
or along the length of the main supply pipe (C).

(left) Ill. 8. Attach an anti-siphon control valve to the water
pipe, making sure the valve is at least 6 inches above the ground. (right)
Ill. 9. Connect the system from the control valve outward. Before attaching
the heads and filling the trenches, turn the water on to check for leaks and then fill in the trenches.