Fix-it-Yourself--Major Appliances: REFRIGERATORS (part 2)
| HOME | Troubleshooting | DIY Tips |
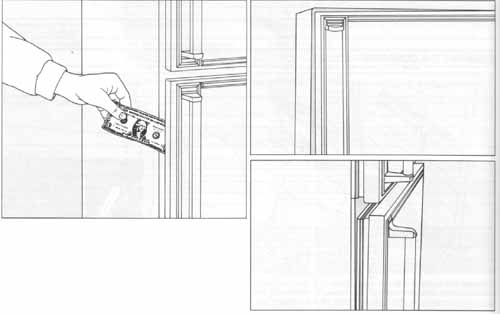
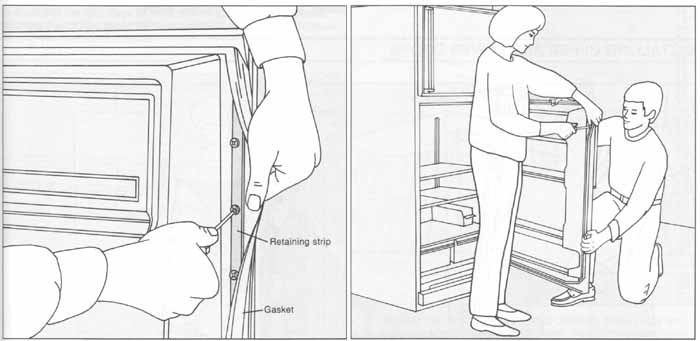
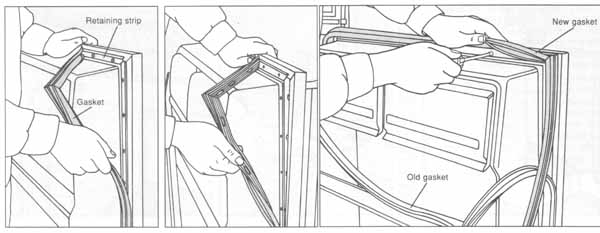
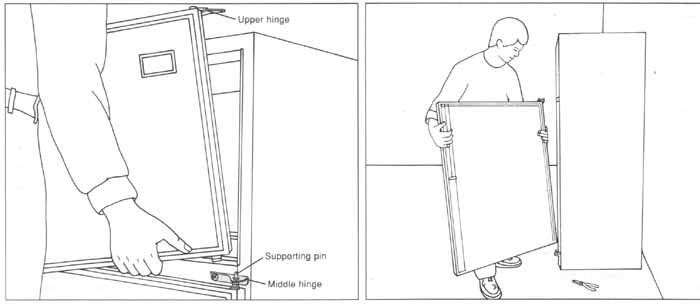
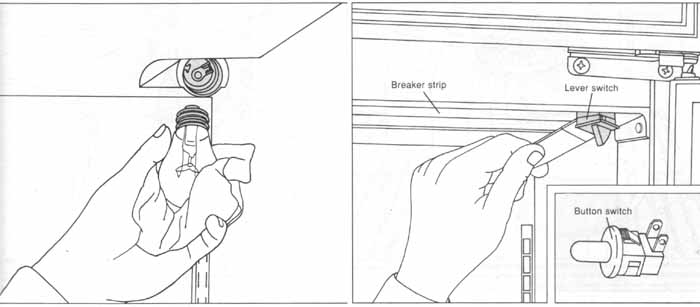
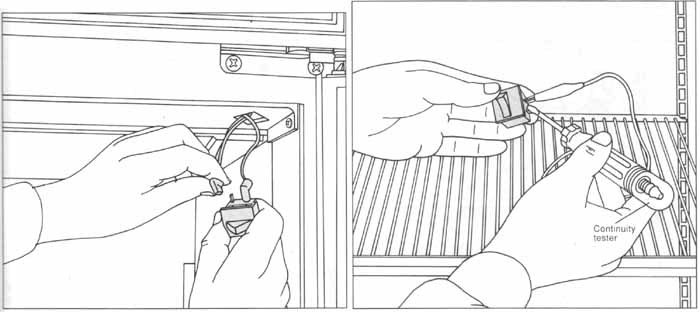
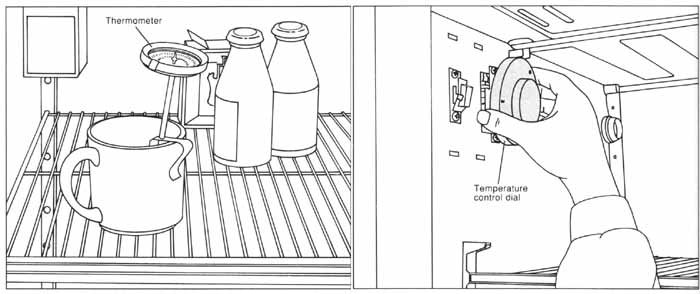
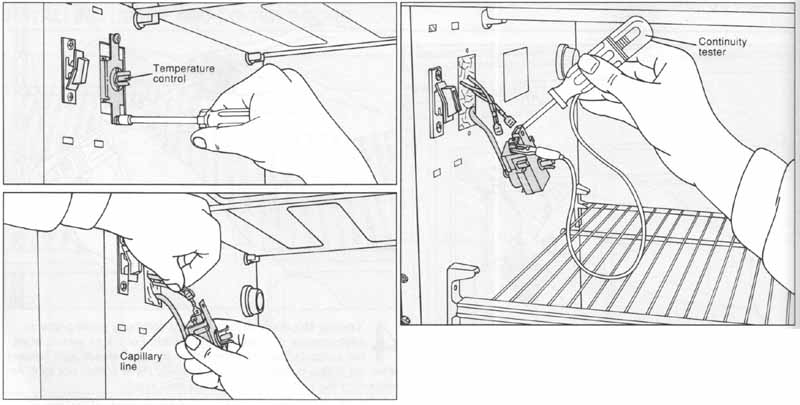
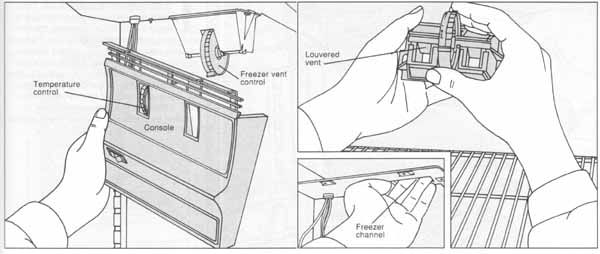
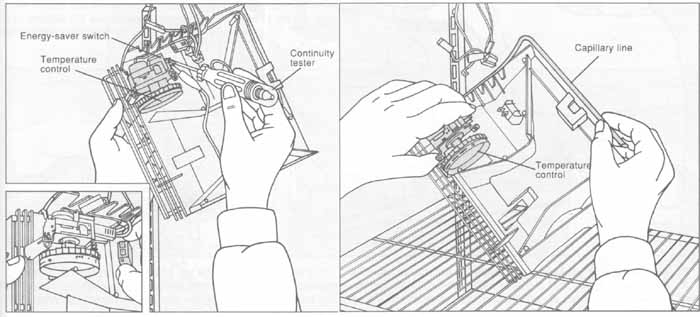
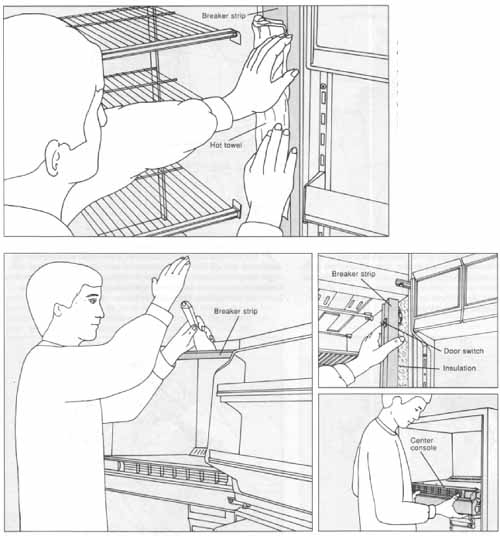
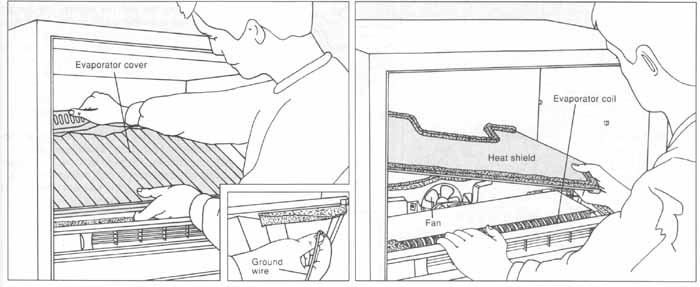
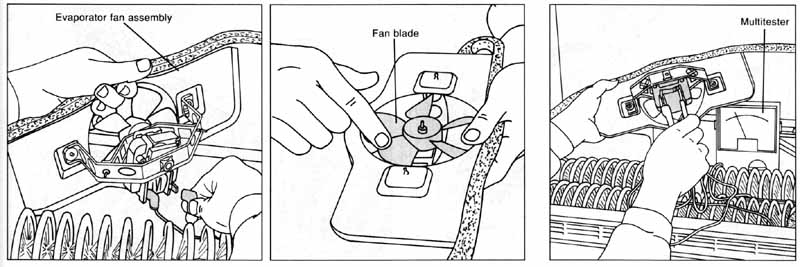
CHECKING THE DOOR SEALChecking the door seal. Open the door and examine all four sides of the door gasket for tears. Feel the gasket for brittleness or cracks. If the gasket shows damage, replace it. If not, close the door and check the seal between gasket and cabinet for obvious gaps. Next open the door and shut it on a dollar bill, as shown. Slowly pull the dollar bill Out of the door. If the gasket seals properly, you will feel tension as it grips the bill. Repeat this test all around the door. For the door to close tightly and automatically, the refrigerator should tilt backward slightly. If the door seal isn’t tight, have a helper push the refrigerator backward while you adjust the feet or rollers to raise the front of the refrigerator slightly. If the gasket still does not seal tightly, check the door for sagging or warping (next step). Checking the door for sagging or warping. If the refrigerator or freezer door sags on its hinges (above, top), a poor seal will result. First adjust the hinges. If the door gasket does not press flat against the cabinet, or the door appears warped (above, bottom), the inner and outer door panels may be out of alignment. Try adjusting the hinges; if this doesn’t work, reposition the door panels. Adjusting the door hinges. Unplug the refrigerator. To correct a sag in an upper freezer door or in a full-length refrigerator door, use a socket wrench or hex wrench to loosen the bolts on the upper hinge (above, left). Slight adjustments may also be made to a refrigerator door by loosening the bolts on the lower hinge (above, center). Lift or push the door square with the refrigerator cabinet and retighten the hinge bolts. To correct a sag in a lower refrigerator door, open the door and loosen the screws on the middle hinge (above, right). Shift the hinge slightly toward the outside of the cabinet and tighten the screws. To straighten a warped door, loosen the hinge bolts nearest the warped area, push the door tight to the cabinet and retighten the bolts. Check that the door rests flat against the cabinet all around the gasket. If not, the door panels must be realigned (next step). Loosening the retaining strip screws. Unplug the refrigerator. Open the door and pull back the door gasket to expose the metal or plastic retaining strips. Loosen, but do not remove, all the screws along the strip (above). Aligning the inner and outer door panels. Grasp the outer door panel at the top and side and twist it opposite to the warp, flattening the door. While you hold the door in this position, have a helper partially retighten the retaining screws (above). Close the door and check that the warp has been corrected. If so, open the door and hold it while your helper tightens the screws securely. It the door is still warped, try adjusting it again. If the warp persists, the door may need to be replaced. REPLACING A DOOR GASKET1. Removing the gasket. Before removing the old gasket, soak the new one--In warm water to soften it and make installation easier. Unplug the refrigerator, pull back the gasket to expose the retaining strip and loosen the screws. Try to pull out the gasket from behind the retaining strip. On newer models, it will come free (above, left); on older models, the screws pass through holes in the gasket itself (above, right). To free such a gasket, remove the screws from the retaining strip along the top edge of the door and one-third of the way down each side. Pull the upper part of the gasket away from the retaining strip. 2. Installing a new gasket. On a newer model, start at an upper corner and simply insert the rear flange of the gasket behind the retaining strip, partially tightening the screws as you go. To keep the door from warping, have a helper hold it at the top and side as you tighten the screws. When the gasket is installed all around the door, tighten the screws securely. On an older model, push the flange of the new gasket behind the retaining strip. Install and partially tighten the screws (above). Then remove the screws from the lower part of the retaining strip and pull. Out the rest of the old gasket. Push the rest of the new gasket into place. Starting at the bottom corners, reinstall and partially tighten the screws, then tighten all the screws securely. INSTALLING UPPER AND LOWER DOORSRemoving and replacing the doors. Unplug the refrigerator. Use a socket wrench or hex wrench to remove the bolts holding the upper hinge to the refrigerator cabinet and lift the upper door off the supporting pin (above, left); save any hinge washers. To install a new door, remove the upper hinge from the old door and insert it in the new door, replacing any washers. Rest the door on the lower supporting pin and, aligning the door with the cabinet, install the upper hinge. To remove a lower door, you must first remove the upper door. Next, unscrew the middle hinge from the refrigerator cabinet and lift the door off the lower supporting pin (above, right). Install a new door as described, replacing any hinge washers. CHECKING THE LIGHT BULB AND DOOR SWITCH1. Checking the light bulb. In most refrigerators, a single door switch controls the interior light. In others, the same switch or a second door switch controls an evaporator fan as well. To test the evaporator fan switch only, go to step 2. If the interior light doesn't glow when you open the door, first check for a burned-out bulb. Protecting your hand with a rag or glove, unscrew the bulb, as shown. Replace the bulb with a new one of the same wattage. If it does not light, the door switch may be faulty; remove and test it (step 2). If you suspect that the light stays on when the refrigerator door is closed, warming the interior, press the door switch by hand. If the light stays on, remove and test the switch. 2. Removing the door switch. Unplug the refrigerator. Pry out a lever door switch (above) or a button switch (inset) using a putty knife, the blade padded with masking tape to prevent scratching the breaker strip. On some older refrigerators, the breaker strip must first be removed to free the switch from behind it. 3. Disconnecting the door switch. Ease the switch housing from the breaker strip and pull it out to expose a few inches of wiring, The switch will have two or four terminals. Remove the push-on connectors, labeling the wire positions for reassembly. If the wires are burned or corroded, splice on new ones. 4. Testing the door switch. Place a continuity tester probe on each terminal of a two-terminal switch. For a light switch, when the switch button is out the continuity tester should light (above); when the button is depressed the continuity tester should not light. An evaporator fan switch will give the opposite result. If the switch has four terminals, it is a combination evaporator fan and light switch. There should be continuity between one pair of terminals with the switch button out. Depress the switch button, and the other pair of terminals should show continuity. If the switch fails any test, replace it. Connect the new switch to the wire leads and snap the switch into the breaker strip. TESTING AND REPLACING THE TEMPERATURE CONTROL (Dial type)1 Testing the refrigerator and freezer temperature. The ideal temperature for the refrigerator is between 38°F and 40°F; for the freezer compartment, between 0°F and 8°F. (The freezer temperature may be about 10°F higher in a single-door refrigerator.) To test the temperature of the refrigerator compartment, place a cup of water in it for 24 hours. (In a freezer, use cooking oil.) Place a cooking thermometer in the liquid for three minutes. If the temperature is too cold or too warm, adjust the temperature control. If the problem persists, test the control (dial type, step 2; console type). 2. Removing the dial. Unplug the refrigerator. Turn the dial to its coldest setting. If the dial has a screw in the center, unscrew it, then pull the dial straight off its shaft, as shown. 3. Removing the temperature control. Remove the screws securing the temperature control to the wall of the refrigerator (above, top). Pull out the control to expose a few inches of electrical wiring, taking care not to bend or damage the metal capillary line. Pull off the wire connectors and the ground wire (above, bottom). 4. Testing and replacing the temperature control. Touch a continuity tester probe to each terminal (above). With the control at its coldest setting (step 2), the tester should light, indicating a closed circuit. Turn off the control by twisting the shaft in the opposite direction until it stops, then retest; the tester should not light. To install a new temperature control, pull the capillary line of the old control out of its opening in the refrigerator wall. Set the new control to its coldest setting and carefully thread the capillary line into the opening without kinking it. Attach the wires to the terminals, screw the control in place on the wall, and reattach the dial. TESTING AND REPLACING THE TEMPERATURE CONTROL (Console type)1. Removing the temperature control console. Test and adjust the temperature of the refrigerator or freezer. If the temperature is not within the acceptable range, unplug the refrigerator. Unscrew the console and carefully remove it from the refrigerator wall. The temperature control (and energy-saver switch, if any) is mounted on the console; let it dangle by its wiring. The freezer vent control will remain attached to the refrigerator wall. 2. Checking the freezer control. Unscrew the freezer vent control from the refrigerator wall. Use a hair dryer set on LOW to melt any ice blocking the louvered vent. Remove any food that might have fallen into the vent from the freezer. Finally, reach into the freezer channel in the refrigerator wall with your fingers (inset) and check for obstructions. Reinstall the freezer vent control. 3. Testing the energy-saver switch and temperature control. If the console has an energy-saver switch, remove the push-on connectors (inset) and test the switch for continuity. With a probe on each terminal, the tester should light when the switch is on. If the switch is faulty, pull it off the console, snap on a new switch and reattach the push-on connectors. To test the temperature control, remove the push-on connectors and the ground wire from its terminals. Touch a tester probe to each terminal (above). With the control turned to its coldest setting, the tester should light; with the control turned off, it should not light. Replace a faulty control. 4. Replacing the temperature control. Note the position of the temperature controls capillary line in the console; the new one must be installed the same way. Pull out the old control and snap in a new one, threading the capillary line into place in the con sole. Remount the console on the refrigerator wall. REPLACING THE BREAKER STRIPS1. Softening the breaker strip. Dam aged breaker strips allow moisture to enter the insulation between the inner and outer walls of the refrigerator or freezer, causing odor and reducing cooling efficiency. Inspect the breaker strips around the inner frame for warps or cracks. To replace a dam aged breaker strip, first unplug the refrigerator. Because a breaker strip is brittle when cold, soften the strip before attempting removal by pressing a hot, wet towel against it along its entire length (left). 2. Removing and replacing a breaker strip. The way breaker strips are installed varies from model to model. Before beginning work, check to see how the strips are attached to each other and to the refrigerator cabinet. Most can be pried from the cabinet with a wide putty knife (above). Be careful not to damage the foam insulation behind the breaker strip. If the insulation is damp or ice-clogged, or smells bad, leave it uncovered for a few hours or dry it with a hair dryer set on LOW. To replace the breaker strip, simply snap a new one in place. Other kinds of breaker strips are more complicated to remove. On some models, you must first remove the unbroken strips to release the broken one. In other cases, the breaker strip may have a door switch mounted in it. Partially free the strip (right, top) and disconnect the wires from the back of the switch before removing the strip completely. Transfer the switch to the new breaker strip before installing it. On some refrigerators, the top and bottom breaker strips are attached to the side strips with sealant. Cut through the sealant with utility knife before removing the damaged breaker strip. After replacing the strip, reseal the corners with an arsenic-free sealant rated for USE in food compartments. The most difficult breakers to remove and replace are those that run from the bottom of the refrigerator to the top of the freezer and are held in place by the center console. To free these strips, first remove the screws that hold the console in place, then pull the console forward (right, bottom) and rest it in the freezer compartment without disconnecting the wires. Replace the breaker strip as described above and reinstall the console. TESTING AND REPLACING THE EVAPORATOR FAN1. Removing the evaporator cover. The evaporator coils are part of the sealed refrigeration system and should only be serviced professionally. But the evaporator fan, the defrost heater and the defrost limit switch-all located under the evaporator cover are easily tested and replaced, and are more likely to cause problems. On most models, the evaporator cover is also the freezer bottom. To remove it, first unplug the refrigerator. Remove the screws around the edges of the cover and lift it partway out. Unclip the ground wire from its underside (inset) and remove the cover from the freezer, as shown. If the freezer has an icemaker, remove it first. On side-by- side models, the evaporator cover may be located at the top of the refrigerator compartment or at the back of the freezer. 2. Removing the insulation and heat shield. Carefully peel off the tape that holds the rigid sheet of foam insulation in place and remove it. Lift the metal heat shield from the evaporator coil compartment (above). With a hair dryer set on LOW, melt any ice that has built up around the fan blades, taking care not to melt plastic components. Remove any objects that have fallen into the compartment through the air vent. 3. Checking the evaporator fan. If the fan housing is attached to the cabinet with screws, remove them. Lift the fan assembly a few inches and disconnect the push-on connectors and the ground wire (above, left), using long-nose pliers if they do not pull off easily. If the fan blade is damaged, replace it. Unscrew the nut at the center of the fan blade, pull the blade off the motor shaft and slide on a new blade, replacing any washers. Hold the fan horizontally and spin the blade to check for binding in the motor (above, right), If the blade does not spin freely, replace the motor. Remove the fan blade, unscrew the smaller bracket at the front of the motor and remove the motor from the housing. Install the new motor and replace the bracket and the fan blade, taking care not to reverse the blade. 4. Testing the evaporator fan motor. Set a multitester at RX1 and touch a probe to each motor terminal. The meter should show some resistance. If not, install a new motor (step 3), and reinstall the fan. Test the defrost heater before replacing the evaporator cover. Prev: REFRIGERATORS (part 1) Next: REFRIGERATORS (part 3) Home top of page |
