Fix-it-Yourself--Major Appliances: REFRIGERATORS (part 1)

HOME | Troubleshooting | DIY Tips


An average lifespan of fifteen years puts refrigerators among the longest lasting and most trouble-free of all major appliances. All refrigerators work by means of a sealed cooling system. Refrigerant gas, liquefied by high pressure, passes through a narrow capillary tube and enters the evaporator coils inside the refrigerator. Under reduced pressure, it quickly boils into a gas, absorbing heat in the process. This gas flows to the compressor, which pumps it into the condenser coils on the outside of the refrigerator. Now under high pressure, the refrigerant gives off heat to the surrounding air as it returns to a liquid state. The refrigerant then passes back through the capillary tube into the evaporator coils as the cycle of heating and cooling continues. When the desired temperature is reached, the thermostat control turns off the compressor.

The sealed cooling system limits the range of jobs that can be tackled by a do-it- Repairs to the compressor, evaporator or condenser require special skills and tools and must be handled by professionals. But many other problems can be diagnosed and repaired without any special tools.

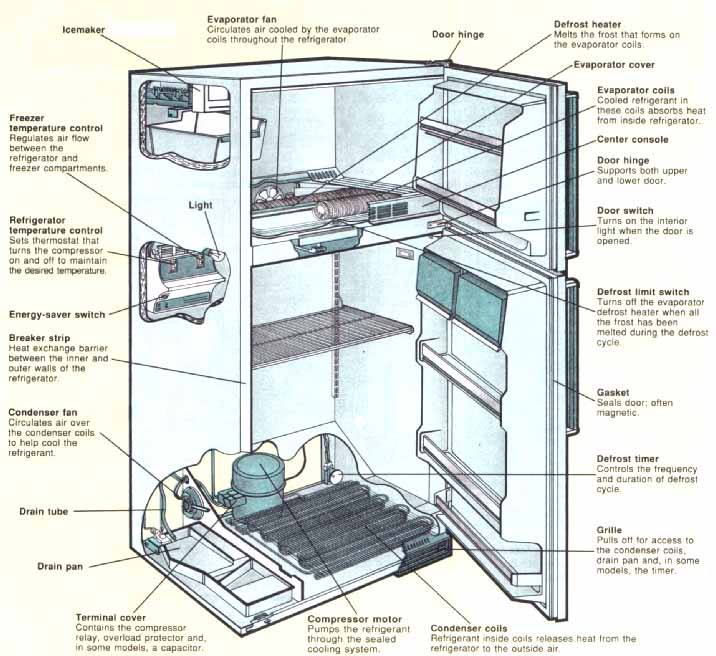
Though they chill food the same way, refrigerators vary in style and features. Shown below is a typical two-door, frost-free model with floor-level condenser coils. Variations are described within each repair step. Follow the instructions that most closely fit your machine.

- - -

Labels/captions of fridge schematic above:

  • Condenser coils--Refrigerant inside coils releases heat from the refrigerator to the outside air.
  • Evaporator coils--Cooled refrigerant in .— coils absorbs heat from inside refrigerator.
  • Defrost limit switch
  • Turns off the evaporator “-defrost heater when all the frost has been melted during the defrost cycle.
  • Gasket “Seals door; often magnetic.
  • Defrost heater--Controls the frequency and duration of defrost cycle.
  • Grill -- Pulls off for access to the condenser coils, drain pan and, in some models, the timer.
  • Evaporator fan--Circulates air cooled by the evaporator coils throughout the refrigerator.
  • Defrost heater--Melts the frost that forms on the evaporator coils.
  • Evaporator cover
  • Refrigerator temperature Control--Sets thermostat that turns the compressor on and off to maintain the desired temp.
  • Energy-saver switch
  • Center console
  • Door hinge--Supports both upper and lower door.
  • Door switch--Turns on the interior light when the door is opened.
  • Terminal cover--Contains the compressor relay, overload protector and, in some models, a Capacitor.
  • Compressor motor--Pumps the refrigerant through the sealed cooling system.

- - -

Refrigerators vary mainly in the way they handle the home maker’s bugaboo: frost build frost-free refrigerator has a defrost heater that warms the evaporator coils in both the refrigerator and freezer compartments. Pictured throughout this section, it contains all of the components found in the other two types. A semi-automatic refrigerator has a defrost heater that prevents frost in the refrigerator compartment only; the freezer compartment must be defrosted by hand. A manual refrigerator has no defrost heater and must also be defrosted by hand. To defrost a refrigerator, turn off or unplug the machine and use a hair dryer on a low setting to melt a light layer of frost. For a heavy buildup, place a pan of hot water in each compartment and close the doors. Never hammer at ice buildup or try to pry it away with a sharp tool; this may puncture the evaporator.

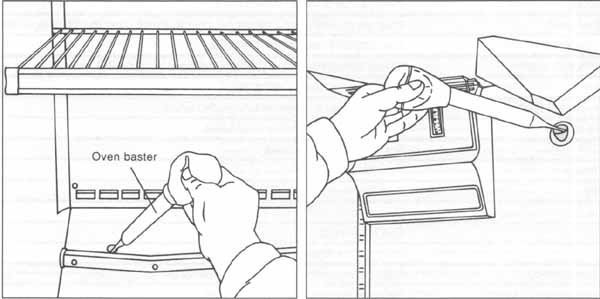
Regular cleaning prolongs the life of a refrigerator and keeps energy costs down. Brush or vacuum the condenser coils at the bottom or back of the machine regularly. If the coils are greasy, wash them with soapy water. To prevent odors and ice, keep the drain tubes and drain pan clean and unblocked. Using an oven baster, flush the drain tubes with warm water and baking soda (). Wash the compartments, trays, shelves and drain pan twice a year using a water and baking soda solution followed by a clear water rinse.

If the power goes out, food will keep in a closed refrigerator for 24 to 36 hours. If the power is out for a longer period, pack the food in dry ice (frozen carbon dioxide). Set the dry ice on heavy cardboard or layers of newspaper, not in direct contact with food. Keep the door closed as much as possible and do not touch the dry ice; it causes frostbite. If food must be removed from the refrigerator or freezer during a repair, place it in the bathtub, layered with newspapers and dry ice.

Before starting any repair, always unplug the refrigerator or disconnect the fuse or circuit breaker. When disconnecting electrical parts, mark the locations of wires and terminals to ensure correct reassembly. Before plugging in the refrigerator, wait an hour. This equalizes the pressure in the sealed cooling system, lessening the start-up strain on the compressor.

A refrigerator may come equipped with an icemaker, or one may be installed later. To make ice, a solenoid-operated water inlet valve at the back of the refrigerator meters in enough water to fill the ice mold. A thermostat switch inside the icemaker determines when the water is frozen and activates the motor and mold heater (if any) to eject the ice into a bin. A shutoff arm, pushed up by accumulating ice, turns off the icemaker when the bin is full. The Troubleshooting Guide for icemakers appears below. The diagram and repairs begin next.

REFRIGERATOR TROUBLESHOOTING GUIDE

(match number in POSSIBLE CAUSE column with same number in PROCEDURE column)

SYMPTOM

POSSIBLE CAUSE

PROCEDURE

Refrigerator doesn’t run and light doesn’t work

  1. No power to refrigerator
  2. Power cord loose or faulty
  1. Check that refrigerator is plugged in; check for blown fuse or tripped circuit breaker
  2. Test power cord

Refrigerator doesn’t run, but light works

  1. Temperature control turned off
  2. Temperature control faulty
  3. Compressor overheated
  4. Condenser fan faulty
  5. Overload protector faulty
  6. Compressor relay faulty
  7. Defrost timer faulty
  8. Compressor faulty
  1. Check temperature control
  2. Test temperature control (dial type; console type)
  3. Clean condenser coils
  4. Service condenser fan and motor
  5. Test overload protector
  6. Test compressor relay
  7. Test defrost timer
  8. Service compressor or call for service

Refrigerator not cold enough

  1. Temperature control set too high
  2. Temperature control faulty
  3. Condenser coils dirty
  4. Door doesn’t close automatically
  5. Poor door seal
  6. Door gasket damaged
  7. Door switch faulty (some models)
  8. Evaporator fan faulty
  9. Evaporator clogged by ice
  10. Refrigerant leaking or contaminated
  1. Move temperature control to lower setting
  2. Test temperature control (dial type; console type)
  3. Clean condenser coils
  4. Door should swing shut when left open halfway. If not, raise leveling feet or rollers to tilt refrigerator backward slightly
  5. Check door seal
  6. Replace door gasket
  7. Test door switch
  8. Service evaporator fan
  9. Defrost refrigerator; Test defrost heater; Test defrost limit switch; Test defrost timer
  10. Call for service

Refrigerator too cold

  1. Temperature control set too low
  2. Temperature control faulty
  1. Move temperature control to higher setting
  2. Test temperature control (dial type; console type)

Refrigerator doesn’t defrost automatically

  1. Defrost heater faulty
  2. Defrost limit switch faulty
  3. Defrost timer faulty
  1. Test defrost heater
  2. Test defrost limit switch
  3. Test defrost timer

Moisture around refrigerator door or frame

  1. Breaker strips faulty
  2. Energy-saver switch on or faulty
  3. Internal heater defective
  1. Inspect breaker strips
  2. Reset or test energy-saver switch
  3. Call for service

Ice in drain pan or water in bottom of refrigerator

Drain tube clogged

Clean drain tube ;

Water on floor around refrigerator

  1. Drain pan damaged or misaligned
  2. Drain tube clogged
  3. Icemaker water inlet valve leaking
  1. Check drain pan ;
  2. Clean drain tube ;
  3. Check icemaker water inlet valve

Interior light doesn’t work

  1. Bulb loose or burned out
  2. Door switch faulty
  1. Check bulb ;
  2. Test door switch ;

Refrigerator smells bad

  1. Contents spoiled
  2. Drain pan dirty
  3. Insulation absorbing moisture through damaged breaker strips
  1. Remove spoiled food; wash interior of refrigerator with baking soda and warm water
  2. Wash drain pan ;
  3. Remove breaker strips and allow insulation to dry; replace strips if damaged

Refrigerator noisy

  1. Refrigerator not level
  2. Drain pan rattling
  3. Compressor mountings loose or hardened
  4. Condenser fan damaged
  5. Evaporator fan damaged
  1. Adjust leveling feet
  2. Reposition drain pan
  3. Replace compressor mountings
  4. Inspect condenser fan
  5. Check evaporator fan

ICEMAKERS


Icemaker doesn’t make ice

  1. No power to refrigerator
  2. Water supply to icemaker turned off
  3. Freezer compartment too warm
  4. ON/OFF switch faulty
  5. Holding switch faulty
  6. Water inlet valve switch faulty
  7. Motor faulty
  8. Thermostat faulty
  9. Water inlet valve filter clogged
  10. Water inlet valve faulty
  1. Check that refrigerator is plugged in; check for blown fuse or tripped circuit breaker
  2. Turn on water at valve under sink
  3. Freezer must be 10 or less; check temperature
  4. Test ON/OFF switch
  5. Test holding switch
  6. Test water inlet valve switch
  7. Test motor
  8. Test thermostat
  9. Clean water inlet valve filter
  10. Test water inlet valve

Icemaker doesn’t stop making ice

  1. Shutoff arm out of position
  2. ON/OFF switch faulty
  1. Prop up shutoff arm; if ice stops, check shutoff arm
  2. Test ON/OFF switch

Water on floor

Water inlet valve tubes leaking

Check water inlet valve tube connections

Water overflows from icemaker

  1. Icemaker not level
  2. Water inlet valve switch faulty
  3. Water inlet valve faulty
  1. Adjust refrigerator leveling feet
  2. Test water inlet valve switch
  3. Test water inlet valve

Icemaker doesn’t eject ice cubes

  1. Motor faulty
  2. Holding switch faulty
  3. Thermostat faulty
  1. Test motor
  2. Test holding switch
  3. Test thermostat

Ice cubes discolored or flecked

  1. Water inlet valve filter dirty
  2. Ice mold worn
  3. Hard water
  1. Clean water inlet valve filter
  2. Call for service
  3. Have in-line water filter installed; call for service

Ice cubes smell or taste bad

  1. Refrigerator or freezer dirty
  2. Food spoiled or improperly stored
  3. Ice bin dirty
  4. Ice old
  5. Hard water
  1. Clean refrigerator and freezer; flush drain
  2. Remove spoiled food; rewrap food
  3. Wash ice bin
  4. Discard ice; wash ice bin
  5. Have in-line water filter installed; call for service

DEGREE OF DIFFICULTY: Easy; Moderate; Complex

ESTIMATED TIME: Less than 1 hour; 1 to 3 hours; Over 3 hours

CLEANING THE CONDENSER COILS

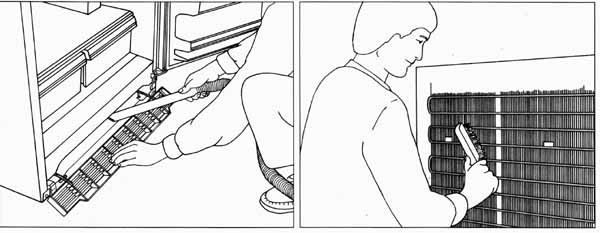
Cleaning two types of coils. An accumulation of dirt and dust prevents condenser coils from radiating heat, making the refrigerator cool poorly, run constantly, or even stop completely if the compressor overheats. Clean floor-level coils twice a year (above, left); more often if you have pets. Unplug the refrigerator. Pull off the grille and use a vacuum cleaner with a wand attachment to remove dust and pet hair that accumulate behind the grille. Clean rear-mounted coils (above, right) yearly, using a stiff brush or a vacuum cleaner with a brush attachment. If the coils are greasy, wash them with warm, soapy water, taking care not to drip water on other parts of the refrigerator.

CLEANING THE DRAIN AND DRAIN PAN

Cleaning the drain and drain pan. The drain opening may be in the floor of the refrigerator under the storage drawer (far left), or at the top of the back wall, behind a pull- off drain trough (near left). To clean the drain, use an oven baster to force a solution of hot water and baking soda or bleach into the opening. To clear a stubborn clog, insert a length of 1/4-inch round plastic tubing into the drain and push it through to the drain pan below, then pull it out. The drain pan is located under the refrigerator, behind the front grille. Wash the pan regularly with a warm baking soda solution. If the pan rattles, it may be located too close to the compressor; reposition it.

Prev: Fix-it-Yourself--Major Appliances: EMERGENCY GUIDE

Next: Fix-it-Yourself--Major Appliances: REFRIGERATORS (part 2)

Home     top of page