Flooring Installation: Resilient Sheet Goods
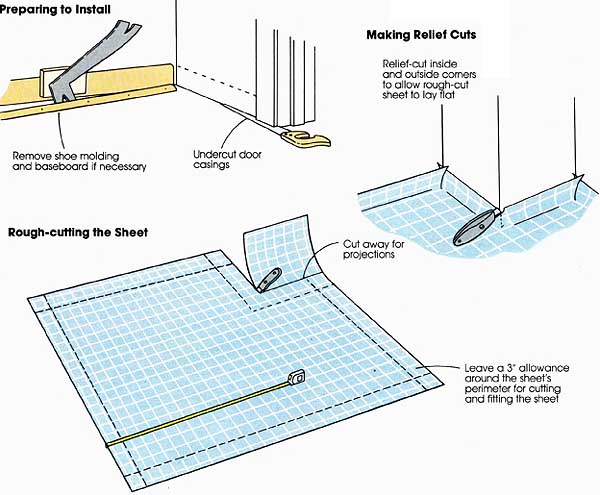
Before installing resilient sheet materials, there are a few room preparation steps you'll want to take. In addition to preparing the existing floor surface, remove all shoe molding or baseboards and mark pieces for later identification if you plan to reuse them. Undercut door casings just enough so the sheet flooring can slip under them. Make rough cuts. Measure the room's dimensions accurately and mark them on a rough sketch. Include any permanent features, such as cabinets or a hearth. To make the rough cuts, roll the material out, face up, on a clean flat surface, such as a well-swept driveway or garage floor. Do not assume that the factory edges are straight or square to any pattern the flooring might have. Check them with a straightedge or snap a chalk line to measure from. On glossy surfaces you may need to use a water-soluble felt pen. Recut the edges to square them if necessary. Starting from the longest edge of the longest wall, begin marking out the measurements. (Add a 3-inch allowance to all edges; this excess allows adjustment of the flooring before the final trimming.) Double-check all measurements. Rough-cut the piece to size using a utility knife, shears, or rotary power cutter.
Lay the flooring in place. Roll up the flooring, face inside, so that the longest edge of the longest wall re mains free. Carry it into the room and position that edge so that its 3-inch margin curls up the wall. Unroll the sheet, tugging and adjusting it so that it is essentially centered and the pattern lines are square to the room. Make relief cuts at outside and inside corners of the 3 inch margin as you proceed. Do this very carefully, slit ting the corners just enough so that the margin opens to allow the flooring to lay flat. Be careful not to cut beyond the margins. To fit around a pipe or post, cut a slit from the edge of the flooring closest to the obstruction. Fit the flooring around it by making small relief cuts. When it fits, trim the flooring exactly. Trim the edges to fit. You may need to trim twice, first to remove most of the margin, and secondly, to perfect the fit. Begin by making freehand cuts with a utility knife; feel along the edge of the floor with the knife blade, or use a straightedge pushed tightly against the margin’s fold. Cut as you go, leaving a 1/8-inch gap along the wall to allow for expansion. The gap will later be covered by baseboard or cove molding. Proceed carefully around the room, making sure the sheet doesn’t shift position. At doorways without a threshold, trim the flooring at the centerline of the closed door. The exposed edge of the sheet will later be covered with a flat metal bar. Glue down the flooring. Some sheets can be attached to the subfloor with a band of adhesive around the perimeter and under seams, or even installed with staples set so close to the edges that the base trim will hide them. Other sheet materials should be completely glued down with adhesive. To apply adhesive, carefully lift up and fold half of the sheet onto the other half. Apply the adhesive to the floor with a toothed trowel according to the manufacturer’s directions. Work from the corners to the center of each length of wall. Special applicators are available for hard-to-reach spots. Then unfold the sheet into place; walk on it to press it into the adhesive. Repeat the process for the other half of the room. Finally, use a mallet and padded block to press the flooring into the adhesive around the edges, or if adhesive was spread over the entire floor, use a floor roller to bond the new flooring fully. You can rent a floor roller from a tool rental outlet, or from the flooring dealer. Start at the center and roll toward the edges. Install the trim. Nail baseboard or shoe molding back in place, or install vinyl cove molding according to the manufacturer’s specifications. Cut each length of coving to fit, only as you need to; many will be installed full-length. Bend it at the inside corners by scoring the back and cutting a V-notch at its base to create a miter joint. For outside corners, score a wide groove in the back of the cove material and bend it around the corner, but do not cut its base. Trowel adhesive onto the wall or the back of the cove material and press it into place. Use a board to force it tightly against the wall. Work your way around the room piece by piece until all the coving is installed.   Trimming Away the Allowance: Trim away allowance; Use a straightedge to guide the cut; Adhering the Sheet; Edge Detail: Baseboard Prev.: Refinishing a Wood Floor Next: Resilient Tile |
Wednesday, 2011-05-11 4:00
