Flooring Installation: Wood Block & Parquet
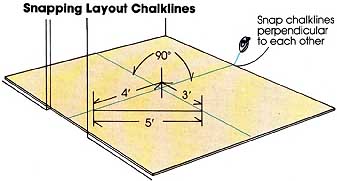
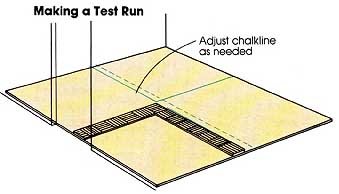
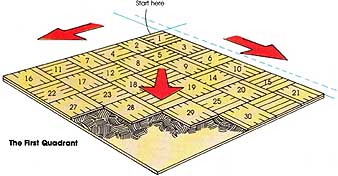
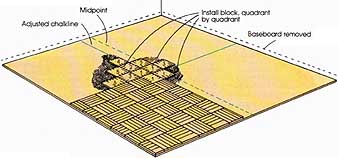
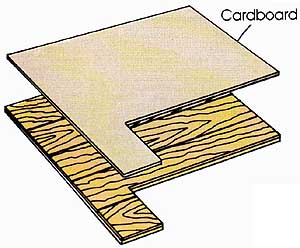
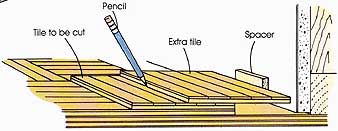
Wood block and parquet flooring are tile materials. To install them, you’ll use the quadrant method of layout, Find the midpoints of the two side walls and snap a line between them. Snap a second chalkline perpendicular to the first, using the midpoint of the end walls to position it. Before snapping the line, however, square it to the first chalkline by measuring a 3-4-5 triangle. These are preliminary layout lines, which may have to be moved toward or away from a wall after the test run (see below), although the lines must still be kept perfectly square to each other. If your pattern is to be laid on a diagonal, repeat the process by snapping a second set of chalklines at a 45-degree offset from the first. Be sure the diagonal lines are square to each other. Make a test run and adjust guidelines until you have a layout that pleases you. Try out the layout with a test run. Begin the test layout with one of the quadrants that leads to the room’s en trance. Start at the chalkline intersection and work to ward both walls. At the room’s entrance, you want a row of full-size blocks. Therefore, when your test run reaches the entrance wail, adjust it so full blocks will end there, allowing for a ½-inch gap along the wall. If the room has another entrance on an adjacent wall, repeat the process on an axis leading to that wall. This sets a new intersection so that any cut tiles will fall on side or back walls. With the test run completed, adjust the chalklines accordingly. Note: In most cases it is desirable to have full blocks at the entrance. But if they create a row of cut blocks along the opposite wall that would be more distracting than cut blocks at the entrance, adjust your lay out accordingly. Begin the first quadrant. Carefully sweep and vacuum the subfloor. Apply enough adhesive for six to eight blocks at a time, or according to manufacturer’s instructions, holding the toothed trowel at a 35 to 45 degree angle. If possible, avoid covering the chalklines, or re snap them over the adhesive. Start the installation at the chalkline intersection and complete one quadrant at a time. Carefully position the first block so that it is well squared to both chalklines. This is the "key" block for guiding the entire installation. Any errors in placement will be magnified as the installation progresses, so be careful. Lay the next few blocks along each axis, pressing each one "hand-tight" into place, and keeping all edges aligned. Fill in the area between the two axes, working your way progressively out to the walls. Complete the first quadrant. Continue laying blocks along each axis and filling the area between. When you reach a wall, there should be a ½-inch gap between it and the last tile. This gap is for expansion of the flooring during humidity changes, and should be filled with a cork strip or other compressible material to keep the blocks from shifting. At some point you will have to walk and kneel on newly laid blocks. Lay plywood over them to distribute your weight and to prevent displacing any blocks. Also, avoid sliding blocks into place, because this forces adhesive up into the joint, preventing a tight, clean fit. Immediately remove any adhesive that squeezes up onto the surface, using a compatible solvent. When you reach a heat register, hearth, or any other obstruction, mark and cut individual blocks to fit neatly around it. Use a fine-toothed backsaw or dovetail saw for straight cuts, and a coping saw or saber saw for curved cuts. If the cut is complex, cut an exact template from card board to trace onto the wood block. Then cut the block accordingly. When you need to, cut blocks to fit at a wall. Use the process illustrated below for marking border tiles to fit. Complete the remaining quadrants. Finish each quadrant as you did the first, starting at the center of the room and fanning out along both axes. When the entire floor has been installed, allow it to stand as long as the adhesive manufacturer specifies. Then install shoe molding and other trim, nailing it to the baseboard or wall and not into the flooring. Next, install door thresh olds. You may need to trim doors down before hanging them. If the block flooring is not prefinished, sand it and apply sealing and finishing coats according to the manufacturer's instructions
Prev.: Tongue-and-Groove Plank Flooring Next: Refinishing a Wood Floor |
Sunday, 2011-04-10 19:57
