A glass-block wall divides a room without shutting out light. It can't be load-bearing, but it will be a sturdy structure, thanks to metal reinforcing rods that are positioned in the mortar, Blocks sit with the mortar joints aligned and , because the blocks form the wall’s decorative finish, white mortar is normally used to give a neat result. Glass blocks can also be used to build a screen across part of a room, as shown here, or (with no lumber frame) as a shower cubicle. Do not build any higher than six courses without stopping to let mortar dry overnight, otherwise the wall may collapse.
PLANNING AND PREPARATION
Most glass blocks measure 7½ x 7½ x 3½ in (190 x 190 x 80 mm). They can't be cut to size, so base your calculations on how they best fit into the space. Half-blocks and corner blocks are available. Use wooden plates to fill any gaps left between blocks and a wall or ceiling. These will be inconspicuous when painted.
Overview

Click here or image above for full-size.
Designing a Partition
- Lay out a single row of blocks to judge a screen’s extent into the room. A full wall may need a doorway. Its position will depend on how blocks fit across your room. The opening will need suitable ties inserted through the door lining into the mortar. iii Building within a wooden frame gives clean edges, but the mortar method can be used without a frame, provided you consider your floor surface (see below).
The Floor Surface
- Mortar can be laid directly onto a concrete floor. i With a wooden floor, lay the first row of blocks on a wooden sole plate, even if you aren't building in a frame.
Calculating Quantities
- Multiply the length of the wall by its height to find its surface area. Divide this by the area of one block for a rough idea of the number of blocks needed, not allowing for mortar joints. Buy 1 0 percent extra, in case any get broken. iii White mortar (ready-mixed) is available in 27½-lb (12.5-kg) bags—enough to construct a small shower enclosure. liii Spacers give even joints. Allow 1 /2 per glass block, and buy 10 percent extra. The spacer shape can be modified from X-shaped to T- or L shaped as required.
- Allow two reinforcing rods per row of blocks. Buy more if you wish to push rods into the vertical joints for extra rigidity.
Sealing the Partition
- Use white mortar and white grout. Use waterproof grout and silicone sealant in a humid room, such as a bathroom, and use silicone sealant on the joint between the glass-block wall and the existing wall.
- Some manufacturers supply expansion strips for the wall’s perimeter in a humid area or one with temperature change.
Lumber, expansion foam, spacers, white mortar, bricklaying trowel, spot board, plasterer’s hawk, metal reinforcing rods, wall ties, white grout, grout shaper, silicone sealant*, paint*, paintbrush*. * = optional.
1. CONSTRUCTING THE FRAME

A. Make a wooden frame to fit your chosen wall dimensions.
Use lumber struts of 4 x 2 in. (100 x 50 mm) or 3 x 2 in. (75 x 50 mm),
with the same width as the blocks.
B. Fix the frame in place at your chosen location for the wall.
Remember to use a cable detector to check that it's safe to screw into the floor.
2. LAYING THE FIRST BLOCKS
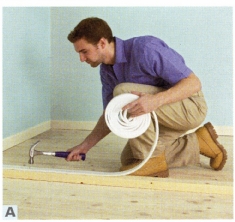
A. Nail white expansion foam to the inside of the
wooden frame. This foam is a spongy material that allows the wall a
small amount of movement without any danger of damage -- for instance,
if materials expand slightly when the temperature changes. Make sure
the foam sits centrally on each length of wood.
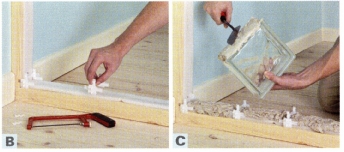
B. Position spacers inside the floor of the wooden frame, ready to
hold the glass blocks. Check that they are level and accurately spaced
to fit the dimensions of the blocks. C. Trowel white mortar onto the
frame’s floor, between the spacers. Spread mortar onto one side of
a glass block. Try not to get any on the block’s face.
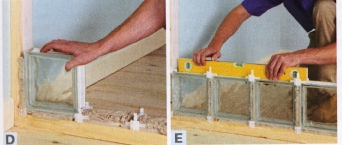
D. Place the first block onto the spacers, pressing
the mortared side firmly into position against the frame and bedding
the block into the mortar along the floor. E. Lay more blocks and spacers
to finish the row, checking that they are level. Wipe off any excess
mortar with a damp sponge; dried mortar is hard to remove from glass.
3. BUILDING UP ROWS
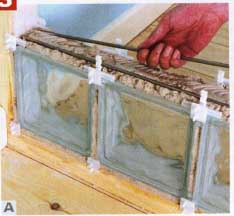
A. Apply mortar along the top of the first row. Drill holes in the
wall plate and fit the reinforcing rods. Press them down into the mortar.
Continue laying blocks on top.
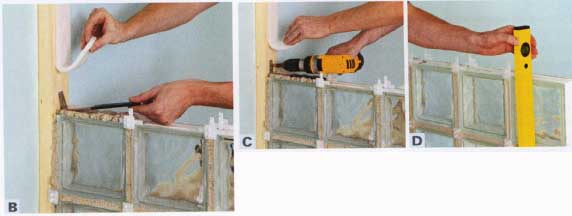
B. After every two rows, cut through the foam on the
wall plate, just above the top edge of the course. Apply mortar to
the end block, ready to bed in a wall tie. C. Screw
the wall tie to the wall plate, behind the foam, and bed the tie into
the mortar. Then lay mortar and reinforcing rods, and continue laying
blocks. D. Keep checking as you build up the height that blocks are
level and plumb (vertically aligned). If you are going higher than
six courses, let mortar dry overnight before finishing.
4. FINISHING THE PARTITION
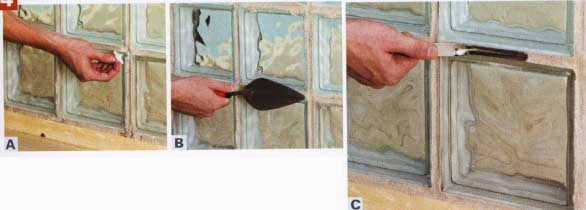
A. Once all the glass blocks are in place, twist the spacers’ faceplates
to remove them. B. Allow the mortar to dry, and then grout the joints.
Wipe off excess grout from the glass-block faces as you go, because
grout is difficult to remove once it has dried. C. Smooth the grout
using a grout shaper, or brick jointer as shown here. Apply silicone
sealant around its perimeter if required to make the seams waterproof, and wipe down the wall to give it a polished look. Paint the wooden
frame if you wish.