|
Before finishing be sure the finished armhole and neckline are the desired size and shape. On the paper pattern the stitching line represents the finished size.
BIAS BINDING It may be single or double fold. The finished width depends on the weight of the fabric. Plan finished width before cutting bias, allowing 1/4 inch seam. Make a sample on a curved edge. Joining bias strips — Mark a “true bias”, 45°, line on the fabric with chalk or pencil. Measure and mark as many strips as required. Join on the lengthwise grainline and the seam will be less noticeable. Use 1/4-inch seams. Press open. 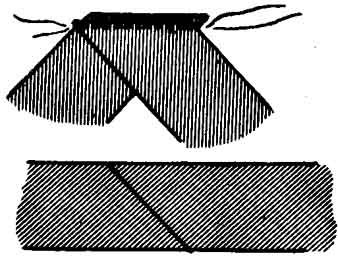
Cut on a true bias. If pattern doesn't suggest a bound edge, trim off seam allowance at the stitching line. Pin bias in position, stretching bias slightly around curved areas. The greater the curve, the more stretching required. Why? The finished edge of the binding forms a smaller circle than the stitching line.
Stitch to garment. Trim slightly. Do not clip seam allowance. Fold bias over cut edge. Baste. Hand stitch to inside of garment on stitching line. Machine stitching instead of hand stitching will provide a more durable finish and is quicker, but bias strip must be cut wider — 1/4 inch for single fold, 1/2 inch for double — because inside folded edge must extend over stitching line. Make a sample. Stitch to garment, fold over cut edge, baste “in the crack” of the seam line. Check inside of garment to be sure folded edge extends over stitching line. Machine stitch slowly in crack of seam. SHAPED FACINGS All facings have a more professional finish if interfacing of a suitable weight is used. Cut interfacing exactly the same size as facing. Baste each section together and sew as one piece. Join seams of facings, cut edges meeting exactly at stitching line. Stay stitch outer edges, trim slightly if necessary. Overcast by hand or machine. Pin facing to garment, baste if necessary. Machine stitch. Trim seam line no less than 1/4 inch. Clip curve at regular intervals read following note on clipping. Understitch—Section 9—preferably by hand. Why? To avoid stretching curved edge. Turn to inside of garment. Baste, using stitch suitable for bulk of fabric, close to turned edge. Pin, then baste outer edge of facing to garment. Fasten to garment, following procedure for French hem; if done carefully, stitches will not show on right side of garment. Fasten securely on seams or darts. If collar is inserted on neckline, pin and baste collar to neckline. Then proceed as above. NOTCHING and CLIPPING CURVED SEAMS Be sure you understand the difference between notching and clipping. There are two types of curved seams; (1) out curves — the cut edge is longer than the stitching line, resulting in excess fabric which must be removed by notching when the faced curve is turned, (2) in curves (concave) — the cut edge is shorter than the stitching line and it's tight and must be clipped before turning so the facing will lie fiat. All notching and clipping must be done at regular intervals to produce smooth flowing curved edges. Clipping — On normal neckline curves clipping should be every 1/2 inch. On a very sharp in-curve, every 1/4 inch. Clip to within 1/8 inch of stitching line. (See diagram 96.) Notching — is required on out curves such as collars, rounded patch pockets, tabs, etc. The degree of the curve determines the spacing of the notches. Cut to within 1/8 inch from stitching line. Observe diagram 97. * Trim seams evenly before clipping or notching. * Blend seams if fabric is heavy or bulky. * Understitch seam edge, preferably by hand. Stitching pointed seams — When stitching facings to pointed collars, cuffs, belts, pocket flaps, etc., place one stitch across the pointed corner. This will produce a sharper, also a stronger, corner when the section is turned right side out. 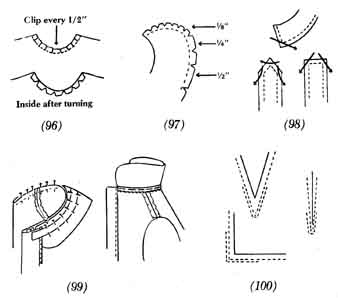
The corners of square necklines, V-shaped necklines and the points of slashed necklines require added strength. When stitching the facings to the neckline place one stitch across the point of the corner. To reinforce the corner set the machine stitch at 20 and place a second row of stitching on top of, or very close to, the first row. See diagram 100. Clip the seam allowance to the corner, as close to the stitching as seems advisable, never right to the stitching. Loosely woven fabrics ravel or fray easily. Always consider the fabric before clipping or trimming any seam allowance. See “trimming seam allowances”. Turning and rolling faced seam edges of collars, lapels, cuffs, belts, etc. Trim the seam allowance to no less than 1/4 inch, blending the cut edges. The narrowest seam edge will be on the facing side. Turn right side out. Working from the facing side, grasp the seam edge firmly between your thumb and forefinger. Moisten your finger slightly so it will grip the fabric. Work the seam edge back and forth between your finger and thumb until the machine stitching can be seen along the rolled edge. Hold the edge firmly SO it can not roll back. Diagonal baste. Press, using the wooden clapper to obtain a sharp, fiat edge. On some garment sections, if the stitching will not been seen, you might understitch the seam allowance to the facing side, then baste along the edge. Press. Remember — any curved seam will stretch less if the understitching is done by hand. Armhole and neckline facings cut in one piece. It is easier to finish the armholes and necklines if separate facings are used. It is a simple matter to cut a combined facing and make separate facings. 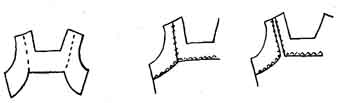
Draw a cutting line on pattern or the cut out fabric section. Cut. Assemble as follows: 1. Apply interfacings to the facing sections and finish outer edges. 2. Join shoulder seams of garment. Press seams open. 3. Join shoulder seams and underarm seams of the facings. Press seams open. 4. Pin and stitch the neck facing to the neck of the garment. Trim seam to no less than 1/4 inch. Trim from facing side and blend seam edges. Understitch the seam allowance to the facing, preferably by hand. 5. Pin and stitch armhole facings to armholes of garment. Trim from facing side, blending seam edges. Clip at regular intervals around curve (see clipping and notching curved seams). Understitch seam allowance to facing. 6. Turn facings to inside and baste. Press, using tailor’s ham or press mitt. 7. The finished outer edges of the facings will just meet. These edges may be whipped together by hand-stitching, leaving the stitches slack enough so the facings will lie fiat. For a custom-made finish place a strip of ribbon seam binding, so that it lies half-and-half over the facings. Whip down each side of the seam binding with small hand stitches. Trimming pointed seams — surplus fabric must be removed before turning. Clip as shown in diagram 98. Fold seam edges back at seam- line to check if sufficient bulk has been removed. To push out points after turning, use an orange stick or any blunt instrument, or use a needle, pricking gently to bring out point. Always compare corresponding points. Be sure they are identical. ATTACHING COLLARS to GARMENTS Making collar. Many patterns have separate pieces for the upper and under collar. The upper collar pattern is slightly larger, because when collar is folded or rolled extra fabric is needed in the upper collar to keep the under collar edge from showing. If same pattern is to be used for both upper and under collar, cut them separately and add a slight amount to the outside edges of the upper collar. (Do not add to the neckline edge), or use a little less of the upper seam allowance—jog the seam about 1/8—1/4 inch, depending on the bulk of the fabric. All collars “sit” better and wrinkle less if interfaced. Try on garment before attaching collar. An alteration on the shoulder seam may affect the size of the neck edge of garment and of collar. Collar attached with strip of bias Baste collar to neck edge, matching center backs, notches and shoulder seam of garment to markings on collar. Turn facings, right sides together, and baste in position. (See diagram 99.) Cut a strip of bias 1-1/2 inches wide and 3 inches longer than neck edge to be finished. Pin strip, with end extending about 5/8 inch over facings (see diagram), to neck edge, pinning at 3/4 to 1-inch intervals, allowing sufficient ease as you pin so bias will lie fiat against garment when turned to inside. Baste with small stitches. Stitch. Trim seam to 1/4 inch. Clip seam at 1/2-inch intervals along entire neckline. Turn facings and bias strip to in side of garment. Baste close to neckline. Turn under raw edge of bias and blind hem to garment. A bias strip may be used on any type of roll, fiat, or turned down collar. It is strong and comfortable to wear. |
| PREV: Know Your Sewing Basics | NEXT: How to Apply Zippers, Snap Fasteners, Buttons | Home |
Thursday, 2023-06-08 23:44
