You don’t have to be told where you spend most of your cleaning time every day. It’s the kitchen — where maintenance never ends.
You spend more time working in and cleaning your kitchen than any other room
in the house.
The average homemaker will spend a total of fifteen years there.
When people remodel, they re model the kitchen more often than any other
room in the house.
Everyone realizes this is the most used and thus the most
maintained room in the house. Everyone is looking for an easier-to-clean kitchen.
So the kitchen is the first place to tackle in planning a house that will do its own housework. The main objectives in a low- maintenance kitchen are to eliminate cracks and corners that will collect dirt buildup and to simplify this area you clean so often.
There should be nothing in the kitchen that isn’t readily cleanable.
This is the last place you want curtains that have to be dry cleaned, flocked wallcovering, ornate hardware—things that take hours to maintain but will still never look good in the high-use environment of a kitchen.
If you’re starting from scratch, eliminate ledges, crevices, corners, curves,
and moldings every where you can. If you like frills and fancies, put them
in the pattern of your curtain fabric or your tough vinyl wall and floor
coverings.
The kitchen will be just as eye-catching and will save you a lot
of time to spend enjoying the good things of life.
Function—The Number One Objective
When Laura worked as a kitchen designer, many clients came to her almost at the point of hysterics about what they wanted in the kitchens of their new homes. Most of them had been in their older homes for at least ten years and they knew how much time and energy a poorly designed or sub standard kitchen could waste. They were willing to spend hours working out every last little detail so that their new kitchen would be perfect.
We each have our own “dream kitchen,” and no two are the same. So very individual preferences as well as important practical questions should be considered when designing your ideal low-maintenance kitchen.
Start by asking yourself:
1. How many people will be using it? What are their food preferences, their ages, etc.?
2. How tall or short is the cook or cooks? The countertop should be right between your hip or waistline so that your elbows bend at a 90-degree angle when you’re using the counter. Can you reach the lower shelves of the upper cabinets easily?
3. Do you entertain or cook from scratch a lot, have a gar den, do canning, eat formally or informally?
4. Is the cook left-handed or right-handed?
5. How often do you go to the grocery store? How much food do you like or need to have on hand? What kind is it—canned, frozen, or fresh?
6. What daily routines do the cook and the other users of the kitchen follow? What’s the traffic pattern to and from the other rooms in the house?
7. Cost and budget are of course always factors. You can do anything if you have enough money.
8 What accessories and appliances do you consider essential: bread bin, pantry, microwave, garbage disposal, cut ting board, cookbook holder, spice rack, sink sprayer, trash compactor?
9. Personal preferences in decor must be considered.
A Ten-Minute Course in Kitchen Design
Every kitchen has a few basic ingredients:
- Refrigerator
- Stove
- Sink
- Counter space
- Food storage
- Dish storage
Your job as a kitchen designer is to combine these elements into an easy-to-maintain place to prepare and eat food. Because eating and preparing are things we do often, the easy-to-dean aspect is absolutely essential.
A basic design that serves your lifestyle is very important to a low-maintenance kitchen. Here is where the questions above come into play. If you entertain a lot, you’ll want a large service area and a closed-off kitchen. If there is more than one cook in the kitchen, you must provide a place for the second cook that doesn’t collide with the main cook’s work area. If you garden, you need good access to the outside and a clean-up area that will keep you from bringing the mud into your main work area. If you are 5’!” you need a lower counter than if you are 5’ll”. Your kitchen has to fit you.
To design this perfect kitchen, let’s first look at the traffic pattern between the three main components in the kitchen—the refrigerator, the stove, and the sink. Since those three appliances are the key work points in the kitchen, a lay out that places them in a triangular pattern is almost always the most efficient. This is the work triangle.
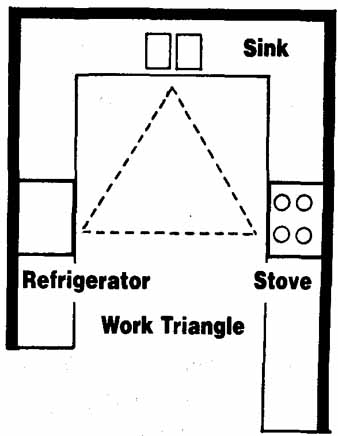
Work Triangle
One of the three main work stations should be at each point of the triangle. There are all kinds of theories (and counter theories) about kitchen work triangles but all you need to know for our purposes is that you will travel the path between the sink and the stove the most, so that’s where you should put your main work area—the area where you prepare the food. You then locate each of your other centers (the eating area, if you have one, and food and dish storage) in a spot convenient to this work triangle.
The more you design the kitchen around this concept, the more efficient it will be. A low-maintenance kitchen minimizes the steps you must take to prepare food and clean up after eating. The easier things are to reach and put away, the less tiring your work will be and the cleaner the kitchen will stay.
To help achieve this, the main work area, the space between the range and the sink, should be both long and wide enough. The ideal length is five to six feet for a family of five. Your bowls, pots, flour, sugar, spices, spoons, etc., should all be in this area so you don’t have to dash all over the kitchen to perform a single cooking operation. Be sure to concentrate your most heavily used items into the work triangle and put your secondary items out beyond the edge of the triangle.
In many ways a compact kitchen is better than one that is more spread out. The farther apart the points of your work triangle, the more dashing around you’ll have to do. And your kitchen floor al ways gets the dirtiest around the main work area. If your kitchen isn’t compact and you have lots of work areas, your kitchen floor gets a little dirty in a lot of places and will always need cleaning. If you concentrate your work area, the floor will get dirtier there, but that smaller area can be wiped up quickly and easily. If you plan your kitchen properly, you won’t be cutting down on much-needed counter space—just concentrating it in one location.
Using the Triangle Theory
There are many kitchen styles that use the work triangle— including the L-shaped, U-shaped, and double-corridor. There are also modifications of these styles incorporating features such as is lands, china hutches, service carts, etc. Of these, the U-shaped and double-corridor kitchens are the most convenient.
The U-shaped kitchen and the double-corridor each have a 10x3½-foot work area that can be cleaned with a couple swipes of a broom or dust mop. Two cooks can work together more easily in a double-corridor kitchen. The U- shape is more suitable for the individual homemaker.
The L-shaped kitchen has the same twenty feet of counter space as the U-shaped and double- corridor kitchens, but the walking distance is greater. The single- corridor kitchen is one of the least efficient.
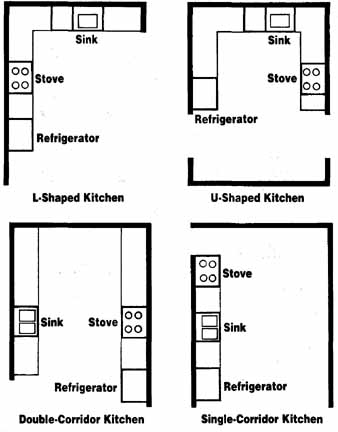
Of the most common kitchen arrangements, the U-shaped
and double-corridor are best. L-Shaped Kitchen; U-Shaped Kitchen; Double-Corridor
Kitchen; Single-Corridor Kitchen
Ceilings
No matter what floor plan you choose, you should also give some thought to the ceiling plan. Al most everyone tries to choose easy-to-clean materials for the kitchen floors and cabinets, but many people forget that the ceiling gets a good share of the smoke, splatters, and splashes, too.
Don’t let anyone talk you into putting an acoustical tile ceiling in the kitchen. These ceilings absorb grease and moisture and in no time they look like the filter inside your range hood.
The most maintenance ceiling I’ve seen in a kitchen is one of solid Plexiglas with fluorescent lights behind the Plexiglas panels. If the en tire ceiling is Plexiglas, you’ll never have to paint it. Cleaning it will be as easy as cleaning a picture window. You’ll have direct light everywhere in the kitchen, so you can eliminate spot lighting. This treatment is especially nice when continued into the dining room. Instead of an ornate chandelier hanging over the table drop ping dust and bugs off into the salad, you’ll have a solid ceiling of light. You may want to install a dimmer switch for different atmospheres, but when you need to, you will be able to see. A glass ceiling looks sharp and is easy to clean.
Even if you can’t construct a ceiling of light, you should strive for built-in lighting. Recessed lights along the tops of walls and boxed fluorescents are by far the most maintenance-free.
If your ceiling is painted, use a smooth enamel (no heavy textures). Don’t use dark colors—a light color will give the kitchen a spacious, airy, “clean” feeling. If you have wood beams up there, seal them well.
Walls
As with every other part of the kitchen, the rule for walls is to spend as little time on them as possible. The easiest way to do that is to get rid of them altogether. We’re eliminating the kitchen walls in our maintenance-free house. One corridor is an island and the other is against a glass wall, looking into the backyard.
Unless you love to cook in private, an open kitchen is more inviting and it can be more fun, too. You can chat with dinner guests while tossing the salad or, if you’re a show-off chef, entertain them by tossing the pizza dough or flipping the pan cakes (if so, pay close attention to the section on easy-to-clean ceilings!).
If you can’t eliminate walls, try painting with good semigloss enamel. Or use a good, durable washable vinyl wallcovering. I’d even suggest you take a soapy cloth and try the paper out before you buy it. The most genteel kitchen will get an occasional spot of food on the wall and if the pa per absorbs it, that spot will be there until you replace the wallcovering. A good heavy vinyl wallcovering will cost a bit more but it’s well worth it in a kitchen. And the slicker the wallcovering the better. When mustard or spaghetti splatters, it just dries up and flakes off.
When it comes to the color or design of a kitchen wallcovering, choose something that won’t show smudges, flying food, and little spots. A printed pattern is your best bet. Plain solid color wallcovering will show the dirt fast and have to be cleaned more often.
You can do anything you want with your wallcovering pattern. If you’re being conservative with your cabinet surface and hardware selections, as we suggest later, live it up with the pattern in your vinyl. Knickknacks printed on the paper don’t take a second longer to clean than a solid-colored pa per. In fact, they’re preferable be cause grime doesn’t show. Just make sure the wallcovering is scrubbable. Then you’ll have a maintenance-free wall. You won’t need trinkets or pictures or doo-dads on the wall because you al ready have your decoration.
Wood with a smooth, hard finish is a natural in the kitchen. It’s warm and appealing and dirt-and- damage disguising and goes with anything. Choose a mid-tone wood stain. Too dark a stain shows nicks and spots, too light shows wear and grime. Solid wood is more durable than wood veneer, so look for solid wood when buying paneling.
Floors
If you pay attention to television commercials, you’d think kitchen floors were the bane of most people’s housekeeping existence. With the right choice of material, they don’t have to be. Sheet vinyl flooring is the best—it’s easily cleaned, inexpensive, and cushions the fall for anything you might drop, more so than terrazzo or earth tile.
In the kitchen, as well as the rest of the house, you can cut down on maintenance if you “cove” your floor coverings. All that means is to bring the floor covering up the wall about three inches. That way you have just one surface to clean, eliminating a baseboard that has to be dusted often and maybe even repainted. You also eliminate cracks and sharp corners that collect dirt and are hard to clean. Make sure the installer puts a coving strip down behind the floor covering before installation.
Your kitchen floors should be a lit. tie darker than you might imagine. Floors that are white, light tan, etc., have to be mopped more often, and they look bad between moppings.
Don’t choose a floor covering with indentations or texturing. There’s plenty of flooring that gives the effect of being textured when in fact the surface is completely smooth. Choose those. Your dust mop or broom will pick the dirt up easily and you’ll still have the look you desire. Floors with smooth surfaces also can be easily cleaned with a floor squeegee.
Why would anyone carpet the kitchen? I’ve seen carpeted gymnasiums—different, but okay. I’ve seen pickup trucks with carpeted beds. I’ve seen carpeted barns, garages, briefcases, and horse’s hoofs. I can understand carpeting ball fields, even basements or beauty parlors—but kitchens—how could you do it? Are you a gambler? There isn’t a 90, 95, or even 99 percent chance that spills, stains, and odors will occur; it’s a 100 percent sure thing that you’ll get all of these on the kitchen floor! Carpet in a kitchen or anywhere food or drink abounds will eventually be recognized as a mistake—plush and kitchen don’t go together because as we know, if an open ace jam sandwich falls to the floor, it falls face first. If the floor is carpeted, that’s ten minutes of your life gone—only ten seconds if it’s a hard floor. Every stain and spill is an emotional strain and they all add up to a very good reason to avoid kitchen carpet!
The Cabinets
If I were allowed to make only one recommendation about cabinets, it would be to build your kitchen cabinets all the way to the ceiling. You won’t believe the extra storage space you’ll have. Instead of building a soffit or leaving this space open to get caked with settling grease and grime, ask for 42-inch upper cabinets—the kitchen designer will know what you’re talking about.
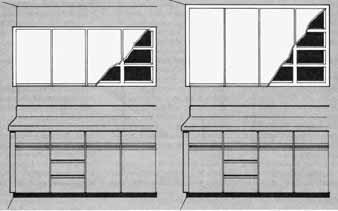
Cabinets that go all the way to the ceiling not only provide
an extra shelf of storage space, but also eliminate the space above the
cabinets that collects dust and grease.
An empty space above the cabinets also becomes a tempting space to stick pretty little plates and such. Whatever decoration you put up there will get twice as dirty as it would in any other spot in the house.
Cabinets to the ceiling will give you one extra shelf in every cabinet. Even though you can’t reach these top shelves readily, they’re the perfect place to store all those seldom-used but sometimes- needed things such as serving platters, cake dishes, picnic baskets, etc. And if you’re worried that you won’t be able to reach the top shelf easily, think how frustrating it will be to climb up there to dust those decorative knickknacks every week!
The trouble with having a lot of things to store is they get stored away and you forget that you have them to use. With this upper shelf you see them every time you open your cupboard. You’re reminded of what you have, but it isn’t in the way or taking valuable low storage space.
Your other shelves will also be less crowded, thus more maintenance-free. The fuller a cabinet gets the more of a maintenance problem it becomes. Things get knocked over, you have to hunt for them, and you can’t get at them easily.
An extra row of cabinets around the top of the kitchen:
1. Uses otherwise wasted space to provide extra storage
2. Enables you to concentrate your kitchen storage in the kitchen and not all over the house
3. Eliminates the space between the ceiling and the top of the cabinets that usually collects dirt and clutter, thus saving you an additional surface to clean
4. Gives the illusion of a higher ceiling
5. costs no more than building a soffit and storage somewhere else
Ideally, kitchen cabinets should have a perfectly smooth surface. Aesthetically, this may not appeal to everyone, but it’s still a good idea to stay with flat surfaces and straight lines in your door decoration. It’s much easier to run a cloth or sponge over a smooth surface than to take your pinky and weave up and down, over and under to clean the crevices and grooves in a fancy door.
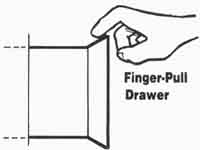
Finger-Pull Drawer: Drawers or cabinets with beveled edges
eliminate the need for handles.
Porcelain-coated steel is the most carefree material for kitchen cupboards, but many people find these stark and institutional. The best compromise is medium-colored hardwood with a factory-applied finish.
The handles you choose for your cabinets can also cost you five or ten minutes a week (that’s more than 400 hours in a life time). If you can’t live without fancy handles, put them in the den or living room to enjoy. You won’t enjoy cleaning crud out of them in the kitchen.
Wire Shelving in the Kitchen Wire shelving is a great idea in most cabinets. Wire shelves scarcely ever have to be cleaned or dusted, they allow more air circulation, and it’s easier to see what’s stored on a wire shelf. Use wire shelving as top shelves to store things like smaller pans or mixing bowls. Towels, canned goods, and oversized objects can also be stored there. But don’t use wire shelves for heavy items such as cookbooks and small appliances. or small items like utensils. Wire storage racks on the inside of the doors of your kitchen cabinets are great because the less you have to dig and hunt for the things you use most, the better off you are. I’d also put light wire storage shelves on the pantry door. 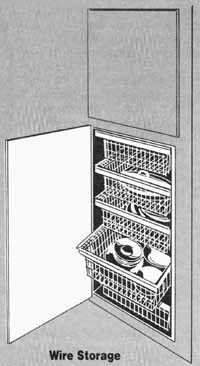 |
Use recessed or hidden hinges (sometimes called invisible hinges) and eliminate exposed hardware entirely wherever you can. Most cabinets are available with finger pulls or beveled edges for easy opening without a handle. If you’ve already got fancy hardware on your cabinets and you’d have big holes if you took it off—replace it with smooth, simple, rounded hardware. It’s safer and easier to clean.
Keep Down the Deposits in Your Dust Fund
Seldom-used things such as cake decorators, cookie cutters, or muffin tins collect dust between uses and sometimes even wire shelves aren’t enough to keep the dust under control.
One solution is a covered or multi-tiered lazy Susan. This minimizes the dust and grime settling on your rare spices and other little-used items. The dust still settles, but most of it only reaches the top tier.
As far as possible, store all your seldom items together in one area—if they are seldom used, that cupboard or cabinet will be seldom opened to the dust and grime.
If dust is a big problem where you live, you can also seal your cabinets. That isn’t as hard as it sounds. You know those little felt tabs some people put on the corners of cabinet doors to soften the “bang” when the door closes? Well, you can buy the stick-on felt in strips instead of tiny little circles. Put the strips around the en tire edge of the door so that when the door is closed the felt takes up any gap between the door and the front edges of the cupboards. Then when the cupboard is closed, it’s sealed and much less dust gets in. This can be done to any door, china cabinet, hutch, gun cabinet, etc., where unused items sit year after year. (Of course, you should also get rid of a lot of these little- used items that demand your care.)
Sealing your cabinets will also save the semiannual, ceremonial washing of glass goblets and display dishes that haven’t been used since the last time you washed them. I wouldn’t hesitate to put those strips on every cupboard that presents a dusting problem, especially in the kitchen where glassware is stored. There are also dust-free cabinets available from a number of manufacturers. Some have routed strips of protruding wood that automatically seal the cabinet. These are nice but expensive.
Counter Intelligence
Your countertops get harder use and even more mess on them than the floor, so they should be models of cleanability. What are your choices in countertops?
1. Plastic laminate: It’s the most common countertop material. It isn’t as durable as some surfaces, but it isn’t as expensive either—for the difference in price, you can replace it when it wears out.
2. Marble: Has a luxurious look but it’s porous as well as hard to install. Its cool, smooth surface is great for working with candy or pastry. It is quite resistant to abuse, but can be damaged by acids such as vinegar and harsh cleaning compounds.
3. Ceramic tile: Since a tile surface has joints, it isn’t completely smooth but it is one of the most durable countertops available. Many people love a tile countertop and food doesn’t stick to one. The grout in tile surfaces does make them a little harder to clean than smooth plastic laminate. No matter what color your tiles are, make sure the grout is medium to dark. You’ll never have to scrub stained grout and your counter will always look nice. Also, don’t edge the countertop with tile—it’s too prone to chipping on exposed edges and corners. Use a beveled hard wood edging that matches your cabinets.
4. Wood: Has to be treated to be used in a countertop and even then it isn’t very long-lasting. It is nice to have butcher block in a few areas for cutting, to serve as a hot plate, etc., but not overall.
5. Conan: This synthetic sheet material developed by DuPont is considered the Cadillac of synthetic countertops by most cabinetmakers. It is smooth, seamless, resilient, and very resistant to damage. But it also costs about three times as much as plastic laminate.
6. Stainless steel: Used widely in restaurant kitchens, it is almost indestructible and is easy to maintain. Better grades of aluminum—especially those with a brushed finish—can look good for years. But cheap grades soon develop a scratched, “used” appearance that isn’t very elegant looking.
7. Granite: Extremely long wearing and almost impervious to abuse, granite is prohibitive in price and its installation re quires skilled craftsmen.
8. Onyx: It’s okay in a bathroom but a little too soft for the hard use a kitchen counter gets.
The choice is yours—just remember the principles of maintenance- freedom here and then fit them to your pocketbook.
A countertop surface must be:
1. Smooth—you don’t want any type of texture
2. Able to stand up to hard use
3. A neutral color (not too light or too dark) to help disguise dirt
4. Simple—don’t give yourself a lot of different surfaces or seams and crevices to clean
5. Safe—no sharp corners or edges
6. A good trade-off between cost and the time and trouble it saves
7. Appealing to you!
A Matter of Splatters
The backsplash is the extension of the countertop up the back wall to protect the wall from splatters.
Don’t let anyone tell you that six inches is high enough for a back. splash, because it isn’t. Food and grease don’t know that they’re only supposed to splash six inches and then stop. There is usually an 18-inch gap between the upper cabinets and the countertop. Often we think a good enamel paint or vinyl wallcovering will be sufficient here, and for the first couple of years it is. But paint or wallcovering isn’t as durable as the countertop and eventually, after you’ve scrubbed flying grease or cake batter off time and again it will look dull and spotty. With a 6-inch backsplash, you’ve also given yourself an extra ledge and two separate surfaces to clean. Run the backsplash all the way up the wall to the upper cabinets. One big smooth surface of plastic laminate or whatever your counter material may be will save a minute or two of cleaning time every day.
myhdth-6-43-0.jpg Many people overlook one of the places where a backsplash is most needed—behind the stove.
Height
It’s important to consider the height of the counter in relation to the height of the user. The standard counter height is 36 inches. If that’s too low, you can adjust ready-made cabinets for a tailor-made fit. Put a few sheets of particleboard or plywood beneath the standard 36-inch cabinet. Upper cabinets can be hung lower or higher than standard, depending on your needs. It’s tougher to make the bottom cabinets lower, though, so you may have to turn to a custom builder if you’re shorter than average.
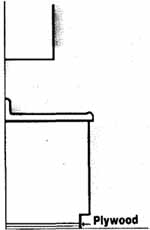
Insert a few sheets of plywood beneath bottom cabinets
to make them higher.
Decorate with Color
Here is a decorator’s tip for making a kitchen seem cleaner. If you are using plastic laminate on the countertops, trim the counter edge with laminate in a complementary bright or dark color. It will carry your eye around the kitchen faster and the kitchen will seem crisper and sharper. Your eye is immediately drawn to the dark sharp edge and the whole kitchen will appear cleaner.
You can also get a decorator effect by using a laminate in a pat tern. The accent won’t create any work, since it’s made of the same material as the countertop, but it will give the kitchen some added interest.
Faucets and Fixtures
For years, both on the job and at home, I accepted the faucet that happened to be available or on sale. It wasn’t until I began to re pair and replace faucets that I realized that some fixtures were twice as easy to install, fix, and clean.
Changing faucet hardware and fixtures is a project that’s well within the range of the average do-it-yourselfer. So choose a faucet fixture that’s not only easy to maintain but also easy to install.
Once again the simplest hardware—the single-handle faucet with a knob at the end—is the best. There are thousands of fixtures on the market and you could look forever and still get a lemon. Even the big-name companies have some bad models. So we’ll make an exception here and name a couple of specific brands. For good overall fixtures that will last, Delta and Moen are both good—if you spend the money to get one of these, you will be happy. Remember ‘to keep things compatible and put the same brand of faucets throughout the house and the same model, at that, in all the sinks. The single-handle, washerless faucet is smooth and easy to clean, with no crevices or corners to trap gunk. The internal workings are relatively durable and trouble-free, are easily re paired, and the parts are widely available.
Sinks
Double sinks are handiest in the kitchen, and in the kitchen or the bathroom, the deeper the sink, the better. If water cascades into a deep sink, less will splash out on to walls, counters, cabinet fronts, the floor, etc. When you drain potatoes or pasta in the sink, you’re less apt to get scalded. When you’re mixing juice or scrubbing a greasy skillet, it keeps any splatters in.
Stainless steel sinks take little upkeep, last a long time, show dirt very little, and are hard to damage. Stainless steel will stain, though—it comes in several grades, and the lower grades will streak and get blotchy-looking.
Porcelain over cast iron is also very good. If you absolutely love the look of porcelain, use it, but avoid dark colors such as red, black, and brown, as well as pure white. Dark colors are sure to show scratches, water spots, and detergent residue. Choose sand, beige, or ivory instead. Neutral colors like these clean up fast and don’t show the dirt as much. Solid cast-iron sinks with porcelain coatings probably retain their good looks longest, and are quiet when the disposal is running.
When installing a sink, be sure to leave at least an inch between the base of the faucet and the back wall or backsplash so you can get a sponge or cleaning cloth through easily.
The Fountain of Youth
A drinking fountain can be a maintenance-free appliance if you have the traffic to justify one. How often do people get drinks of water? Kids, at least five times a day. Visitors, at least once—and if they eat or snack (which they usually do)—three times. How many glasses is that to take out, wash, and put back in the cupboard, and worry about breaking? And of course when the kids do it them selves, they drag a chair across the floor and ding the cabinets. When they’re finished, they never put the chair back.
Water fountains are a luxury, but the trade-off may be worth the cost. They offer instant hassle-free, cool water. I’ll bet a drinking fountain pays for itself in the first three years by cutting the cost of broken glasses, electricity to cool an often. opened fridge, damage to the sink and floor, etc.
A drinking fountain does re quire a water supply, a drain, and an electrical source. And they do burn energy, probably about $40 a year. If your crew is always heading for the water, I’d put one in. Your local plumbing store (or architect) can give you names of a source. Be sure to buy the wall- mounted type to prevent overspray and recess it when you install it. A refrigerator with a cold-water dispenser could be an alternative if your water demands don’t warrant a fountain—it has all the benefits of a fountain except that you still use a lot of glasses. There are also faucets that double as water fountains—the head swivels around to direct water wherever you want. The disadvantage of these is that the water isn’t as cold as it would be from a bona fide fountain.
Appliances
Every year, every appliance company comes out with some thing new; some of these are good and some are bad. Instead of recommending brand names, we’re going to give you some principles of appliance buying and let you take it from there. There are some features you like and need that I don’t like and need. If this weren’t so—if there were one overall best model—it would be the only one on the market.
You know which of your present appliances are not maintenance-free because you rarely use them—it’s too much of a hassle. Think about why you don’t use them and what you don’t like about them when you’re looking over those shiny new appliances in the store.
Whenever possible, choose appliances with a fingerprint-less front. This is a slightly textured finish and almost all manufacturers have realized how good an idea it is. It hides the little finger prints that you usually have to polish or wipe away.
When it comes to color, choose a medium tone—dark colors are hard to clean and so is pure white. Avoid black-fronted appliances—they show every drop and fingerprint. They have to be shined and will get dirty fast. Almond is one of the nicest dirt-minimizing colors there is. Look for plain simple handles and knobs and as few of those as possible. The new electronic touch controls are immensely easier to clean than the old exasperating ridged and decorated knobs and dials.
If you can manage it, a built-in appliance is the best, no question about it. Whenever you seal the top, sides, and underneath, you eliminate all those places to collect grease and dust and flying food that has to be cleaned off. There are two drawbacks to built-ins, though. A built-in appliance is there to stay, so it better be installed in its permanent location. If you don’t plan to stay in your present home permanently, this can be a problem. Also, built-in appliances are slightly more ex pensive than standard ones, and you may not plan to replace your major appliances now, anyway. But if you’re doing major remodeling or building new, built-in is best.

The Trials of Too Many Knobs
The Stove
This is your biggest mess- maker. There are more and more ranges with sealed-in heat elements on the market. These have coils just like the stove you’re using now—only the top is completely sealed so nothing can get down under it. At least three manufacturers currently make them and I’m sure every other manufacturer will follow suit, so shop around for the one that suits you. We prefer these to the glass-top models that require a special kind of pan to cook on them, but glass- tops are great for clean-up and have been improved considerably over the last few years.
The new cooktops on the market also have a downdraft venting system that is wonderful. It’s said to be 80 percent more efficient in getting the grease and grime out of the air before it gets to the rest of the house. It works like this:
Grease and smoke that come from cooking settle down toward the floor, so a vent that is below the cooking surface traps the grease and smoke more efficiently than an overhead vent that pulls fumes up to dispose of them. That flying smoke and grease are what cause the layer of grime you find on the top of your fridge—that stuff is landing all over your house; you just don’t see it because you clean your counters daily and you rub it into your carpets and floor.
There are now several major brands of appliances offering this system and every six months something new comes out so you will soon see this system available in a wide variety of stovetop models. If you are building in, put your venting fan down near the cooktop and vent it to the outside. Filtered, circulating hoods don’t do a good job no matter what the salesperson says—you want to get the smoke out of the house, not re-circulated back into it.
What about those cooktops that are steak barbecues, rotisseries, and deep fryers all in one? They are harder to clean. If you actually do barbecue a lot, you’ll love them, but make sure the use will justify the extra cleaning. Attaching and de-attaching all the parts is questionable otherwise.
If you’re not ready to buy a new stove, you can still cut back your stove upkeep time. There are burner pans available now that have a Teflon surface. Ask at your appliance store—if they don’t have them, you may be able to order them.
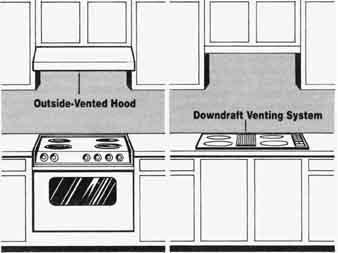
Two good types of built-in cooktops.
Ovens
By all means get a self-cleaning oven. Laura says she didn’t believe they could work as well as they do until she rented out her house one year and the new oven was left a mess. She put off and put off cleaning it even though it was “self-cleaning” because she just knew she was in for a job. One day her husband just turned all the knobs and turned it on. That oven was spotless—and I mean every little drop of burned- on mess was gone and I didn’t even touch it,” she says. Think what that would save in cleaning time over the years—kitchen mess, floor mess, sink mess—not to mention the cost of oven cleaner. Self-cleaning ovens are a definite must for your low-maintenance house—don’t be without them.
Built-in ovens also save work— they sit higher off the floor so they don’t catch as much dirt as the lower ones do.
The Self-Cleaning Oven
Microwaves
Microwave ovens are timesavers for many household jobs. Not only do they boil water almost instantly and cook food in much less time, there’s less cleaning, too, because food doesn’t splatter all over the microwave when it cooks.
Build them in if you can. If you already have a microwave and don’t want to buy a new one, you can buy a kit to convert your countertop microwave into a built-in—ask your cabinet dealer or at the DIY store.
A word of caution about your microwave’s location: If your microwave is set too high, the danger of tipping something out on top of yourself is great. Don’t put a microwave higher than mid- chest. Any higher and you greatly increase the chance of burns, and burns from spattered microwaved food can be severe. Food from a microwave comes out HOT—often hotter than food from a conventional oven.
You should also consider every one else who will be using it, including kids. Built in at the 3 to 3½-foot level is just about right for most people, but here again is a place where you should tailor proportions to fit your family.
Refrigerators
For a fridge, anything but frost- free leaves me cold. Defrosting a freezer is a major, messy job that isn’t necessary in this post Age era.
An automatic ice-maker is also handy. If you have a large family, the job of keeping the ice trays full can be titanic.
Take a hard look at the design inside, too—all those little shelves, drawers, and compartments. This interior architecture can get very tricky to clean—so run your mental washcloth over it and check it out. The various de vices and major drawers should not only store things conveniently and efficiently but must be easy to remove for cleaning.
While buying built-in appliances is always a good idea, built-in refrigerators are particularly handy. They’re wider and shallower than regular refrigerators—and are easier to maintain because you have less “back of the fridge mess.” Also, things don’t get pushed to the back and then forgotten or knocked over and spilled.
Because built-ins are more expensive, you may opt for second best. Build a cabinet over the top of a regular refrigerator and put a panel of wood that matches your cabinets down both sides. Instead of the usual arrangement, in which the fridge top is exposed to collect grease and grime, extend the cabinet out over the top of the fridge. The side panels are attached to the countertop. This means you don’t get that dirt dropping off the counter down between the fridge and the cabinet. The top cabinet also makes an accessible storage place—some people like to put slots in it for lids, cookie sheets, mail, etc. This arrangement eliminates two sides and the top to be cleaned.
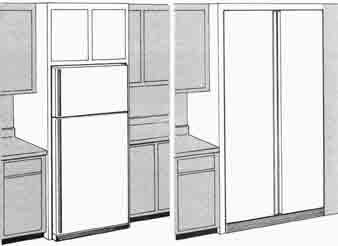
Built-in refrigerators are best—but if you don’t have
a refrigerator that’s made to be built in, you can construct your cabinets
so that your standard model works like a built-in.
Other Appliance Musts
Any kitchen that aspires to be maintenance-free should not be without two timesaving treasures: the dishwasher and the garbage disposal. In addition to the obvious benefit of freeing you from dishpan hands, a dishwasher helps hide clutter between washings, stores clean dishes, and encourages you to deal with the dishes right away rather than letting them pile up in the sink—where the job just gets harder the longer you wait. A garbage disposal eliminates food seepage from garbage bags, aids in speedy cleanup, and makes for less frequent trips to the garbage can since you have less perishable waste.
Suspended Appliances
Count how many things you have on the counter—canisters, can openers, coffee makers, toaster ovens, microwaves, knife blocks, utensil holders—they all add up. Every time you wipe up the counter, what do you do with these things? You have to pick them up and put them down again. What do they look like when you pick them up? Invariably, they have a glob of jam or a bit of spilled tomato paste on them so you have to quickly wipe them down, too. You do this at least weekly and more likely two or three times a week. That’s a lot of extra work. And with many new homes being smaller and more compact, the need for efficient use of counter space is greater than ever. Many appliances and containers can be mounted underneath the upper cabinets or on the back. splash to eliminate that constant handling and free up counter space.
Since manufacturers have grasped the convenience of having fewer things sitting on the counters, you can now get almost any appliance suspended or built in. Some are less common, so you have to pay more for them, but some of the things you use every day, like can openers and mixers, are available for about the same price as the countertop models.
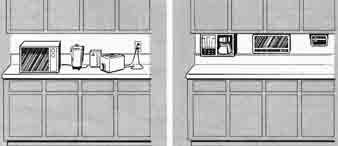 Before and After
Eating Area
If you’re lucky enough to have an eat-in kitchen, you face a decision about the best styles and materials for kitchen furniture. A table with suspended chairs is the way to go in almost any kitchen, but particularly in those that serve large families. It makes mopping easier and saves the floor from the scourge of scuff marks. (We will later present a full discussion of tables with suspended chairs.)
A solid hardwood table is elegant for light use, but most woods have to be treated with special cleaners or oils. A tabletop with a plastic laminate holds up much better for a more rambunctious household and tolerates (if not thrives) on soap and water. Glass is easy to clean and very durable, although it does show fingerprints and water marks.
Make sure the backs of your chairs are open so they let crumbs fall easily to the floor. Don’t get chairs with elaborate upholstery, either. But tons, puckers, and tucks collect every speck of dirt that comes their way.
Oh, That Kitchen Windowsill
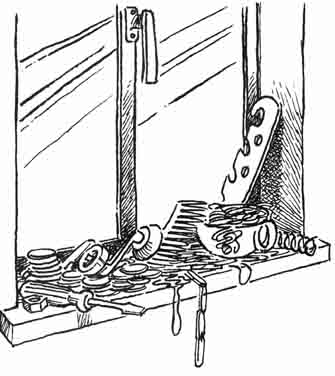
The Kitchen Windowsill
Everything piles up here! You find one of your daughter’s hair barrettes on the floor. You don’t drop everything and run to her room—you set it on the kitchen windowsill. Somebody drops a dime on the floor—you park it on the kitchen windowsill. You find a crayon in the silverware drawer, you don’t scoot to the playroom and put it in the box—there it goes on the kitchen windowsill. You take the rubber band off the morning paper—and drop it on the kitchen windowsill. Then, when there is danger of an avalanche, you finally have to face putting everything away. it may be smarter to consolidate the putting away—your time is valuable—but how do you deal with that messy pile in the meantime?
You need a “control center” with room for all this. The reason you use the kitchen windowsill is because it’s central and convenient. The control center can include a “mail center” with slots or bins for the bathroom, the bed room, the kids’ room, your office. Those slots will invite people to police their own things—even though they never touched the mess on the kitchen windowsill. The slots will also save you a sol id hour of sorting—you sort as you go. The control center also organizes many other kinds of messes and messages.
If you want to go a step further, you can eliminate the windowsill altogether by setting the window in so that it is even with the wall. Then there’s no place for things to accumulate.
But don’t get rid of the kitchen window completely! In fact, consider putting a giant picture window in the kitchen. Nearly every one puts a big window in the living room, but you don’t really live in the living room like you do in the kitchen. You’re usually there in the evening when it’s dark and you can’t see out anyway. The kitchen, however, is the headquarters of the house. Most of the talking on the phone, babysitting, family decision-making, etc., goes on there. So if there’s any place light should come in, where people should see and feel the out side, the kitchen is the place.
Accessories
A lot of the work you do in the kitchen is generated by the dishes, napkins, tablecloths, and other accessories that go with the territory. So while lessening the labor caused by these items won’t exactly make your house do the house work, they’re probably worth a moment or two of thought.
Opt for modern dish styles that are truly serviceable—the plates aren’t too ornate, the glasses aren’t too small to clean easily, the cups are neither too heavy nor too fragile to handle. Choose a material that is smooth and cleanable.
One of the best ways to make sure you’re wasting as little time as possible on the dishes is to make sure you have plenty of storage space for them. You need at least four feet of dish storage for an average family.
Tablecloths and place mats need a lot of care. Except for very formal occasions when you want the elegance they can provide, omit them from your table setting. They have to be washed, ironed, and stored after each use. Place mats often cause more spills than they catch because they create an uneven surface that can tip over glasses and bowls.
Paper napkins are a lot less work than cloth, so decide if the luxury of “real” napkins is worth the washing, ironing, and folding they require.
Next:
Prev.: