People need shelters for many occasions. The shelters we are referring to are not fully-enclosed buildings with doors. They usually have one or more sides open. In a garden or yard, such a shelter might be all you need for storing yard furniture. You can add seating to the shelter so you can rest from your labors or sit and admire the flowers growing. Anyone collecting admission money at an event can use a simple shelter, possibly of portable construction. Something similar might provide shelter for children waiting for the school bus.
A more advanced shelter could have an enclosed part with door and windows towards the back and a broad, more open part, large enough for chairs and table, at the front. You might call this type shelter a summer house or a gazebo. If made large enough, it almost could become a second home. It is difficult to decide on the dividing line between a shelter and a building.
Construction might be very similar to some of the buildings described in section 3, but if the front is open, there is a problem of providing stiffness there. If you provide the open front by just leaving out what would be the front of the building, there is no crosswise stiffness, and a hard push or even a strong wind on one side could distort or even collapse the shelter.
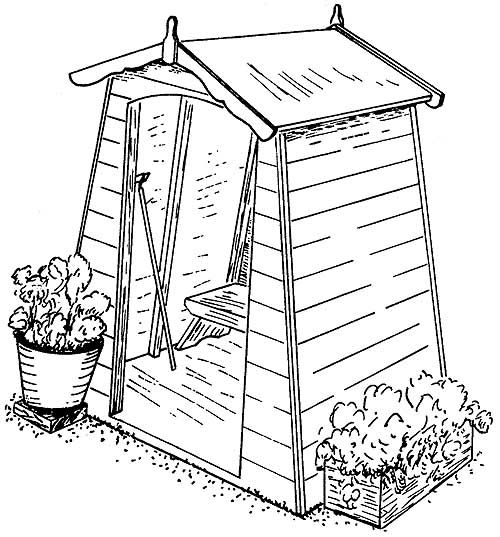
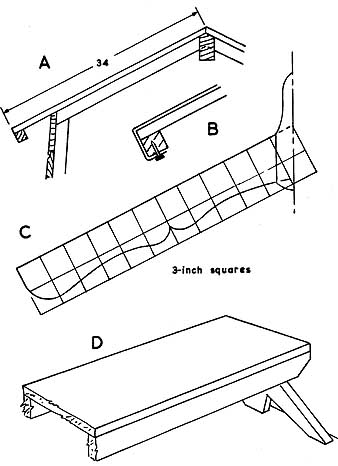
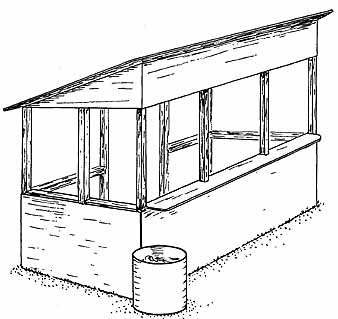
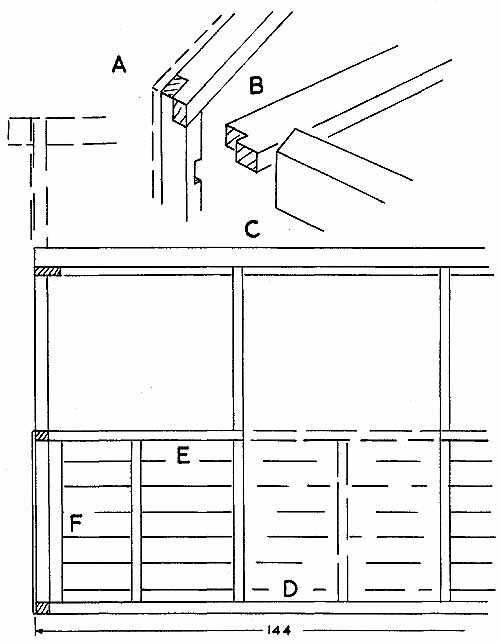
Ill. 4-1. You can take apart this open-fronted shelter.
TAKE-DOWN SHELTER
The take-down shelter is a basic, open-fronted shelter, which you can make permanent, but which is suitable for disassembling into flat sections by removing a few bolts. It has a wooden floor, which keeps the assembly square. As shown in Ill. 4-1, this structure is intended to be a one-person shelter for a ticket seller or money taker at an event. It would also provide shelter from a storm or a storage place for a few garden tools. The sizes suggested in Ill. 4-2A are for a shelter of this type, but you can use the same method for a shelter of many different sizes.
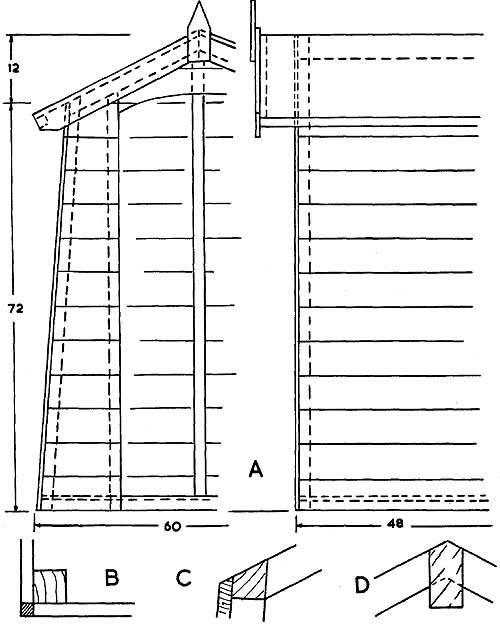
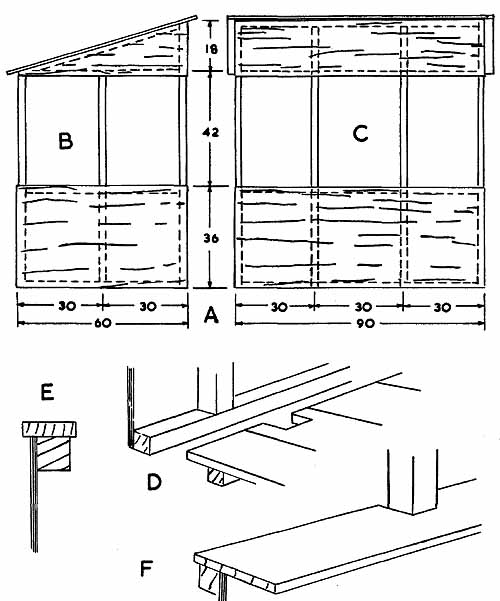
Ill. 4-2. Sizes and construction details of the take-down shelter.
You can board the walls on 2-inch-square strip frames. The roof and floor might be ¾-inch plywood. Assemble the building with ¾-inch coach bolts, which might be left in the outer parts when you take down the shelter.
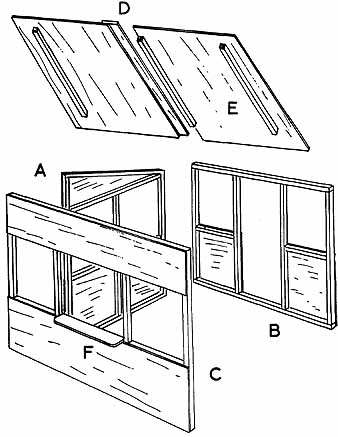
Ill. 4-3. Assembly of the parts of the take-down shelter.
Start with the pair of sides (Ill. 4-3A). The nailed boards might not be enough to keep the sides square, so include cross members and diagonals (Ill. 4-3B). If the cross pieces are about 30 inches from the ground, they can support a board across to act as a temporary high seat or somewhere to put boxes of tickets or other items. So you do not interfere with fitting or removing the floor, notch the diagonals into the rear uprights a few inches up (Ill. 4-2B).
Make the back to fit between the sides (Ill. 4-2C), with the covering boards extending to overlap the side boards (Ill. 4-3C). This assembly should hold its shape, but include a diagonal brace if you think it's necessary. Bevel the top to match the slope of the roof.
For the top of the front, make a piece of plywood to bolt onto the sides (Ill. 4-2D and 4-3D). Round the edges of the hollow. Make a plywood floor (Ill. 4-3E); notch it around the uprights to rest on the bottom rails of the sides and back. Make up the thickness with a strip at the front. Cut a plywood roof to overlap about 3 inches all around (Ill. 4-3F). Cover the front edges of the sides with a strip (Ill. 4-2E) to fit against the plywood front (Ill. 4-3G).
Three bolts at each corner between the walls should be sufficient. Put two bolts through each end of the plywood front. For the floor, there might be two bolts upwards near the front. If the floor is a close fit, you might not need any other bolts through the floor. For a temporary assembly, you might drop the floor onto the bolts without using nuts. It will be best to make a temporary assembly, then mark the roof-bolt holes with the roof in position. When you are satisfied with the first assembly, round all exposed edges and separate the parts for painting.
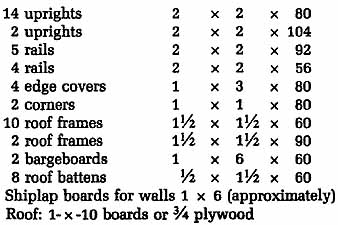
Materials List for Take-down Shelter
SUN SHELTER
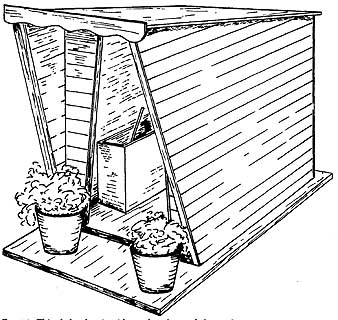
Something with a more decorative appearance than the rather basic take-down shelter will look better in a yard or garden, if you intend to sit in it, sheltered from wind and sun. You can also use it to store outdoor furniture or garden tools.
Ill. 4-4. The sun shelter has sloping sides and decorative bargeboards.
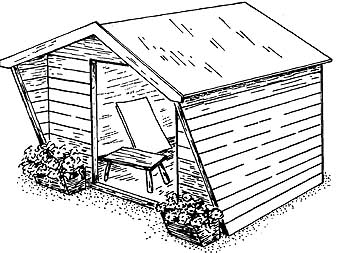
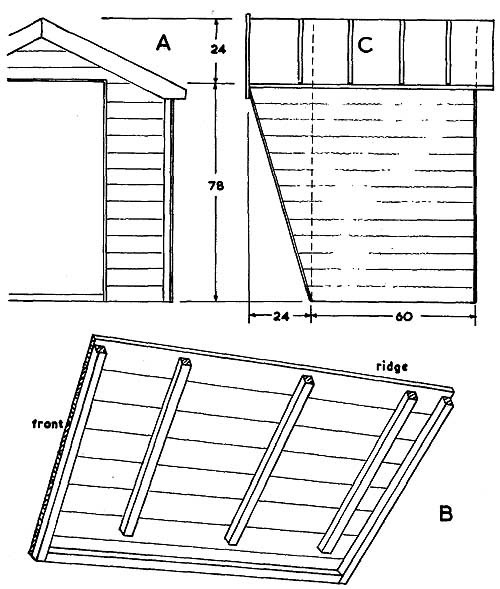
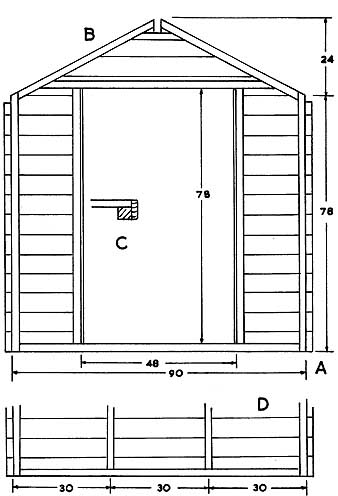
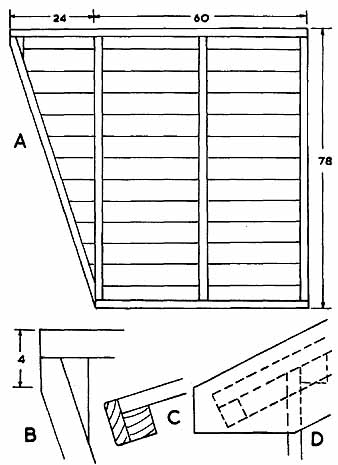
As shown in Ill. 4-4, the back and the front are parallel and upright, but the side walls slope inwards. Curve the top and back of the door opening, and give the front bargeboards shaped edges to avoid an austere appearance. This design includes a wooden floor, so the shelter could be self-contained and not attached to the ground, making it easier to move it to a different location. With the usual softwood construction, it should be possible for two men to carry the whole assembly for a short distance.
The sizes suggested In Ill. 4-5A allow for occupying a ground area about 48 inches x 60 inches, but you can modify the sizes to suit your needs, providing you do not increase the size excessively. The skin suggested is shiplap boarding, but you can use plywood or other sheet material. You can use boards or plywood for the roof, then cover it with roofing felt or other material. Nail the bargeboards on after you have covered the roof. You can build in any seating or you can rely on separate chairs.
The key assembly is the back (Ill. 4-6A). Set this part of the building out symmetrically about a centerline. With the usual covering, one central upright should be all that you need to supplement the outside framing, which you can halve together (Ill. 4-6B). Cover the back with boarding, working from the bottom up.
Ill. 4-5. Sizes and corner joints of the sun shelter.

Ill. 4-6. Back, front, and constructional details of the sun shelter.
Use the back as a pattern for getting the shape of the front (Ill. 4-6C). Arrange uprights for the doorway sides. Cover with boarding. At the top of the opening, nail stiffening pieces inside and cut the curve through them and the boarding, preferably with a jigsaw. Round all edges of the doorway.
You can make the two sides as separate units, with bolts into the back and the front, if you want to prefabricate the shelter or arrange it to take apart for removal to another site, but it's compact enough for you to move it bodily by truck. Consequently, you might find it simpler to assemble it completely and permanently. If so, put pieces across at top and bottom and central uprights at each side (Ill. 4-6D). The easiest way to join to the front and back is with sheet- metal gussets. When you have nailed the side boarding on, you will strengthen the joints further. For the neatest corners, stop the board ends at the uprights and ff1 the corners with square strips (Ill. 4-5B).
You might consider it satisfactory for your purpose for the eave’s strips to be left with square edges, but it will be better to plane them to the slope of the roof (Ill. 4-5C) and make a ridge piece with matching slopes (Ill. 4-5D).
Square the assembly as you fit the floor. What stiffening you provide depends on the materials. Two pieces from back to front should be sufficient (Ill. 4-6E). Over these strips might come particleboard, plywood, or 6-inches-wide boards. Cover the front edge with a strip to match the thickness of the shiplap boarding (Ill. 4-6F).
Allow for a 6-inch roof overhang all around. You can use plywood or arrange boards from back to front. Stiffen all edges with strips below (Ill. 4-7A). Take the roof-covering material over the top without joints. Turn in the edges and tack underneath (Ill. 4-7B). Use more large-head nails elsewhere on the roof, if necessary.
Materials List for Sun Shelter
Make the bargeboards to stand about ½ inch above the roof covering and to project at least 1 inch at the eaves. Leave the lower edges straight,
or give them a regular pattern of deckle edges. The pattern shown is distinctive
(Ill. 4-7C) and you can cut it with a portable jigsaw. Cut one and use
it as a pattern for marking the others. The central piece might have a
simple point or might be curved to match the other decoration.
If you put strips across the sides at seat height, you can place one or more boards across as a seat and move them to stand on end if you want to use the shelter as a store. Another idea would be to make a bench with its feet arranged to come between the sides (Ill. 4-7D), then you can lift outside when you prefer the open air.
If the sun shelter is to stand on soil or grass, soak the lower parts, at least, with preservative. For a permanent position, you should place it on a concrete base. You can leave the inside untreated, but it would look best if you finished it in a light-color paint, even if you paint the outside in a dark color.
CANOPIED SHELTER
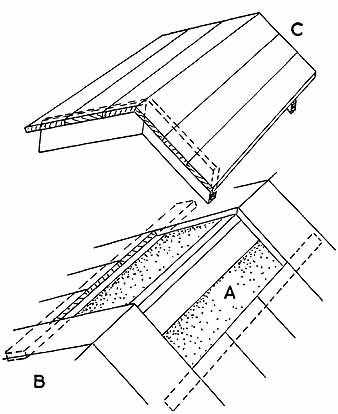
If there is driving rain or the sun is very hot, it's advantageous to extend the roof forward on your shelter. If you can extend the sides also, you can provide a wind break, as well as improve the appearance of the shelter.
The previously listed advantages are for shelters used in a garden or yard, and anyone selling or collecting tickets at an event will appreciate them. The shelter shown in F 4-8 is large enough for many purposes, but it's small enough for a single-sloped roof. This type shelter is simple, but if you want a much larger shelter, it would be better to have a ridged roof, which we will describe later. This shelter is shown on a wooden base that extends all around, with extra width at the front, so you can bring a chair forward, while still benefiting from the shade of the structure. You can make a base of concrete, or you can place the shelter directly on the ground, if you are locating it only temporarily. Construction is done by bolting sections together, so you can do most of the work on the parts before erecting them on a site.
As shown, most of the framing is 2-inch-square wood and the covering is shiplap boards. You also can use plywood or other covering material. You can board the roof, but stout, exterior plywood is strong and simple. Ill. 4-8 is shown with the front board decorated with a deckle edge, but if you use a plain board, it could carry announcements if you are using the shelter at an event. Nail, halve, tenon or hold framing joints, including those on the base, with sheet- metal gussets.
The sizes suggested in Ill. 4-9A will make a shelter of reasonable proportions. If you alter sizes, make sure the roof has enough slope to allow water to run off. If you get heavy snowfalls, it might be advisable to make it steeper. Do not lengthen the canopy too much if you do not anchor down the shelter, otherwise it might tend to fall forward.
Start by making a pair of sides (Ill. 4-bA). Keep three uprights square to the bottom. Bevel the sloping front pieces and nail them at the bottom (Ill. 4-lOB). At the top, place a 6-inch upright part to take the front board. When you cut that corner to shape, reinforce it with another piece inside (Ill. 4-9B).
Ill. 4-7. Roof, bargeboard, and seat details for the sun shelter.
Ill. 4-8. This shelter has its sides and roof extended to make a canopy.
Ill. 4-9. Sizes and details of the canopied shelter.
Ill. 4-10. Side and joint details of the canopied shelter.

Ill. 4-11. Front and bargeboard details for the sun shelter.
Cover the framing with shiplap boards, starting from the bottom. Cut the board ends, back and front, level with the framing. On the front edges only, put on cover strips (Ill. 4-10C) with rounded, outer corners.
The upright front (Ill. 4-11A) fits between the sides. The doorway is shown with sloping sides to match the design of the shelter sides. Make the overall height to match the sides and bevel the top to match the roof slope. Arrange a crossbar to give sufficient headroom (Ill. 4-11B).
When you have assembled the shelter, bolt the front and side uprights together (Ill. 4-10D). Extend the covering boards far enough to go over the second upright, without being so long as to prevent complete tightening. When you cover the front with boards, see that the assembly is without twist.
The back is a simple, boarded frame, with strips around the outside and one central upright. Make its height to match the sides and bevel the top to suit the roof. In a similar way to the front, the boarding has to overlap a second upright when you bolt the parts together. Allow for this overlap (Ill. 4-bE), but you will get the neatest appearance by fitting a square piece in the corner.
When you assemble the shelter, put a bar across the front (Ill. 4-9C). This bar holds the sides at the correct distance and provides a place to attach the roof covering.
If you make a base, allow it to project about 6 inches outside the back and sides. At the front, it might go as far as the canopy. The suggested construction, has a framework with supports across at about 18 inches (Ill. 4-9D), close boarding over that, and a strip covering the board ends (Ill. 4-9E).
Make the front board so it overhangs a little at its ends and projects above the roof (Ill. 4-9F). If you wish, shape its lower edge (Ill. 4-11C), then nail or screw it in place.
No internal work is shown, but you could build in seating or arrange removable benches, as suggested for the previous shelter.
After treating with preservative or paint, bolt or screw the shelter to its base. If you will want to move the shelter and base, use a few blocks or battens to keep the bottom edges correctly located on the base.
Materials List for Canopied Shelter
RIDGED-CANOPIED SHELTER
A ridged roof has a more attractive appearance than a lean-to or single slope. Both look better than a horizontal roof. Over a certain size, a ridged roof is preferable, as it sheds rain and snow easier and offers less wind resistance. A shelter with a ridge from back to front and extending canopy or porch has good access and provides maximum shelter and it looks good.
Ill. 4-12. This canopied shelter has a ridged roof.
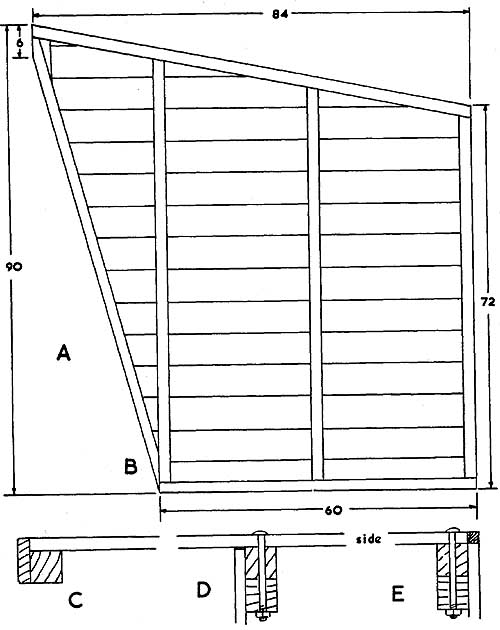
The shelter in Ill. 4-12 has a floor area of about 60 inches x 84 inches, with a lengthwise canopy of approximately another 24 inches. Good clearance is provided through the doorway and it has ample headroom inside. No base or floor is shown, but you could add a wooden or concrete platform or you might build in a wooden floor. Construction is sectional, so you can prefabricate most parts and bolt them together on-site.
Shiplap boarding is suggested for the covering, but you can use other materials. The sizes given in Ill. 4-13A allow for economical cutting of standard plywood sheets. Arrange internal framing of some panels to suit joints between plywood sheets. Join framing parts to each other by halving, tenoning, or by using sheet-metal gussets. Many parts will be satisfactory if you notch and nail them.
Ill. 4-13. Sizes and roof details for the ridged-canopied shelter.
Start by making the front (Ill. 4-14A). Fit this piece between the sides as previously done in Ill. 4-1OD. Allow the covering boards to extend to overlap the side uprights. The doorway is shown 48 inches wide, but you can alter that. If you want good protection for articles stored Inside, make it narrower. If you want to let in plenty of sunlight while you sit inside, make it wider.
At the top, cut away for a 2-inch x 4-inch ridge piece to pass through and put a supporting piece across, below the gap (F 4-14B). After covering with boards, put rounded-edge pieces at each side of the doorway (Ill. 4-14C).
The back has the same outline as the front. Bolt its uprights to the uprights at the rear of the sides, and cut the boarding to allow for fitting a square strip in the corner (Ill. 4-bE). To allow for fully boarding the back, arrange two uprights to the full height intermediately (Ill. 4-14D).
Ill. 4-14. Front and back details for the ridged-canopied shelter.
Make the pair of sides (Ill. 4-15A), cutting the boards level with the framing. Allow a 4-inch vertical part at the front to take the bargeboards. Reinforce with a block inside (Ill. 4-15B). Check the side heights against the matching parts of the front and back. Bevel the top edges to suit the slope of the roof. Cover the front sloping edges for a neat finish (Ill. 4-15C).
Ill. 4-15. Side and roof details for the ridged-canopied shelter.
For assembly, it should be satisfactory to use ¾-inch-coach bolts at about 18-inch intervals. Drill holes for these bolts in the sides. Do not continue drill trig into the front and back uprights until you bring them together on-site, to ensure exact mating of holes.
Make a 2-inch x 4-inch ridge piece to go right through the full length of the roof. Bevel its top edge to match the slope on each side. At the front, match the extension with the shelter sides. At the back, an overhang of about 5 inches should be enough.
You can make the two halves of the roof of thick plywood or wide boards (Ill. 4-13B). Bevel the top edges so they meet along the ridge. Make the sections wide enough to allow for a 5-inch overhang at the sides. Frame at back, front, and eaves. Arrange a strip to fit inside the shelter front and another to fit inside the back. These strips will hold the whole assembly square. The number of other pieces will depend on the stiffness of the roof, but there will have to be at least one more.
Cover the roof from eaves to eaves, with a good overlap. Turn under and fix with large-headed nails at the eaves and the ends. To hold down the fairly large area on top, nail light battens at about 18-inch intervals (Ill. 4-13C).
Fit bargeboards at the front only, or at both ends. Cut so the boards stand about 1 inch above the roof surface and overlap about 1 inch at the corners of the roof (F 4-15D). Nail into the roof end and into the shelter’s sides. No central, decorative piece is shown at the apex of the bargeboards, but you can use one similar to those used on roofs discussed previously; or you might wish to cut and mount a badge or personal emblem there.
Materials List for Ridged Canopied Shelter
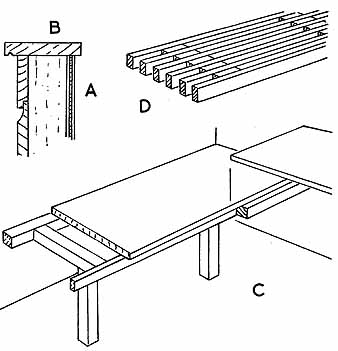
SMALL BARBECUE SHELTER
When using a barbecue, the weather is not always as kind as you would wish. If there is no rain, the sun might be uncomfortably hot or the wind too strong. You also might have the problem of crowds, particularly children who might get burned if they get too close. A shelter which has a roof, but is basically open all around except for barrier walls, allows the cook to work uninterrupted. He can have his equipment and food nearby and is able to serve hamburgers, sausages, or whatever through the open front or sides.
The shelter shown in Ill. 4-16 is designed with this purpose in mind. It also has possibilities as a booth for selling or collecting almost anything. Al though you could erect it as a permanent shelter, it's designed with portable sections, so you can use it anywhere. Assembly and disassembly should not take more than 30 minutes. Construction is plywood on 2-inch-square strip framing, but you could use shiplap boards, if you wish. For a portable shelter, the roof is plywood without extra protection. For a permanent shelter, you could stiffen its edges and cover the roof with roofing felt or other material.
Ill. 4-16. This barbecue shelter has a roof and barrier walls, but there
is plenty of open space for ventilation.
The suggested sizes are based on 30-inch-wide bays (Ill. 4-17A). The height allows normal clearance through the doorway at the back. The barrier-wall edges are 36 inches from the ground, which is a convenient height for serving and probably enough height to keep most wind off the barbecue surface. Boarding directly above the barrier walls is not included, but you could fully enclose any of the walls, if you wish, particularly if you have to contend with a strong, prevailing wind in one direction. You could arrange removable panels to fit in or hang on the open framing, if your needs will vary.
Start with a pair of ends (Ill. 4-17B and 4-18A). With the complete structure, make sure the parts of the uprights that edge the openings are smooth and with lightly-rounded edges, so they are safe if anyone holds on to them. Halve together the uprights and rails which cross at the middle. You can make any of the other usual joints elsewhere. Nailing on the plywood skin will give rigidity to the assemblies.
Hold corner joints between walls with ¾-inch bolts at about 18-inch intervals, similar to the other shelters described earlier. For a portable shelter, you might finish the covering panels level with the edges. For a more permanent shelter, the plywood on the ends might overlap the back and front for a neater appearance. If you plan to keep the shelter in sections for transport by truck to anywhere you need it, you might damage the overhanging plywood, so it's better to omit it.
Ill. 4-17. Sizes and details of the small barbecue shelter.
The back is a simple frame, mostly open (Ill. 4-18B), so use strong joints, particularly at the top. The lower plywood panels should prevent distortion of the assembly.
The front (Ill. 4-17C and 4-18C) has plywood top and bottom to give rigidity. Check the back and front heights against the ends, and bevel the top edges to match the roof slope. It will be best to locate bolt holes during a trial assembly.
Ill. 4-18. Assembly arrangements of the small barbecue shelter.
The roof can be 72 inches down the slope and in two pieces to overhang about 6 inches at the ends. Put a 6-inch-wide cover strip on one half to overlap the other piece (Ill. 4-18D). A stiffening strip under the lapped piece will prevent distortion. If this will be a permanent shelter, you can screw the roof into place as it's , but if it's portable, put more strips underneath to fit inside the walls (Ill. 4-18E). With the portable shelter there should be a few screws or bolts to hold the roof down and keep the building in shape. It is best to do the detail work on the roof during a temporary assembly of the other parts.
You might use the shelter directly on the ground, but you might make a floor to fit inside, probably in three parts, each about 30 inches x 60 inches. Arrange boards to overlap the bottom wall edges, with notches around uprights and strips underneath (Ill. 4-17D). Dropping these sections in place will hold the other parts square.
What you do at the edges of the openings depends on your needs. You can leave the plywood edges uncovered, however, it would be better to add cover strips. Where you do not need any extra width, make them with a slight overlap (Ill. 4-17E). You also could make a serving shelf or countertop, just at the center (Ill. 4-18F) or along the front, notched around the uprights (Ill. 4-17F).
Almost certainly, anything inside will be freestanding, so you can move it around. A few ledges between uprights, however, would allow you to put boards across to serve as seats, shelves, or tables. Use the space above the front opening in this way for a shelf, particularly if you plan to use the shelter for selling or serving from a large stock of food or drink.
Materials List for Small Barbecue Shelter
LARGE BARBECUE SHELTER
A large shelter that will accommodate many people during a barbecue, picnic, or other outdoor gathering when the weather turns sour or when there is an urge to congregate more closely, needs to be an adequate size. It should be a permanent structure and should be built in position, although you might prefabricate some parts.
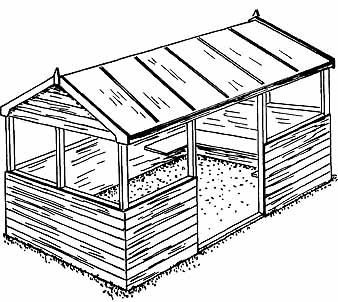
Ill. 4-19. The large barbecue shelter has space inside for several people
as well as the barbecue.
The shelter shown in Ill. 4-19 has a ridge roof and a doorway at one side, although you can place these items elsewhere without difficulty. Closed walls reach 42 inches high and there are open spaces above that. Spacing allows for seating to be built in, or you might prefer to use separate chairs or benches. The framework has to be stouter than in previous shelters and is mostly 2 inches x 3 Inches. The cover might be shiplap boards, although you can use plywood or other covering. The sizes suggested in Ill. 4-20 would allow you to use a single, standard plywood sheet in the width and one and a half sheets in the length. The roof is boarded and covered with bitumastic felt or other roofing material. The pair of gables settle the shape, but two trusses to support the ridge and purlins are under the roof. You should install this type of building on a concrete base. A wooden floor would be inappropriate. In a suitable situation, compacted earth might be satisfactory.
Ill. 4-20. Sizes and suggested layout of the large barbecue shelter.
Ill. 4-21. An end of the large barbecue shelter.
Start with the two gables, which are the same (F 4-21A). All of the framing is 2-inch x 3-inch strips, except the piece across below the eaves, which is a 2-inch x 6-inch section. All pieces have their 2-inch faces towards the outside. You might halve corners (Ill. 4-22A). Halve the central upright where it crosses the rails. At the top, put cheek pieces so you have a space for the ridge (Ill. 4-21B). Notch the other uprights and nail them to the rails. Notch the ends of the 6-inch piece (Ill. 4-22B). Check squareness of the framework and see that the opposite ends match as a pair. Board the outsides level with the openings and edges.
The lengthwise supports for the roof are the ridge, which fits into the apex slots of the gables, two wall plates (Ill. 4-22C), which rest on the side piece across each gable, and two purlins. Notch the purlins into the gables below where the uprights come (Ill. 4-21C)
When setting up the building on-site, start by joining the gables with the bottom members of the sides (Ill. 4-22D). Notch for the uprights at 24-inch intervals and join to the gables with sheet-metal gussets. Use struts, or other temporary supports, to hold the gables vertical until you fit other lengthwise parts. Make and fit the intermediate rails on the closed side (Ill. 4-22E), with notches for uprights to match the bottom members. Include uprights at the ends (Ill. 4-22F) for additional stiffness.
Bevel the top edges of the wall plates to match the slope of the roof. Notch the wall plates where the uprights come, then fit both wall plates to the gables and the uprights which connect to them. Treat the side where there will be a doorway in the same way, but leave a central space.
Check that the assembly is symmetrical by comparing diagonals, particularly on the sides. When you are satisfied that the assembly is square, board up to the intermediate rails and cover the wall plates with similar boards.
At this length, there is a risk of an inadequately-supported roof sagging after it has been in position for some time. To prevent this sagging, use two trusses, equally spaced, placing one over each full-depth wall upright. Obviously, the whole roof assembly must be kept in line. It is advisable to partially make the ridge and purlins, then have the parts of the trusses ready (Ill. 4-23A), so you can cut joints by testing where pieces cross and you will maintain the line of the roof.
At the apex of each truss, allow for the ridge piece and put a supporting strip across (Ill. 4-23B). At the purlin crossings, notch the parts together, but take out less of the truss than the purlin (Ill. 4-23C). At the eaves, cut the trusses against the wall plates and nail each part to a block (Ill. 4-23D). Sight along a temporary assembly to see that the roofline is straight. Check on the slope of the roof in several places with a board resting on ridge, purlin, and wall plates at each side. When you are satisfied, nail all the roof structure parts in place. Let the ridge extend about 5 inches at each end. At the corners of the gables, make blocks which extend the same amount and have sloped tops to match the roof (Ill. 4-23E).
Cover the roof with boards from the ridge to overhang the eaves by about 6 inches. You can use plain boards, although tongue edges would be better. Thicken under the edges (Ill. 4-23F). Turn the roof covering under and nail all around. Nail thin battens at about 18-inch intervals from the ridge to the eaves to prevent the covering material from lifting (Ill. 4-23G).
Ill. 4-22. Side arrangements of the large barbecue shelter.

Ill. 4-23. Roof details of the canopied shelter.
Ill. 4-24. Ventilator details of the large BBQ shelter.
Make bargeboards for the ends, with central decoration, if you wish (Ill. 4-23H). Nail the bargeboards to the roof, to project about 1 inch above its level.
If you are using the shelter for a barbecue, it would be advisable to arrange a central ventilator in the roof. Fit the ventilator in during boarding of the roof. A simple type is shown in Ill. 4-24. Cut the opening as you lay the boards (Ill. 4-24A). Support cut ends with battens underneath, extending lengthwise on each side of the shortened boards (Ill. 4-24B). Nail on strips at each end of the opening to raise the ventilator roof about 5 inches, then board lengthwise over them (Ill. 4-24C). Do not cut or alter the ridge piece below the opening. When you cover the roof, carry the covering material up the ventilator and put more over its roof. The ventilator does not have to be central; you can position it to suit where you will put the barbecue fire.
Ill. 4-25. Wall section and suggested seat construction for the large
barbecue shelter.
What you do inside the shelter depends on its intended uses. You can leave it as it's , which might be satisfactory for varied and occasional uses. A lining inside the closed walls would improve appearance, add to strength, and reduce draughts (Ill. 4-25A). Put a capping over the edges, preferably with a groove below to prevent rainwater running back and inside the cladding (Ill. 4-25B).
The lining could be plywood or particleboard. You might use oil-tempered hardboard, but that would not stand up to rough use, particularly if animals will use the shelter.
Bench seats are easy to build in. Put battens where the seats are to come. A seat height of 16 inches is suitable. Make framed supports. Put a strong support underneath if you carry the seating around a corner (Ill. 4-25C). The simplest seat top is made from thick, exterior-grade plywood. Boards can make up the width. A neat top, which does not trap water or leaves that blow in, is made with 1-inch x 2-inch strips on edge (Ill. 4-25D).
Arrange seats as lockers for storage. Complete them as boxes, nailing down with a few inches at the back of the top and arranging the rest to hinge up. Fit shelves inside the roof at the ends or along each wall plate.
Materials List for Large Barbecue Shelter