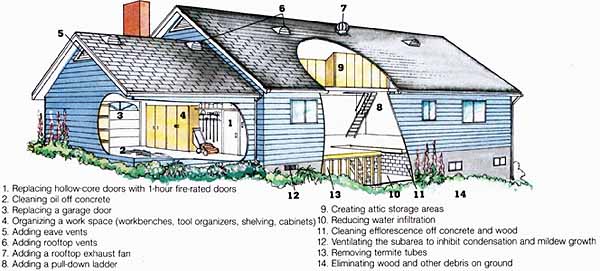
This section discusses improvements to the attic, subarea (the basement or crawl space), and garage, as well as general improvements not covered elsewhere in this guide. There are many inexpensive, do-it-yourself projects that can add to your comfort or reduce maintenance costs, such as installing a fan to improve attic ventilation, using a layer of plastic in the subarea to reduce mildew-causing condensation on the sub floor and increasing garage and driveway parking with a sectional overhead door In addition, you can expand storage areas by building shelves in the garage and improve access to the attic with a pull-down ladder so that it's easier to store infrequently used household items.
The attic and subarea are also likely candidates for conversion when more living space is needed. In some instances these areas can be converted at far less cost than that of adding on to the house.
[To give appeal to an apartment above a garage, and to make it a bright and workable space, consider skylights, built-ins, and recessed lighting.]
Small and Medium General Upgrades
Whereas in other sections, home improvements have been categorized by room or area, some improvements are general in nature and can be made to every area of the house. This section includes such upgrades; they cost up to $4,000 and can take from a few hours to six days to complete.
Cleaning Oil Off Concrete
Oil leaking from a car onto a concrete garage floor is best kept in check with a drip pan, but accidents still happen. Once oil gets onto concrete, it can be tough to remove.
A simple way to clean up oil is with cat litter or sawdust and cola. Spread the cat litter or saw dust onto the affected area and press it in to soak up as much excess oil as possible. Next, flood the area with cola—any brand will do. Then scrub it with a stiff nylon brush, being careful not to let the area dry out. After about 15 minutes, rinse the area with water. You can clean the spot that's left with a solution of 1 cup liquid laundry bleach, 1 cup powdered laundry deter gent, and 1 gallon warm water.
Replacing a Garage Door
By replacing a one-piece over head garage door with a sectional door, you can maximize parking space in the driveway and allow a taller vehicle to park in the garage. Families with two or more vehicles, one of them perhaps a truck or a camper, will appreciate this improvement, which makes living easier and is attractive to potential home buyers.
A sectional garage door takes from 6 to 9 inches less overhead space than a one-piece door be cause of its position relative to the garage door header. There fore, you may be able to keep some trucks and campers that otherwise would not fit into the garage out of sight when not in use. In addition, because a sectional door does not open out into the driveway but rather operates vertically, a car can be parked right in front of the door, which is handy if the driveway is short, if on-street parking is at a premium, or if off-street parking is required in the neighborhood.

Utility Area and General Upgrades:
1. Replacing hollow doors with 1-hour fire-rated doors
2. Cleaning oil off concrete
3. Replacing a garage door
4. Organizing a work space (workbenches, tool organizers, shelving, cabinets)
5. Adding eave vents
6. Adding rooftop vents
7. Adding a rooftop exhaust fan
8. Adding a pull-down ladder
9. Creating attic storage areas
10. Reducing water infiltration
11. Cleaning efflorescence off concrete and wood
12. Ventilating the subarea to inhibit condensation and mildew growth
13. Removing termite tubes
14. Eliminating wood and other debris on ground
Controlling Damage from Natural Disasters
In areas prone to earthquakes, hurricanes, floods, tornadoes, and other natural disasters, residents and prospective home buyers are concerned about how structures will hold up to future disasters. Upgrades that strengthen a home against these natural disasters are cost- effective from the standpoint of family safety as well as salability. In all but extreme cases, these upgrades can greatly re duce the chance of personal injury and extensive damage to the house. Such upgrades include bolting the house to its foundation, installing plywood panels on the cripple walls for shear strength, adding rafter ties, and installing metal connectors and diagonal bracing for post-to-beam connections.
Because the types of natural disasters most likely to occur vary from region to region, it's wise to consult local fire department officials for guide lines on how to upgrade, how to prepare the family to handle such a disaster, and how to deal with it after it has happened.
|
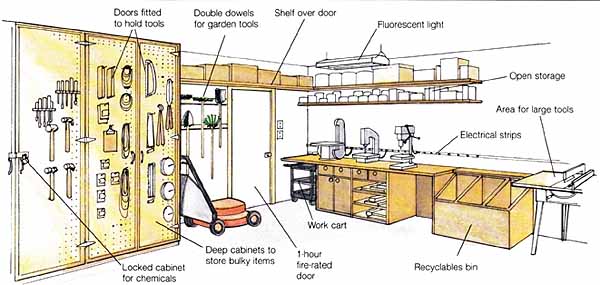
A well-organized, well-stocked work space can make any do-it yourself project easier. Most avid do-it-yourselfers build a workbench before starting any other household project. A basement with full headroom is the most likely spot for a workshop, but you can even use a small garage if you have a portable bench or a bench that folds out of the way when not in use. In either case, the bench should have a smooth, solid top. Plywood is acceptable, but covering it with a layer of ¼” hardboard results in a superior surface. Tiny parts won’t get lost in cracks and knotholes, and the smooth surface is less likely to scratch what you’re working on. A well-organized basement or garage is handy, easy to keep clean, and appealing to a prospective home buyer. For shelving or cabinets, ¾-inch particleboard is the material of choice. Standard shelves are usually placed about 16 inches apart. Even in a small garage, shelving can be added above car level. You can enclose the shelves by adding particleboard or ply wood to make sides, using pine to create a face frame, and shaping particleboard into doors with a small router and two router bits—one to cut a dado and the other to shape the exterior edge. Knobs and hinges finish the job. Pegboard is the most versa tile way to hang a wide assortment of tools. For lasting quality and strength when the pegboard will be larger than 8 square feet, use ¼-inch peg board. Otherwise, ½-inch peg board is sufficient. Every do-it-yourselfer needs a tool kit with certain necessary tools. Although the ultimate investment can be large, starting out doesn’t have to cost a lot. A good set of screwdrivers and a well-made set of combination wrenches, for nuts and bolts, are essential. Two crescent wrenches—an 8 inch and a 10 inch—are useful for odd-sized bolts and many plumbing fittings. For all types of home maintenance, including light plumbing work, channel-type pliers will prove to be invaluable. Having three sizes will provide maximum versatility—a 14-inch pair, a 10- inch pair, and an 8-inch pair. A finish hammer, a wonder bar (flat pry bar), a cat’s paw (nail puller), and a nail punch will take care of the nail driving and removal jobs. Yon will need an 8-point and a 12-point crosscut hand saw for rough and finish wood cutting, respectively, as well as a hacksaw for metal and a coping saw for sculptured cut ting. A small block plane, a set of wood chisels, and a combination wood file and rasp will take care of notching and smoothing work. A 25-foot measuring tape, a 2-foot level, a chalk box-plumb bob, and a tri-square will make light work of measuring, leveling, and squaring each project. With the tools listed, you can make a satisfactory miter box from scrap wood. An electric drill is probably the single most-used home-improvement power tool. Al though one with a simple ¼-inch chuck will serve most drilling needs, one with a 3/8- inch chuck is a better investment. A sander will make painting and refinishing projects much easier. For making cabinets, furniture, and moldings, a router is a smart investment. |
