Most homeowners can confidently remove a bearing wall up to 14’ long. To carry the weight that was borne by the wall, a header made of laminated veneer lumber is installed along the ceiling and supported by 4-by-4 posts at each end In most cases, you can set the support posts inside the walls abutted by the header, leaving an unbroken surface when the job is done. Temporary walls erected on each side of the bearing wall shore up the ceiling until the header and posts are in place.
Structural Considerations: If the load above the wall is uncommonly heavy—a concrete-floored bathroom, for example, or a bedroom containing a water bed—you may not be able to remove the wall. And before tearing down a wall that supports even an ordinary weight, you must make sure the posts that support the new header will rest on solid structure. If you have any uncertainties at all, consult an engineer to make sure your proposed redesign adequately distributes the weight.
TOOLS
- Handsaw
- Saber saw
- Hammer
- Level
MATERIALS
- Double-headed nails (3, 3.5”)
- Framing lumber (1 x 4, 2 x 4, 4 x 4)
- LVL board for header
- Nails (3”, 3.5”)
- Wood shims
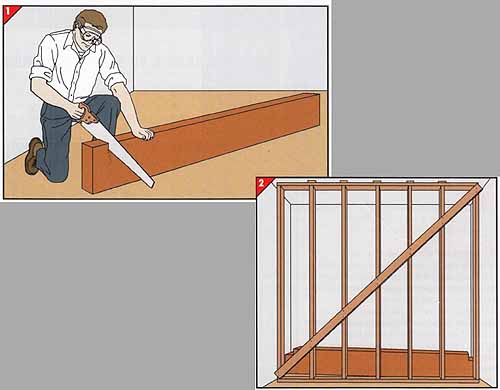
CAUTION! Wear goggles to protect your eyes when hammering, sawing, and using power tools. When lifting the header into place, wear a hard hat.
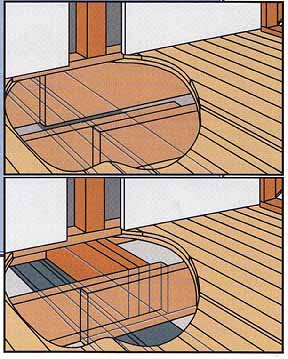
STRONG BASE FOR HEADER SUPPORT: The posts that support
a header are usually placed on the soleplate of an adjoining nonbearing
wall that runs perpendicular to the wall being removed, In most cases,
the plate transfers the weight to a joist directly beneath; in turn, the
joist passes the weight down to a girder or bearing wall resting on the
house’s foundation. Sometimes, however, carpenters position a soleplate
between joists. In such a case, the plate and post need special blocking
under them to safely transfer the weight to the girder or bearing wall.
If there is no girder or wall directly beneath, consult an architect or
contractor regarding proper placement of the header posts.
To determine the nonbearing wall’s location relative to the joists below, drive a nail through the floor next to the wall and find where it protrudes. If it turns out you need blocking, cut two pieces of board the width and thickness of the joists and long enough to run between the joists. Nail them together with six 3- inch nails and butt-nail them to the joists with two 3.5” nails for each board at each end. This blocking should fit snugly between the bottom of the subfloor and the top of the girder or wall below; shim any gaps above or below the blocking.
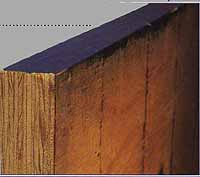
BUYING A HEADER: The best material to use for a new
header is laminated veneer lumber, or LVL. Made by gluing together thin
layers of wood, LVL is lighter and stronger than ordinary lumber but just
as easy to saw and nail. A coating of wax over the long edges prevents
moisture from working its way between layers.
LVL is cut to order by most lumberyards; the lumber yard will also advise you on the correct width for the board. To determine the proper length, measure the distance the header must span—including the thickness of any wall surfacing—and add 3.5” for each end that L intersects a perpendicular wall.
INSTALLING A HEADER BETWEEN WALLS
Cut notches into the upper corners of the header, 3” deep and 3.5” long, so it will fit around the top plates in the adjoining walls.
2. Installing temporary supports.
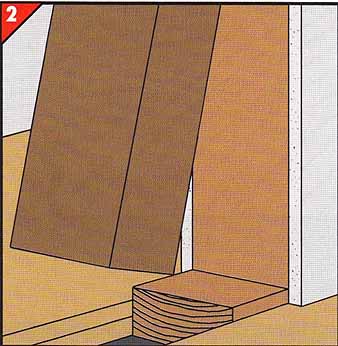
Before proceeding, place the LVL header on the floor against the wall to be re moved so it will be inside the workspace when the temporary walls go up.
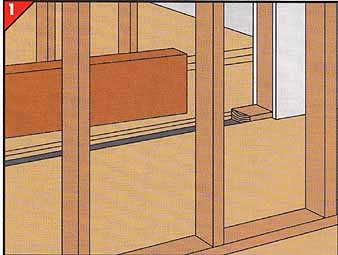
• Put up stud walls about 30” out from the wall on both sides, following the procedure prev. noted and using double-headed nails for easy removal later. The temporary walls should run the width of the span but need not abut a side wall closer than 2”.
• Brace the wall with a diagonal 1-by-4 nailed to every stud.
• Find the positions of the joists above and then shim tightly between them and the top plate.
Make sure the sup port walls are vertical and firmly secured by their tight fit. Then remove the existing wall surface and studs in the manner shown in Steps 1 to 3 earlier.
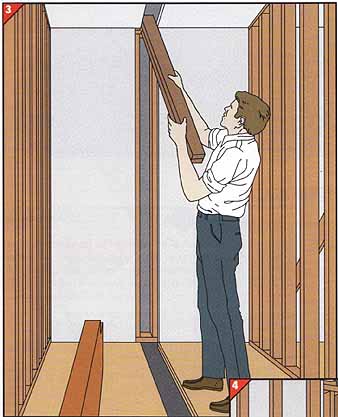
3. Prying out the plates.
The doubled top plates of a bearing wall are interlocked with those in the adjoining wall; use the following procedure to remove them:
• Cut out a 2” chunk of the top plates with a saber saw and begin prying a length of the doubled plate down far enough to use it as a lever. Get a firm handhold on it and work it free from its nailing in the adjoining wall.
• Remove the other section of the top plates in the same way.
• Cut and remove the soleplate as described in Step 4.
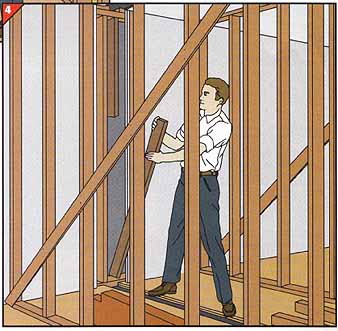
4. Preparing the support posts.
After the wall has been removed, the breaks in the side walls will reveal pairs of close-set studs placed to provide nailing for wall surfacing (Step 3).
• Cut the wall back to the nearest studs on either side of these nailing studs, and pry the nailing studs free.
• Place the header, notched edge up, on the soleplates of the side walls at each end. Measure from the bottom of the notch to the joist above it, and cut a pair of 4-by-4 posts to this length.
• Test-fit the posts to make sure they provide exactly enough clearance for the notched ends of the header.
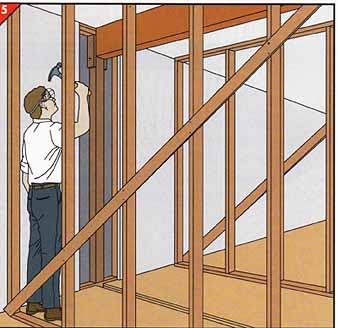
5. Raising the header.
This step will require a few helpers.
• Raise the header to the ceiling. Check whether it fits flush against all joists; if the center ones are low, put the header down and raise the sagging joists by tightening the shims on top of the temporary walls.
• While holding the header in position, insert a 4-by-4 under each end. Check the posts with a level to make sure that they are plumb.
• Toenail the posts to the soleplate and the header.
• Nail a piece of 1 -by-4 about 1 foot long to each side of the header and the top of the 4-by-4. These boards provide a nailing surface for wallboard.
Remove the temporary walls. Patch the wall and surface the header with wallboard and corner beads.
REMOVING PART OF A BEARING WALL
When you intend to leave part of the wall intact on both sides proceed as follows:
• Erect temporary support walls as de scribed in Step 2.
• Dismantle the wall surface and studs back to the studs nearest the desired ends of the wall.
• Cut the doubled top plate flush with the stud and remove it (Step 1).
• Cut the soleplate 3” out from the studs and remove the remainder (Step 4).
• Use the procedure de scribed in the box onto determine whether the existing stud stands over a joist, and install blocking if needed.
When removing one end of the bearing wall all the way to a side wall, prepare the side wall as described in Step 4 on leaving no part of the bearing waif’s soleplate remaining on that end. Notch the end of the header that will abut the side wall -- Step 1.
Follow this procedure when part of the bearing wall remains intact on both sides.
• Place the header on the stubs of the soleplate and measure the distance from the top of the header to the joist above it. Cut two 4-by-4s to this length.
• Raise the header and insert the posts between it and the soleplate at both ends.
• At four evenly spaced points along each post, drill counter-bored holes through the post and adjacent stud, and then join the post to the stud with toggle bolts.
• Cover the posts and header with wall board and corner beads.
When one end of the bearing wall is removed all the way to a side wall, cut a support post to fit into the side wall -- Step 4. Attach the notched end of the header to that post as described in Step 5 above.
