A room is not complete without baseboard molding installed along the bottoms of walls to cover the gap between the flooring and the wallboard. Base shoe at the baseboard and crown molding or cove molding around the ceiling add a touch of elegance.
The Order of Work: Nail baseboard and ceiling moldings in place after completing work on the walls, ceiling, and floor but before painting the room. Base shoe, which hides the joint between the baseboard and the floor, is generally stained and is in stalled after the room is painted.
At the Lumberyard: Baseboard and ceiling moldings are usually stocked in pine but can be ordered in other woods. Base shoe is readily available in oak to match wood floors.
Moldings come in precut lengths of 6, 8, 10, 12, 14, and 16’. For a neat job, plan your purchase to minimize splicing. Be sure to add 2” to room dimensions for each corner joint and each lap-joint splice that you anticipate. And take into account that a splice in baseboards must fall at a stud. Since paint will hide lap joints but stain will not, avoid splicing base shoe if possible.
Essential Tools: The extra 2” at each joint are required for the angled cuts, or miters, required at splices and corners. To cut base board and crown molding miters, you need a backsaw and a miter box with a height-adjustable saw guide as shown. A coping saw is essential to complete a coped joint, used at in side corners.
Fastening: Before nailing, remove any irregularities—such as accretions of paint on old walls or lumps of joint compound at the top or bottom of newly installed wallboard—that might prevent a tight fit. Nail with the same care used in cutting: A misplaced hammer blow can easily dent the soft pine of most molding.
TOOLS:
- Miter box
- Backsaw
- Coping saw
- Utility knife
- Hammer
- Nail set
- Electric drill with bit
MATERIALS:
- Baseboard
- Base shoe
- Ceiling molding
- Finishing nails (1.5”, 2”, 2.5”, 3.25”)
- Wood filler
CAUTION! Protect your eyes with safety goggles when drilling or hammering overhead.
MITERING FOR OUTSIDE CORNERS AND SPLICES
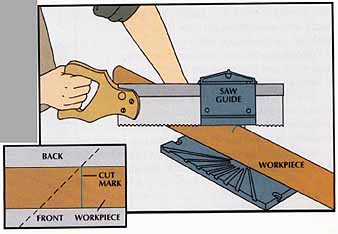
Cutting baseboard and base shoe.
• Place a length of molding against the wall and mark the top at the corner. For an additional length of molding, simply mark the correct length as described.
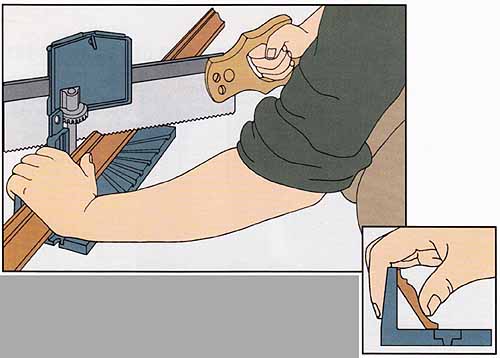
• Set the saw guide at a 45-degree angle so that the front of the workpiece will be cut longer than the back. The dotted line in the inset shows the cut for the right-hand side of a corner.
• Raise the saw guide of the miter box high enough for the molding to stand upright. Place the molding in the box face outward, align the saw-teeth with the cut mark, and make the cut.
• Adjust the miters to fit the corners as needed.
Crown and cove molding have flat surfaces at the top and bottom that rest against the ceiling and wall. For cutting, both are placed upside down in the miter box.
• Hold a length of crown molding against the ceiling and mark the molding’s bottom edge at the corner of the wall; mark additional pieces to the correct length as described below.
• Place the molding upside down and face outward in the miter box, as if the bottom of the box were the ceiling.
• Cut the molding so the front is longer than the back. Since the molding is upside down in the box, the saw shown above is angled correctly for the right-hand side of the corner.
• Adjust the miters to fit the corners as needed.
• For baseboard molding, locate a stud for nailing the splice.
• After mitering one end of a piece of molding for the preceding joint, place it against the wall and mark it across the top, at the stud center.
• Miter the molding at a 45-degree angle so that the cut bisects the mark.
• Miter another length of molding in the opposite direction, then mark and miter it for the next joint.
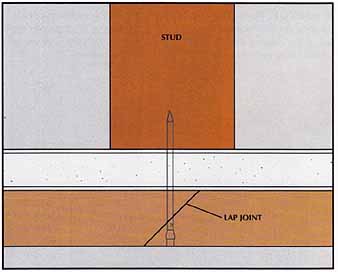
• Nail the first piece to the wall, then fit the second piece so that the angled cuts for the lap joint butt together. Drive a 1.5” finishing nail through the splice and into the center of the stud as shown here.
A splice in ceiling molding need not occur at a stud. When mitering ceiling molding for a lap joint, place it upside down in the miter box, as described above.
COPING AN INSIDE CORNER JOINT
• Hold a piece of molding against one wall of the corner and butt the factory end against the adjacent wall. Cut the other end for the next joint, then nail the piece to the wall.
• Miter the end of the other piece at a 45- degree angle, cutting it so that the back side of the molding will be longer than the front. High light the front edge of the cut with a pencil.
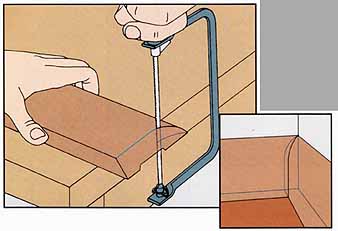
• Cut along the curve with a coping saw, angled a few degrees to make the front of the molding piece longer than the back.
• Fit the shaped end against the molding already installed, then mark and cut the other end for the next joint.
• Nail the finished piece to each stud. Do not nail a coped joint at the corner.
MAKING OUTER CORNERS FIT EXACTLY
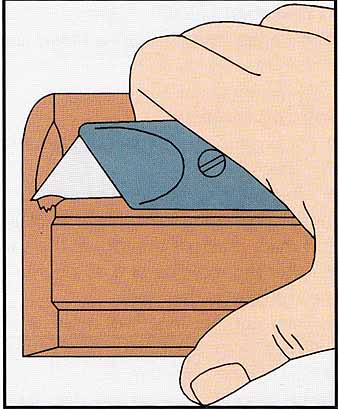
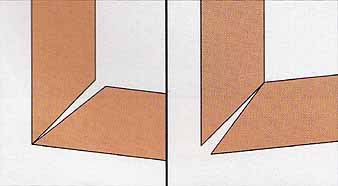
To ease the fit of molding at outside corners, cut a crescent-shaped piece out of the mitered end of the molding with a utility knife or coping saw. Begin the cut half an inch below the top of the molding; cutting out any portion of the top will create a visible gap in the joint. Cut inward and down to the bottom.
Since corners in a room seldom make exact 90-degree angles, mitered molding joints must usually be widened or narrowed to fit corners perfectly.
• If the joint gaps on the wall side, shave away the fronts of the angled cuts with a coping saw or utility knife.
Check the fit frequently while you work.
• When the joint gaps on the face side, shave away the back of the cuts in the same manner.
• Double-check the angles at both ends of each length of molding for fit before nailing the molding in place.
THE RIGHT WAY TO NAIL MOLDING
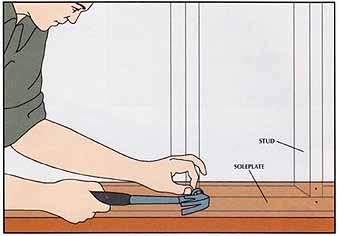
Fastening baseboard.
• Secure baseboard to the wall by driving two 2.5” finishing nails into the molding at each stud.
• Drive one of the nails through the middle of the molding, straight into the stud, and the other nail, at a 45-degree angle, into the soleplate near the bottom of the molding.
• Set the nails about 1/8” into the wood with a nail set and fill the holes with wood filler.
===
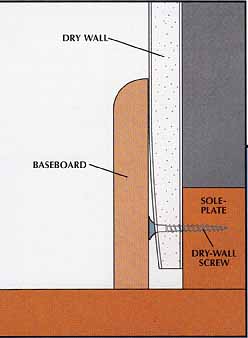
PRO TIP Fine-Tuning Baseboard with Screws
To ensure that baseboards are plumb, even when installed over irregular sections of dry wall or tapered edges, drive 1.25” dry-wall screws into the soleplate at the ends of each baseboard section and at 2-foot intervals between ends. Turn the screws in or out to bring the molding vertical. At mitered corners, place screws under both pieces of molding; at coped corners, shim only the square cut molding.
===
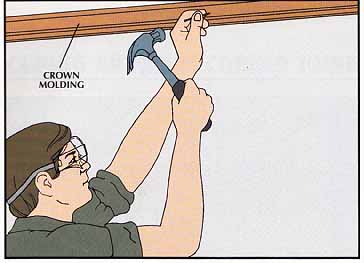
Nailing up long strips of molding works best when you have a helper to support one end. Begin work at a corner and work across the room to the opposite end.
• Hammer 3*” finishing nails through the convex section near the center of the molding and into the top plate at approximately 16” intervals. To ensure hitting the plate, hold the nails at about a 45-degree angle.
• Countersink the nailheads with a nail set.
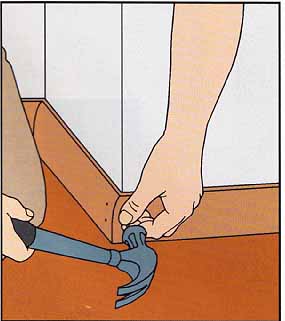
Finishing outside corners.
To secure mitered ends of baseboard and ceiling moldings, hammer two 1.5” finishing nails through the molding on each side of the corner, driving them into the corner stud inside the wall. Blunt all nail points with a hammer to prevent splitting the molding, and countersink the nail heads with a nail set.
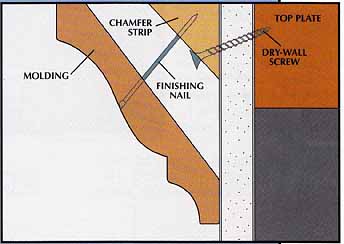
Creating a Shortcut for Nailing: For easier and faster installation of ceiling moldings, first attach a triangular wood
nailer called a chamfer strip along the joint between wall and ceiling.
Instead of passing through wallboard into the top plate, the nails securing
the molding can then be sunk into the more accessible chamfer strip.
Chamfer-strip nailers are especially useful on brittle plaster walls, where
nailing could create unsightly cracks. Buy 1” chamfer strips from a lumberyard and secure them to the top plate with 2” dry-wall screws in plaster or
2” finishing nails in wallboard. Space fasteners at 2-foot intervals.
Nail the base shoe to the floor with 1.5” finishing nails spaced at intervals of about 16”.
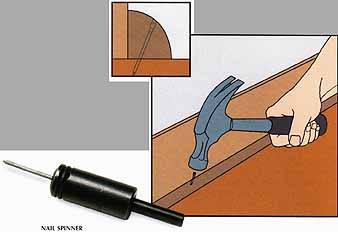
• For pine base shoe, place the nail point just above the middle of the base shoe; starting the nail too near the top of the shoe can split the wood. Drive each nail into the floor at about a 60-degree angle.
• For hardwood moldings, drill a pilot hole for each nail with a 1/16” bit. Alternatively, use a nail spinner, a drill attachment that drives finishing nails through hardwoods without pre-drilling.
• Countersink the nailheads with a nail set.
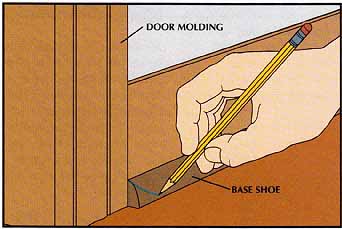
Shaping base shoe at doorways.
• To improve the appearance of base shoe that ends at a door molding or built-in, sculpt the square-cut end of the base shoe into a graceful curve.
• Holding the base shoe in place, mark a freehand pencil line on the base shoe. Begin the line where the top of the base shoe meets the door molding, and curve the line away from the doorway.
• Set the base shoe on a solid surface, cut along the line with a coping saw, and sand the cut smooth.
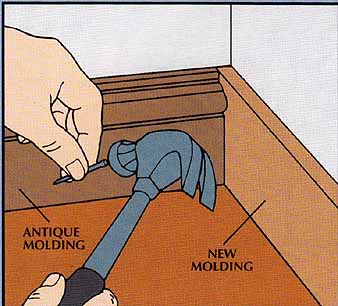
Marrying New Trim to Old: When you add a partition
to a room, you may be able to buy new moldings that match the old. If so,
trim the old molding to butt against the inside corner formed with the
new wall. Then join the new molding to the old with a coped joint.
In the case of an antique molding that you can't match, substitute a plain new molding or clear pine board cut to the same height as the old molding. You can then butt the ends of the new molding against the existing walls and fit the antique moldings against the new with butt joints.
