AMAZON multi-meters discounts AMAZON oscilloscope discounts
The preventive maintenance of buildings involves many types of equipment that rely on flexible drive belts for their operation. Air handlers, exhaust fans, and rooftop air-conditioning units (RTUs), air compressors, and other equipment utilize drive belts in most facilities.
Drive belts are such a simple device that including a technical section on them may seem unnecessary. The fact is unsatisfactory installation, improper belt selection, and poor adjustments make belt drives account for a very high percentage of preventable mechanical failures in facilities. By having a better understanding of some of the engineering of drive belts and by taking the time to install and adjust them correctly, many mechanical failures can be avoided. And avoiding mechanical failures is why we're performing PM in the first place.
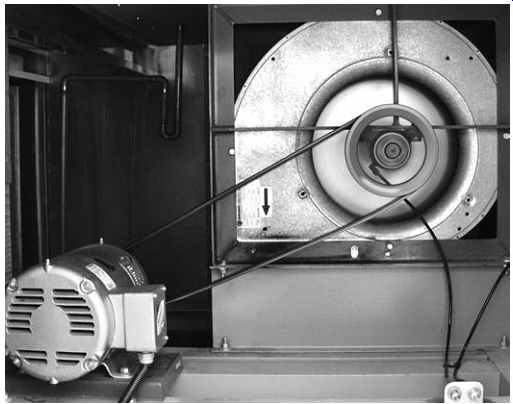
FIG. 1. Belt-driven blower
Drive belts are commonly called "vee-belts" or sometimes "Gates belts" after John Gates who developed the V drive belt in 1917. V-shaped drive belts solved two problems that were associated with flat belts in use at the time. The first problem was that flat belts could slide sideways on the flat pulleys or sheaves causing alignment problems. This was solved because vee-belts can't slide out of the v-shaped groove on their pulleys. The second problem was that flat belts often slip under heavy load, vee-belts tend to wedge themselves into the pulley groove under load increasing the resistance to slipping.
THE 3 TYPES OF DRIVE BELTS
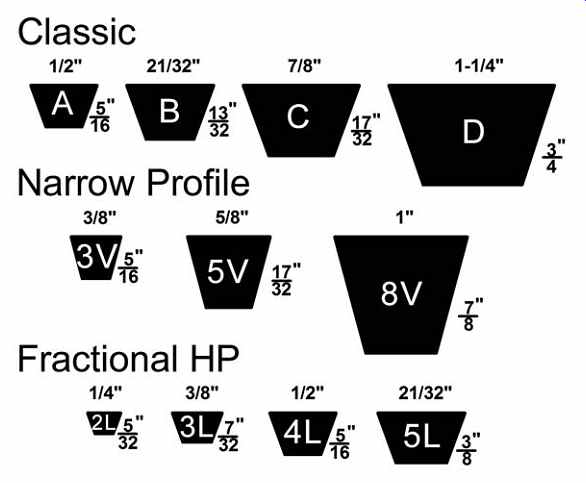
FIG. 2. The three-drive belt types
Most of the drive belts that are used in equipment in our buildings are going to be one of three types. The three different types are "classic cross section" belts, "narrow profile" belts, and "fractional horsepower" belts. FIG. 2 shows the classic profiles in the top row, the narrow profile belts in the middle row, and the fractional horsepower belts in the bottom row.
The first two belt types, the "classic cross section" belts and the "narrow profile" belts are known as industrial belts and are typically used on equipment with power requirements over 1 horsepower. The profiles of drive belts are standardized, and the classic cross section belts are designated by the letters A, B, C, and D. Narrow profile belts are narrower than classic belts and are designated using the letters 3V, 5V, and 8V.
The third type of belt is the fractional horsepower belt. These are usually used on equipment with power requirements below one horsepower, although there is quite a bit of cross over between fractional horsepower belts and industrial belts in equipment around 1hp. Fractional horsepower belts are designated by the letters 2L, 3L, 4L, and 5L.
DRIVE BELT LENGTHS
Now that we understand the cross section designations of drive belts, we need a way to determine the lengths of drive belts.
There is a standard numbering system for drive belts that identifies both the cross section shape and the length of the belt. Drive belt lengths are measured in inches. Both the Fractional horsepower belts (cross sections 2L, 3L, 4L, and 5L) and V-series belts (3V, 5V, and 8V) are numbered with the cross section designation followed by the length in inches plus a zero. For example, a fractional horse power belt with a 2L cross section that was 22 inches in length would be a 2L220 belt. A 3V550 belt would have a 3V profile and be 55 inches in length.
Industrial belts of cross sections A, B, C, and D have a slightly more complicated numbering system. Like the fractional Hp belts and the V-series belts, the first part of the belt number is the cross section letter. The second part of the belt number will also give you the belt length in inches but you will need to do some simple addition. For the A cross section belts, you need to add two inches to the part number to get the length of the belt. For example, a drive belt with the part number A43 is 45 inches in length since 43 + 2 = 45. In the same way, you need to add 3 inches to a B cross section belts and 4 inches to the C cross section belt. A B35 belt would therefore be 38" in length (35+3) and a C96 belt would be 100 inches all the way around (96+4).
Measuring the length of a drive belt is not as simple as it seems.
Since the top and bottom surfaces of a drive belt stretch and compress as the belt bends around the pulleys, the measurement of length is not actually taken at the outside (top) or inside (bottom) surface of the belt.
The actual length measurement of a drive belt is taken at a location known as the "neutral axis" which is usually where the reinforcing cords are located within the belt. FIG. 3 shows the reinforcing cords at the neutral axis inside a drivebelt.
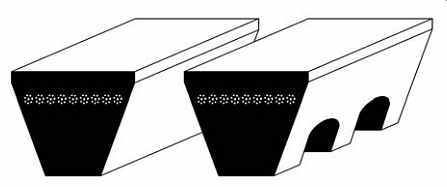
FIG. 3. Reinforcing cords are located at the neutral axis.
It can be almost impossible to accurately measure the length of a drive belt. Drive belts are just too flimsy to get a good measurement. Most industrial suppliers will have a tool for measuring belt length. The tool is a pair of sliding pulley's mounted on a rule. A belt is wrapped around the pulleys and the pulleys are slid apart to tighten the belt. The belt length is then read directly from the measurements marked on the rule. If you can't find a belt's size printed on an old belt and you don't have the proper tool for measuring the belt, the easiest way to measure the length is to cut the belt and stretch it out flat.
WHAT IF I DON'T HAVE AN OLD BELT TO MEASURE?
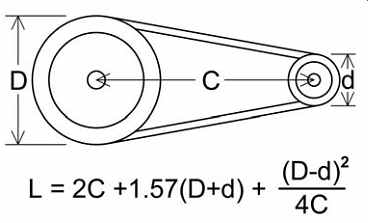
FIG. 4. Formula for determining drive belt length.
Sometimes we don't have an old belt to measure because the old belt is too damaged or even missing. If we don't have an equipment owner's manual or the old belt, it's still not too hard to figure out what size belt will fit a particular piece of equipment. First, we can figure out the cross section of the belt by trying some spare belts and second, we can determine the length of the required belt with a little math.
The first step to figuring out the size of a missing belt is to deter mine the cross section of the belt that fits the pulleys. This is best done by trying a few spare belts of different cross sections in the pulley groove to see what fits. Remember that most of the time, the top of the belt should just about sit flush with the top of the pulley groove and that the belt should never bottom out and touch the bottom of the groove.
When trying to figure out what cross section fits best, it's also useful to remember that the classic cross section belts (A,B,C,D) and the fractional horsepower belts (2L,3L,4L,5L) belts are much more common than the less often seen narrow profile belts (3V,5V,8V). Most of the time it will be easy to see what profile fits the best. The two belt profiles that can be difficult to tell apart are the A profile classic section belt and the 4L profile fractional Hp since these are almost exactly the same. If these two belts are difficult to tell apart, don't worry. These are the only two belt profiles that are interchangeable so you can choose either one and still be right.
Once we've figured out the cross section of the belt we need, the second part of figuring out the size of a missing belt is to do some math to figure out the length of the belt. To do this, we need to know 3 things: First, the diameter of the larger pulley; second, the diameter of the smaller pulley; and third, the center to center distance of the pulley shafts. FIG. 4 shows two pulleys and the formula used to calculate the length of belt needed.
OTHER DRIVE BELT CHARACTERISTICS
Standard drive belts are available with a few options. One of these optional styles is notched belts. A notched belt has notches molded into the bottom surface of the belt and is sometimes referred to as a cogged belt. Notched belts can be flexed tighter to run on smaller diameter pulleys than standard drive belts. Notched belts will have an "X" added to the part number after the cross section numbers. 5VX, 3VX, and AX are notched belts in 5V, 3V, and A cross sections.
Some of the larger horse power motors will use several drive belts side by side on pulleys with multiple grooves. When this is the case, the belts need to be ordered as "matched." That means the belts have been verified to be the same length so that all the drive belts will have the same tension when installed. Ordering matched belts is not as much a problem today as it was 20 years ago. Manufacturing tolerances in belts have improved and most belts are close enough to standards to be considered matched right off-the-shelf. It's still a good idea to tell your supplier if you need matched belts to avoid any problems.
Lots of drive belt types exist other than the ones discussed above.
Some examples include metric belts, synchronous drive belts, flat belts, grooved belts, and double V belts that can run on both the inside and outside surfaces of the belt. It is rare for any of these types to be used in the types of equipment that are encountered during PM of most facilities. Even when an equipment manufacturer has their own part number for a proprietary drive belt, it probably matches exactly with one of the standard industrial or fractional belts available, and often at a fraction of the price of the manufacturer's original equipment.
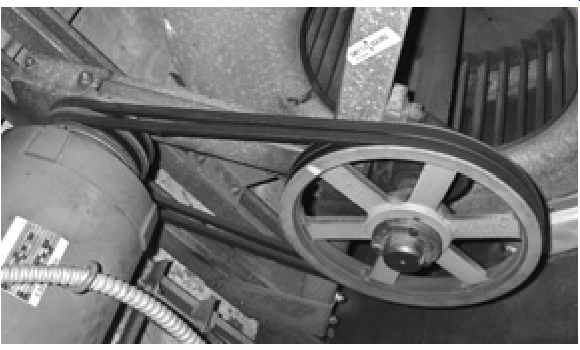
FIG. 5. A pair of matched belts for a high-torque application
PROPER OPERATION
Drive belts in continuous operation should be expected to have a useful life of about one year if installed and adjusted correctly. Proper installation means well aligned pulleys and proper belt tension.
Pulley alignment can be checked by using a straight edge such as a steel ruler or steel carpenter's square or a piece of string held taught across the face of the pulleys. If pulleys are found to be out of alignment, the time spent making adjustments to the motor orientation or to the pulley's depth on the motor shaft will save time replacing damaged or thrown belts later.
Drive belt tension can be checked using a quick rule of thumb. A properly tensioned belt should deflect approximately 1/64 of its span length when deflected by hand. For multiple belts, each belt should be deflected individually instead of attempting to check all of the belts at once. Belts that are too loose will slip and wear prematurely. Slipping belts can usually be heard squealing at startup. Belts that are too tight will also wear prematurely from excessive friction as the belts enter and leave the pulley groove during pulley rotation.
Although rarely done, when installing new drive belts, it is good practice to run the belts for a day to give the belts an opportunity to stretch and then re-tension the belts again. Belt tension should be checked, and adjusted if needed, each time a machine is maintained.
PROBLEMS WITH BELT DRIVES
Pulleys that are misaligned or shafts that are misaligned will cause premature wear and overheating to belts. Misaligned pulleys cause side pressure and twisting of belts which will cause wear to the belt edges, hardening caused by overheating, and fatigue cracks due to excessive flexing. One of the tell-tale signs of belts with worn edges is a belt that sits too low in the pulley groove. The bottom surface of a belt should never touch the base of the pulley groove and the top surface of a drive belt should barely stick up above the rim of the pulley.
Since the metal pulleys wear so much slower than rubber belts, most repairs involve replacing drive belts and not the pulleys. How ever, after years of operation pulleys can become worn on the inner surface of the belt groove. The easiest way to find this is to look at the groove walls on the inside of the pulley groove. A worn pulley will have concave walls while a new pulley will have perfectly flat sides inside the belt groove. When the side of the pulley groove is worn down, the drive belts will sit too deeply in the pulley groove.
Once a pulley (or belt) is worn to the point that the belt is sitting on the bottom surface of the belt, the belt can no longer wedge itself into the groove and excessive belt slipping will occur. The desirable friction between a pulley and drive belt is created when the belt is squeezed between the sides of the pulley groove. Once a drive belt has bottomed out in the pulley groove, it is no longer being squeezed and the needed friction is gone. Many times, worn drive belts appear to be in perfect condition except that they seem to be too small for the pulley they're riding on. This happens when the sides of the belt have worn down to make the belt narrower than when it was new.
Belts that squeal on startup or during operation are almost certainly under tensioned. Another sign of under tensioned belts is excessive belt vibration or "slap." Under tensioned belts slip and slipping belts will wear much faster than properly tensioned belts.
Belts which have far exceeded their useful life can begin to separate. The rubber on the bottom (inside) of the belt will begin to break away from the fabric backing leaving large chunks of belt missing. You can usually hear the clunk-clunk-clunk of these belts passing over the pulleys before even opening the machine for inspection. The best way to avoid this is to inspect belts and replace them before they reach the end of their life. Belts in continual use should be replaced annually if not before.
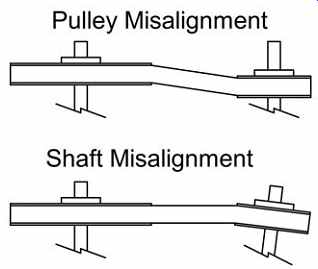
FIG. 6. Two types of misalignment leading to belt wear
INSPECTING BELT DRIVES
Belt drives that operate continuously should be inspected every 3 months. Since most drive belts are found on air moving equipment (RTUs, air handlers, etc.), these inspections are usually scheduled to be performed with filter changes or other HVAC inspections.
When performing preventive maintenance inspections on belt drives the PM technician should look for the following items:
--First run the machine while watching and listening to the belt.
Notice and correct the cause of any jumping belts, clunking noises, or obviously slack belts.
--Next, turn off the machinery, lock out the power source to prevent accidental starts and look for the following:
--Look for black rubber dust under the belt that would indicate that a belt is being abraded away. This is usually a result of a pulley misalignment.
--Check to see if the belt is riding too low in either of the pulley grooves. Drive belts usually ride just a fraction of an inch above the outer edge of the pulley.
--Check for cracked belts. Run the belt slowly by hand and check the entire length of the underside (inside) of the belt.
--Check the belt for a shiny, glazed, hardened surface on the sides and bottom (inside) of the belt. This indicates that the belt has been slipping and has been overheated. Replace a glazed belt and correct the cause of the slipping.
--Drive belts typically operate at a temperature of about 140ºF. A drive belt should feel hot but you should be able to hold it in your hand. Any belt that is too hot to hold in your hand is running at too high a temperature. Causes can be slipping due to wear or poor tension or excessive friction due to misalignment.
--Check the alignment of belt pulleys with a rigid straight edge or piece of string held against the outer face of the pulleys. Adjust alignment if necessary.
--Check belt tension to see that you can deflect the belt approximately 1/64 of the belt's span between pulleys by hand pressure. Adjust tension if necessary.
Drive belts can be reliable and practically trouble free if proper installation and maintenance techniques are followed. Poorly installed or maintained drive belts can be a big time waster for the maintenance department. Drive belt failures also have one of the largest impacts on your building's occupants since drive belts are primarily used for comfort control equipment. Belt drives are one of the building components that benefit significantly from a simple but effective PM program.
SUMMARY
• Unsatisfactory installation, improper belt selection, and poor adjustment make belt drives account for a very high percentage of preventable mechanical failures.
• The three different types of drive belts commonly in use are "classic cross section" belts, "narrow profile" belts, and "fractional horse power" belts.
• Classic cross section belts have cross sections designated as A, B, C, or D.
• Narrow profile belts have cross sections designated as 3V, 5V, and 8V.
• Fractional horsepower belts have cross sections designated as 2L, 3L, 4L, and 5L
• All drive belt part numbers give the belt length in inches if you know how to do the conversion for each type of belt.
• High torque applications make use of multiple drive belts side by side on multi-grooved pulleys. These belts are ordered as matched sets to ensure that the length of each belt in the set is the same.
• A properly tensioned and aligned drive belt should last one year of continual operation