| HOME | FAQ | Books |
Links |
|
AMAZON multi-meters discounts AMAZON oscilloscope discounts GOALS: Skill-Based:
Terminology: Task -- an activity that needs to be performed to complete a project. Priority -- giving a task precedence over others. Assigning tasks -- giving a task to someone to complete. Troubleshooting -- the process of performing a systematic search for a resolution to a technical problem. Diagnostics -- the process of determining a malfunction.
Introduction To successfully complete a project regardless of its complexity or nature, it must first be divided into tasks that can be assigned and the results measured. This is irrespective of whether it's a new installation or replacement or repair of a defective piece of equipment. The only difference is that if the project consists of replacing or repairing equipment then removal and /or troubleshooting will be included as a task to be performed. Establish Priority of Work Tasks Traditional wisdom about setting priorities promises you higher productivity and a greater sense of accomplishment. All you have to do is write out a to-do list, prioritize it by the order of importance and urgency (using the ubiquitous A, B, and C labels), and then tackle it, right? Then why, after a period time, is that same C item still on your to-do list? Also why, after a busy day of completing tasks, do you still find yourself saying, "I didn't get anything done today"?
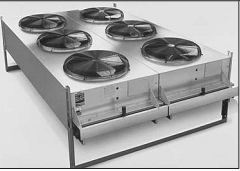
Two reasons may cause this: 1. Priorities changed during the day, but for good reason. You may not have accomplished A, B, or C on your to-do list, but you did respond appropriately to the additional tasks that you were presented with that day. 2. Don't fall into the "ACT, then THINK" method of setting priorities. To prevent yourself from falling into this method of setting priorities, understand three common priority-setting traps and how you can avoid them. a. Whatever hits first: Do you "choose" your priorities simply by responding to things as they happen? If so, your priorities are really choosing you. Think about how this general lack of control over your day contributes to your stress level. You need to clarify your priorities by determining each task's importance and level of urgency (i.e., "THINK, then ACT"). This means negotiating with people to respond in a time frame that's convenient to you and agreeable to them. b. Path of least resistance: When was the last time you heard yourself say, "It's just easier to do it myself"? This is not always an incorrect assumption, but if you're saying it too often, you're probably not giving the other workers enough credit or you have the wrong person working for you. Ask yourself these questions: Am I trying to avoid conflict? Does the task at hand require more expertise than the other workers have? Should time or money be invested to train someone to take on some of the lower-priority tasks I am currently performing? Answers will help you determine what alternative action you need to take. c. Squeaky wheel: In most situations, it's not hard to identify who the squeaky wheels are. Their requests are always urgent and need to be done right away. Usually, you do the work on their time frame. Unless the request is really urgent, give them a specific time or date when they can expect you to complete the task. Eventually they'll understand that their requests to complete tasks need to be prioritized with all of your own prioritized tasks. Assign Tasks Assigning tasks isn't just a matter of telling someone else what to do. There is a wide range of responsibilities that you can assign to a person along with a task. The more experienced and reliable the person is, the more unsupervised tasks that can be as signed to the person. The more critical the task is, the more cautious you need to be when assigning tasks. It is important that each worker understands his or her part in a job and can perform the assigned task. If a worker does not have the ability to complete an assigned task, as a supervisor or manager, you would have to assign that task to someone else who can do that. Before assigning work to a worker, consider the following aspects of the job the worker will do: • What hazards are in the workplace environment or around the worker? • Are there special work situations that come up which could lead to new risks for this worker? • For example, are there risks that might be encountered outside the normal work area? Just once a week? During a task to fetch materials? • Are there occasional risks from coworkers, such as welding or machining, that could affect the workers nearby? In slow periods, workers might be asked to "help out" other employees. Ensure that any hazards associated with those jobs are reviewed with the worker, by both you and the coworker who will supervise those tasks. Ensure that you communicate with the worker about the job tasks clearly and frequently, repeating and confirming this training over the first few weeks of work. Some workers are overwhelmed with instructions at first and may need to hear this information repeated more than once. Also: • Inform workers not to perform any task until they have been properly trained. • Inform workers that if they don't know or if they are unsure of something, they need to ask someone first. Get them to think in a safety-minded way about all their work. Carry Out Work Order Systems Once tasks have been assigned to the appropriate workers, the tasks will need to be completed. Following are suggestions on how to document the completed tasks: 1. Develop a progress report for the current week. This report should contain the following information: a. Work accomplished: Document the tasks accomplished during the previous week. They should be specific in nature. b. Major findings: Document any issues that were encountered when a specific task was dealt with. c. Worker: In the documentation, record the name of the person who completed the specific task. d. Estimated hours to complete: This is used to identify the worker's effectiveness in task estimation. The goal is to compare the predicted value (estimated the week before) with the actual number of hours it took for the team to accomplish a specific task. e. Actual hours to complete: Record the actual number of hours the worker took to complete a specific task. 2. Plan items for the following week. The report should contain the following information: a. Work items for next week: List all the tasks that the worker plans to accomplish for the following week. b. Worker: List the worker who is responsible for completing the listed task. c. Estimated hours to complete: For planning purposes, the estimated hours to completion should be identified to show how long it will take to actually complete the task. The Troubleshooting Process Some consider troubleshooting to be an art form; whereas, others consider it to be science. Actually it's a combination of art and science-trying to solve a problem using a pure scientific approach may not always work. In any case, some steps can be followed (especially by new technicians) to assist in the development of trouble shooting skills. One of the most important of these steps-establishing a good rap port with the customer-was briefly discussed in section 1. Often what the customer perceives as the ultimate problem is nothing more than a symptom. Often when the technician establishes a good rapport with the customer, he or she can easily get the actual information needed to determine the actual problem. However, as mentioned earlier, rapport is only a small portion of the troubleshooting process. Actually two major phases can be associated with the troubleshooting process: the identification and the repair processes. The identification process is more than just shining a l ash light into a boiler or heat exchanger and trying to spot a defect or a malfunctioning part. This process can be divided into several key phases or steps as follows: 1. Gathering information 2. Verifying the issue 3. Looking for quick fixes 4. Performing the appropriate diagnostics (the process of determining a malfunction) 5. Using additional resources to research the issue (if necessary) 6. Escalating the issue (if necessary) 7. Complete the repair process Gathering Information When starting to troubleshoot a system, the first step is to gather the information necessary to correctly identify the problem. This is often done by simply asking the customer a few simple questions. However, when questioning the customer, keep two general rules in mind. They are: 1. Start with open questions such as "What is the issue?" Open questions can't be answered with a "yes" or "no." 2. Let the customer explain in his or her own words what he or she has experienced/is experiencing. Never interrupt a customer or add comments to what he or she is telling you. Verifying the Issue As stated earlier, the situation or problem that the customer describes is often not the actual problem. Therefore, always verify whether the problem described by the customer is the actual problem of the system and not just a symptom. Looking for Quick Fixes Although in many cases the actual fix is more involved than simply resetting or changing the battery in a thermostat, there are still cases in which the simplest and / or most obvious fixes/ corrects the problem. For example, suppose that you were called to look at a customer's gas central heating unit because it would not ignite. If the customer is using an electronically controlled thermostat, it might be useful to check its battery before starting to break the furnace down. Performing the Appropriate Diagnostics If the quick i x does not resolve the issue, then you will need to perform a more thorough diagnostics. Often the equipment manufacturers will supply troubleshooting charts and information to help diagnose the equipment. Using Additional Resources to Research the Issue If you have never encountered a problem like the one that's currently before you, and you are having trouble locating the issue, don't be afraid to go to the Internet, a distributor, or even a fellow colleague to help resolve the issue. Escalating the Issue If you are working for a large company and continue to have trouble locating and correcting the problem, the issue can often be escalated for assistance to a service manager. If you are self-employed or working for a small company and you encounter a problem that you can't resolve, the equipment manufacturer can often be of assistance. In any case, though, you should never escalate an issue unless you are truly stumped. Complete the Repair Process Once the issue has been correctly identified, the repair process can proceed. Like the identification process, the repair process also involves several steps. They are: 1. Repairing or replacing the faulty item and /or equipment 2. Testing the system thoroughly to verify that the repair actually corrected the issue 3. Educating the homeowner about the nature of the problem and the action(s) taken to correct it 4. Completing all administrative paperwork Verifying that the Repair Actually Corrected the Issue Verifying that the repair actually corrected the issue is one of the most critical steps in the repair process. Never leave a customer site without first testing the repair and /or installation to confirm that you actually corrected the problem. Educating the Customer about the Nature of the Problem and Actions Taken to Correct It Always show the customer the worn and replaced parts and explain to him or her why the old parts are defective. If a customer understands the issue and the corrective action taken, he or she is less likely to become dissatisfied with the repair job. Completing All Administrative Paperwork Completing the paperwork is especially important when dealing with warranty work. If the necessary paperwork is not completed correctly and on time, then there will be a delay in the service company receiving its payment. In some cases, the claim may even be denied. Solving a Technical Problem When solving a technical problem, the facility maintenance technician doesn't start by pulling out a calculator and entering numbers; there is a systemic approach that must be taken. This approach starts by defining and then researching the problem. Once sufficient information has been ascertained, the facility maintenance technician can start determining all possible solutions to the task. The steps required for successful problem solving are listed next and can be executed in order with the exception of steps 1, 2, 7, and 8. Step 1. State the problem Step 2. List unknown variables Step 3. List what is given Step 4. Create diagrams Step 5. List all formulas Step 6. List assumptions Step 7. Perform all necessary calculations Step 8. Check answers The following example illustrates each step of this process. Note that not every step may apply to all situations; however, the overall concept is still the same. In this example you will calculate the amount of concrete necessary to pour a slab for the condenser shown in Fgr. 1. The cooling tower is 8 ft x 5 ft and requires a 1 ft x 6 in. overhang around the perimeter. Fgr. 1: Air conditioning unit to be set Step 1 State the problem In this step a statement of the problem is created. The statement should be kept as simple and direct as possible. There is no need to list every detail about the problem, but just the key points. Additional information can be added later if necessary. A statement for the problem shown in Fgr. 1 might read: Statement: For a 8 ft x 5 ft condensing unit, calculate the amount of concrete required for a slab having a 1 ft x 6 in. overhang and 6 in. thick. Step 2 List unknown variables Create a list of all the unknown attributes for the stated problem. Even though the problem is in its infancy, some calculations might have to be performed to determine some of the missing information. Be sure to provide ample space for any future elements that might require calculations. Therefore, the list should look like: Find:
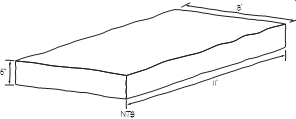
Step 3 List what is given A list of all known parameters associated with the stated problem is next created: Given: Condensing unit width = 5 ft Condensing unit length = 8 ft Required overhang = 1 ft x 6 in. Step 4 Create diagrams Often the best way to determine exactly what is going on in a problem is to make a simple sketch. The sketch should be void of any unnecessary details that might hinder the interpretation of the actual problem (see Fgr. 2). Step 5 List all formulas In this step, a list is created of all the formulas that will be used to solve the problem, as well as a source reference for each formula. This list will serve as a guide that will facilitate checking the final answer. When a technical solution is validated, all stages of the solution are verified including formulas and their connotation. To solve the example problem the following formulas will be used: Formulas: Feet = inches/12 Volume = length x width x thickness (height) Cubic yards = cubic feet/27 Fgr. 2: Rough hand sketch of concrete pad Step 6 List assumptions Often when solving a technical problem it's necessary to assume some of the details of the project. Suppose that an engineer is calculating the amount of heat that's transferred via conduction through the exterior walls of a building to its surroundings. Although the average outside temperature can be obtained from the ASHRAE Fundamentals Handbook for all major cities in the United States, it may be necessary to assume a temperature if the area where the building is located is not listed. In the case of the example problem we don't have any assumptions. Therefore we would list N/A for our assumptions or leave it completely off. Assumptions: N/A Step 7 Perform all necessary calculations The necessary calculations are carried out. Solving the example problem would yield the following calculations. Converting the thickness from inches to feet Feet = inches/12 Feet = 6 in./12 Feet = 0.5 Determining the volume of the slab (cubic feet) Volume_cubic feet = length x width x thickness Volume_cubic feet = 11 ft 3 8 ft 3 0.5 ft Volume_cubic feet = 44 cubic feet Converting the volume from cubic feet into cubic yards Volume_cubic yards = volume_cubic feet/27 Volume_cubic yards = 44 cubic_feet/27 Volume_cubic yards = 1.63 Step 8 Check answers Any time a calculation is made it must be checked for accuracy. Check: To check our work for this example problem we will work the problem in reverse. Convert from cubic yards to cubic feet 1.62 cubic yards x 27 = volume_cubic feet 44 = volume cubic feet Finding the thickness of the slab If we use two of the known dimensions of the slab, we should be able to find the remaining dimension. For example, if we divide the volume_cubic feet by the length and then again by the width, the remaining portion should be the thickness of the slab. First Unknown: = total cubic feet/length of slab Unknown = 44 cubic feet/11 feet Unknown = 4 square feet Second Thickness = unknown (from step #1)/width of slab Thickness = 4 _square feet/8 ft Thickness = 0.5 ft Or Thickness (in.) = 0.5 ft x 12 in. Thickness (in.) = 6 in. QUIZ:
Prev:
Customer Service Skills |