| HOME | Plumbing
Basics Budget Upgrades | Outdoor Structures |
|
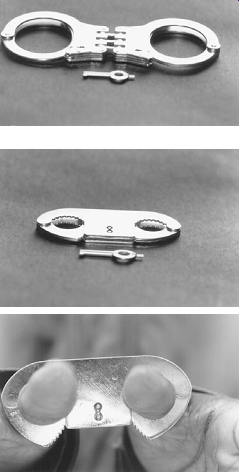
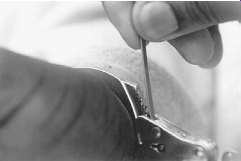
Frequently, locksmiths gain entry into locked places by impressioning or picking open a lock. A good locksmith also can gain entry through special techniques called Emergency Entry Procedures (EEPs). It might not seem like good locksmithing practice to force a lock open, but economics, time, and other requirements may make it necessary. In an emergency, or when a lock resists picking and impressioning, the EEPs are used. Even though you may rarely use EEPs, you need to know them to help make buildings more burglary resistant. As a professional locksmith, you should have the proper equipment to make emergency entries as quickly and neatly as possible. Some entry tools are sold through locksmith supply houses; some tools you can make yourself. Experience will show you which tools and techniques work best for you. Several preliminaries should be undertaken when preparing to make an entry using EEPs. Try to get as much information as possible. You can then best decide what methods will work. Ask questions about the type of lock, the key numbers, nearby open windows, a possible extra key held by someone else, the condition of the lock, alarms and other devices attached to the door, and so on. All this information will aid your preparations for the entry. You don't want to damage your customer's property when it isn't necessary. Drilling Pin Tumbler Locks Drill a lock only as a last resort. Two drilling methods can be used with pin tumbler locks. The first method involves drilling of the cylinder plug. This has the advantage of saving the cylinder itself. The inner core can be replaced. This method destroys the lower set of pins just below the shear line, allowing the plug to be turned. Follow these procedures to drill a cylinder plug: 1. Drill the plug below the shear line. 2. Insert a key blank and a wire through the drill hole to keep the upper pins above the shear line and the destroyed pins below it. 3. Turn the cylinder core and open the lock. Once the door is open, dismantle the lock; remove and replace the core, and fit new pins to the lock. If you used the plug follower when removing the core, you will only have to fit new lower pins to the lock to match a key. The second method involves drilling just above the shear line into the upper pins. 1. Insert a key blank into the lock to push all the upper pins to the upper pin chambers. 2. Drill about 1/8 ” above the shear line or shoulder of the plug and directly above the top of the keyway ( ill. 1). A drilling jig can be useful to ensure that you drill at the proper point on the lock face. Use a 1/8- or 3/32-inch drill bit. 3. Poke a thin wire or needle into the hole, and withdraw the key to just inside the keyway. Then use the tip of the key to turn the core. Removing the key partway allows the bottom pins to drop below the shear line while the wire or needle keeps the upper pins above the shear line. Once the door is open, dismantle the lock, remove the cylinder, and replace it with a new one. ill. 1 A drilling jig can help you drill straight. ill. 2 A cylinder removal clamp. (Desert Publications) Cylinder Removal Sometimes the cylinder must be removed to open a lock. This means shearing off the screws that hold the cylinder in place. Several different rim cylinder removal tools are available. The one in ill. 2 can be made in your own shop. It's called a cylinder removal clamp. To make one, follow these steps: 1. Use a piece of steel tubing about 1/8 ” larger in diameter than the cylinder. The tubing should be no more than 2 1/2 ” long. 2. Cut into the tubing about 3/16”. 3. Cut a center hole, 1/4 to 1/3 ” in diameter at the end of both cuts, and insert a steel rod about 10 ” long. The rod becomes your handle for turning the cylinder. 4. Drill two holes in the tubing so that you can insert a bolt perpendicular to the handle. Ensure that the bolt will be 1/2 ” in front of the handle. The bolt threads must extend on both sides of the tubing. To remove the cylinder, follow this procedure: 1. After first removing the cylinder rim collar, set the removal clamp over the edge of the cylinder. Tighten down the tension bolt; this provides the grip ping pressure on the cylinder. 2. Twist the cylinder clamp by the handles, and force the cylinder to rotate, shearing off the retaining screw ends. 3. Remove the cylinder from the lock. When removed, reach in and open the door by reversing the bolt. You also can use a standard Stillson wrench to remove the cylinder. Cylinders also can be pulled out of the lock unit, but this method ruins the cylinder threads, requiring you to replace the entire unit. The tool used is called a nutcracker. The sharp pincer points are pushed in behind the front of the cylinder face. Clamp down and pull the cylinder out. Many times an unskilled locksmith can ruin the entire lock and a portion of the door by not knowing how to use this tool properly. Some cylinders have to be drilled. Follow this procedure: 1. Drill two 3/16-inch-diameter holes about 7/8 to 1 1/8” apart on the face of the cylinder. 2. Drive two heavy bolts into these holes so that at least 1 1/2 ” are sticking out. 3. Place a pry bar or heavy screwdriver between the bolts, and use it as you would a wrench to force the cylinder to turn, shearing off the long screws. Window Entrances Window entrances are relatively easy. The old butter knife trick is usually successful. Since most window latches are located between the upper and lower windows, sliding a knife up between the windows allows you to work open the latch. Should the area be too narrow for a knife, shim, or other device, drill a 1/16-inch hole at an angle through the wood molding to the base of the catch. Insert a stiff wire, and push back the latch. ill. 3 Sometimes a thin strip of spring steel inserted into the keyway of a filing cabinet lock (A) can be used to pull the bolt down (B). Office Locks Most office equipment can be opened using a few basic methods and a handful of tools. Filing cabinets Although most filing cabinets have locks in essentially the same position, the locking-bar arrangement for the drawers will vary. These variations have to be considered in working on the locks. One method is to work directly on the lock itself. Slide a thin strip of spring steel 1/8 ” thick into the keyway, and pull the bolt downward. This will unlock the lock. If the lock has a piece of metal or a pin blocking access to the locking bolt, use a piece of stiff wire with one end turned 90°. Insert the wire between the drawer and the cabinet face, and force the bolt down with the wire. This will allow you to open the drawers. If there is not enough room for you to work with the wire, use a piece of thin steel or a small screwdriver to pry back the drawer from the cabinet face to allow you to see and work with the wire. You also can open the drawers individually if necessary. 1. Use a thin piece of spring steel or a wedge to spread the drawer slightly away from the edge. 2. As your opening tool, use another strip of steel about 18 ” long, ½” to 1’ wide, and 0.020 ” thick. 3. Insert the opening tool between the drawer catch and the bolt mechanism ( ill. 4). 4. With a healthy yank, pull the drawer open. The opening tool creates a bridge for the drawer catch to ride on and pass the bolt. Other filing cabinets can be inverted to release gravity-type vertical engaging bolts. When the lock mechanism itself is fouled up, the best way to proceed is to drill out the cylinder and replace the entire assembly. Desks Desks with locking drawers controlled from the center drawer can be opened in a couple of ways besides picking and drilling. Look at the desk from underneath to see what the locking mechanisms for the various drawers look like. Notice that the locking bar engages the desk by an upward or downward pressure depending on the bolt style. Closing the desk drawer all the way pushes the bolt into the locked position. Herein lies the weakness in the desk's security. The bolt usually needs to be pushed up from under the desk by hand to open most of the drawers. The center drawer has its own lock. ill. .4 Sometimes the drawer of a filing cabinet (A) can be opened by wedging the drawer away from the cabinet frame (B) between the drawer catch and the bolt mechanism (C). In other desks, you might have to use a little force and pull outward on the center drawer to push the bolting mechanism downward slightly to open the various drawers. To open the center lock, follow this procedure: 1. Use two screwdrivers and some tape or cardboard. Put the cardboard or tape between the drawer and the underside of the desktop so that you don't mar the desk. 2. Insert a screwdriver, and pry the drawer away from the desktop. 3. With the other screwdriver, pull the drawer outward to open it. With practice, this can be done with only one screwdriver. If you drill a small hole in the drawer near the lock, you can insert a piece of stiff wire, such as a paper clip, to push down the plug retainer ring. In doing so, you pull the plug free of the lock, causing the bolt to drop down into the open position. Doors Possibly the simplest way to open most doors is with a pry bar and a linoleum knife. Insert the linoleum knife between the door and the jamb with the point tipped upward. Insert the pry bar as shown in ill. 5. Exerting a downward motion on the pry bar spreads the door slightly and allows you to disengage the locking safety latch. When this is done, bring the linoleum knife forward, pushing the latchbolt into the locking assembly and opening the door. If there is no safety catch, the knife alone can be used to move the bolt inward. It's also possible to use a standard shove knife or even a kitchen knife. Sometimes the deadlatch plunger is in the lock, but there isn't room to insert a pry bar. What do you do? Use wooden wedges. Insert one of them on each side of the bolt, about 4 to 6 ” from the bolt assembly. Spread the door away from the jamb. Then use a linoleum knife to work the bolt back. Some doors and frames have such close clearances that you cannot insert a wooden wedge or pry bar. Instead, use a stainless steel door shim. Force it into the very narrow crevice between the door and the frame, and work back the bolt. Often a door lock can be opened with a Z-wire. This tool is made from a wire at least 0.062 ” thick and 10 to 12 ” long ( ill. 6). Insert the Z-wire between the door and the jamb. When the short end is all the way in, rotate it toward you at the top. As you do this, the opposite end will rotate between the door and the jamb. It contacts the bolt and retracts it. If the bolt binds, exert pressure on the knob to force the door in the direction required. Sometimes you may be required to open locked chain latches. You can, of course, force the door and break the chain, but there are better ways. The rubber band technique works most of the time. 1. Reach inside and stick a tack in the door behind the chain assembly ( ill. 7). 2. Attach one end of a rubber band to the tack; attach the other end to the end of the chain. ill. .5 Opening a door using a pry bar and linoleum knife. ill. .6 Opening a door with a Z-wire. ill. .7 The rubber band technique is usually the easiest way to unlock most chain locks. 3. Close the door. The rubber band will pull the chain back. If it doesn't pull the chain off the slide, shake the door a little. 4. If the door surface won’t receive a tack, use a bent coat hanger to stretch the rubber band ( ill. 8). Make sure that the coat hanger is long enough and bent properly so that you can close the door as far as possible. If the door and jamb are even and there is enough space, a thin wire can be inserted to move the chain back. Sometimes you can open a door very easily if it has a transom. Use two long pieces of string and a strip of rubber inner tubing. The tubing should be 8 to 10 ” long. Attach a string to each end of the tubing so that you can manipulate the tubing from the open transom. Lower the tubing and wrap it around the knob. Pull up firmly on both strings to maintain tension and turn the knob. This method can be used with either a regular doorknob or an auxiliary latch unit. ill. .8 A variation of the rubber band technique. ill. .9 A standard pair of hand cuffs and key. ill. .10 Thumbcuffs lock thumbs much as handcuffs lock wrists. Unlocking Thumbcuffs, Handcuffs, and Legcuffs Standard thumbcuffs, handcuffs, and legcuffs all work the same way and have the same basic parts ( ill. .9 and 17.10). The information here can be used for unlocking all of them. Typically, when you're asked to unlock cuffs, someone will be in them. Don't automatically assume that something illegal is going on. Cuffs are sold in army surplus stores, martial arts stores, and magic and novelty shops. People may call you because they've lost the key or the key isn't working. Before opening cuffs, assure yourself that you're not helping a fleeing criminal. Feel free to ask what happened, and consider what the person is wearing (or not wearing) and the surroundings. A kid locked in handcuffs while wearing a top hat and black cape just didn't learn to do the trick correctly. The scantily dressed woman cuffed to brass bedposts, with adult novelty items around the room, probably isn't a fleeing felon either. Also consider how the cuffs are on. When properly handcuffed by law enforcement, the person's arms will be behind his or her back with his or her hands facing out, both thumbs up, and the cuff's keyholes facing out. and if the cuffs have a double-lock feature, they should be double-locked. If you feel uncomfortable about the situation, call the police station and ask if anyone recently escaped from custody. You also can just tell the caller that you don't do hand cuff work. How cuffs work You don't have to know how cuffs work to be able to unlock them. By knowing how they work, however, you'll be able to open them faster and come up with your own techniques when you face unique situations or don't have the tools we mention here. Two cuffs are connected by chain or hinges. Each cuff looks and works like the other. The main parts of a cuff are the keyway, pawl, and ratchet. The key way has a post for the barrel key to slide onto ( ill. 11). The ratchet has a long row of teeth and slides against the pawl in the direction that tightens the cuff's grip ( ill. 12). The pawl is a spring-loaded bar with a small row of teeth that are angled opposite to the ratchet's teeth ( ill. 13). The opposing angles of the pawl and ratchet's teeth allow the ratchet to slide across the pawl in one direction but don't allow the ratchet to back out until the pawl's teeth are lifted off the ratchet. The bit of the key can lift the pawl out of the way, freeing the ratchet, of course. ill. .14 shows how all the parts fit together. You also can unlock a cuff by using a bent paper clip to pick the lock. An easier way is to shim the cuff. Insert a 3-inch-long strip of spring steel between the ratchet and pawl until it covers the pawl's teeth ( ill. 15). A standard L shaped torque wrench works well because you can use the bent part as a handle. The ratchet then should be easy to pull out, unless the cuff was double-locked. ill. .11 The keyway of most cuffs is for a small-barrel key. ill. .12 The ratchet of a cuff has a row of teeth that are angled in a direction to allow the cuff to close freely but not to open without a key. ill. .13 The paw of a cuff is a spring-loaded bar with teeth angled opposite of the teeth of the ratchet, which lets the ratchet close but not back out without a key. Better cuffs have a double-lock feature that allows someone to use the back of the key to push a pin into the cuff to block the pawl. When a cuff is double locked, the key has to be turned in two directions to unlock it. One direction is to free the double-lock pin ( ill. 16); the other direction is to lift the pawl. It isn't hard to pick open a double-locked cuff, but you need to pick it both ways, as with the key. ill. .14 The parts of a standard pair of handcuffs. RATCHET CHEEK PLATES PAWL KEYWAY CHAIN SWIVEL EYE DOUBLE LOCK ACTUATOR KEY 50 mm (min.) ill. .15 Place the shim between the ratchet and pawl to open cuffs. ill. .16 When you depress the double-lock button, the pawl is blocked from moving, and the cuff can't be shimmed. Double lock button The easiest way to unlock any cuff is to use a key. Most of their differences are ornamental and apply to the shape and design of their bows or grips. One design lets the key double as a screwdriver. Another is removable to make the key easier to hide. The handles have no effect on which cuffs the key can unlock, how ever. Only the part that enters the keyway, the bit, does the unlocking. If two keys have bits of about the same size and design, the keys should be able to unlock the same cuffs. Among standard cuffs, there are few planned bit variations. Most variations are the result of poor machining and show up in low-cost off-brand models. It's useful to have two or three different standard cuff keys from different companies. This should let you open almost any standard cuff quickly. One way to get the keys is to buy a couple of pairs of handcuffs and thumbcuffs from different companies (at least one brand-name and one generic model). You also can buy keys for a few dollars from locksmith or law enforcement supply houses. Forced Entry Forced entry in place of proper professional techniques is never recommended except in emergencies or when authorization is given by the owner. There are some simple rules about forced entry that you should consider: ** Attempt a forced entry only as a last resort. Try other techniques first. ** If you must jimmy the door, do it carefully. Today, antique doors and frames can be a valuable part of a home. Don't risk a costly lesson by being too hasty. ** If you must break a window to gain access to a lock, break a small one. Replacing broken windows can be expensive. ** Don't saw the locking bolt. This is very unprofessional. Remember that lock picks and many other entry tools are considered burglar's tools in some jurisdictions. In many cases you must have a license to carry them. Check with your local police, keep your locksmith's license current, and destroy worn-out tools. Be aware of the trust that your city and customers put in you by allowing you to be a locksmith; you possess certain tools and knowledge that others don’t have. Don't abuse this privilege. |
| Prev: Opening Locked Cars | Next: | Related Articles |