If you have little or no insulation in your walls, you will definitely benefit from installing some. Conductive heat loss through uninsulated walls represents a significant heating and cooling load, and it’s usually cost—effective to add insulation.
Exterior walls are fairly difficult to insulate, unless you are remodeling, installing new drywall, or re-siding the house. Retrofitting insulation almost always means blowing in insulation, usually cellulose; the process is very much like that of the sloped-ceiling dense-pack outlined above. The type of siding has a big impact on how easy it is to get into the wall, and it may help you decide whether to tackle the job yourself or hire an insulation contractor.
What’s in there now?
How do you know what’s in the walls already? If you have done any remodeling, you probably already know. If not, there are a several ways to find out. It’s important to know what is in there, because that will have a big impact on how easy—or useful—it will be to insulate the walls.
Remember that there may be different types of insulation (or none at all) in different parts of the house. If parts of the house have been remodeled (for example, the kitchen) or built at a different time, they will likely be insulated differently. And sometimes people start to insulate a house and don’t finish, so look in at least five or six places to be fairly certain of what there is.
Insulating from outdoors
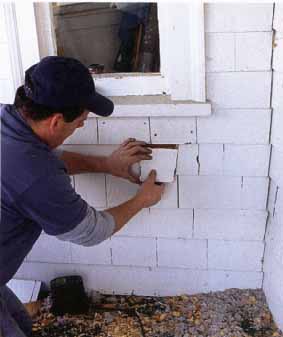
If you have wooden clapboard, shingles, or vinyl siding, it probably makes sense to insulate from outdoors. First, you’ll need to remove a row of siding and drill a hole in each stud bay. If you are using a fill tube (my preferred method), plan for a row of holes one-third to halfway up the wall on each story. If you have a nozzle, you will need one row of holes about 3 ft. from the bottom and another one within 1 ft. of the top on each story.
Whether you are using a tube or a nozzle, you’ll also need to drill a hole in each stud bay below windows. I make those holes about 12 in. down from the bottom of the window. In addition, there are usually some odd cavities formed by diagonal bracing, bridging, fire-stopping, and other blocking. The more thoroughly you can find and access those cavities, the better your insulation job will be.
To drill the holes, first strip off a layer of siding for each horizontal row of holes. Shingles or clap boards can be removed by cutting just at the line of the next overlapping layer. Carefully insert a small prybar from the bottom to lift out any nails (in clapboards) and help snap the wood at the cut. Set the siding pieces aside carefully—you may want to label the backs with a marking pen, using letters or numbers to match their locations. Asbestos-cement siding must be treated with care—use a small cat’s paw or diagonal cutters to pull the nail heads and gently ease out the shingles. If necessary, take off two courses to expose the exterior sheathing.
If the house is sided with vertical tongue-and- groove or board-and-batten, or some type of plywood siding, you’ll have to make a decision. One option is to drill right through the siding and try to patch it seamlessly (good luck with that!).Another option is to try to remove a substantial amount of siding. A third (and maybe the best) option is to drill and blow the wall cavities from the interior. If you have brick veneer, stucco, or other masonry cladding, you really don’t have much choice but to insulate from the inside.
Insulation in Older Homes
Most homes built before the 1930s had no insulation at all, so if your home is from that era, you will be looking for insulation that was added later. It may be blown-in cellulose or urea-formaldehyde foam. If the walls were already insulated, it is rarely worth adding more, unless you find large areas that were never done at all. One thing to be careful of in older homes is back-plastering. Although unusual, back-plastered walls were built with an extra layer of lath and plaster in the middle of the stud space—this added an extra airspace and reduced heat loss through the wall. Those walls are difficult to insulate due to the narrow space, and it’s probably better to leave them alone unless you do major remodeling.
Homes that were built more recently may have minimal insulation—some have insulation that looks like layers of wrinkled paper that may be sandwiched between layers of black paper. Or you may find thin, 1-in, to 2-in.-thick batts made of glass fiber or rock wool. It is possible to add cellulose insulation to walls with those thin layers of insulation, but it is definitely advisable to use a fill tube. If the wall has thicker batts, it will probably be almost impossible to get the fill tube into the wall cavity without bunching the insulation; in that case, it won’t be worth trying to add more.
Vinyl and Aluminum Siding
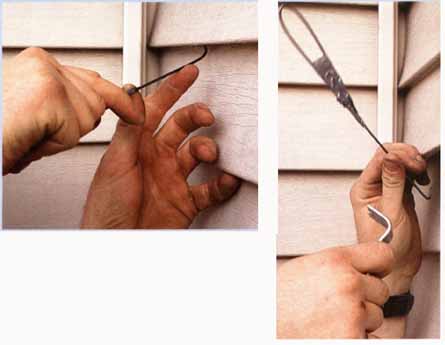
Vinyl siding can usually be unlocked one course at a time (two clapboards in height) with a Zip tool, which is simply an insulation push rod with a hook at one end and a handle at the other. Unlock the top of the course where you want to drill holes, then reach in with a prybar and remove the nails holding the siding strip. Short pieces of siding may not flex enough to pull out safely; you can slide them down between the trim channels to expose the sheathing. When working with vinyl, make sure your hands are clean, or you could permanently stain the plastic. Aluminum siding can also be removed with a Zip tool, but watch out—it dents easily. On a windy day, the material can easily bend and, once dam aged, both vinyl and aluminum siding may be difficult to match.
The unlocking tool for vinyl or aluminum siding is just an insulation push rod, with a bent hook at one end and a round handle at the other. Be very gentle, especially near the corners and around window trim. You can also use a prybar to help open the siding, but be careful not to mar, bend, or break the lower piece.
TIP: When preparing to insulate walls from the outside, be sure to remove pictures from walls and breakable objects from shelves
WHAT CAN GO WRONG: Beware of loose plaster or drywall, which can be a problem in older homes with plaster on wood lath and in newer homes with poorly installed drywall. If there are any loose or spongy areas, secure them by driving drywall screws into studs before blowing cellulose; they can be patched later. And always keep an eye on the plaster and drywall while filling wall cavities. If there is any sign of bulging or nail pops, cut back on the air pressure or increase the material feed to reduce the density. If you are working from the outside, periodically look indoors or station a helper inside to warn you of any trouble.
Estimating Cellulose Wall Insulation
To figure the amount of cellulose needed to insulate walls multiply the height and width of the walls to obtain the square footage Subtract areas that are already insulated as well as any large window or door areas Divide the area by 3 (assuming a 4-in.-thick wall cavity) to get the total cubic feet you are insulating. Then multiply the cubic feet by 2.5 (if you are using a nozzle) or 3 (if you have a fill tube) to get the approximate weight of material needed (in pounds) This method will probably overestimate but its easier to bring back some unopened bales than to have to run out and buy more when you are in the middle of a project.
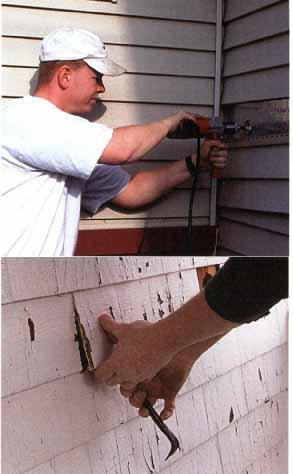
Before drilling holes for blown-in insulation, remove the
siding, so that you’re only drilling through the sheathing. That makes
it easier to find stud bays and patch the holes once you’re done blowing
the cellulose.
Once the top edge is scored with a knife, pry up from the bottom to snap off the shingle.
To remove a wooden shingle or clapboard, first cut into
it with a sharp utility knife, tilting the blade upward so the joint
will shed water when you put it back together.
When working with asbestos-cement siding, rule number one is never damage the shingles! Drilling, cutting, or sanding them can release harmful asbestos fibers.

Start filling each wall bay by pushing the fill tube up from
the center of the bay. Keep the control switch close at hand, so that
you can find it in a hurry when you need to shut off the flow of cellulose.

Once you have dense-packed the upper half of the wall cavity,
continue by inserting the tube down at the bottom.
Filling walls with a tube
Once you’ve drilled the holes, you’re ready to begin. Whether the holes are on the inside or the outside, the basic technique is the same. If you have a fill tube, start by inserting the tube up into the wall bay, pushing it in so the end is close to the top. It’s not a bad idea to cover the hole around the tube with a small piece of fiberglass or a rag; this helps control dust and keep cellulose from blowing back out of the hole.
Start the machine, let it fill the wall cavity until the material flow starts to back up, then pull back the tube 6 in. to 8 in. (this process is described in more detail earlier). Continue until you have filled the upper half of the cavity then fill the lower half of the cavity in the same way. The lower part will fill up quickly, since it will already have a fair amount of material in it.
Cavities under windows are filled in the same way except there’s no upper half to do. When you finish each hole, make sure that it is tightly packed; it should be difficult to push a finger through the cellulose.
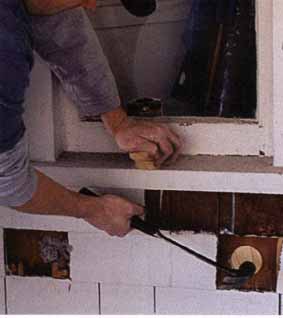
When you are finished, plug the holes and refinish the surface. From the outside, tap in wooden plugs, then neatly replace the siding. You will probably need to apply some touch-up primer and paint as well, depending on the finish.
Be sure to plug any holes cut in the sheathing, even if the
siding will cover them later. Precut tapered plugs are generally available
from a cellulose supplier.
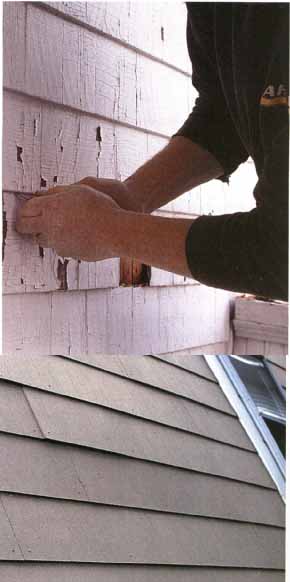
Once the hole is plugged, set the shingle or siding in place
and attach with siding nails.
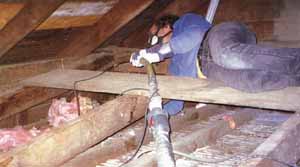
Some walls in older houses open into attic areas. Before you
start drilling, check for this situation—you’ll save yourself a lot of
drilling if you can just insulate the wall cavities from the attic.
Tip: If one wall seems to take a long time to fill, check the basement or a nearby closet for a pile of cellulose.
WHAT CAN GO WRONG: W all cavities that open into a basement, chimney chase, built-in cabinet, or other open area can turn into bottom less pits for insulation. Before you start blowing cellulose, check for any of these potential cavities against exterior walls. Also, check the subfloor in the basement just above the sill. If you find any openings, you must block them to avoid filling the basement with a pile of cellulose!

In some cases, walls are framed so that the bays open into
the basement. The bottoms of the wall bays must be stuffed with fiberglass
before the wall cavities can be blown with cellulose.

Whether you’re drilling from the interior or the exterior,
a self-feeding bit makes it easy to drill the large holes needed for
blowing cellulose into walls.
After filling each stud bay with cellulose, the nozzle holes in the wall are patched with slightly inset Styrofoam plugs and ready-mixed patching compound.
Drilling and patching from indoors
If you have siding that you don’t want to deal with, or if you are planning to substantially remodel, paint, or paper the interior, it may be easier to drill and insulate from indoors. Of course, this will be much more disruptive and dusty, but it may be a lot faster and easier, especially if you are doing significant refinishing anyway. The preparation is basically the same as insulating from the outside, except there’s no siding to remove. If you have a fill tube, make a row of holes about halfway up the wall, with one or two holes in each stud bay (don’t forget the bays under windows). If you are using a nozzle, drill one row about 3 ft. from the floor, fill the holes with material, then do another set 12 in. to 18 in. from the ceiling.
There are two options after you’ve finished blowing cellulose into the wall. One is to insert pre-made styrene foam plugs (they’re usually available from a cellulose supplier), slightly inset from the existing wall surface. The holes can then be conventionally patched with a good-quality Spackle or setting-type joint compound. If you are doing substantial refinishing, or if you want a more solid patch, it may be worth making drywall patches instead; they are more time— consuming but less likely to crack or pop over time.
SAFETY FIRST
Before working on a ladder always make sure its stable Keep your body weight in the middle—don’t overreach. Ladder jacks and staging can help. They are well worth the trouble of setting up because you can strip siding and insulate a large area before having to move the staging Follow the safety instructions carefully use common sense and be especially careful while drilling. The torque developed by a I ½-in or 2 in self feed drill bit can be quite dramatic If the bit binds in the wall sheathing the handle can kick back violently, knocking you right off your perch.
Strategic dense-packing
You can also use dense—packing to seal air leaks between interior partition walls and cathedral- ceiling or flat-roof cavities. The technique is the same as that of filling exterior wall cavities from the interior. Use it for plumbing walls, duct chases, and other places that are likely to have big leaks into the ceiling cavity (avoid doing this around a chimney chase!).This is a messy job, but if you have significant ice damming or cathedral- ceiling dripping, it may be the cheapest and best fix. In that case, try to do all the interior partitions as well. Be extra careful when drilling into walls that contain plumbing and other services.
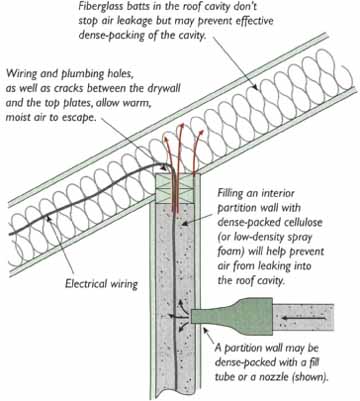
Strategic Dense-Packed Cellulose: If you
have cathedral ceilings that are already insulated with fiberglass batts,
or for some other reason are unable to dense-pack the roof cavities,
dense-packing partition walls with cellulose is about the only way to
reduce air leakage without demolishing the interior walls. Fiberglass
batts in the roof cavity don’t stop air leakage but may prevent effective
dense-packing of the cavity. Wiring and plumbing holes, as well as cracks
between the drywall and the top plates, allow warm, moist air to escape.
Filling an interior partition wall with dense-packed cellulose (or low-density
spray foam) will help prevent air from leaking into the roof cavity.
A partition wall may be dense-packed with a fill tube or a nozzle (shown).
Electrical wiring
TIP: If you are insulating an overhang that is covered with a vinyl or aluminum soffit material, you will first have to remove it carefully—don’t try to drill through it.
WHAT CAN GO WRONG: One common mistake when installing kraft-faced fiber glass batts is to staple the facing tabs to the bottom of the floor joists. In most climates, this is incorrect for two reasons. First, the vapor barrier is on the cold side; more important, the insulation is typically not in contact with the subfloor. I’ve never seen problems resulting from vapor diffusion into a floor, but unfaced batts are better than improperly installed faced batts. And the insulation should be in contact with the subfloor.
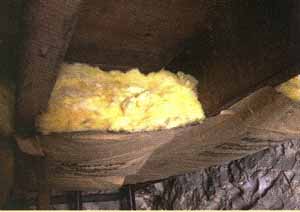
While stapling a faced batt to the floor joists is
common practice, this is the wrong way to install fiberglass insulation
in floors — unless you live in a hot climate. A vapor barrier belongs
on the warm side of the insulation.
Next: Insulating Floors
Top of page Related Articles Home