Invest $75 now and save hundreds in the years to come...
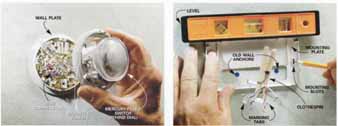
1. TURN OFF power to heating/cooling systems at the main
panel. Mark wires with a tab (or tape) and letter that represents the
terminal; unscrew them. Remove and discard the old thermostat. 2. LEVEL
the new mounting plate in position and mark the mounting screw holes. Drill
3/16-in, holes, insert drywall anchors and screw the plate to the wall.
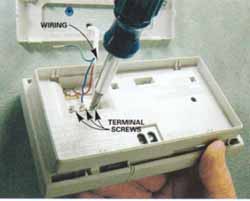
3. SCREW wiring to terminals on new thermostat using labels
as reference (strip wires back if needed). Hook wires up to same terminals
on new thermostat. Snap thermostat to mounting plate.
You can reduce your home’s heating and cooling costs by about 15 percent with a programmable thermostat. It automatically keeps the temperature at a comfortable level when you’re home, but switches to an energy-saving level when you’re away or asleep. Programmable thermostats are available from home centers and hardware stores for $25 to $100. The higher-priced models provide more programming options.
Programmable thermostats will work with most gas or oil furnaces, and central air conditioners. However, heat pumps, electric baseboards and a few other systems require special features. Read the package to make sure the programmable thermostat you buy is compatible with your heating and cooling system. If you’re unsure, call your local utility or a heating and cooling contractor listed in your phone book or Internet.
Quick Tip PROGRAMMABLE THERMOSTAT OPTIONS. When shopping for a programmable thermostat, select one with the options that are right for you. Some contain a time-to-change-the- filter light or low-battery indicator. Others have keypad lock features to prevent tampering, or contain mechanisms that automatically reset your temperature settings when moving between heating and cooling seasons. |
Energy-Saving Q and A Setback thermostats save money Q: We’ve always used a setback thermostat to lower the temperature at night and during the day while we’re gone. My son-in-law says we’re not saving anything, claiming the amount of energy used to reheat the house is far greater than if we left the thermostat set at a constant temperature. Who’s right? A: You’re right. Your son-in-law holds a common mis conception, which has been dispelled by years of research and numerous studies. The fuel required to reheat a building to a comfortable temperature is roughly equal to the fuel saved as the building temperature drops to the lower setting. You save fuel between the time that the temperature stabilizes at the lower level and the next time the heat is needed. So, the longer your house remains at the lower temperature, the more energy you save. Studies show you can cut costs by as much as 20 per cent by lowering your thermostat 5 degrees F at night and 10 degrees during the day when no one is home. The same goes for raising the temperatures by that same amount when using air-conditioning in warmer climates. |
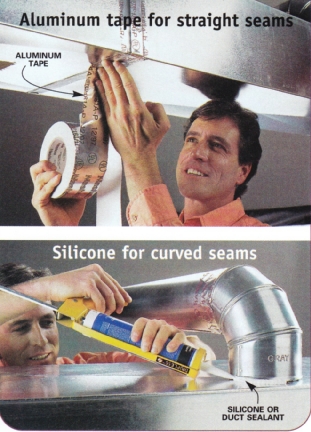
Quick tip DONT USE DUCT TAPE ON DUCTS. Studies have shown that cloth-backed duct tape is one of the worst materials you can use for sealing leaky ducts; it degrades quickly. Use aluminum tape, mastic or other adhesive specially approved for sealing ducts. |
Remove the old thermostat as shown in Photo 1. If your old thermostat contains mercury, you’ll see a small glass tube with a shiny silver ball inside. Mercury is toxic. Take this type of thermostat to a hazardous- waste disposal site.
There will be anywhere from two to five wires hooked up to the old thermostat. Label the thermostat wiring with marking tabs using the letters on the old screw terminals as reference. If your new thermostat doesn’t come with marking tabs, use masking tape.
Clip a clothespin to the cable so it doesn’t slide down inside the wall cavity, and mount the new wall plate (Photo 2). If the thermostat has back-up batteries, insert them before wiring the new thermostat (Photo 3).
The thermostat may need to be configured to your heating system. It may come preprogrammed, but to maximize savings, set it up according to your schedule. Consult the instructions that come with the thermostat for system adjustments and programming. You won’t save energy if the thermostat isn’t programmed correctly.
Energy-Saving Q &A Duct tape: not for ducts Q: What’s the best way to seal leaks in my ductwork? Duct tape seems to deteriorate pretty quickly. A: It’s one of those goofy ironies that duct tape really doesn’t work well on ducts. In fact, the Model Energy Code bans the use of duct tape for sealing ducts. Instead, use the aluminum tape you’ll find with the vents and ducting home centers. This tape, which costs about $20 for a large roll, works on most ductwork connections as long as the metal is fairly clean.
|
Fall Furnace Tune-up
Simple maintenance pays big dividends for comfort, efficiency and safety.
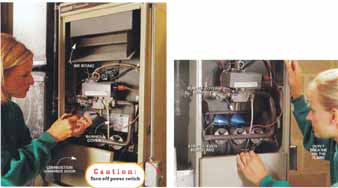
1. FLIP the electrical power switch to OFF. Remove the
combustion chamber door by lifting up and pulling it out, and remove
the burner cover (if you have one). It’s usually held in place by two
screws. 2. TURN the power switch on and activate the burners by turning
up your thermostat. Inspect the burner flames. The flames should be fairly
even and blue. Yellow flames indicate dirty burners. (Don’t breathe on
the flames because the extra oxygen will also make them turn yellow.)
Don’t adjust the burners yourself. Call in a pro.
When it comes to furnaces, an ounce of prevention truly is worth a pound of cure. To help you avert the hassle of your furnace dying or simply not putting out enough heat—just when you need it most—we’ll walk you through a series of simple steps that will keep it in tip-top shape. The entire maintenance operation takes less than three hours and costs only a few dollars—pretty cheap insurance.
Here, the focus is on natural gas and propane-fueled furnaces. The maintenance tasks involving the blower chamber also apply to oil furnaces; however, oil furnace combustion chambers are very different and should only be worked on by professionals.
(Heat pumps, on the other hand, work more like a central air conditioner than like a furnace, so we won’t deal with them here.)
Routine furnace maintenance and cleaning don’t require special skills. If you’re handy with a few basic hand tools, you can do it. You won’t be doing tricky or potentially dangerous stuff like adjusting the gas burners. Leave that for a pro. See “Symptoms That Call for a Heating Professional,” below for more details.
We should warn you that your furnace may look somewhat different than the one we show here. If you don’t feel confident about taking some of the steps shown, skip them. and pay close attention to the safety precautions in this article, in your furnace service manual (if you can find it!) and posted on your furnace.
Even if you follow our maintenance steps, call in a heating professional for a thorough furnace checkup at least every three years. (Look/search for under ‘Heating’ in the Yellow Pages or Internet).
TIP: f you’re faithful about changing your filter, you won’t have to clean the blower. |

Gas furnace details--A forced-air furnace
has four main sections: (1) the blower chamber; (2) the combustion chamber;
(3) the return duct; and (4) the supply duct. When your thermostat calls
for heat, the burners will kick on and begin to heat up the heat exchanger.
The heat exchanger contains all the dangerous gases produced by combustion and vents them through the exhaust stack. When the heat exchanger gets
hot enough, the blower starts. The blower pulls cooled air through the
return duct, passes it over the warm heat exchanger and returns the warmed
air to the rooms.
Furnaces vary quite a bit in design, so yours may be somewhat different from this illustration. If confused, consult your service manual or a heating professional.
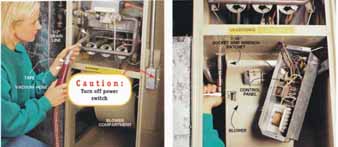
3. TURN OFF the power switch again and shut off the gas
by giving the valve a one-quarter turn (see ___ above for approximate
gas shutoff valve location). Vacuum the burners and the furnace base.
To get at the back of the burners, tape a 20-in. length of 1/2-in, drain
line to your vacuum hose. Vacuum every where you see dust. While everything
is open, use a flashlight to look for signs of soot (fine black powder),
which often indicates poor combustion (see Symptom 5 below). Lift off
the lower door (blower door) and vacuum the blower compartment. 4. REMOVE
the blower (also called a squirrel cage) in order to clean it. If you
have a control panel in front of the blower, two screws will loosen it and you can let it hang. Next, using a 7/16-in, socket and ratchet, remove
the two bolts that hold the blower in place, then gently lift it out.
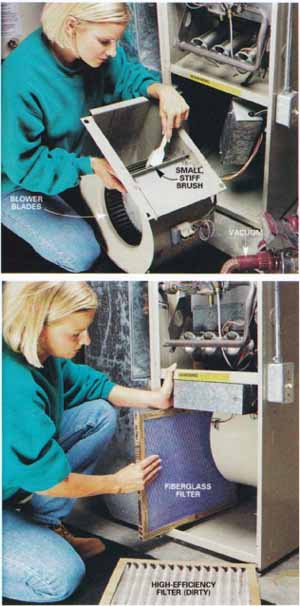
5. CLEAN the blower blades thoroughly with a vacuum and small brush. Take care not to stress the wiring or disturb the counterweights
that will be on the fan blades. If you can’t clean the blower thoroughly,
don’t clean it at all; you could throw it off balance. 6. CHANGE the
furnace filter every one to three months. A $1 fiberglass filter will
adequately protect the blower and blower motor. If you want to install
a more expensive, high-efficiency filter, check the owner’s manual for
the manufacturer recommendations. High-efficiency filters can restrict
the airflow, strain the blower motor and make your furnace less efficient.
If you want cleaner air, the best option is a separate air-cleaning system.
Carbon monoxide alarm
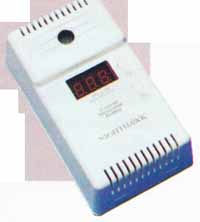
INSTALL A CARBON MONOXIDE ALARM on each floor. If you already
have these alarms, test them. Carbon monoxide is an odorless, co1orless
gas sometimes produced by oil-, gas- and wood-burning appliances (furnaces,
stoves, fireplaces, etc.). If this gas spills into your home in high
enough concentrations, it can be fatal. Plug carbon monoxide alarms into
electrical outlets or directly wire them to the electrical system. They
cost about $40. Do not install them in utility rooms, garages, kitchens
or bathrooms.
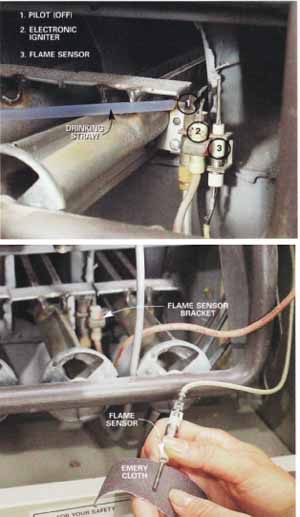
7. BLOW dust off the pilot. Direct air to the exact spot
by blowing through a drinking straw. A dirty pilot can cause the flame
sensor (or thermocouple) to get a false reading that the pilot isn’t
lit Some newer furnaces have hot surface igniters instead of pilots and electronic igniters. (Note: One burner was removed for clarity.). 8.
THE FLAME SENSOR occasionally becomes coated with residue and will prevent
your furnace from lighting. Remove it by pulling it down out of its bracket.
Lightly clean the surface with fine emery cloth and slip the sensor back
into its bracket.
Caution: While working on your furnace, do not remove burners, stick anything into the pilot orifice or make adjustments. Misaligned burners can pose a serious hazard by allowing build up before the burner ignites, causing a flash fire. Poking a sharp object into a pilot can widen the orifice, turning the pilot into a flamethrower.
TIP: If your furnace has a standing pilot (a pilot that burns all the time), turning off the gas to the furnace when the heating season is over will save you as much as 5 percent per year on your gas bill. To relight the pilot, consult the instructions on your furnace’s gas valve.
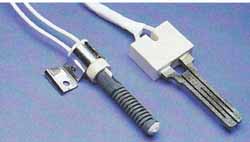
9. HOT SURFACE IGNITERS are the most common ignition system
on furnaces being manufactured today. They take the place of standing
pilot Lights and electronic igniters. Clean the dust off the hot surface
igniter by leaving the igniter in place and blowing air through a straw.
This part breaks very easily; don’t even touch it. In fact, when you
replace the furnace doors, do so gently to avoid breaking the igniter.
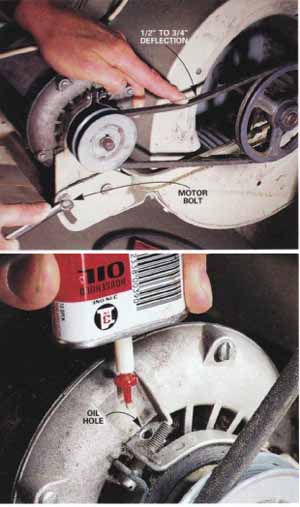
10. THE BELTS on belt-driven blowers need occasional
adjustment or replacement. Inspect the drive belt for cracks or frayed
areas. A new belt costs about $5. When you install the new belt, tension
it so it deflects 1/2 to 3/4 in. 11. SOME OLDER FURNACES have two motor
bearings and two blower shaft bearings that require annual oiling. Clean
around the oil caps and remove the caps. Apply two to three drops of
Lightweight machine oil and replace the caps. Don’t over lubricate!
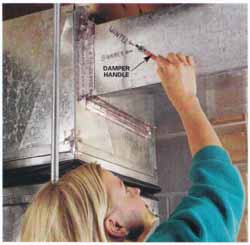
12. IF YOUR FURNACE heating ducts also serve as air-conditioning
ducts, they may have dampers that require adjusting for seasonal changes.
The seasonal settings should be marked. Two- story homes often have separate
supply trunks to serve the upstairs and downstairs. To send more warm
air downstairs (winter setting) or more cold air upstairs (summer setting),
adjust the damper handle on each supply trunk.
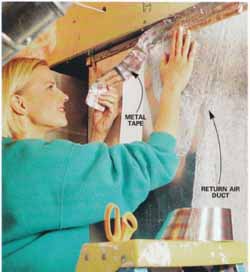
13. SEAL leaky ducts especially return air ducts with special metal
tape (available at home centers for $12) or high- temperature silicone.
Then conduct the following backdrafting test to make sure the combustion
gases go up the flue: Adjust the thermostat so the burners come on. Hold
a smoking stick of incense beside the draft hood (Photo 14). The smoke
should be drawn into the hood. Also inspect the exhaust vent pipes on
your furnace and water heater (while they’re cool). White powdery residue
can indicate corrosion. Gently squeeze the exhaust stack with your hand.
It should be firm but slightly flexible. Call a heating professional
or plumber to fix all these types of problems.
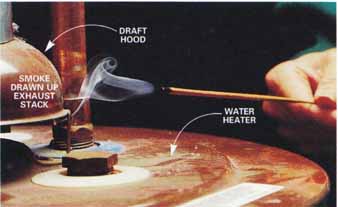
14. TEST your gas water heater for backdrafting while your furnace is
off. Turn up the water heater thermostat until the water heater burner
comes on. After a minute or more, hold a smoking stick of incense or
match up to the exhaust stack. The smoke should be pulled into the stack.
Conduct the test with all exterior doors and windows closed and bath and kitchen fans running. If the vent doesn’t draw, call in a heating
specialist or plumber to find the problem. Turn the thermostat back down.
Symptoms that call for a heating professional
Symptom 1: Short cycling
When your furnace runs for only short periods (less than three minutes) before shutting off, the problem is called short cycling. This happens when the thermostat is out of adjustment or when the heat exchanger overheats and the burner automatically shuts off to prevent damage.
Symptom 2: Irregular flame
Properly functioning burners have fairly even rows of flames. If the flames are uneven or lean toward the back of the furnace, call in a pro. It could be a sign of dirty burners or a cracked heat exchanger.
Symptom 3: Odd noises or rumbling
While rumbling and popping aren’t cause for concern in a hot water or steam heating system, they shouldn’t be present if you have forced-air heat.
Symptom 4: Chronic illness
Frequent headaches or flulike symptoms can be a sign of combustion gases leaking from a cracked heat exchanger or carbon monoxide leaking from an exhaust stack. With these symptoms, have your heating system checked out even if your carbon monoxide alarm remains silent.
Symptom 5: Soot deposits
Soot is a fine black powder that collects when combustion is incomplete. Its presence may indicate that your burners need adjusting or that you have a cracked heat exchanger that needs replacing.
Next: Cheap vs. expensive furnace filters
