If high energy bills are causing you shock and frustration, take heart. There’s something you can do—call your local utility company and ask for an energy audit. An energy auditor will come to your home and con duct a series of tests to provide detailed information about your home’s energy usage and energy loss. A report, generated at the conclusion of the two- to three-hour audit, will detail:
• The condition and efficiency of your heating and cooling system.
The overall efficiency of your home, including the primary areas of air leakage in your exterior walls and ceilings
• Low-cost ways you can improve energy efficiency and save energy
• Larger upgrades that will pay back their cost with energy savings within a relatively short period.
Here, you’ll walk through a professional energy audit with Eric Smith, a Minnesota state-certified energy auditor, whose company, Enervision, has performed more than 12,000 audits. An audit typically costs $250 to $400, but most utility companies offer a rebate to reduce the cost to you. The house shown here was built in 1979.
An energy audit addresses five priorities:
- First is home safety. If your house isn’t safe, energy efficiency doesn’t matter.
- Second is durability. Finding and fixing moisture problems and rot helps the house last longer.
- Third is comfort. The audit identifies drafts and cold spots.
- Fourth is to set up the best action plan to make your home more efficient, especially things you can do yourself.
- Fifth is cost benefit, which tells you what it’ll cost to make improvements, and how long it’ll take for the savings to pay off those costs.
Checking heating and hot-water systems
The audit starts with a furnace combustion efficiency test. With the furnace running, Eric inserts a gas analyzer in the furnace’s draft diverter (Photo 1). If there’s no draft diverter, he drills a small hole in the flue for the wand, then later patches it. The analyzer provides an immediate reading. Our furnace had a 76.9 percent combustion efficiency—not bad considering furnaces at least 15 years old are usually 55 to 68 percent efficient and this unit is 27 years old (typical lifespan is 15 to 20 years).
This test also measures:
The amount of carbon monoxide in the flue gases The draft pressure in the flue to determine if gases could leak into the house. These are safety issues. If waste gases aren’t being drawn up the chimney, then moisture, carbon monoxide and other pollutants could be flowing into your home. Common causes of vent problems (allowing gases to “back draft” into the home) are birds’ nests in the vent pipes and vents that have come apart. Eric often finds these problems. He notes one common clue: “If you have moisture on your windows, the first thing to check for is backdrafting in the furnace and water heater flues.”
Eric tests for backdrafting in the water heater flue as well by holding a flame or a smoke stick next to the draft diverter (Photo 2).
The check of the heating and hot-water systems concludes with a visual inspection. Rust particles (called “scaling”) inside the furnace heat exchanger indicate corrosion, which will eventually lead to holes and combustion gas leakage. Scaling may also be visible on top of the water heater around the draft diverter.
Eric looks to see if the furnace filter is clean and installed correctly. “Clogged filters can cause a moderate increase in heating costs, but more significantly, cause the heat exchanger to overheat and fail, and cause the fan motor to heat up, increase electric consumption and reduce the life of the motor.” He also looks for combustibles stored near the furnace or water heater, because the flame could cause an explosion.
Other common problems Eric has found include disconnected flue pipes, leaky ductwork, clogged condensation pipes, dirty burners and dirty fan blades. ‘I’ve found many furnaces missing the cover for the filter slot, and major leaks in the return-air ductwork. This causes depressurization in the furnace room and can draw dangerous exhaust gases out of the flue pipe and distribute these gases throughout the house,” he says.
Tip: Old boilers, originally designed for coal, then converted to oil and then to natural gas, can be as low as 55 percent efficient—that’s 45 percent waste! The best furnace designs feature variable- speed fan motors and modulating or multi stage burners, which enable the furnace to match its Btu output to the home’s 4 temperature needs, thereby increasing the system’s efficiency.
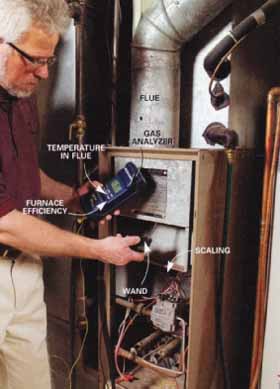
1. FURNACE EFFICIENCY TEST: The auditor tests the furnace
/ exhaust with an electrical gas analyzer, which gives a combustion efficiency
reading. It also measures draft pressure to determine if flue gases might
leak into the house.
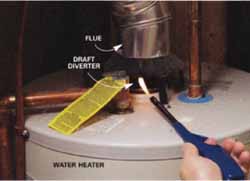
2. BACKDRAFT TEST: With all doors and windows closed and all combustion appliances turned on, the auditor tests for back drafting
at a natural-draft gas water heater. The flame, held next to the draft
diverter, should be drawn up into the flue.
Testing for air leakage
Part two of the audit entails a blower door” test, which measures the home’s “tightness,” or air infiltration rate. Eric first closes all doors and windows, then he sets an adjustable panel with a variable-speed fan in a doorway, completely sealing it. He turns on the fan to blow air out of the house, which reduces the indoor air pressure, and then measures airflow through the fan at predetermined pres sure points (Photos 3 and 4). Outside air then enters through cracks and gaps in walls and ceilings.
With the fan running, you can feel air come in with your hand, especially around leaky windows and doors. Gauges connected to the fan measure the airflow rate needed to maintain a constant pressure, allowing the auditor to calculate the leakage rate.
Newer homes are built tighter under the most recent Minnesota building code. (Most other state codes have tighter rules too.) It even requires special ventilation fans to ensure adequate fresh air. Still, their leakage rate is often equivalent to a 6 x 6-in, hole in a wall. Older homes weren’t built nearly as tight. They often have a leakage rate equivalent to a 19 x 19-in. hole, which is like having a window wide open all the time! The house we tested had leaks totaling .77 sq. ft. (about an 11 x 11-in, hole). Eric estimates that sealing air leaks alone will save 10 to 20 percent on this home’s annual heating bills.
Eric pointed out several signs of air leaks: stains around exhaust fans and dirt on insulation. A batt of insulation between joists in the basement was dirty, meaning the insulation was serving as a filter for air leaking in through the foundation. “You can’t fix these leaks with insulation because it won’t stop the airflow,” Eric says. “You have to seal them with caulk, expanding foam or some other sealant.”
Tip: In our opinion there’s no limit to how tight you can make the ceiling. The less air that goes out the ceiling, the less that will come in around doors, windows and other leaky areas. When you’re carrying water in a bucket, it doesn’t matter if the top leaks, because no water is going to get out. What matters is the bottom. Think of your house like an upside-down bucket holding heat.
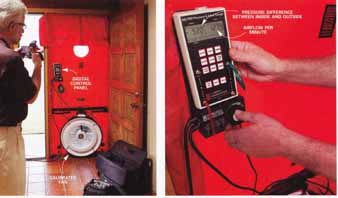
3. BLOWER DOOR TEST: With all doors and windows closed,
the auditor inserts a blower door in the front or back doorway and starts
the fan. 4. THE GAUGE shows the pressure difference between the inside and the outside and the airflow per minute. From these, the auditor calculates
the leakage rate.
Pinpointing sources of energy loss
While the blower door test measures the overall leakiness of the house, infrared scanning (technically called “thermography”) graphically identifies the precise locations of those leaks. Eric keeps the blower door fan running to draw in outside air. Then, using an infrared camera, he scans the walls and ceilings, photographing surface areas that show up as cooler (Photo 5).
Cold areas show up as blue, and warm areas as yellow (Photos 6 — 8). Today (a chilly day in March), the framing members showed up as blue, since they’re cooler than the insulated portion of the walls. (The opposite would be true on a hot day when the indoors is air conditioned and the outside air is warmer.)
Air leaks in the ceiling typically cause the greatest energy losses. Openings made for light fixtures, plumbing vents, exhaust fans, attic access and smoke alarms will leak if the builder didn’t make an extra effort to seal them. In this house, the area around the attic access panel and the exhaust fan in the upstairs bathroom showed extensive leaking (Photo 6), while a ceiling light fixture, which must have been sealed better, leaked very little.
Electrical outlets and light switches on outside walls also usually leak, unless the builder took extra pains to seal them. The infrared scan showed that four of these in the north kitchen wall leaked profusely (Photo 7). The homeowner confirmed this, noting that she often felt cold drafts when standing by this wall.
While some of these problems are easy to fix—foam weather stripping on the attic access panel, spray foam or caulk around the exhaust fans, and foam seals under the outlet and switch cover plates—others are difficult to seal and may not be practical to go after. Leaks around exterior wall top plates and inadequate insulation in some wall cavities are common (Photo 8), but hard to access and therefore expensive to remedy.
Expect some air leakage around windows, sliding patio doors and exterior doors. “All doors will leak, especially since people step on the threshold as they enter and leave the house, wearing a gap between the door and sill,” Eric explains. “The only doors that don’t leak are the ones on submarines.”
Infrared scanning can identify other hidden problems. It’ll show cold spots where insulation is poor or missing. Eric has even found double-pane windows that have failed. Condensation between the layers of glass, which is the usual sign of failure, hadn’t shown up yet. Yet the infrared image showed that the centers of the panes were cooler than the sides, which meant the special argon gas they had been filled with was completely gone.
Since infrared scanning works by identifying heat differences, it can also detect water leaks (not to mention warm-blooded critters in the walls). Eric once found an area in a basement floor that was inordinately warm. Turns out a hot water pipe was leaking under the concrete, which explained the homeowner’s high energy bill.
“With my infrared scanner, I’ve discovered missing batts of insulation, insulation that stops 2 ft. short of the top of the wall, and entire room additions—20 by 30-ft. rooms—with absolutely no insulation in the ceiling. I’ve also found broken ducts sending heat into uninsulated attics.”
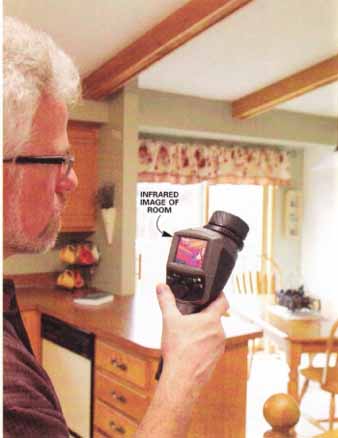
5. THERMOGRAPHY: The auditor uses an infrared camera to scan
waits and ceilings. The camera detects temperature differences and can pinpoint
cold spots and air teaks.
Photos and Infrared Scans
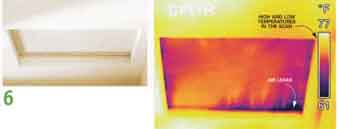
6. DARK BLUE AREAS around the perimeter of the attic access
panel indicate air Leakage. The overall blue tinge indicates poor insulation.
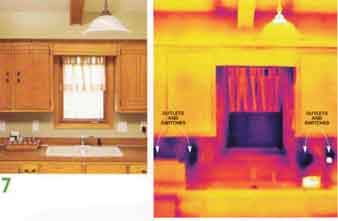
7. ELECTRICAL OUTLETS and SWITCHES typically leak, but this
is excessive. This kitchen wall feels cold and drafty in the winter.
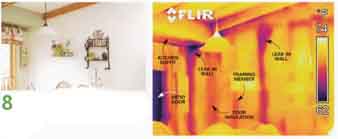
8. INADEQUATE INSULATION in a wall cavity and gaps in the
top plates (wall framing) cause most of the air Leaks in this dining room.
Final report—what you can save
Once the testing is complete, the auditor prepares a comprehensive report detailing the amount of leakage, ways to improve efficiency, the cost of specific improvements and the time frame for recouping those investments (see below).
The report lists specific low-cost steps for reducing energy usage that you can usually do yourself. For this house, they include insulating the attic access panel, weather-stripping it with closed-cell foam tape, sealing ceiling penetrations at electrical fixtures, insulating kitchen soffits, adding attic insulation, insulating the rim joists and caulking around windows, doors and base trim. Eric estimates that these upgrades will cut annual energy bills by 15 to 20 percent. Adding insulation to exterior walls isn’t worth the cost.
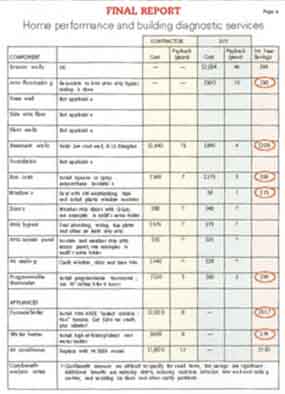
The final report lists energy-efficient upgrades, their
cost (hiring a contractor vs. doing it yourself) and estimated annual
savings. Upgrades that pay back in seven to 10 years are considered good
investments.
The furnace, installed when the house was built in 1979, had an “annual fuel utilization efficiency” (AFUE) of about 68 percent. This furnace is operating well below the current minimum standard specified by the building code and far below the efficiencies currently available.
(ENERGY STAR furnaces must have at least a 90 percent AFUE. Eric recommends replacing any old furnace (in Minnesota’s cold climate) that’s not at least 80 percent efficient since newer models use less energy and eventually pay for themselves (in this case, in nine years). Your energy auditor will make these calculations and recommendations based on your local climate. Furnaces that are at least 95 percent efficient may qualify for a federal tax credit. Installing a programmable thermostat in this home will pay for itself in just two to three years. A new high-efficiency air conditioner isn’t a priority, but it’s likely to be a priority in warmer climates. You want to recoup your investment through predicted energy savings within seven to 10 years.
Recommended energy saving tips:
- Seal leaks in ductwork
- Clear space in front of heating units, registers and radiators
- Reduce water usage by using low-flow showerheads
- Insulate the water heater tank and water pipes
- Wash clothes in cold or warm water and rinse with cold
- Dry laundry loads consecutively to maximize dryer efficiency
- Replace incandescent bulbs with efficient compact fluorescent bulbs
- Use timers or motion detectors to turn off lights when not needed
- Install air-sealing gaskets behind switch/outlet cover plates
- Lock windows to create a better seal Add weather-stripping and caulking around doors and windows
- Seal around pipes and ducts that penetrate outer walls
Next: Energy saving projects and payback