• Windows are notorious energy wasters. In summer they allow sunlight into a house, overheating it and driving up air- conditioning costs. In winter they let precious heat escape, sending fuel bills soaring. Some 25 to 30 per cent of a typical home’s heat goes out the window during cold months; in older houses, with loose-fitting windows, the loss can exceed 50 percent.
Windows act as heat passageways because glass is a very poor insulator. Most windows have an insulation rating, or R value, of less than 1.
Fortunately, keeping outside heat from coming in through a window is easy, be cause much of it enters in the form of sunlight. You need only cover the window glass or direct the sunlight away from it. A variety of conventional shades, blinds, shutters, and awnings all effectively block out the sun. A louvered over hang, built with preservative-treated wood, will bounce heat-producing rays away from the glass while still allowing some indirect light to filter through.
Controlling heat loss through windows is more difficult, in part because heat not only exits through the glass but leaks out through cracks around the frame. Caulking and weather-stripping window frames will dramatically reduce the out flow of heat. But the most effective solution is to insulate the windows them selves with permanent or seasonal layers of glazing, and then cover them on cold nights with insulated shades or shutters.
No glazing material is in itself a good insulator, but a window’s R value can be doubled by adding a second layer of glazing, which creates an insulating pocket of trapped air. The insulation can be increased by another third, to almost R-3, by adding a third layer of glazing.
One of the simplest and most commonly used methods of adding glazing is to install exterior storm windows fitted with single or double panes of glass or rigid plastic. A less expensive but equally effective technique is to fashion interior windows of rigid plastic or plastic film. The plastic is either mounted on frames (available in kits) or secured directly to the window casing with screws or tape.
A third technique for increasing layers of window glass is to replace individual panes with sealed, double-glazed panes, /8 inch thick. If the window sashes can not be altered or reconstructed to accommodate the thicker panes, the entire window can be replaced by a prefabricated unit with double or triple glazing.
When adding multiple glazing, keep in mind that the south windows of a house serve as solar collectors in cold weather, transmitting warming, energy-conserving sunshine into the home. A second layer of glazing added to these windows should be one of the high-transmittance materials listed in the chart opposite. Ordinary window glass is transparent, but it has a shiny, reflective surface that allows sunlight to bounce off. The somewhat duller-looking high-transmittance materials absorb most of the sun’s rays, allowing more heat to pass through.
Usually it’s not worthwhile to triple- glaze south windows. Whatever material is used, a third layer will reduce the pas sage of light, and the subsequent loss of solar heat in cold climates may actually offset the heat-containing value of the added insulation.
To reduce heat loss further, windows may be blocked out completely at night, using a variety of opaque insulating materials. Lightweight fabric insulation, available at many fabric and shade stores, can raise the insulating value of a single- glazed window to R-6. On a multi-glazed window, the extra insulation can raise the total R value close to that of the surrounding walls.
The insulation, which comes in large, blanket-like sheets, generally consists of two layers of dense polyester fiber—similar to the material used to fill bedroom qui Its and outdoor clothing—sandwiching a plastic-film vapor barrier. The insulation is faced with moisture-resistant fabric; some brands also include a heat- reflective metallic shield. Covered with decorative drapery fabric, the thick insulating material can be fashioned into a variety of heat-saving window coverings; the accordion-pleated Roman shade is one example.
Flexible magnetic strips backed with adhesive—available at many hardware and fabric stores—are attached to the edges of the shade. Pressed against a steel window frame—or against matching magnetic or steel strips mounted on a wooden frame—the magnets seal the window against leaks.
Interior shutters of rigid foam insulation are an inexpensive alternative to bulky fabric window coverings. Pop-in shutters of ordinary styrene foam board—similar to the material used for inexpensive picnic coolers—have an R value of 4 to 5 per inch of thickness. Even better are shutters made from urethane foam or foil-sided polyisocyanurate foam—rated at R-8 per inch and used to insulate exterior walls under such trade names as Thermax and R Max.
Pop-in shutters have several draw backs: They must be removed and stored during the daylight hours; they tend to shrink or warp with age; and unless coated with fire-retardant paint, they may burn or give off toxic fumes when ex posed to flame. Hinged bifold shutters, faced with flame-resistant fabric or a thin skin of wood or plastic, take longer to construct; but once in stalled, they are sturdier, less hazardous and far more convenient.
Dozens of other window treatments are available in kit or manufactured form. Those pictured are a representative sampling of ingenious space-age products that can transform energy-wasting windows into energy conserving home accessories.
The Basic Glazing Materials:
Material
|
Common trade names |
Form |
Characteristics |
|
Sunadex Solakleer Heliolite Plexiglas Lucite Acrylite Exolite Tuffak Lexan Exolite Fjlon Sun-Lite Crystalite Glasteel Flexigard Mylar Llumar Sun Gain Heat Mirror |
|
|
Choosing a glazing. This chart lists, by both generic and common trade names, the glazings best suited for insulating windows—from traditional glass to film as thin as a plastic sandwich bag. All of the glazing materials are either transparent or translucent, and many of them are available in a variety of tints or with decorative finishes and coatings. All of the rigid materials are available ri what is known as double-wall form: prefabricated double-glazed sheets, with two layers that are connected and held parallel by sealed edges or interior connectors.
Multiple-pane Windows for Comfort and Convenience
Adding layers of glass and plastic. Three techniques for adding layers of glazing are illustrated here, as seen from the outside of a double-hung window. Double glazing, the most effective and most expensive of the methods, involves replacing single-pane glass with double- wall insulating glass—two ½-inch panes separated by a %-inch air space. Panes with triple glazing are also available.

The combination storm window and screen is somewhat less efficient than double-glazed window panes or weather-stripped single-pane exterior storm windows; air leaks through the cracks around the panels. But the combination window is convenient: It never has to be removed, and in summer it can be quickly transformed into a screen for open-window ventilation. Thin plastic film mounted inside the window is an inexpensive alternative or addition to any of the other installations and works equally well.
Making the overhang. Using 2-by-8s, cut two side supports for the louvers, each 3 to 4 feet long, and front fascia and rear mounting boards the width of the overhang. Mark louver positions every 8 inches at 60 degree angles on each support. For louver slots, rout ½-inch grooves 6 inches long and 1 inch wide, or nail 1-by-i cleats to the supports. Nail the 2- by-8s together with 3½-inch galvanized nails.
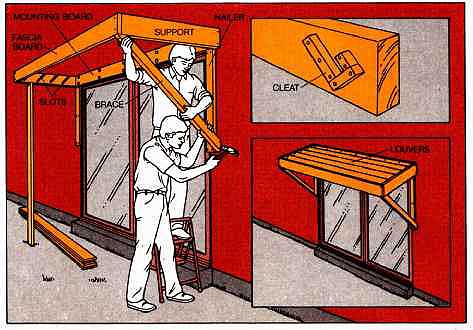
To mount the box (shown here above a sliding door), screw lag bolts through the mounting board into the header. Temporarily prop the box with long boards. Nail two 2-by-4s vertically to the house wall as nailing surfaces, and cut two additional 2-by-4 braces at opposite 45 degree angles, as sh Nail them to the outer edges of the nailers and the underside of the box. Cut louvers from 1-by-6 lumber, and slide them into the louver slots.
A Louvered Overhang to Deflect the Sun

Anatomy of a Roman shade. An accordion- pleated Roman shade is raised and lowered by vertical cords threaded through rings tied to the fabric and through eye screws set into the bottom of a mounting board. The cords are gathered into a single, knotted lift cord at the side of the window. When the lift cord is pulled, the shade gathers up into 4-inch folds. To keep the shade raised, the lift cord is secured to a cleat on the window casing or on the adjoining wall.
Blanketing Windows with Insulated Fabric
Lowered, the shade seals the window tightly. Flexible magnetic strips sewed into the fabric edges are attracted either to a steel window frame or, in the case of wood-frame windows, to matching magnetic strips or steel straps mounted on the molding. A weighted metal bar holds the bottom of the shade snug against the sill.
A Roman Shade with a Magnetic Seal
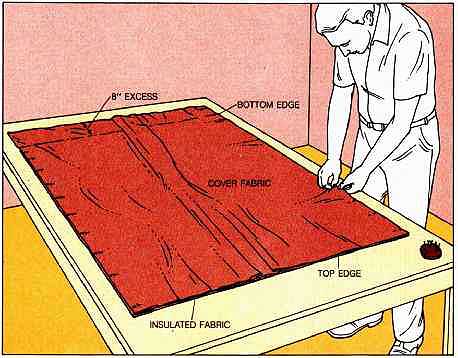
1. Preparing the fabric. Cut a piece of insulated fabric 4 inches longer and 2 inches wider than the dimensions of the window. (For wide windows, you may need to stitch two lengths of insulated fabric side to side.) Cut a length of decorative cover fabric—preferably sheeting or tightly woven drapery material—3 inches wider and 8 inches longer than the insulated fabric.
Lay the insulated fabric with its outside face up on a table, and lay the cover fabric, face down, on top of it. Align the top and side edges of the two fabrics; pin the sides together, allowing the cover fabric’s 8 inches of excess length to over hang the bottom of the insulation. Using a sewing machine, stitch a seam 1/2 inch in from each side of the insulated fabric; then, on each side, stitch a second, zigzag seam as close to the edges as possible, penetrating all layers of insulated fabric. The excess width of the cover fabric will lie loosely on top of the insulation.
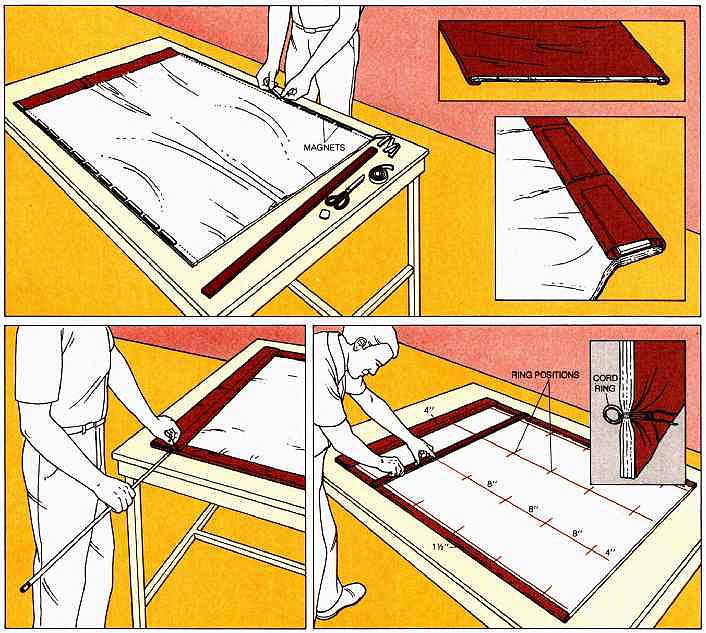
2. Attaching magnetic strips. Use tailor’s chalk to mark fold lines on the sides of the shade, spacing the marks every 4 inches. Cut adhesive- backed magnetic strips into 3½-inch lengths; round off the sharp corners with scissors, Place the magnets outside the straight seam on each side, centering them between chalk marks. Don’t put magnets at the top or bottom 4 inches of the seam lines. Fold back 4 inches of the overhang at the shade bottom, then fold another 4 inches and set two more magnets on the front side of the folded cover fabric.
Turn the shade right side out (top inset, be low), so that all of the magnetic strips are concealed (bottom inset, below) except the two at the unfolded bottom; these will eventually be hid den by the hem. Smooth out the shade, ironing it with a cool iron if necessary.
3. Weighting the hem. With the shade right side out and face down, make a hem by again folding the overhang up 4 inches, then another 4 inches. Machine-stitch the hem along its top edge, then 1 inch below this stitching to form a channel. Cut a %-inch steel rod 2 inches shorter than the width of the shade. Coat the rod with rust-resistant paint or varnish, and tape its ends to protect the fabric. Slide it into the channel, leaving an inch at each end for the bottom mag nets; then hand-stitch the sides of the hem.
4. Attaching the rings. With tailor’s chalk, mark vertical lines on the back of the shade, starting 1½ inches from each edge, spacing the lines at equal intervals of 8 to 12 inches. Mark horizontal lines on the shade every 8 inches, starting 4 inches from the top. (Some insulation is pre stitched every 8 inches, so measuring is unnecessary.) Where vertical and horizontal lines meet, sew ½-inch cord rings through all layers of the fabric, using heavy thread. Tie a square knot, and cutoff the excess thread.
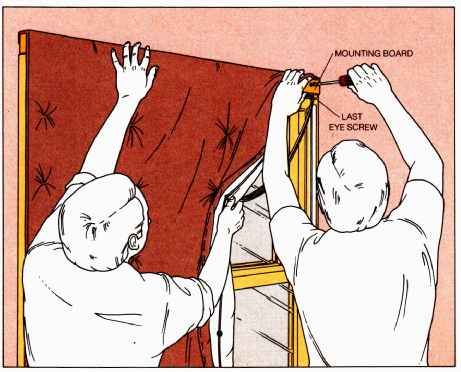
5. Attaching the mounting board. Cut a 1-by-2 board the width of the shade. Align it with the top of the fabric, and mark its bottom edge to correspond with each vertical row of rings. Insert 1/2- inch eye screws into the board at each mark, and a final one at the far left end of the board. Drill 1/4-inch screw holes through the board 1 inch in from each end. Then wrap the top 4 inches of the shade over the top of the board, and fasten the fabric to the wood with staples or tacks placed 2 to 3 inches apart.
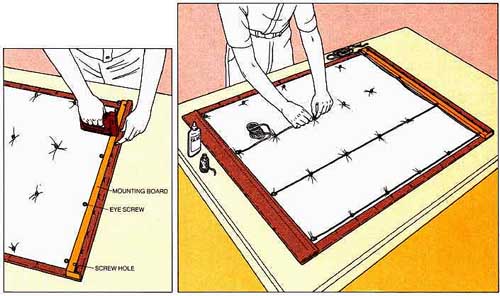
6. Stringing the cords. For each vertical row of cord rings, cut a length of nylon shade cord about twice the length of the shade. Tie each cord to the bottom ring, securing the knot with a few drops of white glue. ‘String each cord up through its rings, threading it from right to left through the eye screws above. All of the cords will pass through the eye screw at the far left edge of the shade. Tie the cords together just beyond the last eye screw, and knot them once again several feet down from the first knot. Trim the ends.
7 Mounting the shade. While a helper holds it at the window, check the shade for squareness and fit; adjust as needed. Uncover the screw holes on the mounting board, and attach the board to the wall above the window, or to the top of the window frame, using 1½-inch screws.
Test the shade by pulling the lift cord firmly down ward. The shade should rise evenly in 4-inch folds that bunch loosely below the mounting board. If raising the shade is difficult, replace the last eye screw with a pulley; or attach a pulley to the wall 3 inches beyond the mounting board, then run the lift cord through the pulley. Attach a metal cleat to the wall or window casing to hold the lift cord when the shade is raised.
For a metal-frame window, simply lower the shade and press its sides against the frame; the mag nets will hold the shade. With wood-frame windows, clean the frames with isopropyl alcohol, then mount either continuous strips of magnetic tape or thin steel straps directly behind the shade edges. Press the magnets against the strips on the frame to seal the window. Pull the shade out from the bottom to break the seal.
Inside Shutters for Nighttime Warmth
Two insulated shutters. Both of these removable interior shutters cover a window.
With rigid foam insulation. The edges of the pop-in shutter are protected by aluminum-foil tape, with adhesive-backed neoprene at the top and bottom edges. Magnetic tape on the window side of the shutter holds it to metal shelf standards or to strapping screwed onto the window casings. Duct-tape handles on the sides of the panel break the magnetic seal for removing the shutter from the window.
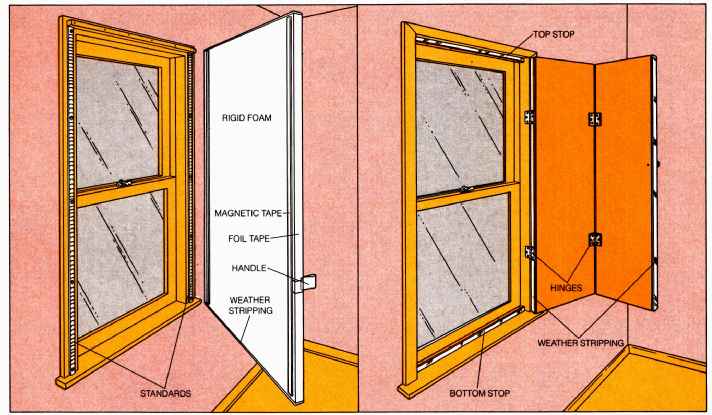
The more decorative bifold shutter is made of two foam boards, covered with wooden door paneling and hinged together. The vertical edges are covered with neoprene weather stripping; the top and bottom edges fit against weather-stripped stops. At night, when the shutter is closed and latched, the weather stripping seals the windows tightly. During the day, the shutter can be folded to one side.
Building a Bifold Shutter
1 Assembling the frames. After measuring the window, build two four-sided frames for the shutter panels, using 1-by-2 kiln-dried lumber. Allow a 3 clearance between the outer edges of the shutter and the window frame and a 1/8 inch gap between the panels. After nailing the framing pieces together, place the frames in the window; adjust the fit if necessary.
Lay the frames on the back of a sheet of ½-inch plywood veneer, and mark the outlines, tracing each frame twice. Cut out, using a circular saw fitted with a plywood-cutting blade. Glue a cut section of veneer onto one side of each frame with carpenter’s glue. Secure the veneer to the frame with %-inch brads placed at each corner and every 6 inches along the edges.
2 Insulating the shutter. Cut two pieces of ¾-inch rigid foam insulation
to the inside measurements of the frames, allowing d 1 clearance on all
four sides. Lay the insulation into the frames, and enclose the insulation
with veneer. Set all the brads in the veneer with a nail set, fill the holes
with matching wood putty, and sand the edges with 120-grit sandpaper. 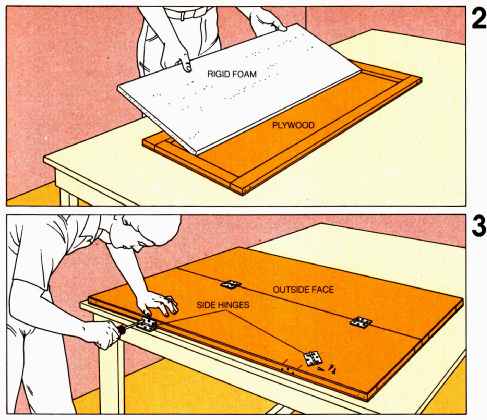

3 Mounting the hinges. Align the panels, out side faces up, inch apart. Connect them with two butt hinges equally spaced about 6 inches from top and bottom. Set two more hinges along the side edge of one shutter, aligning them with the hinges in the center and running the hinge pins along the lower edge of the panel, as shown. Screw the hinges to the panel.
4 Hanging the shutter. Set the closed shutter into the window frame, using wooden shims to position it with a 3 clearance on all sides. Mark the hinge placements on the window casing. Remove the shutter and transfer the marks to the window jamb. Next, while a helper holds the opened shutter in place, mark the position of the screw holes on the jamb. Remove the shutter, and drill starter holes for the screws. Replace the shutter, screwing the hinges to the jamb (above, right). Use screws long enough to reach a stud— inch for drywall, 1 1/4 inches for plaster. If necessary, cut a pair of 1-by-i wood strips the width of the window, and screw them to the top and bottom of the frame to act as stops for the shutter. Attach neoprene weather stripping to the stops and to both of the vertical outer edges of the panels. Screw a knob to the shutter on the unhinged side, and add vertical sliding-bolt latches, if necessary, to hold the shutter closed.
A Potpourri of Window Products
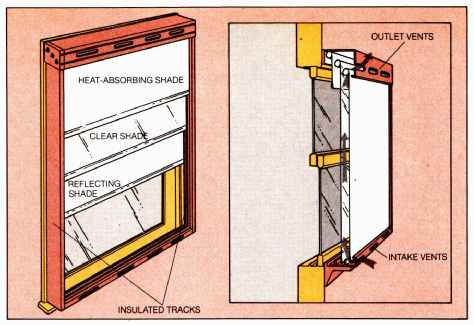
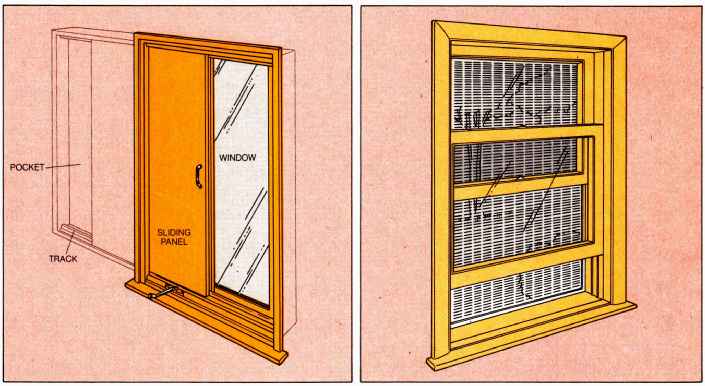
Multipurpose shades. Three plastic shades mounted in an insulated triple track control both the gain and the loss of solar heat. On a winter night, all three shades are drawn to form tightly sealed layers of insulation. On a sunny winter day, the clear center shade and the inside heat- absorbing shade are pulled down to trap solar heat. At about 85° F. a thermostat in the lower frame opens a damper, permitting cooler air from the room to pass through vents into the air space between the two shades. As it’s warmed by the sun, the air rises and wafts into the room through vents at the top (inset). On a summer day, the reflecting shade blocks hot sun light from entering the room; on warm nights, all three shades can be raised and the windows can be opened for ventilation.
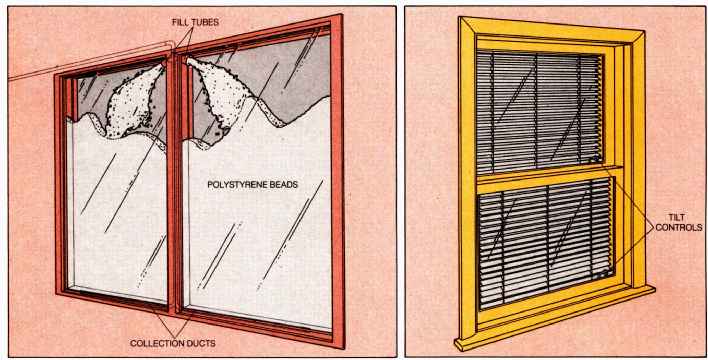
A window full of beads. An ordinary-looking picture window during the day, a double-glazed bead wall is transformed at night: The 2½-inch air space between its two panes of 3 tempered glass fills with millions of tiny styrene beads that increase the window’s R value from 1.5 to 8. The beads are blown in through fill tubes at the top of the window by concealed fans activated by either a toggle switch or an automatic heat sensor. In the morning, the sun starts the fans again, but in reverse, creating powerful suction to draw the beads out through ducts in the bottom of the frame and up into a holding tank, leaving the window clear again.
Built Venetian blinds. A double-pane window encloses thin Venetian blinds within a 13 inch air space. The slats, which can block 80 percent of the sun’s rays, may be tilted—but not raised—by controls at the bottom of each wooden sash. If the tilting mechanism malfunctions, the inside window pane can be snapped out so that the blinds can be repaired.
A pocket window. Set on tracks in the frame of a casement window, a 1½-inch wood-faced panel of rigid foam insulation slides in and out of a 4-inch pocket built into the adjacent wall. The window, panel and pocket are sold as a single prefabricated unit to be installed in a new wall; providing a pocket in an existing wall is an operation that requires extensive alterations.
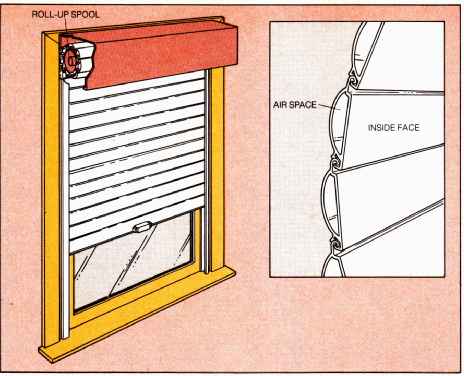
A shade made of hollow slats. This indoor blind is made of hollow, interlocking slats of rigid PVC plastic (inset) that roll up and down inside an insulated track. The air space inside each slat forms a thermal barrier. The shade is raised and lowered manually on a spring-tensioned spool, as shown here, or mechanically by a small electric motor available as optional equipment from the manufacturer.
Solar screening. Rows of tiny louvers in these aluminum screens block out 80 percent of the sun’s rays, even though the surface of the screen is transparent and 70 percent open. The solar screening is available in sheets that can be cut to any window size and installed in frames designed for ordinary insect mesh.