AMAZON multi-meters discounts AMAZON oscilloscope discounts
Power tools produce a tremendous amount of dust. In addition to the mess this creates, long-term expo sure to airborne particles can lead to chronic respiratory problems.
You can protect your lungs by wearing a dust mask or respirator. A more thorough solution is a sys tem that collects dust at the source. This system combined with good ventilation or an air-filtration box can remove virtually all wood dust from shop air.
Portable Dust Collection: Shop vacuums and portable dust collectors can be wheeled around and hooked up to any tool. Vacuums offer the most economical solution. Powered by universal-type motors, they have good suction capacity; however, they can't move huge volumes of air or manage large wood chips such as those from a planer or jointer. Portable dust collectors (below) are designed to handle much more waste than shop vacuums.
With either machine, you need a means of directing dust from the tool to the collector. The simplest solution is to attach a vacuum hose to the tool with an adapter or a shop-made dust hood (opposite).
A Central System: Instead of removing the dust at each tool, you can assemble a system in which all the shop tools are connected with ducting or polyvinylchloride (PVC) pipe to one stationary dust collector, or to a large portable model. A dealer can help you choose the best machine for your shop. If you use PVC, ground it to prevent the buildup of static electricity (Step 2), which can ignite wood dust.
TOOLS:
- Screwdriver
- Hammer
- Tin snips
- Hacksaw
- Coping saw
- Electric drill
- Caulking gun
- Dust collector
MATERIALS:
- Hose clamps
- PVC pipe, Ys, reducers, sweeps, caps, and elbows (3” or larger)
- Perforated metal strapping
- Roofing nails (1 1/2”)
- Hardboard 1/8”
- Jumper wire Stranded copper wire (14-gauge)
- Wire caps
- Duct tape
- Silicone caulk
- Flexible hose (3’)
- Reducers and adapters
- Wet/dry vacuum hose and head
SAFETY TIPS: Wear goggles when nailing or when using power tools. Put on heavy-duty gloves when handling sheet metal.

The workings of a dust collector.
Portable dust collectors can be wheeled to any tool in the shop or hooked up to a modest central system. A machine rated to move at least 500 cubic feet of air per minute is adequate for most home workshops.
The machine shown here is a two-stage collector. Debris- and dust-laden air is drawn in below the motor so most of the heavier particles drop into the waste container. The finer dust passes through the blower and into the filter bag. Filtered air is exhausted from the machine.
COLLECTING DEBRIS AT THE SOURCE
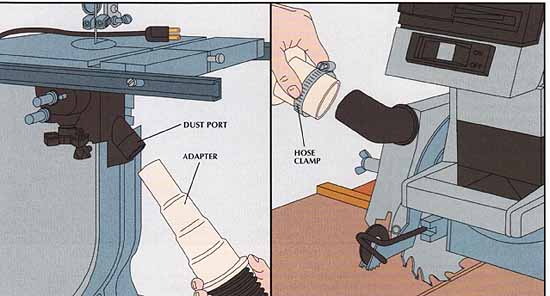
Connecting to a dust port.
Choose an adapter for the dust-collector or shop vacuum hose that connects to the tool’s dust port snugly with a friction fit (above, left). If the part of the tool with the dust port moves, such as the motor of a radial-arm saw, reinforce the adapter with a hose clamp (above, right).
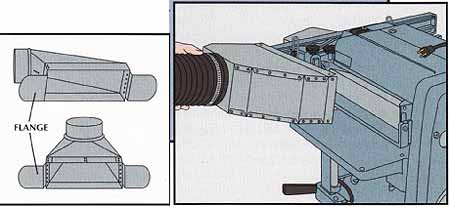
Shop-Made Metal Dust Hoods
|
INSTALLING A CENTRAL SYSTEM
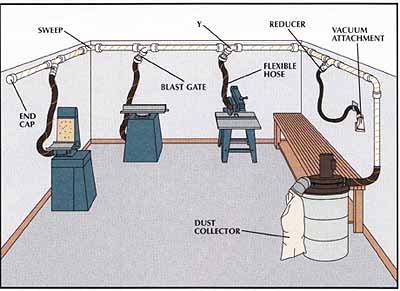
Layout of the system.
In this workshop, 3-inch PVC pipe — connected to a dust collector at one end and capped at the other—runs along the wall above stationary tools and the workbench. The pipes are suspended from ceiling joists with hanger straps (Step 1, below). Sweeps that turn corners in a radius of 24 inches or more are less likely to get clogged than standard pipe elbows. Ys branch to flexible hoses running to the machines and to a vacuum attachment at the bench. A short length of pipe attached to each Y contains a blast gate, either commercial or shop-made (Step 2, below), used to cut a tool off from the system when the tool is not operating.
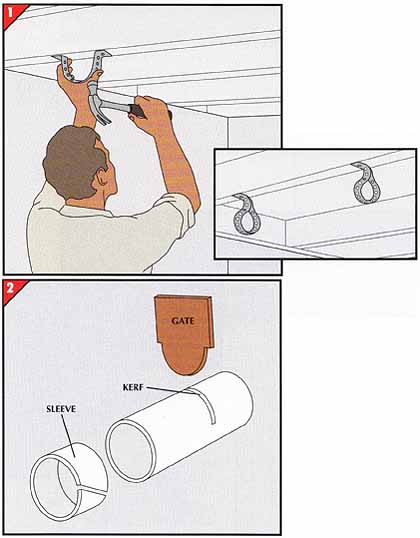
1. Attaching the hanger straps.
• To form hangers—you’ll need one for every 4-foot run of straight pipe and another for each side of all elbows and Ys—mold 12-inch lengths of perforated metal strapping around a section of 3-inch PVC pipe.
• For a pipe running perpendicular to ceiling joists, bend out the ends of the hangers to form flanges. Nail through the flanges into a joist with 1 roofing nails (left). For a pipe running parallel to a joist under a finished ceiling, bend the ends of the hanger so they overlap and nail it to a joist through both ends at once (inset). For an unfinished ceiling, nail the straps to the sides of the joist.
2. Making blast gates.
Commercial devices are available, but you can also fashion inexpensive blast gates.
• For each gate, saw a 1/8-inch kerf halfway through a short section of 3-inch PVC pipe.
• Cut a gate from 1/8-inch hardboard to fit in the kerf, then saw a semicircle in one half of the gate the same size as the inside diameter of the pipe; leave the other half intact so that it can protrude from the kerf to form a handle.
• To seal the slot when the machine is in use and the blast gate is removed, cut a sleeve from the same size pipe with a diagonal slit to allow it to fit around the pipe and slide over the kerf.
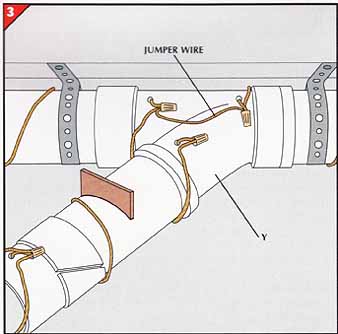
3. Joining and grounding pipe sections.
• Drill a 1/8-inch hole through both ends of each Y.
• Run 14-gauge stranded copper wire through a length of pipe, then slide the pipe through the hanging straps.
• Thread the wire through the drilled hole in the Y, then fit the Y onto the pipe. Do not use PVC glue, but if any Ys are loose, secure them with duct tape.
• Wrap another wire around the outside of the pipe.
• Twist together the inner and outer v res with jumper wires to join the first length of pipe to the Y, and fasten them with a wire cap. Seal the hole with a dab of caulk.
• Continue adding pipe and connectors, grounding each elbow in the same way.
• Ground each blast gate but, instead of a jumper wire, add a wire long enough to reach the tool; then insert the blast gates in the Ys.
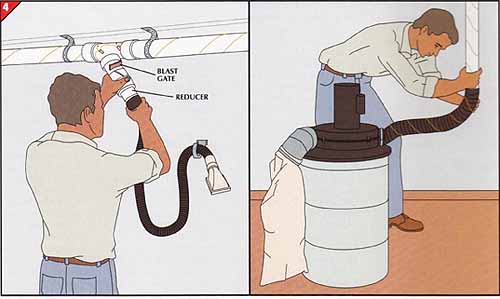
4. Attaching hoses to the machines.
• With 3-inch flexible hose, connect the vertical branches to the tools, adding adapters and reducers as necessary. The flexible hose does not require grounding, but wrap the long wire around it, and attach the wire to the grounding screw on the tool’s motor or switch.
• To make the vacuum attachment, buy a hose and vacuum head for a wet/dry vacuum and fit them together. Fasten a hook to the wall to hang the hose. Plug a reducer into a vertical branch, then fit the hose cuff around the reducer (above, left).
• Hook up the dust collector to the end of the run of pipe with 3-inch flexible hose (above, right); secure the hose with a hose clamp. Attach the ground wire from the main run of pipe to the grounding screw on the switch or motor of the collector.
• At the far end of the run, close off the end of the main line with an end cap.
Prev.: The Modern Home Workshop: Article Index
Next: (none)