Making Exterior Changes: Converting a Garage
| Home | Wiring | Plumbing | Kitchen/Bath |
|
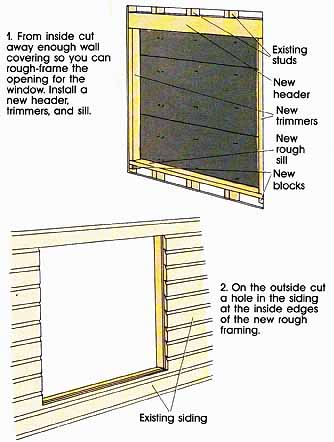
Converting a garage provides an easy means of gaining new living space. In most cases the space is dry, well ventilated, and completely weatherized. The floor is solid and the walls are generally ready for finishing with wallboard or paneling. In short, the typical garage offers 200 to 500 square feet of first-class real estate just waiting for improvement. Before you charge ahead, however, check the building code for restrictions that may apply. In some areas the code specifies that each home must have en closed off-street parking. It this is the case, you can’t legally convert the garage to living space. The code may require additional windows, especially ii the space will be used for sleeping. If you need to add windows, click here. To add a conventional door or sliding glass doors, click here. One of the first problems you’ll face is the driveway leading to the garage. Often it’s desirable to leave the slab in place and use the driveway for parking. You can build planter boxes between the house and driveway to camouflage the division. Or you can remove the drive way by breaking up the asphalt or concrete surface and removing the pieces. Use a sledgehammer and pick ax or rent an electric jackhammer.
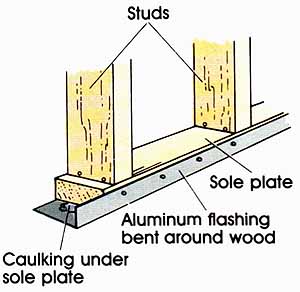
Replacing the Garage Door Removing the garage door generally means disassembling the unit in place. Garage doors vary a great deal in how they are assembled. Refer to the installation instructions if you still have them. Otherwise you may need to call an owner-builder center for specifics on your unit. Since the door is heavy and the springs can be very dangerous, get help in handling it. If the door is spring- balanced (most are), open it and prop it in place with several 2 by 4s to relieve the tension. Find the bolts or S-hooks that release the tension on the springs and disconnect them carefully. Then remove the props and close the door slowly to keep it from slamming shut. Disassemble the hardware and tracks. If the door is hinged in several places, take it apart in sections light enough to carry Use a flat bar to pry the exterior trim from around the door. With the overhead door and trim removed, frame a new wall to enclose the garage. One difference here is that the framework requires no top plate. Simply leave the existing header in place and toenail the studs to the bottom of the header. The sole plate can be nailed to the slab with concrete nails, but lag bolts and expansion shields 24 to 30 inches apart are preferred. Since the sole plate is in contact with masonry, coat it with preservative or use pressure-treated lumber. Mark the header and plate for the location of new studs 16 inches o.c. (Make sure the positions of the lags and studs don’t conflict.) If you plan to add a window, frame the opening as shown above. The window header bears no weight, so use two 2 by 4s laid flat. To create a termite barrier beneath the sole plate of the new wall, cut a piece of aluminum flashing as long as the sole plate and 7 to 9 inches wide. Bend the flashing at an oblique angle, as shown in the illustration. It works best to bend it over the edge of the board. Apply a bead of caulking to the slab and press the flashing in place. Add more caulking and bolt the sole plate over it to the floor. Once the frame is complete, cover the exterior with sheathing. Check the existing sheathing on either side of the opening. It’s not essential to use the same material, but the new sheathing should match the thickness of the old. Or nail furring strips to the studs to build the proper thickness. Sheathing grade plywood ½-inch thick goes up fast and provides a solid nailing surface for all types of siding. Apply the panels horizontally with 8d nails spaced o inches apart at the edges and 12 inches inside the field. Stagger the joints on different studs. To allow for expansion leave a gap of 1/16 inch at the ends and 1/8-inch at the edges. Staple or nail building paper over the plywood, overlapping the paper about 6 inches. If the siding doesn’t require a continuous nailing surface—such as clapboard applications—treated fiberboard sheathing can be used. Panels are generally 2 by 8 feet in size and 1/2 inch thick. Secure the fiberboard to the studs with 6d roofing nails spaced 3 inches apart at the edges and 6 inches elsewhere. Solid boards are the least expensive type of sheathing but take more time to install. Apply 1-by-6 or 1-by-8 boards diagonally and nail with two or three 8d nails at each stud. Cover the boards with building paper to minimize air and moisture penetration.
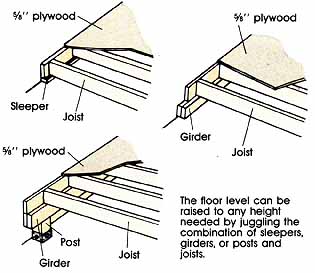
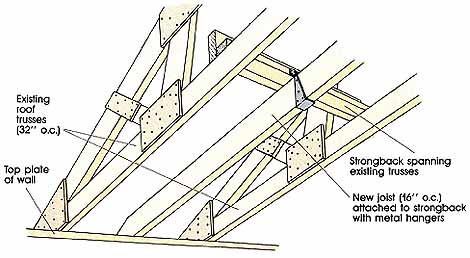
Finishing the Exterior To finish the exterior you have three options: (1) remove the old siding surrounding the opening and re-side the entire wall, (2) fill in the space with new material that doesn’t match exactly but harmonizes with the old, or (3) patch new pieces of the same type of siding into the material already in place. If the old wall was a little larger than the doorway itself, the first option is easiest. Remove the old material completely and re-side the wall as in new construction. The second option is feasible if you are adding new windows that extend across the width of the opening. The only area that needs to be covered is beneath the windows, so use plywood siding or cedar shingles to contrast with the surrounding material. Landscaping under the windows can be used to minimize the difference. The third option, and usually the most difficult, is patching old and new siding. This is desirable only when the garage door wall is an extension of another wall of the house. It’s essential to blend the new pieces carefully; otherwise the joints will always be obvious. This is practical only with certain types of siding, such as cedar shingles or horizontal lap siding. To pry up a section of lap siding, insert a pry bar underneath at the edge of the opening. If you need to cut a long section, drive several pieces of shim stock under the board to be cut. Slip a hacksaw blade underneath and cut the nails. Mark the piece with a square and make a smooth vertical cut with a backsaw or reciprocating saw. Continue the process all around the opening, cutting every other row and staggering the joints. Alter the new siding is pieced in and nailed, fill the joints with wood putty or glazing compound. To patch cedar shingles, cut every other row with a utility knife and pull out the pieces. Unexposed nails can be cut with a hacksaw blade. Nail in new shingles and stagger the joints. The shingles will weather in a year or so to blend with the old. Or, if you can find them, use old shingles salvaged from another project. Finishing the Interior To prepare the garage floor for finishing, refer to the section on basement floors. With a few exceptions the problems are similar. The basement is generally well below grade, so insulation under the finish floor is optional. But a garage floor is at ground level and subject to greater fluctuations in temperature. For comfort and energy conservation, extra insulation under the floor is advisable in cold climates. In most cases 3 ½-inch fiberglass batts or 3 rigid panels are sufficient. Check with the building department for the R-values in your area. Prepare a subfloor and place the insulation between the sleepers. The vapor barrier should face toward the inside of the room. In many attached garages the concrete slab is be low the floor level of the rest of the house. This problem can be solved in either of two ways: save the existing step or raise the height of the subfloor. If you need to build a new step because the ceiling height won’t allow raising the floor, check the local code first. You may be required to build a landing at least 36 inches square. Construct the framework with 2 by 4s and nail to the subfloor. H steps are necessary, follow the formula for rise and run used in building a stairway. If you have sufficient headroom in the garage, the subfloor can be raised to any height needed. Simply juggle the combination of sleepers and joists to achieve the right level. For example, 2-by-4 sleepers laid flat, plus 2-by-a joists set on edge, plus 5 plywood will raise the height of the floor 7 inches. If the floor must be raised 13 inches run a 4-by-a girder (two 2 by 6s nailed together) down the length of the garage. Then span the width with 2-by-8 joists. If the floor must be raised more than this, let’s say 18 inches, raise the girder with 4-by-4 posts set in metal supports. Secure the supports to the slab with expansion shields and lag bolts. Other possible combinations include 2-by-3 sleepers, 2 by 4s with 1 by 4s on top. 2-by-10 joists, and so forth. Depending on the size of the garage, one or two joists will span the width. If 2-by-4 joists are used, place the supporting sleepers every 4 feet; for 2 by 6s, every 6 feet. If two joists are used, overlap them and nail together with 16d nails. Toenail the ends of the joists to the sole plate. If the walls are covered with wallboard, cut away sections to provide access to the plate. If the joists span more than 10 feet, add blocking between them for greater stiffness. Garage slabs are often sloped slightly for better drainage, so shim under the sleepers or joists to level the subfloor. You will need to install a plastic vapor barrier either directly on the slab or between the joists and the subfloor. If you want extra insulation or anticipate moisture problems, put the plastic right under the subfloor. In most garages the studs are exposed and ready for finishing. Add insulation, a vapor barrier, and ‘/2-inch wallboard. If the walls are already covered with wall board, probe behind the surface to see if it has been insulated. If not, call several professionals and get bids for blowing in loose fill. If there’s no fire-blocking in the wall cavities, you may be able to cut notches along the top of the wallboard and pour in the insulation yourself. To create a vapor barrier, paint the wall with two coats of oil enamel, or a sealer followed by a coat of alkyd paint. Another possibility is to remove the existing wall board, add fiberglass batts, and apply new wallboard. This requires some effort, but the total cost may be lower than that of blowing in loose fill. If you live in a mild climate, the most cost-effective approach may be to leave the walls intact, uninsulated. If the existing collar beams are at the right height and made of 2-by lumber, use them for finishing the ceiling. Add new ceiling joists as necessary, 16 inches on center. If trusses frame the roof and the span is too great for a single joist, nail strongbacks to the trusses and hang new joists from them. Insulate between the joists with fiberglass batts, and the ceiling is ready for finishing with wallboard or tile. Don’t forget to include a scuttle for access to the newly created attic space.
When you still need more room and have exhausted all possibilities for converting unused areas of the house into living space, it’s time to consider an add-on. You have three options for expanding your home beyond its present limits: (1) adding out at ground level, (2) adding up with a second floor, or (3) adding down by excavating a basement. All three types of projects involve extensive new construction, structural modifications to the existing house, design skill in blending the new with the old, and securing proper permits. For detailed instructions on building the foundation, floor framing, wall framing, roof framing, sheathing, siding, and roofing, Basic Carpentry Techniques. For finishing off the addition, see Basic Carpentry Finishing Techniques. This section will focus on problems that are unique to joining new and old construction. If you plan to add a new deck or patio, see our guide, How to Design and Build Decks and Patios.
Ground-Level Additions A number of factors enter into planning an addition at ground level:
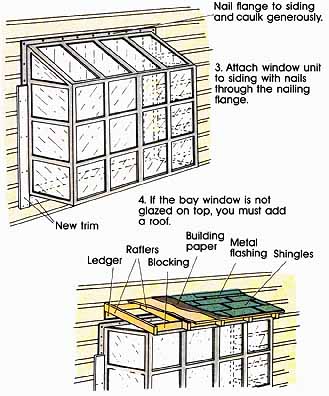
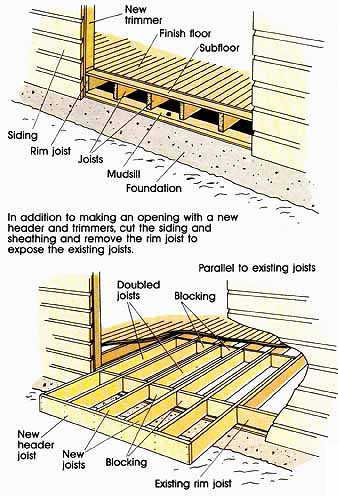
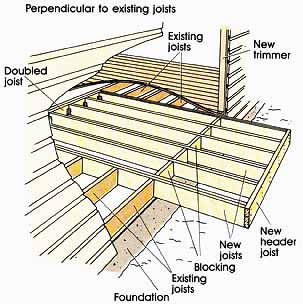
When these considerations, as well as numerous others like cost, choice of materials, traffic flow, and use of space, are all factored into a final design, you can draw up plans, take out permits, and proceed with the job. For information on building plans and permits, see our index on the home page. This type of addition is quite suitable for a do-it- yourself project. The techniques are common to all new construction and are easy to learn about. The job can stretch out over time because the house isn't disturbed by construction debris or weather until the separating wall is actually removed, after the addition is completely closed in. Finally, access and movement of materials are easy since all the work is close to ground level. Push-outs. The simplest type of ground-level addition is to push out the walls with one or more bays. A pre fabricated window unit makes the task even simpler. All you do is make a rough window opening in the exterior wall and frame it with new trimmer studs and a properly sized header. Then attach the new window unit to the outside. Caulk the joint between new window and old siding, and cover with new trim boards. The top of the window unit will either be glazed or require roofing. which is a simple matter of building short rafters, attaching sheathing, nailing on shingles, and installing flashing where the new roof joins the side of the house. The inside is finished out with wallboard patching and wood trim. The bottom of the window can either be a plant rack or be modified into a window seat with cushions. A larger push-out, which still requires no new foundation, can be built by extending the existing floor sys tem with new cantilevered joists, usually 4 to 5 feet out from the house. Start by removing siding and sheathing that cover the existing floor framing along the length of the proposed push-out. Then remove the perimeter joist or rim joist to expose the ends of the floor joists. Nail a new joist of the same depth next to each exposed joist so that no more than one third of its length extends outward to form the cantilevered floor of the new push-out. For example, if the addition extends 4 feet out, install 12-foot joists, with 8 feet doubled against the existing floor joists. Be sure to install blocking between the joists where they cross over the foundation sill or cripple wall, and at the end of the new joists where they are doubled against the old. Add a header joist at the end of the new joists. If the existing joists aren't perpendicular to the wall, but run parallel, you must cut out sections of five or six of them to be able to run cantilever joists 8 feet back under the floor. The last remaining joist should be doubled, as with a new stairway, and the new cantilever joists anchored to it with metal joist hangers. The cantilever joists now bear 8 feet of the existing floor, as well as the 4-foot push-out. The two outside cantilever joists should be doubled up because they are bearing all the cut ends of the original joists as well as their own loads. This system may require additional support from a new post and pier. Get help in analyzing the floor loads. Once the floor framing for the push-out is completed, nail down a subfloor and frame up the walls with conventional techniques. Be sure the new framing ties directly into the old. Remove siding and sheathing to expose the old framing. If an existing stud isn't avail able to tie into, add a new stud or entire corner assembly within the cavity of the old wall. For the roof, either extend the existing roof eave out over the push-out or build a small shed roof that ties into the end wall of the house if the push-out is located on the gable end. The opening between push-out and existing house should be spanned by a properly sized header so that the roof and ceiling loads are still carried directly down to the foundation. The main advantage of a simple push-out is that it’s easy to build. It isn't possible with slab foundations or other foundations that lack a wall high enough to cantilever out from. Another limitation is that this type of addition adds very little space, although for enlarging a cramped kitchen or expanding a living room it may be just the solution.
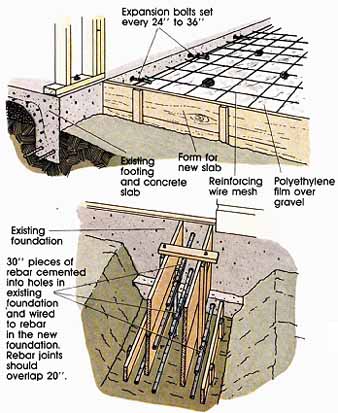
Room additions. The first task in adding a whole room is laying out the perimeter of the new foundation with string lines. Normal batterboards and techniques for squaring the corners are used, except that room additions present one situation that's unique: the house itself may be out of square. If the addition goes on a back corner of the house, where one of its walls becomes an extension of the side wall, it's important that the new foundation and walls be in line with the side of the house, even if that side isn't perfectly square with the back of the house. When running the string line for that side of the addition, site along the side of the house and align the string visually, rather than square it a perfect 90 degrees from the back of the house. All other string lines and corners should be square. Excavation for the new foundation is the same as with new construction, except that it may be impossible to get a backhoe or other large equipment into the backyard. In that case, digging by hand is the only solution. The problem is further compounded by having to remove dirt by wheelbarrow or similar device, unless it can be left in the backyard. In any event you must dig trenches for the foundation footings, and may need to remove some topsoil if a crawl space is required. The foundation for a room addition involves straightforward techniques for building forms, setting rebar, placing concrete, curing concrete, and stripping forms. The complexity of the job will vary with the style of foundation, slope of the grade, accessibility, and over all size. The style of the foundation is generally the same as that of the house in order to maintain uniform floor levels. The following points are important to consider when joining a new foundation to an old:
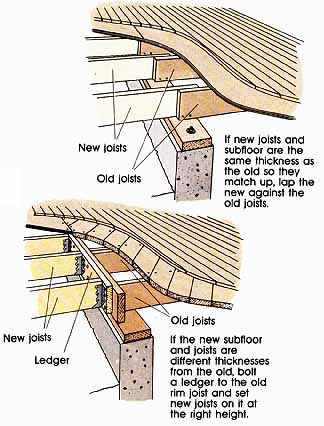
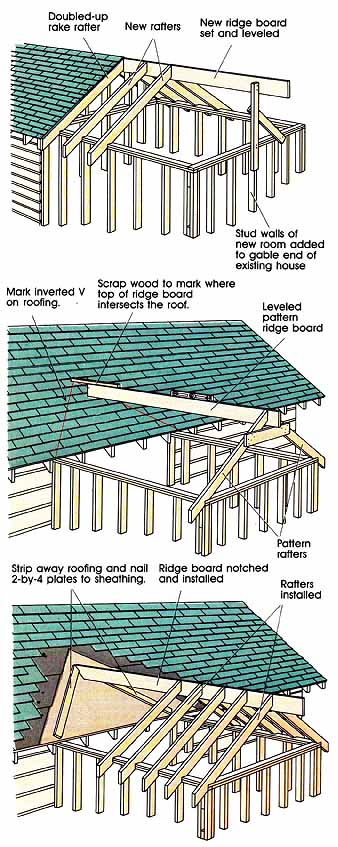
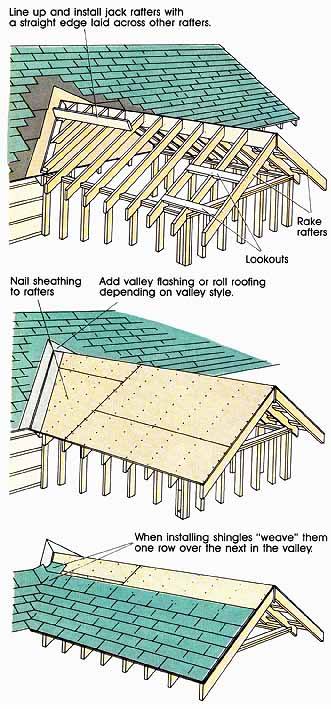
Like the foundation, the floor, wall, and roof framing for a ground-level addition are also straightforward except for tying into the existing house framing. Floor joists can be connected by removing the old rim joist and lapping new joists against the exposed ends of the house’s joists. If the new subflooring material will not match up with the old, it's better to leave on the rim joist and butt a ledger to it that's one size larger than the new joists. Then attach new joists to it with joist hangers so they are high enough for the new and old subflooring to match up. As with simple push-out additions, the wall framing must be tied directly into the house’s framing. When connecting new framing to the old, strip away only enough sheathing and siding for access to the connection points. Wait until the addition is closed in before removing the rest of the exterior wall material. Techniques for tying in the roof framing vary with the design. If the addition is on the gable end of the house, the new rafters will be framed parallel to the old, and the point of connection is simply the first pair of new rafters doubled up against the existing rake rafters on the end of the house. A more complicated connection occurs when the ridge line of the new roof runs perpendicular to the ridge of the existing house. Then the new roof is tied into the slope of the existing roof, usually some distance be low its ridge, creating two new valleys. Frame the new roof by cutting a full pair of pattern rafters. Temporarily support them on the far end of the addition so they hold one end of the ridge board in position. Level the ridge board and mark exactly where it intersects the slope of the existing roof. This point is the apex of the inverted V where the new roof intersects the existing roof slope. Mark this V on the existing roofing material with a nail and strip away enough roofing so 2-by-4 plates can be nailed directly onto the sheathing along the path of the V. Drive 10d nails through the 2 by 4 and sheathing into the rafters below. Cut an angle on the end of the ridge board so it will lie on the apex of the 2-by-4 plates. Make sure it's level. Then use the two pattern rafters at the far end of the addition to mark and cut the rest of the full rafters. Nail the first pair in place, securing one end of the ridge board to them and its other end to the apex of the root plates. Nail the rest of the full rafters in place toenailing them to the cap plates with three 10d nails and alternately face nailing and toenailing them to the ridge board with 10d nails. Then cut pairs of progressively shorter jack rafters to fit between the ridge board and roof plates. Cut and fit each pair carefully so they maintain the same roof plane established by the full-size rafters. The best way to check is to lay a long straight edge across their tops. With the rafters in place, nail down the roof sheathing—either ½-inch plywood for composition and most rigid roofing materials, or 1-by-4 slats for wood shingles.
Where it intersects the old roof, cut and nail it so its edge fits snugly against the old sheathing to provide a solid nailing surface, without gaps, along the newly created valleys. Lay plywood perpendicular to the rafters. Roofing for the new addition must be tied carefully into the old. Choose roofing material that matches the old, unless you are reroofing the entire house. If the new roof is simply an extension of the old gable roof, tie the new roofing material into the old by removing one shingle at the end of every other course of old roofing. Then start the new shingles for each course where the old course ends. That way seams between the old and new will be staggered and not line up in a straight line from eave to ridge. For roof intersections with one or two new valleys, apply valley flashing first. If the old roof is being re roofed, lay the flashing over the old material. If not, care fully tuck the metal ribbed flashing, or 90-pound roll flashing, under existing shingles all the way up the valley, You will need to remove individual nails first, to make sure the flashing extends the required 8 to 10 inches up under the roofing on each side of the valley. Once the flashing is in place, apply new roofing over it and the rest of the addition. Siding for the new addition should either match the old or provide a pleasing contrast of texture and color. To make a contrasting material look more harmonious and less “stuck on,” it sometimes helps to have the side of the addition set back about 6 inches where it joins the house. (For matching new siding to old, see our earlier discussion garage conversions.) The new windows should also match the old as much as possible. The rest of the ground-level addition, such as plumbing, electricity insulation, and finish trim, uses the same techniques as new construction or basic interior remodeling. When removing part or, all of the exterior wall, be sure to install a beam or header of proper size. Final Considerations Each type of room addition has unique advantages and construction problems that must be considered. One more factor, which will ultimately depend on the site orientation and local climate, is energy efficiency. A basement, for instance, shares the advantages of earth- sheltered housing such as superior insulation and modulated temperature swings. A ground-level or second- floor addition can take advantage of any solar exposure simply by having predominantly south-facing glass and a roof slope suitable for mounting solar collectors. In all cases the addition itself can be a sunspace that collects, stores, and distributes solar-generated heat or cooling to the entire house. When building room additions, as with all re modeling projects, you should make your home more energy-efficient and structurally sound than it was be fore. Above all, learn how to enjoy the process of re modeling and not just focus on the completed job. As you make positive changes in your home, you will bring positive changes to your home environment, whether the project is adding a window or adding a room. |
| HOME | Prev: Building a Dormer | Next: Working with Professionals |

