You may wish to create space to run HVAC, reposition an attic hatch, or replace an old ceiling that has become distorted and unsightly. Three ways of replacing a ceiling are shown here. The method chosen depends on your particular needs and preferences. Do not plan any change without considering its structural consequences—a structural engineer can advise on whether a bowed ceiling should be completely replaced, joists and all, for instance. You may take the opportunity, while redoing a ceiling, to add insulation or soundproofing. Also plan for later decoration.
THINGS TO CONSIDER
Remember to use a detector to check whether there are any pipes or wires beneath a surface before inserting any nails or screws. For wood-frame homes, you need to find the joists so that you can screw into them. Do not attach directly to drywall.
If you are lowering a ceiling that features a light fixture or fan, simply remove the fixture, extend the wire, and reattach the fixture.
CUTTING AN ATTIC HATCH
Attic access is important for inspection purposes as well as storage. If you need to make a new hatch, perhaps because your property does not have one, or because alterations mean it needs to be relocated, consider how you wish to use it, as well as the safety aspects.
Positioning the access hole
Consider the angle at which a ladder will extend through the opening, if relevant, and if it will have room to fold or slide into the attic space. Make sure there will be headroom in the attic, and do not position the hatch too close to a staircase. If possible, cut into only one joist to make the opening, because the cuts weaken the structure.
Installing a hatch and ladder
The design of the hatch itself will depend on whether you wish to use a disappearing stair. If you will access the attic via a stepladder, use a simple hatch resting on a section of doorstop. If a disappearing stair is to be installed, you may need a hinged door; check the specifications for the hatch and ladder. Install according to the manufacturer’s instructions.

Above: A simple attic hatch: This method cuts only one joist,
to minimize structural weakening. The attic is accessed with a stepladder, and the hatch rests on a ledge. Architrave; Section of doorstop supports
the hatch; Simple hatch; joists above ceiling; Lining; Ceiling.
REPLACING A LATH-AND-PLASTER CEILING
If you live in a home that's more than 60 years old, you may have a plaster ceiling. You can either replace it, as described here, or choose one of the options opposite (Google for “drywall” options, and on “decorating”). Removing a ceiling creates a lot of dust and debris, so wear protective clothing, including a respiratory mask (a simple dust mask isn't sufficient).
Removing the ceiling
Use a hammer to break away some of the plaster, and then pull away chunks by hand or with a pry bar, working your way across the ceiling. Once all the plaster is cleared, pry out any remaining nails or screws from joists with a claw hammer or pry bar. Then inspect the joists to see if they are in sound condition before applying drywall.
REROUTING WIRES AND PIPES
Any services that run through a ceiling need to be protected from damage and supported while the ceiling is removed. They may need to be rerouted to suit your new ceiling, but you may be unable to plan this very far in advance.
Locating services for re-routing
Switch off the electricity supply at the panel and water supply. Use a detector to locate pipes and wires, or cut a small inspection hatch and look inside the ceiling to see where services run. When removing a ceiling, proceed carefully—removal may expose some services that you hadn’t previously found. Support all pipes and wires. Once the ceiling is gone and all services are clearly visible, work out the best way of dealing with them in accordance with your plans for the new ceiling and its fixtures.
LOWERING A CEILING
One way of replacing an unsightly ceiling is to create a new one below the old ceiling. This avoids the mess involved in removing an old ceiling.
Technique
Using a level, draw guide lines on the walls for the new ceiling. Attach 4 x 2s along these lines, and attach joist hangers to two of these wall ledgers. Screw joists into the hangers. Attach blocking (strengthening the wood) between joists, to provide attachment points for drywall. A large span will need more blocking than a narrower span. Then attach drywall to the joists ( click here for more info).

Above: A Lowered Ceiling: On a stud drive screws into studs; on masonry,
insert screws anywhere
LEVELLING A CEILING WITH METAL CHANNELS
If joists sag slightly, but not enough to be replaced, achieve a level ceiling by removing the old one, and attaching a metal frame to the exposed joists. Then cover it with drywall.
Technique
Mark guide lines on the wall at the height that you want the ceiling, as described above (Lowering a Ceiling). Attach wall channels along the guide lines, then attach brackets to the joists, at intervals of 16 inches (400 mm) for 8-x-4-ft (2.4-x-1.2-m) boards. Attach channels to the brackets, and then apply drywall to the brackets as shown here.
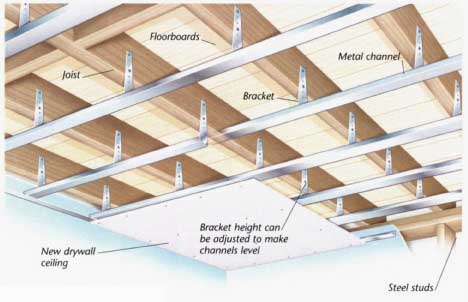
Above: Using Metal Channels: New drywall ceiling; Bracket height can
be adjusted to make channels level.
ADDING A SUSPENDED CEILING
This gives a different look from other ceilings, and offers other options for lighting, as well as acoustic and thermal insulation. It involves hanging a wooden or metal grid from the ceiling, and filling it with panels.
Planning and technique
The grid may not fit exactly, so you may have to cut panels to fit around the edges. Work out the best position for the ceiling to keep even cuts on all sides. Mark a guide line on the walls (see Lowering a Ceiling, above). Attach wall angles, and insert tees (the main channels) and cross tees. Suspend tees from the ceiling above using wires that can be adjusted to keep the framework level. Then insert panels.
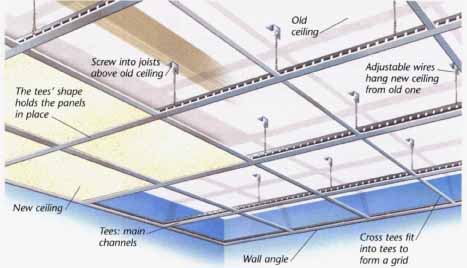
Above: A Suspended Ceiling: Adjustable wires hang new ceiling from
old one; Cross tees fit into tees to form a grid; The tees’ shape
holds the panels in place; Screw into joists above old ceiling; Old
Ceiling; Tees: main channels; Wall angle.