Replacing a Broken Sash Cord
Work from the interior. Use a chisel to pry away the beading holding the inner sash in the frame. Cut any unbroken cords attached to the sash so that you can lift it out. Remove the central staff beads and repeat the process to remove the outer sash. Undo the knots or remove the nails holding the old cords to the sashes. With the sashes removed, you should be able to pry the four weight covers out of the frame to expose the weights.
Threading in the replacement cords
The easiest way to thread the new sash cord over the pulley mechanism is to use a piece of string with a small weight tied to one end -- a small screw or nail is fine. Tie a length of sash cord to the other end of the string. Then, push the nail over the pulley, so it drops down next to the weight. Use the string to pull the new cord over the pulley, being careful not to pull the whole length over. Tie the cord to the weight -- you may need to remove the weight from the frame to do this. Repeat for the other three cords.
Replacing the sashes
Hold the outer sash up to the frame in the fully open position. If your sash cords are knotted in place, pull the cord taut, and mark the cord where it reaches the hole. Lower the sash, then thread the cord through the retaining hole, and knot it at the marked point. If your cords are attached with nails, the technique is similar but you should mark the position of the top of the sash on the taut cord. Lower the sash, realign your mark, then nail the cords in place along the sash edge. Check that the sliding mechanism still fits. Fasten the staff beads in position and refit the inner sash. Finally, replace the weight covers and beading.
TOOLS AND MATERIALS NEEDED
- Basic Toolkit
- Installing a mortise casement fastener: Wood filler sandpaper
REMOVING BROKEN GLASS
Wear thick gloves, work boots, and goggles when working with glass. Put masking tape over the glass to prevent falling shards, then remove the putty or beading and tap out the pane in one piece. If this isn't possible, break the glass and dispose of it carefully. Clean the rabbet before you re-glaze. Here's more information on how to remove glass.
Glass is traditionally held in place by putty or glazing beads. However, aluminum and vinyl windows often use gaskets and cover strips to form a watertight seal. If you purchase windows with a special system, use it as instructed.
BROKEN WINDOWS
It is unlikely that you will be able to replace a broken pane immediately, so do one of the following in the meantime:
- Patch small cracks with clear glazing tape.
- Stick masking tape across badly cracked glass, then stretch polythene sheeting over the window, using furring strips to stop it from tearing. This will keep the weather out until you can reglaze.
- If security is an issue, cut a sheet of plywood or hardboard to size and screw it to the frame.
INSTALLING A MORTISE CASEMENT FASTENER
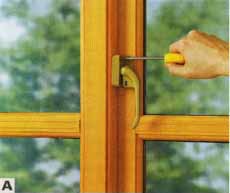
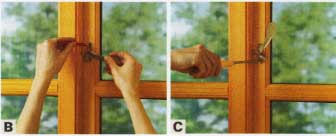
Most side-opening casements require one fastener, although larger ones may need two, as will large awning windows. Installing fasteners is a straightforward procedure that simply requires accuracy in positioning. For hook or wedge fasteners follow steps A-C, below, then pilot and screw the hook or wedge in position on the window frame.


A. Remove the old fastener. Fill the holes with wood filler. Sand
the filler smooth when it's dry. You can buy colored fillers that
are almost invisible in wood with a natural finish. If your window
is painted, you will need to prime over the filler before touching
up the paint. B. Hold the fastener in position and mark the screw holes.
C. Drill pilot holes in the casement frame at the points you have
marked. Screw on the fastener.


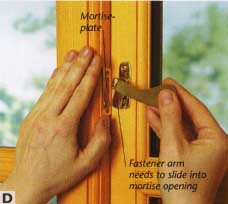
D. Close the casement. Swing the fastener toward the
window frame. Position the mortise-plate so the arm touches the frame
in the middle of the opening. When you are happy with the position,
use a pencil to draw around the edge of the mortise-plate and its central
opening. This will provide a guide for chiseling out the mortise (slot).
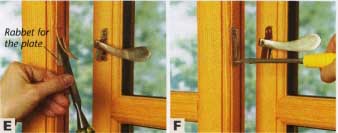
E. Chisel out the mortise and a rabbet for the plate. The mortise depth
should be slightly greater than the length of the arm. F. Mark and drill pilot holes at the attachment positions. Reposition the mortise-plate and screw it in place.