Both carpet and vinyl should be cut at least 6 inch (150 mm) larger than required, with an overlap along all edges. If possible, do the cutting where there is space to roll out the flooring; in dry weather, you may do this outdoors. With a large pattern, leave larger overlap areas so that the flooring can be adjusted to fit neatly. A woven-backed carpet is stretched with a knee-kicker while being fitted and is laid with under-layment and tackless stripping. A foam-backed carpet needs no stretching or tackless stripping.
Tools, Materials and Supplies: Basic Tool Kit, and see this page.
Laying Jute-Backed Carpet
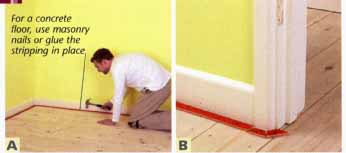
A. Nail down tackless stripping, teeth pointing to the wall. Leave a gap between molding and stripping, a little less than the carpet thickness. For a concrete floor, use masonry nails or glue the stripping in place.
B. To fit stripping around obstacles such as door frames, follow the shape of the obstacle’s base and cut sections with a hacksaw.
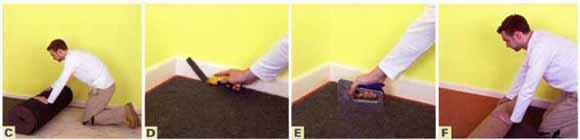
C. Roll out the underlayment across the floor, allowing it to lap over the tops of the tackless stripping.
D. Cut along the inside edge of the tackless stripping to remove any excess underlayment. Leave a neat, flush fit.
E. Staple down the underlayment to the floor, and tape any joints. Or, on a concrete floor, use a commercial adhesive to stick down the underlay.
F. Position the roughly cut carpet, allowing the overlap to run up the walls. Adjust it to the required position, square within the room.

G. To allow the carpet to sit flat, make small cuts at right angles to the corners. Repeat for any other angles in the room, such as alcoves.
H. Trim the carpet around the edges, flush with the base of the wall or baseboard.
I. Use a bolster to secure the carpet to the tackless stripping in one corner.
J. Using the knee kicker, stretch and position the carpet, and work toward an adjacent corner. Secure the carpet in this second corner.
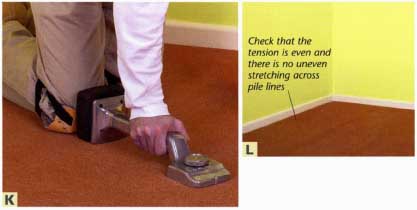
K. Return to the first corner, and work with the knee kicker toward the other adjacent corner. Secure the carpet in this corner. Return again to the first corner, and work with the knee kicker diagonally across the floor to the opposite corner. Secure the carpet. If you need to reposition it at any time, unhook it from the gripper rod.
L. To complete the room, work around the edges of the carpet, fixing it in place behind the tackless stripping.
Seams In Jute-Backed Carpet
Joining lengths of jute- backed carpet is best left to a professional (essential for expensive carpets). If you do decide to attempt it, you will need a hot seaming iron, a seam roller, and seaming tape. Take great care as you move along the seam. Use napping shears to trim the pile along the seam.
Laying Foam-Backed Carpet
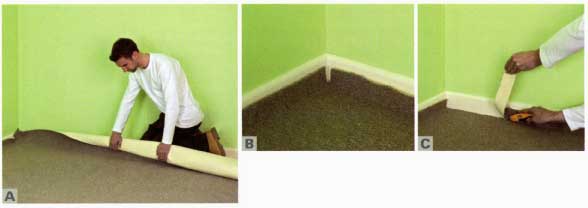
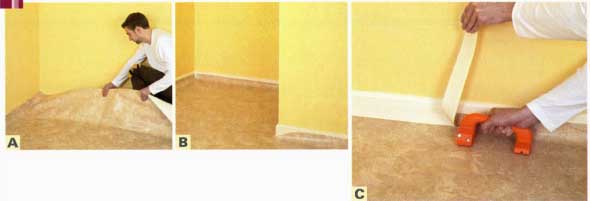
A. Foam-backed carpet does not need an underlayment or tackless stripping. Lay the carpet roughly in place, allowing overlap to run up the walls. Adjust the position until any pattern is aligned squarely within the room.
B. Make small cuts in the corners and any alcoves, to allow the carpet to sit flat on the floor.
C. Crease the carpet into the junction between wall and floor. Trim its edge at the base of the molding, with a carpet knife, as precisely as possible.
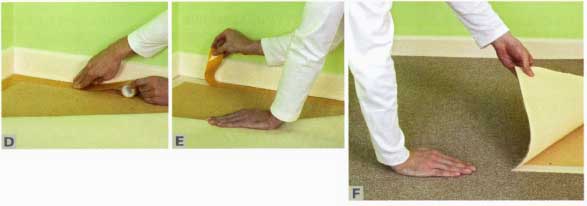
D. Pull back the edge of the carpet. Stick double-sided tape to the floor, all the way around the perimeter of the room.
E. Remove the backing from the top of the tape, in sections. Press the carpet down into place and smooth out any wrinkles.
F. For any joints between lengths of carpet, use double- sided tape along the edges to stick down both pieces of carpet. Slowly smooth the carpet into place by hand, making sure that it does not ripple along the joint.
Laying Vinyl With Adhesive
A. Lay the roughly cut vinyl on the floor, allowing the overlap to run up the walls. Adjust the position to get any pattern squared in the room.
B. Make small cuts at right angles to the corners and any alcoves to allow the vinyl to lie flat on the floor.
C. Crease vinyl into the joint between the wall and the floor. Thin vinyl creases quite easily. Thicker varieties can be made more pliable with gentle heating from a hair dryer (do not apply heat for long). Cut along the edges using a vinyl cutter or utility knife. Take time to ensure that cuts are precise: you can't correct errors later.
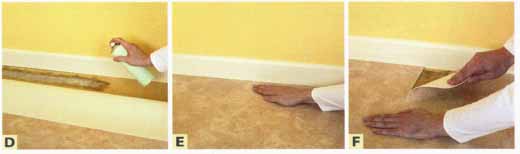
D. Fold back the edge of the vinyl. Spray adhesive on the floor, around the room’s perimeter, or lay double-sided tape if you prefer.
E. Press down evenly on the vinyl, all around the room, to ensure that it lies smoothly on the floor surface.
F. For any joints, use spray adhesive or double-sided tape along the edges between the lengths of vinyl.
Threshold Strips
A threshold strip should be installed at every doorway. The strip type will depend on the floor coverings being joined. Some types of strip are screwed down to the floor surface before the floor covering is fitted into it. In other cases, the floor covering is roughly butt-joined before the strip is installed over it.