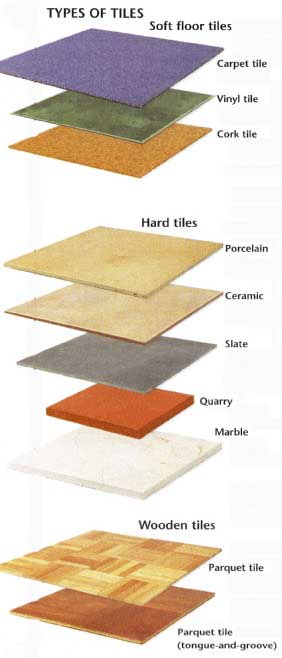
The application methods for soft and hard floor tiles differ, but planning their layout is the same. The only difference is that hard tiles have grout joints, and soft tiles butt right up against each other.
Tools /Supplies needed:
Soft tiles are laid with the items in your basic toolkit and the extras listed opposite bottom. Hard tiles call for largely the same items as are used for wall tiles, with a few key differences, as follows:
- Tiles are very robust, so a cutter must be of a high quality. Check that a score-and-snap cutter, if you use one, is large enough for floor tiles.
- Adhesive and grout must be harder-wearing than on wall tiles, and some tiles need special additives in adhesive for sound adhesion. If you are laying tiles on a wooden sub-floor, buy adhesive and grout with flexibility (check the packaging); additives may again be required.
- Cross-shaped spacers lie flat on the floor and are removed before covering with grout. If the tile depth is insufficient for this, use vertical pieces of thin cardboard. Remove after the adhesive dries.

Soft floor tiles
These may be self-adhesive, or laid with or without adhesive.
Carpet tile: Usually laid dry (i.e., without any adhesive).
Vinyl tile: May be self-adhesive or may need adhesive.
Cork tile: May be ready-sealed, or need sealing once laid.
Hard tiles
These are available in various materials and sizes.
Porcelain: Laying porcelain tiles normally requires special adhesive or additives to standard adhesive.
Ceramic: A wide range of colors and designs is available, some mimicking natural tiles such as limestone.
Slate: A natural material. Apply sealant to the top surface before laying slate. This prevents excess adhesive from soaking into the tile, making it easier to remove later.
Quarry: A natural material. Seal top surface before use.
Marble: Another type of natural tile.
Wooden tiles
These are usually patterned, and are another form of hard tiles.
Parquet tile: Gives appearance of traditional parquet design. Installed with adhesive. May be finished, or may need sanding and sealing after application.
Parquet tile (tongue-and-groove): Tongue-and-groove mechanism locks tile in place. It is laid with adhesive.
Laying a Tiled Floor
Do not just start laying tiles against one wall: the wall may not be straight, and adjustments to allow for this will become exaggerated and unsightly as you progress across the room.
First, find a starting point: Use the center of the room as a base for the layout. “Dry lay” a few tiles, starting in the center and working toward the walls. The last full tile before you hit the wall is at your provisional starting point. (1) Adjust the gap between this and the wall to avoid the need to cut awkward thin slivers. Gap for cut tiles: adjust center to avoid gaps being too narrow. (2) Start laying tiles without adhesive in the center of room. (3) Chalk lines to locate center of room. Note location of door.

Lay the first tile: Consider how tiles will need to be cut to fit around any obstacles. If you can, tile with the fixtures removed, so that edges of tiles are hidden by the replaced fixtures. (1) First tile. (2) Furring strips at edge of full-tile area. (3) Extent of area covered by full tiles. (4) Reasonable size for cut tiles.

Estimating Quantities for Floor Tiles
Basic estimate |
As a basic rule of thumb, estimate quantities by calculating the area of the floor minus the area covered by permanent fixtures. |
Wastage and trimming |
Buy about 10 percent extra— maybe more if you are tiling a floor with many obstacles, because this results in a lot of cutting. |
Adhesives |
Manufacturers’ guidelines for the necessary quantities tend not to be very generous, so it's worth buying a little more than is recommended. |
Grout |
Grout requirement depends on thickness of joints and size of tiles. There will be guidelines on packaging. |
Extras |
Remember to include spacers or sealant if necessary. consider your sub-floor requirements. These extras can add considerable expense. |