Caring for Wood Floors
| Home | Wiring | Plumbing | Kitchen/Bath |
|
The finish on a wood floor protects it from wear and seals it against dust and spilled liquids. Before cleaning a floor, determine the type of finish on it (b). Older floors often have penetrating finishes. These soak into the wood pores and require waxing. Modern flooring more often has a surface finish—typically polyurethane—which forms a protective film and does not need to be waxed. Waxed Penetrating Finishes: To pro long the life of the wax, vacuum or dust- mop the floor weekly before dirt and dust are pressed into the surface. Wipe up spills immediately with a dry cloth or paper towel; use a barely damp cloth for sticky spills. Blemishes can be lifted with the products described. When the wax loses its luster, it can some times be restored by buffing (- 18). If this fails, you can apply more wax, but after two or three coats, the old wax should be stripped first (o). For stripping, use a cleaning/renovating product designed for wood floors; it will both clean and reseal the wood. Before re-waxing, vacuum the floor thoroughly; otherwise, any surface dirt will be incorporated into the new wax. If the wax is worn through in one spot, treat that area only. if the damage extends to the wood itself, the spot can be repaired as described opposite. Buffing waxes are available in two forms: paste and liquid. Both varieties have a solvent base and differ only in the amount of solvent they contain. The thicker paste waxes tend to be more durable and are a good choice for old floors because they fill in small cracks. But liquid buffing waxes are easier to apply, and are adequate for most floors. Surface Finishes: Vacuum or dust-mop these floors regularly and wipe up spills immediately. Worn spots in the finish can sometimes be patched (o), but often the area won’t blend in well with the rest of the floor, if you are not satisfied with the results, try refinishing the entire floorboard end to end. If the floor was waxed, care for it as you would one with a penetrating finish. TOOLS:
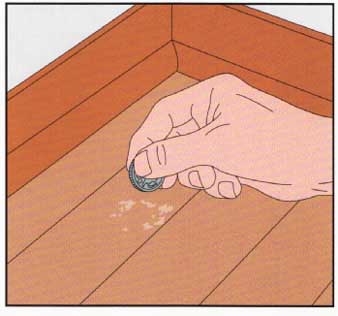
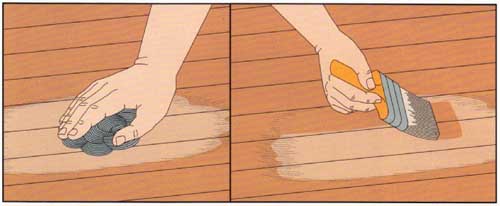
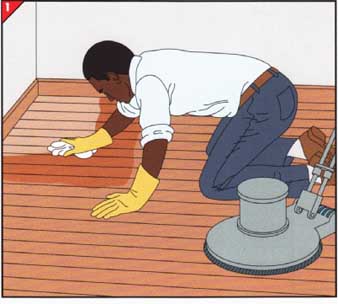
Identifying the finish. Check whether the floor is waxed by scraping a low-traffic spot with a fingernail; if you can scrape off material, it’s waxed. If not, scratch an inconspicuous spot with a coin (r). The coin will make a powdery white mark on a surface finish; if it makes no mark, the finish is the penetrating type. /16 REFINISHING A SMALL AREA Treating the spot. • Remove any wax from the worn area using a cloth moistened with mineral spirits. • With #1 steel wool, rub down to the bare wood, working from the center outward. (If you plan to apply a water-base finish, use 120-grit sandpaper.) Polish the edges of the spot to feather them into the surrounding finish. • Sweep or vacuum up the dust. If the color of the wood does not match the rest of the floor, apply a matching stain and let it dry. • With a 3-inch paintbrush, apply a very thin layer of finish over the bare spot, working with the wood grain in smooth, even strokes to avoid air bubbles. Feather the new finish into the old by starting at the center and lifting the brush at the edge of the spot. • Let the new finish dry, then apply additional coats in the same manner. • If the floor was waxed originally, rewax the spot and buff it with a soft cloth. STRIPPING AND RE-WAXING A FLOOR 1. Removing the old wax. • Open all doors and windows to provide ventilation. • Pour a commercial cleaner/renovator over a 2-foot-square area. • Rub the chemical into the floor with a rented floor buffer equipped with a steel-wool pad. • As the wax dissolves, put on rubber gloves and wipe it up immediately with a lint-free absorbent cloth. • Continue cleaning small sections — changing or turning the pad over when it becomes clogged—until you have covered the entire floor. • Remove residual wax by letting the floor dry and rubbing it lightly with a dry pad of #3/0 steel wool. • Sweep or vacuum up any remaining wax powder.
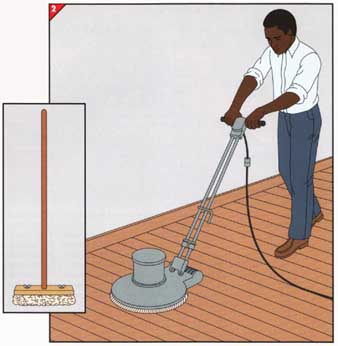
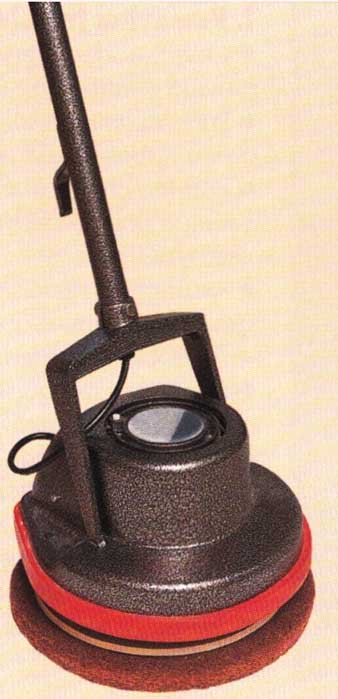
2. Applying new wax. • If you’re applying liquid wax, pour a saucer-sized pool of it on the floor near one wall and spread it with a fleece wax applicator. • Let the wax dry for about 30 minutes, then attach a soft-bristle polishing brush to the floor buffer. Working on one small section at a time, guide the buffer from side to side, paralleling the floorboards. To change direction, tilt the machine slightly for ward or backward. • Buff the edges of the floor with a soft cloth. • Install a white nylon pad on the buffer and go over the floor once to brighten the shine and eliminate any swirl marks. If you’re using paste wax, wrap a lump of wax in a cotton cloth (a sock works well). Rub the cloth on the floor to apply a thin layer— the warmth of your hand will soften the wax. Buff the floor in the same way you would for liquid wax. A Lightweight Home Buffer: For buffing waxed floors or adding wax without removing the existing layer, consider buying a lightweight buffer (l ) rather than renting a heavy-duty model. The buffer weighs only 24 pounds—light enough to be operated with one hand and hung on a wall for storage. It can be equipped with a polishing pad or a fleece pad to buff floors to a high gloss
|
| HOME | Prev: Reviving Wood Finishes | Next: | Article Index |
 //18
//18