The thermostat is the bridge between a
home’s climate-control system and the comfort of its occupants. The
core component of this mechanical-type, temperature-sensitive switch
is a bimetallic coil composed of two thin metal strips. Fluctuations
in temperature cause the coil’s metal strips to expand or contract,
automatically tripping a switch to turn the climate-control system
on or off. Most older thermostats control only a furnace or boiler and often have a simple rotary dial or a lever to set the desired temperature
threshold. Modern versions per form the same function for an air-conditioning
unit as well, and most are programmable so you can preset selected
temperatures for certain times of the day or week. Most thermostats
work on low-voltage current, usually provided by a transformer on the
furnace.

Setback Thermostats
A setback thermostat lets you set varying temperature controls ahead of time; newer units offer electronic programming. By allowing an empty house to get warmer or cooler than normal and adjusting the temperature only when occupants are due or at home, energy consumption is reduced. Some people even adjust them to save energy while they’re sleeping. These thermostats can pay for them selves in short order.Replacing a Thermostat
If your thermostat doesn’t function properly or doesn’t offer programmable features, you can replace it with a new one, provided it operates on the same voltage and is compatible with your climate-control system. Most gas or oil forced- air furnaces and air-conditioning units can operate with modern programmable thermostats, but heat pumps, electric baseboard heaters and some other systems require special features. Always shut off the power to the furnace and air-con ditioning unit before making repairs such as this, even with low-voltage systems. Be aware that upgrading to a more versatile or full-featured thermostat may also require replacing the wire feed. (You may have to have a professional installer run new cable for you.) Note the model or specifications of any appliance that’s thermostatically controlled (furnace, air conditioner or humidifier) and have that information with you when you shop for a new thermostat. Verify that the new unit has the programmable features you want, plus a manual over ride you can use without altering the program settings.
Location. If the thermostat’s current location creates false readings from nearby heat sources, sunlight or drafts, reroute the wire feed to another spot. Choose an inside wall; keep it away from fireplaces, heat-generating appliances or drafty windows, and don’t place it above a heat register.
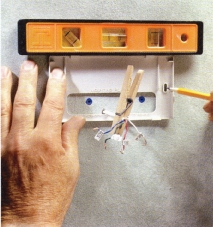
How to do it . Turn off power to the furnace. Disconnect your old thermostat and tie the wire feed into a loop or clip it with a clothespin to keep it from slipping back through the hole in the wall. The wires should be color-coded, but if they’re not, use tape tags to mark the letters of the terminals to which they were attached. Affix the new mounting plate to the wall with screws and anchors; then make the wire connections (and set the programming) according to the installation instructions provided with your thermostat. One final note: If your old thermostat contains mercury (look for a small glass tube with a shiny silver ball inside), don’t throw it in the trash. Mercury is toxic, so the thermostat should be brought to a recovery facility or a hazardous-waste disposal site.
1. Turn off the system power, mark the wires to identify their correct terminal and disconnect the old thermostat. Dispose of the old unit properly.
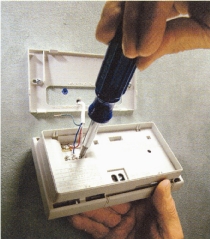
3. Using lettered tape tags to keep track of new hookups, connect the wires to the terminal screws of the new thermostat, then snap onto mounting plate.


Adjusting Thermostats
A thermostat that’s not working properly doesn’t always need to be replaced. As with almost any mechanical object with moving or adjustable parts, some times a tune-up is all that’s required.
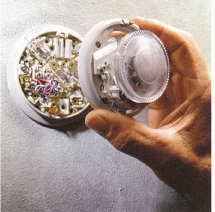
First, check the thermometer, which has to be calibrated accurately to trigger the system on and off as required. Place another accurate thermometer next to the thermostat and adjust the setting; with some types, you use a screwdriver to turn a shaft in the center of the bimetallic coil, but other versions require a wrench or pliers to turn a nut behind the coil.
The next step is leveling the thermo stat itself to ensure that the mercury switch functions accurately.
Finally, set the anticipator. This device controls the on-off cycling by compensating for the heat or cooled air that has yet to make its way through the system. It’s like turning off a stove burner and letting the residual heat in the pan finish cooking the food. The net effect is a more consistently modulated temperature range.

2. The thermostat’s switch is often a glass tube containing mercury, which, when tilted by the movement of the bimetallic coil, flows to connect a pair of electrodes. This connection turns the system on. Leveling the thermo stat provides the base, or off, position for the switch. The anticipator adjusts via a lever and dial to control on-off cycling intervals.


In-line Thermostats
In-line thermostats are used to control single appliances, typically an electric wall or baseboard heater. Newer electronic thermostats maintain a more even temperature by cycling on and off more frequently and sending only the required amount of power to maintain the desired temperature. Some electric heaters consume a large amount of current and require their own dedicated 240-volt circuit; check with the heater’s manufacturer and your local building officials before installing and wiring one of these units.
Caution: Unlike most other thermostats, in-line units have high-voltage wiring.

How they work. Although individual units can vary, the basic wiring for an in-line thermostat is, in most cases, similar in principle to that of a wall switch. The thermostat shown here is a 240-volt unit with two wire leads for connecting to the incoming wiring, called the line wires, and two wire leads, called the load wires, that connect to the lines going to the wall heater. Unlike in a standard wall switch, however, the direction of current travel is critical. Whereas a switch merely has to complete the wire loop to get current to flow and turn on a light fixture, for example, an in-line thermostat has to receive incoming current at the correct terminal(s) and send it out through the correct terminal(s).
Always shut off power at the circuit panel before working on or installing an in-line thermostat .