A gas burner is designed to efficiently burn propane or natural gas to heat water or air in a boiler or furnace. When the thermostat calls for heat, it signals the burner control to open a valve, sending gas to the burner ports, where it mixes with air and is ignited by the pilot light or electronic ignition. Burning gas heats the heat exchanger containing air or water. Combustion gases escape through a vent pipe. A draft diverter hood on the vent pipe or furnace outlet stops air currents from blowing out the pilot light. A thermocouple stops gas flow if the pilot light goes out.
Energy efficiency: If you significantly improve your home’s energy efficiency, you may be able to reduce furnace output. Talk to an expert about reducing the size of the burner’s orifice. To allow an efficient flow of gases, keep the burners and air shutters free of dust and dirt. If you want to convert an oil burner to a gas burner, look into a power burner because it uses less gas.
Maintenance: Have a heating contractor or the utility company inspect, test, adjust and clean the burner as needed every year. To clean the burner yourself, turn off its main gas valve and electric power. Slide the burners out; some disassembly, twisting or lifting may be required. If the pilot and thermocouple are attached to a burner, remove them. Clean the burners, air shutters and combustion chamber with a stiff brush, then vacuum. Unplug gas ports carefully with a toothpick.
continued....

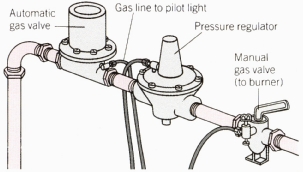
The gas train: An automatic gas valve regulates flow of gas supplied to burner; an automatic pressure regulator controls gas pressure. In newer systems, they are combined in a combination control. A pressure regulator is supplied by the utility company in areas where gas pressure is medium to high. Don't try to adjust the regulator yourself; call the utility for service.
Components of a Gas Burner and How it Works
| To burn gas efficiently, the air and gas mixture should be adjusted until flame burns as shown in bottom picture. | |
| Wrong. Not enough primary air; yellow tip, lazy inner flame. |  |
| Wrong. Too much primary air; sharp, blue, hard inner flame. | |
| Right. Soft blue-green inner flame. | |

How It Works. When the thermostat calls for heat, it signals the burner control to open a valve, sending gas into the ports in the burners. There the gas mixes with air and is ignited by a pilot light or electronic ignition. Burning gas heats the heat exchanger, the chamber containing air or water. Combustion gases escape through a vent pipe. :
Caution: Make sure the burner has an adequate air supply; an outside air source is best. Don’t re-light the pilot light or make any repairs if you smell gas. Close the main valve and call the gas company from a neighbor’s house. Don’t operate any electrical switches.
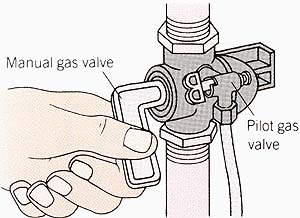
Relighting a pilot: For an older burner, turn the manual gas valve and pilot gas valve to “off.” After airing the burner 5 minutes, turn the pilot gas valve to “on.” Press in the red button on the switch for one minute while lighting the pilot. If pilot doesn’t light, wait five minutes, then repeat steps. If it still doesn’t light, replace thermocouple (see below) or call the gas company.
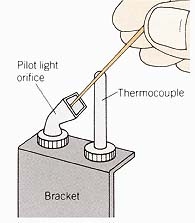
Cleaning the pilot orifice: If the pilot doesn’t light, its orifice or air-shutter orifice may be clogged. Turn off the main shutoff valve and electrical switch. Remove the access panel by unscrewing its bracket. Carefully clean orifice with a toothpick. Remove debris from the edges with a cotton swab or paint brush.
 s
s
Replacing a Thermocouple
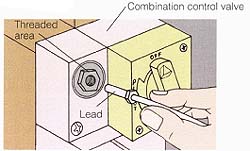
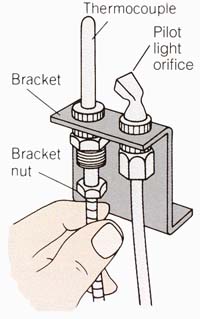
Turn off gas knob (or manual and pilot gas valves) and power to burner. Air 5 to 10 minutes. Unscrew lead from combination control valve; wipe threaded area with clean rag. Unscrew nut holding thermocouple to bracket. Fasten new thermocouple to bracket, lead to control valve.
