Thus far we have considered, for the most part, only the construction of a basic structure, a shell. However, this constitutes only about half or less of the total work that goes into a finished house. There are a lot of important odds and ends that have to be taken care of before you can move in the furniture, and there are also a few construction features that have not yet been discussed. Much of the finish work in a log house is the same as for a conventional frame house, using identical methods, procedures, and materials. There are, however, several major areas of concern particularly applicable to log structures that de serve further investigation.
INTERIOR PARTITIONS
Interior partition walls can be built in a number of different ways. One is to construct them of logs the same size as those used for the exterior walls. They can be built right along with the exterior walls, or left until the shell is complete. In the former case, the partition courses are built up concurrently with the wall courses, notched into place and secured in much the same way. Caulking and sealing, however, is not necessary except at exposed exterior wall joints; caulking is sometimes done just for the sake of appearance.

Fig. 11-1. Interior partition wall logs can be fitted to the
exterior wall logs and lagged through from the outside.
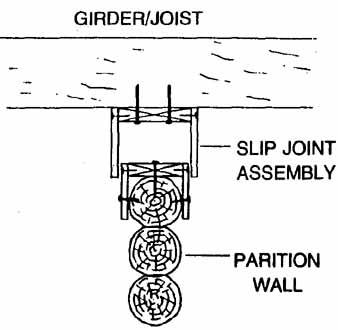
Fig. 11-2. Interior log partition walls can be fitted into a
slip joint arrangement like this one.
In the latter case, the interior wall courses are stacked and secured to one another, to the floor frame, and to the exterior walls where applicable. Joining the interior wall courses to the outside-wall logs can be accomplished in several ways. Assuming same-size logs, one way is to cut each interior log end to a curve and fit it tightly against the abutting outside wall log. Drive a lag screw through from the outside to secure each set of logs (Fig. 11-1), or toe-nail through the top of each partition log into the wall log. Also, a wide notch can be cut in the exterior wall from floor to ceiling, with the interior wall logs cut to matching tenons that will fit neatly into the slot. Toe-nail each interior wall log successively from the top into the exterior wall logs to secure them in place.
Interior partition walls can be built from logs that are substantially smaller than those in the exterior courses. If laid horizontally, they are secured to one another, with the first course anchored to the floor frame. Because the rate of shrinkage will be different than that of the exterior walls, a slip joint must be provided at the ceiling level so that the main structure can settle down without buckling the partition (Fig. 11-2). Where a partition abuts exterior wall logs, the smaller logs cannot be attached to the exterior wall logs, for the same reason. A wide and deep slot can be cut from floor to ceiling in the exterior wall, to receive the interior wall log ends; these may be left full-sized or tenoned, as you wish. The slot should be carefully sized to be just big enough to allow freedom in the settling process, but not so loose that the partition wall is unstable or wobbly. The partition logs should be spiked to one another as the wall is laid up.
Log partitions that are built stockade- fashion should be fitted with a slip joint at ceiling level and should not be attached to exterior walls at any point. The settling differential will be considerable, because logs shrink much less lengthwise than they do in diameter. Again, where a partition wall abuts an exterior wall the best bet is to cut a floor-to-ceiling slot in the exterior wall logs, into which the end log of the partition can be fitted to allow just enough freedom so that settling can take place without binding.
Conventional stud-wall construction for partitions can also be used with no problems in a log house, and this is often the preferred method. The partitions themselves are made in the usual fashion with 2- x -4 sole plates, studs, and top plates, covered with plasterboard or wood paneling, or both. The sole plate is nailed securely to the floor frame. The wall top must be fitted with a slip joint (as in Fig. 11-2) to allow proper settling of the structure. Where an interior partition abuts an exterior wall log, cut a floor-to-ceiling slot to accommodate the partition end. The slot should be just wide enough to admit the wall frame and the wall coverings so that the entire assembly is, in effect, mortised into the exterior wall (Fig. 11-3).
Some of the raw edges of the slot will be visible and might contrast sharply with the finished appearance of the interior partition. Should this be objectionable, you can apply a thick molding at the intersection of the walls, creating a deep shadow effect that will completely hide the rough seam. Don’t anchor the partition to the exterior wall at any place except the very bottom, and attach the molding only to the partition and not to the exterior wall. The interior partition structures them selves can be joined to one another in the usual fashion, simply by nailing them together. Make sure, though, that there are no obstructions anywhere along the slip-joint arrangement that might later bind up.
FURRED WALLS
There are occasions when a log wall must be furred out—or fitted with a series of nailing strips to which another wall covering is then applied—in order to hide the logs. Such would be the case where additional insulation must be installed, as discussed in Section 10. A similar situation would occur where a series of pipes, wires, or heating ducts have to be in stalled against an outside wall but must be hid den from view. There might also be situations in which a log wall is best covered with a conventional wall covering—in a kitchen or bath room, for example. Whatever the case, furring out a log wall is not done in quite the same manner as in conventional construction.
The usual method of furring makes use of a series of thin strips of wood, usually 1 x 2s, securely nailed to the surface being covered. But because of the settling problem, furring strips cannot be nailed to log walls, and be cause of the irregularity of the surfaces of many log constructions, shimming and notching a lot of individual thin strips to achieve a plane surface becomes quite a chore. The solution is to use heavier, self-supporting, rigid stock such as 2 x 4s, built into a stand-alone framework just like a partition wall (Fig. 11-4).
Move the framework into position, anchor to the floor frame at the bottom, and fit with a slip joint at ceiling level. Install insulation and/or apply a wall covering to the framework as necessary. The slip joint must have sufficient clearance to admit the wall covering as well as the upper portion of the framework. If one end of the furred-out section is exposed to view, it is finished by making a return around the end with the same covering material that is used on the wall face, and a molding can then be applied from floor to ceiling at the joint between the logs and the furred-out section. Neither the molding nor any part of the furring should be rigidly attached to the log wall.
TRIMMING OUT
Trimming out is a term usually applied to the finishing-up process of installing any necessary ceiling, wall, and floor covering (floor last, usually), and then applying all the various bits and pieces of woodwork that hide the joints and seams. Putting on any applied finishes is part of the process, too. Trimwork can be pre-painted or pre-stained, then applied. At the same time, light fixtures and switch and out let covers are put on, any missing hardware in stalled, and any other missing odds and ends taken care of.
Fig. 11-3. One method of securing paneled stud-type interior partitions is to set the ends into floor-to-ceiling grooves cut into the exterior wall logs.
Finished ceilings are applied to the ceiling framework as discussed in Section 7. In a log house, wall coverings are needed only on conventional stud-type partition walls or furred-out sections as just covered. If the flooring is of the single-layer variety, all that is required is a bit of sanding and cleaning up, plus a coat or two of sealer and/or an applied finish. Underlayment and/or a finish floor covering such as hardwood, tile, sheet vinyl, or wall-to-wall carpeting may be put down as well. There is a tremendous variety of such materials, and installation is accomplished simply by following the manufacturer’s instructions. The only unusual aspect lies in the fact that at least in some cases the flooring material should be cut to fit closely along the exterior wall log contours, with caulking applied as necessary to ensure an airtight, draft-free fit.
Exactly how this is done depends upon just how the log structure is put together, but the object is to achieve a long-lasting joint that will not come apart and that will prevent air in filtration.
Fig. 11-4. A furred-out interior wall set against an exterior log wall, combined with a frame work for a dropped ceiling, allows room for plumbing and wiring.
After this phase of the construction is complete, the various moldings and trim pieces that dress out the interior can be applied. This includes door and window casings, moldings at the ceiling/wall joints if necessary, mopboards, and shoe or base moldings. Again, most of this installation follows conventional methods, the one exception being that you must always bear in mind the settling problem.
With windows, the stool or interior sill and the apron can be solidly attached to the log wall and the window buck or frame. The casing sides, however, can be nailed only to the window frame and not to the log wall. The casing top is likewise attached to the window frame only, because the settling gap is directly behind it. The casing stock should be wide enough to completely cover the settling gap above the window. Much the same is true of door casings; attach them only to the door frames or bucks. Interior door casings on stockade log or conventional stud partitions can be attached to both door frame and partition.
Trim moldings that hide the joints between ceilings and walls must be placed and attached in such a way that subsequent settling of the structure will not peel the moldings off. They should be nailed up so that the settling sections can slide down past them, or so that they move with the settling sections. Exactly how this is done depends upon general construction methods used in the framework of the house, as well as the slip-joint arrangements.
Baseboards or mopboards installed in log houses are usually quite a bit wider than might be used in a conventional frame house. Nominal 1- x -6 or 1- x -8 stock should be satisfactory, and allows plenty of height to cover the rather large space at the floor level created by a round log. The baseboard effectively hides the rough joint where the flooring abuts the log wall, and in many cases also affords a natural runway for electrical wiring. The baseboard is nailed to the log wall at the top, and might also have to be attached to a nailing strip secured to the flooring for a stable installation. Base cap molding and/or shoe molding can be added if desired (Fig. 11-5). If the wall logs are flatted on the interior surface, any appropriate width of base board (or just a narrow shoe molding alone) can be nailed directly to the flat log face.
Fig. 11-5. One method of installing base molding.
Fig. 11-6. Wall-mounted cabinets should be mounted with a slip-slot arrangement.
CABINETRY AND BUILT-INS
Cabinets, as might be found in a kitchen or bathroom, and built-ins, such as book shelving, window seats, storage walls, or any of a hundred other items, are just as applicable to the log style of house as any other. The installation procedures, however, are a bit different. Once again, the prime consideration is settling. For instance, kitchen wall cabinets that are attached to a log wall and butted against the ceiling will eventually drop down as the wall settles, leaving an unsightly gap at the ceiling level. To counteract this problem, space the cabinets below the ceiling to provide an extra, open top shelf so any settling will be unnoticeable. Or, add a wide face board across the top of the cabinet installation to act as a slip joint and hide the gap that is sure to develop. Cabinet fasteners should be mounted with screws in slip-slots; note that the bottom fasteners are fixed (Fig. 11-6).
Kitchen base cabinets (or any other of that type, like a bathroom vanity), should be of the self-supporting, freestanding style, so they can be set in place and secured to the floor but need not be attached to a log wall at any point. If they are attached rigidly, something is eventually bound to pull apart or bind up. If base cabinets are backed up to a furred-out or conventional stud wall, however, they can be attached to the wall. Also, the space between counter tops and wall cabinets should be calculated to allow for the amount of settling that might occur. That space could diminish as much as 3 or 4 inches over a period of time, and easily put the squeeze on countertop appliances calculated to fit nicely into the standard 18-inch spacing.
Much the same situation applies to all other kinds of cabinetry or built-ins. They must be constructed and/or mounted to the building in such a way that they are unaffected by settling of the log shell. Remember, downward movement of only a fraction of an inch can break open cabinet joints or render doors and drawers inoperable. Units that are built into or installed against conventional partition walls can be anchored in normal fashion. Any units that are built into or attached to log walls— whether interior or exterior—or to or against an upper-floor frame, must be arranged to accommodate the settling drop by means of slip joints or the method of attachment, or both.
APPLIED FINISHES
Applied finishes—paints, enamels, stains, varnishes, and sealers—are employed in log structures in just the same way as in any other, with one notable exception. The log surfaces them selves should not be treated with a hard or impermeable applied finish. This is true of exterior surfaces as well as interior. The interior log surfaces should be treated before construction begins with a non-toxic clear preservative that leaves the appearance of dry wood. This surface can be left as is, but is susceptible to accumulating grime and stains as time goes on. To help alleviate this, wipe on a coat of boiled linseed oil for surface protection. This will darken the wood slightly, but also enhance its natural appearance. The treatment can be repeated every few years if necessary, but not so often that the surfaces become gummy. Another possibility, one that provides good surface protection, is an application of a neutral-colored wax of the type designed for use on raw wood. A stain-wax can also be applied to darken the color.
Log exteriors are sometimes spar-varnished or stained, or even painted. For the most part this is not a good course to follow, because the coatings always seem to produce more problems than they solve. The natural breath ability (not to mention the appearance) of the logs is destroyed, and the coatings have a tendency to crack and peel away. Varnishes in particular tend to take on a shaggy, ragged appearance after a time, something that cannot be successfully corrected. The maintenance problems are continuous, and once such a finish is applied it must then be frequently reap- plied to preserve the appearance. This is expensive, time-consuming, and pointless, especially since a natural log exterior will weather and last quite nicely without that kind of help.
The only treatment that a log house exterior really needs is periodic application of a log sealer/preservative. There are several brands of quality log sealers on the market that do the job nicely and can be either sprayed or brushed on. These finishes will help the log walls retain their integrity against insect and fungus attacks and keep the wood looking good without altering the natural appearance.
If you don’t want to use a commercial finish, a good alternative is the traditional 50/50 mix of boiled linseed oil and turpentine, liberally applied with a brush. Or, you can use the FPL Natural Finish, developed and tested years ago by the Forest Products Laboratory (part of the U.S. Department of Agriculture, under the Forest Service). This is a mix-it-yourself finish, which should be done outdoors using the proper precautions. The finish, for a 5-gallon batch, consists of 3 gallons of boiled linseed oil, 1 gallon of paint thinner or mineral spirits, 1 pound of paraffin wax, and ¼ pound of zinc stearate. (The original formula also contained half a gallon of 10:1 concentrate of pentachlorophenol, but this is no longer available to the public; substitution is not recommended).
To mix the finish, pour the thinner into a metal pail. Melt the paraffin in a double boiler, and very slowly add it to the thinner, mean while stirring rapidly. Let this mix cool to room temperature (about 70 degrees), then put on your dust mask and add the zinc stearate. Last, add the linseed oil, and stir until all the ingredients are completely melded.
This finish can be colored and used as a stain, too. Add 1 pint of burnt sienna tinting color for a cedar color, a pint of raw umber for a light redwood color, or a pint of Indian red oxide for a dark redwood color. The first application will only last about two years or so before it weathers out. Reapply at this point, and then about every 8 to 10 years thereafter.
STAIRWAYS
The options open to you in the way of stairways are practically endless. Any of the conventional stairway designs (Fig. 11-7) work fine. The absolute minimum for a conventional stairway width is 2½ feet; 3 feet is about average, and 4 feet allows great convenience. An opening in the floor above of suitable width and a mini mum length of 10 feet is required. Check local building codes for stairway details; minimum dimensions are often spelled out.
If space is tight, you might consider in stalling a prefabricated spiral assembly. Most of these are made of steel, and have either steel or wood treads that can be carpeted. The unit is essentially vertical and takes up less room than a conventional stairway. The bottom of the assembly bolts to the first floor and the frame work extends upward into a trimmed-out rectangular hole in the floor being served. Though sizes vary, a hole about 3 to 4 feet square is common.
Most conventional stairways present a somewhat formal appearance. If an easy going rustic design is desired, to complement the overall informal and rustic appearance of a log interior, an open stairway can be built using logs for stringers and slabs or hardwood dimension stock for treads. The risers can be eliminated or not, as you wish. The length of the log stringers is calculated to hold the proper number of treads and risers (or riser spaces) to afford an easy stair angle. Treads cut from heavy slabs are attached to angle-blocks that are glued and nailed or screwed to the stringer faces. Dimension-stock treads can be similarly attached to blocks, or can be set in slots dadoed into the stringer sides (Fig. 11-8). If you prefer the appearance to be totally rustic, you can use the ancient design for second-story (especially loft) access, which consists of a series of hard wood pegs driven into a vertical post to form a rudimentary ladder. This system is easy to construct, uses little material, and takes up little space.
Whichever stairway design you opt for, the trick is to make sure that the stairway angle is neither too steep nor too shallow, and that there is a comfortable relationship between the height and the width of each step. As a general rule of thumb you can figure that the width of a tread multiplied by the height of a riser should equal approximately 70 to 75. For in stance, one widely used riser/tread combination, where the total height from floor to floor is 9 feet, is a tread width of 9 inches and a riser height of 7¾ inches (9 x 7.75 = 69.75), for a total run of 9 feet 9 inches. However, there is a great number of other combinations that could be used.
In any event, as with so many other items in a log building, a slip joint of some sort should be provided to compensate for settling, unless the stairway can be attached to non settling members. This can be accomplished by leaving the top of the stairway loose and figuring in extra height at the last riser, which will diminish as time goes by. Or, the bottom of the stairway can be set upon temporary shim blocks or wedges that can be rearranged as the building settles.
Fig. 11-7. This is a conventional but relatively informal kind of stairway that can be built in a log house.
Fig. 11-8. On the left is a log-stringer stairway using log slabs for treads. The log-stringer stair way on the right uses heavy planking for treads.
STOVES AND FIREPLACES
The odds are pretty good that today, as in the past, not many log cabins or houses are built without inclusion of at least one fireplace or wood stove. There is a wide range of possibilities in either case, and what you choose is largely a matter of personal preference balanced against costs, the intended use of the unit, aesthetics, building code requirements, and various other factors.
In a few areas of the country, fireplaces are no longer allowed in new houses, or are restricted to certain types, or limited to only one approved installation. In cold country it is strongly recommended that all fireplaces be equipped with dampers that will close down completely, or better yet, that they be of the newer variety that consist of a steel shell en cased in the masonry, equipped with glass- front doors and special intake pipes that bring combustion air in from outdoors. This helps to minimize the tremendous heat looses attributable to conventional fireplaces.
Whichever kind, design, or style of fire place you choose, you must consider usual installation problem: settling. Masonry fireplaces must be constructed in such a way that the structural framework can slip by the masonry as it settles, without pulling something apart. In some cases, where massive masonry construction is an integral part of the building, structural members might have to be integrated into the masonry work in such a way that settling is obviated and the building will remain intact. This usually requires some skilled design work. There is also the possibility of building the shell first and allowing most of the settling to take place before the masonry work is begun.
It is a good idea to build a masonry fire place so that the entire mass (except for the chimney top) is enclosed within the building—even though an exposed outside construction is traditional, common, and attractive. Keeping the masonry mass inside has two advantages. The first is that the flue re mains hotter and allows better and more efficient combustion with less creosote buildup, especially with a low fire. The second is the heat that builds up within the masonry mass is returned directly into the interior of the building, rather than being wasted into the out side atmosphere. This arrangement is often less expensive, too. In all cases, whether building codes are in effect or not, the fireplace is best built in conformity to the latest revision of the National Fire Protection Association’s publication #211, Chimneys, Fireplaces, and Vents.
The installation of wood stoves is being increasingly regulated, for reasons of both safety and air pollution. This is a constantly changing situation, so before purchasing and installing a wood stove, be sure to check with local authorities for pertinent details. The matter is sometimes handled by local fire departments, sometimes by building officials. You might be able to buy only certain approved models of stoves, a permit might be required for installation, and the installation might have to be made according to code and with approved materials, and inspected before being put into service.
A wood stove—whether used for occasional fires for pleasure, as a backup heating system (for a passive solar design, for example), or as the main source of heat—should be a high-quality, highly efficient, low-polluting, cast-iron type with firebrick or other refractory lining, preferably with an outside-air intake, and sized to the area to be heated. Such stoves are expensive, to be sure, but will perform very well and last a lifetime. Much has been said recently about the great advantages of stoves with catalytic combustion units in them, but actually some of the new super-stoves without such units perform better with less maintenance. De sign improvements and testing are going on continually; be sure to check into all the details.
The chimneys used with wood stoves are called appliance chimneys. The best are made of double-wall stainless steel with an insulant between the walls. Some of the chimneys are triple-wall with air space between the walls, and are made of galvanized steel. Either type is designed to be held in a special support basket, mounted in the ceiling framework directly above or offset slightly from the stove. It must extend up through the roof to a height of at least 2 feet above any roof or building section within a radius of 10 feet. The section of stack from the stove to the chimney, within the living area, should be made of heavy-duty steel; these are usually painted black but sections of porcelanized piping are also available in several colors. The inexpensive blued steel smoke-pipe is not recommended even for this purpose, and should never be used as a chimney.
Wood stoves must be installed with great care; the fact that you think you might use it only occasionally is no excuse for making a sloppy or questionable installation. Clearances are particularly important; the specifications might change and do vary from place to place, so investigate before installing. Usually a stove (or its smokepipe) must be at least 3 feet away from a combustible wall, which includes plaster or plasterboard. However, certain kinds of noncombustible backboards can be interposed between the stove and a combustible wall, and the clearance can be reduced to as little as 12 inches, depending upon the specific material used.
All noncombustible backboards must have free air circulation all around them. A masonry or synthetic stone or ceramic tile facing built up against or glued to a combustible wall, as is so often done, does not qualify. Similarly, a stove must rest upon a suitable hearth with the firebox a certain distance from the floor, or the hearth, depending upon the design of both. The hearth must extend a certain distance be yond the stove in all directions. Clearances must also be observed as the chimney is in stalled; typically there must be a minimum of 2 inches between chimney walls and any combustible material. Note, however, that a few stove models are designated as zero-clearance and need no added protection. Stove manufacturers will gladly supply you with their installation recommendations; follow them and modify as necessary according to local regulations, and you will have a trouble-free installation.
The slip-joint arrangement is usually easy with a stove chimney installation. The entire chimney and the basket it rests in will gradually lower. With proper sizing, you can slide the smokepipe up inside the chimney when you install it, with a snug but free fit. Then the chimney will just lower itself around the smokepipe. If the smokepipe has a tapered end for a jam-fit into the chimney bottom, however, the smokepipe will eventually buckle and could become an instant fire hazard.
DECKS AND PORCHES
Decks or porches can easily be added to a log house; in fact, many houses look naked with out one or the other. And they can unquestionably increase the livability and convenience of the home. There are dozens of design possibilities, with decks generally being the easiest to build because there is no roof to contend with. Decks also require less material, but are completely unsheltered from the weather. Porches can be made in open style, nothing more than a roofed deck, sometimes with railings, some times without. They can also be partially en closed, fully enclosed with windows or screening, depending upon the season, Some kinds of porches, in fact, can serve admirably as greenhouses, solariums, or solar collectors.
Either porches or decks can be added onto the house at any time after construction is finished, or can be built concurrently with the shell. The most useful arrangement is to have both a deck and a screened porch, the former for sunning and barbecuing, the latter for taking one’s bug-free ease of a warm evening.
In most cases the component parts of a deck should be made from heavy stock, not so much for strength as for weatherability, and to preserve the appearance of solidity and massiveness of most log structures. Posts, headers, joists, and decking are best made of either red wood or stock pressure-treated with preservatives. The decking, which is often 2- x -4 or 2- x -6 stock, should be secured with decking screws rather than nails, to avoid the constant “popping” (lifting up) of nails that would otherwise occur. The deck can be left to weather naturally, or can be treated with a finish (which must then be periodically reapplied). Railings, stairs, and steps can also be made of dimension stock—again, treated stock or redwood fares best—or they can be fashioned from logs, slabs, and poles to carry out the rustic log appearance.
One easy way to make a deck frame is to secure a header to the house sill with lag screws. The header should be backed with aluminum or other flashing, curled into a joint at the top. An opposite header, properly squared up, is secured to a sill or sill plate supported by piers or posts an appropriate distance away. End joists are installed to form a rectangle, which is filled in with joists on 24-inch or 3 0-inch centers, depending upon the size of the stock and decking being used. The framework is decked over and the railings and stairs added as required. If the deck is low to the ground, the front sill can be supported by stubby concrete piers poured into form tube. If the deck is high or the grade level slopes down rapidly from the house, the same short piers can be used to about a foot above grade level and the deck edge is supported by posts of whatever length is necessary (Fig. 11-9).
Fig. 11-9. A cross-section of a typical deck assembly.
The deck frame might be made of logs. In that case, the log joist ends can be notched into the house sill log as the house construction begins, so that the house foundation serves as one supporting point for the deck. One drawback here is that the joints form an entry point for moisture into the sill log. This can be minimized by thoroughly caulking the joints, keeping the first run of decking back a half inch or more from the house wall to allow for air circulation. Providing a long eave or rake over hang so that roof runoff falls some distance away from the house walls will also help, and is not a bad idea even where there is no deck. Guttering can also be added for this purpose. For the outside edge of the deck, a second sill log is mounted upon appropriately spaced piers or posts, with the opposite log joist ends notched into it. The joists should be flatted and carefully leveled so that the decking will lie smooth and even.
To make a porch, all you have to do is add a roof to the deck. One way to do so is to se cure a header or ledge plate to the house wall with lag screws. Posts are set across the leading edge of the deck, positioned directly over the piers, and a plate is mounted on top of them. The rafters run from the header or ledger plate to the front plate. Roof sheathing and a weather surface is laid on top of the rafters, and trim is added last.
On many log houses the porch roof is actually an extension of the house roof. This means that the porch framing must be done along with the house framing. If two different roof pitches are involved, the house roof rafters stop short at approximately the centerline of the house plate log. A porch plate log is erected on posts at the leading edge of the deck, and the porch roof rafters run from the house plate log to the porch plate log. The rafter logs are notched and securely spiked to make a strong, solid structure.
If the porch roof is a same-pitch continuation of the house roof, the same arrangement can be used, or full-length rafters run straight through. The whole affair must be ruggedly built, because when wind blows hard in under it, as will often happen, the entire roof assembly will want to act as a kite and sail away. Once the frame is built, the sheathing and weather surface can be laid on both the house and the porch in one continuous application. Depending upon the meeting angle of the two roofs and the type of weather surface being applied, there might be a solid, unbroken surface or there might be a flashing strip at the joint of the roofs.
UTILITIES
The general requirements for the utilities in a log house are no different than for any other kind of house. The methods of installation, however, must be handled somewhat differently. In most cases the outside walls are essentially solid, so there are no convenient voids and air spaces through which the pipes, wires, and ducts can be run. The same problems occur if some or all of the partition walls are also of log construction. In addition, many of the other structural members, such as in the floor or roof, might be large and heavy and don’t lend them selves to easy notching or boring. They should be avoided wherever possible. Many log de signs tend to be more open, with more components visible, than in a conventional frame house, so utility hardware and devices are not so easily hidden. All this means that the utilities systems, which include domestic water, waste disposal, electrical, heating and perhaps cooling as well, and auxiliary systems like intercoms or doorbells, must be carefully planned out ahead of time to minimize the amount of installation time required and to eliminate installation difficulties.
The easiest way to get around such problems is to keep everything you can out of the exterior log walls. Route wires, pipes, and ducting through the floors and ceilings and within hollow partition walls as much as possible, following the lines of easiest access. Arrange pipes and plumbing appliances so that they do not interfere with log walls, girders, or joists. Sometimes it is possible to build in hollow spaces hidden inside box beams that run from basement to second floor or attic, and use them as runways for pipes and wires.
Pipes and wires can often be installed as construction of the shell proceeds, thus avoiding many of the access problems that would occur if these systems were installed after shell completion. In order to do this effectively, though, the systems and the utilization points—such as electrical outlets, water and waste line connections, shutoff valves, and heating outlets—have to be well planned ahead of time. Be wary of making changes part way through an installation, because the changes might give rise to a bundle of problems later on in completing the installation. Bear in mind, too, the ever-present settling problems. Locate wires so that they won’t get crushed or stretched, pipes so that they won’t bend and crack or pull apart at the joints, and ducting so that it will not buckle or separate.
Most log houses contain a variety of auxiliary systems. These include such items as doorbells or chimes, integrated stereophonic sound systems, fire alarms, intrusion alarms and security systems, telephones, TV-FM aerial lead-ins, heating/cooling controls, and sensors for various kinds of mechanical troubles. All of these systems must be installed along the same lines as the utilities systems, using the same basic methods.
TERMITE CONTROL
In certain parts of the country the danger of extensive damage caused by termite-infestation warrants that special preventive measures be taken as the house is built. They are simple and effective, provided that they are coupled with regular inspections and maintenance.
There are three generally recognized types of termites: subterranean, damp-wood, and dry-wood. The subterranean are much more prevalent, more difficult to spot, and cause the most damage. They are also the easiest to control. The damp-wood type is also destructive and hard to spot, but less prevalent. The dry- wood variety is much less common and confined to a much smaller geographical area. They are easy to spot and cause less damage, but are harder to control. There are virtually no places in the United States, except the very arid country and the highest elevations, that are free of termites, though the problems are worst in the damp and humid southern states.
Subterranean termites live almost entirely in the earth, especially warm and moist soil. They live on cellulose, and must have moisture to survive. They tunnel vigorously and build earthen tubes above ground to reach cellulose food supplies, like your front porch steps or the sills of your house. The damp-wood termites function in much the same way, except that they live almost entirely within damp or wet wood, and mostly stay there. The dry-wood termites, on the other hand, fly directly to wood and bore their way into it from outside, and don’t need the dampness to survive. All three varieties are easiest to spot in the spring or early summer when they breed and emerge sporting new wings for their annual migration to greener pastures.
Some termite control measures can be taken during the construction of a new house. For instance, an open pier foundation affords the least opportunity for them to get a toehold, and a continuous-wall poured concrete foundation is next best. Block foundations must be solidly capped all the way around. Any cracks that appear in either type must be immediately filled and sealed off—they love to follow along masonry cracks. PWF or wood post foundations that have been pressure-treated with preservatives will not be attacked, though the termites can build tubes up them, as they can with continuous-wall foundations. Wood foundations are not recommended in any areas where termites are a serious hazard. Slab foundations afford the easiest entrance for termites, because they can come right up into the house through cracks that inevitably occur with aging.
Foundation drainage systems can be important, too, because the drier the ground is around the structure, the fewer the termites. Every effort must be made to direct ground moisture and roof run-off well away from the building. Insulation should be placed on the inside of foundation walls, rather than the out side, for two reasons. One is that the termites, while they will not eat the insulation, will bur row into it and colonize where it is warm. The other is that inside insulation allows a lesser amount of heat to escape the building into the surrounding soil, allowing a better chance to freeze them out.
As the building site is prepared, all possible bits of wood should be rooted out and cleared away from the foundation area. As construction proceeds, keep the site cleaned up and free of bits of paper and scrap wood, which they will travel to like homing pigeons. An all- too-common practice is to just bury the rubbish in utility trenches and alongside the foundations when the backfilling is done. Nothing could be a bigger invitation for the early onset of crumbling sills. Never bury or leave lying on the ground anything containing cellulose.
The use of wood preservatives in certain parts of the building has been mentioned previously. Those same preservatives are also effective against termites, provided the preservative is reapplied every few years. Log walls, and particularly the joint surfaces, should be liberally treated as construction goes along, and all accessible exterior surfaces should be regularly treated at intervals thereafter. Sills and any other wood members in or close to the ground—12 inches is the minimum—should be either redwood or commercially pressure- treated wood, preferably the latter. Crawl-space floors should be covered with a double layer of plastic film and be well ventilated to reduce moisture, and all the exposed wood surfaces— joists, beams, sills, or whatever—should be liberally treated with preservatives. All chases or holes where pipes or wires go through foundations or woodwork should be thoroughly sealed off with caulk or roofing compound.
For many years one method used against termite infestation has been to treat the soil around the building with pesticides. This method is still used, although there have been changes in recent years. The old chemicals were extremely toxic to termites, but also to humans, so different chemicals are coming on line, but with less effectiveness. Research continues, and procedures and chemicals are in a constant state of flux. Any of this work must now be done by trained and licensed personnel, and you can obtain details from your local exterminating or pest control company.
Another measure of termite control that used to be popular was the installation of metal termite shields between the foundation top and the sill or plate. This system has fallen into disfavor for two major reasons. First, the shielding systems often were not properly installed, and later deteriorated or were damaged and left unrepaired, which all could lead to more dam age than they might have prevented. Second, the shielding system afforded the building occupants a false sense of security. The shield will not prevent termites from entering the structure. It merely forces them to tube out and over it where they can be seen. However, with regular inspections, regular maintenance, and correct installation with the proper methods and materials, termite shields do constitute another useful weapon against a tireless enemy.
Termite shields are best made of copper, about 24 gauge or better, but can also be made of galvanized iron, aluminum, or sheet zinc. Seams should be soldered, but can be over lapped substantially, caulked or tarred, and pop-riveted together. On a continuous-wall foundation place the shield directly on top of the wall, followed by sill seal and the sill or plate. The shield should cover the entire foundation top and extend outward for about 2 inches and downward at about a 45-degree angle, to the exterior for full basements and to both exterior and interior for crawl spaces. Handle piers in the same way, with the shield extending out and down on all sides. Seal all holes in the shield, such as to admit passage of anchor bolts, tightly with roofing compound or caulk.
Don’t give the little bandits a toehold anywhere—if you do, they’ll find it, and you can count on that!
PREV: Insulation
All DIY Log Home/Cabin articles© CRSociety.net