Even if you can’t cook, you can cook on the trail. All you need is some hot water and a package of freeze-dried food.
You can get many fruits, vegetables and meats in freeze-dried form. When you add hot water and wait a few minutes, the food is restored to something like its original condition. It tastes good when you are trail-hungry; some of it you would even serve to guests at home. The biggest drawback is the cost. Freeze-dried food is expensive.
One step down from freeze-dried food, and as far down as most hikers go, is dehydrated food—anything that has little or no water in it. Such foods are widely available in supermarkets, and they cost much less than freeze-dried foods. But many of them demand more work to prepare. Dehydrated foods include old standbys like uncooked cereals, newer creations like Lipton Cup- a-Soup, and food especially made for backpackers, sailors and others who find light weight and imperishability very important. You can get most common vegetables and fruits, and some meats and dairy products, in dehydrated form at backpacking stores or supermarkets, or by Internet or mail from catalogs.
For the more ambitious, home-drying your food is a possibility, from drying fruit or beef for snacks to drying entire meals like curried chicken and vegetables with a first course of soup. Home drying requires a lot of labor and time, but if you are concerned about cost, have dietary constraints, or have a gourmet streak, this may be the alternative for you. Many cookbooks on food preserving have sections on food drying to tell you how to do it. See Section 14 for further recommendations.
One more step down from dehydrated foods—some purists would call it a step up—is food eaten cold. It simplifies. If you can get used to eating foods that require no cooking on the trail, you will be way ahead of everybody else in convenience and in the hour that you start the day’s hike. The no-cook breakfast and
the no-cook dinner are like the lunches that most people already eat on the trail: dry salami, cheese, crackers, candy bars, nuts, raisins, fruit-drink mix (add water), powdered milk (add water).
Even simpler than a meal of such things is a meal of one multi-purpose food. Two common types of multipurpose food go by the names muesli and granola. In them is almost everything a normal person needs nutritionally for a week or so. One can draw on stores in one’s body for the few vital things these mixtures lack, Here is a list of some of the foods available in freeze-dried form. Most come already cooked.
Freeze-Dried Foods |
|
Fruits |
|
Vegetables |
|
Dairy foods |
|
Drinks |
|
Meat |
|
Main dishes |
|
Now, here is a list of some dehydrated foods suitable for backpacking. Most are available in supermarkets. Others may be ordered from backpacking-supply stores.
Natural-food stores are also a good source of dehydrated and other dry foods.
Dehydrated Foods |
|
Breads and cereals |
|
Vegetables |
|
Fruits |
|
Dairy foods |
|
Meat and other protein foods |
|
Drinks |
|
Sweets |
|
Flavorings |
|
Suppose you’ve got enough money to buy all the freeze-dried food you want, and you have investigated what backpacking food is available. Then your menus for a weekend trip should, in my opinion, look something like this:
Friday dinner |
|
Saturday breakfast |
|
Saturday lunch |
|
Saturday dinner |
|
Sunday breakfast |
|
Sunday lunch |
|
The way to simplify kitchen work on the trail is to prepackage everything in advance, meal by meal. Use sturdy plastic sacks. Figure out how much of each thing (other than condiments and staples) you need for a meal. If any cooking or reconstituting directions are needed, cut them off the package or write them on a piece of paper and put it in the plastic sack with the food. Put all food sacks for one meal in one large plastic sack (some hikers prefer a cloth sack), and write on the sack what meal it is.
You can further simplify food preparation on the trail by doing as much preparing at home as you can. You can probably combine at home any dry ingredients that are to be cooked or served in the same dish—for example, cereal and dry fruit. Add dry milk in advance to pancake mix, biscuit mix, instant pudding, etc.; then, in camp, you need add only water. (Write on each package how much water to add. If you have added dry milk, use as a guide the directions for reconstituting dry milk.) If everyone in your party likes one teaspoon of sugar in coffee, mix equal parts of instant coffee and sugar in advance, to carry in a single bag.
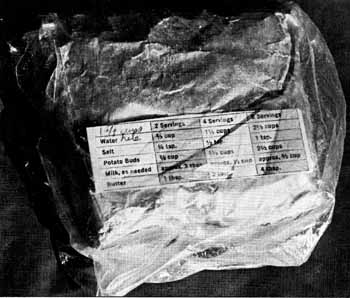
Fig 4-1 Food packed with cooking directions
How much food do you need? A general rule is 1½ pounds of dry food per person per day. Most people find they eat less than at home for the first few days on the trail, but begin to get very hungry after 5 to 7 days. So by the end of a week-long trip you might be eating 2 pounds a day. Pay no attention to the statement on any food label about how many people the contents serve. Try a dish at home to find out how many people it serves. Or else get an accurate little scale, and weigh things. If you plan by weight, you will have enough food overall, even if you have too much salami and too little Noodles Almondine.
What kind of food do you need? You need protein, carbohydrate and fat. Eat some protein at every meal—meat, milk, eggs, cheese, nuts, if you are not a vegan. It is especially important to have protein and fat for breakfast on a hiking day, as they give off their stored energy gradually, rather than quickly, as carbohydrates do. You should have your vitamins, minerals and bulk in fruits and vegetables, but the weight problem won’t allow you to carry much fresh produce, if any. Freeze-dried fruits are good but expensive. Ordinary dried fruits can be eaten plain or stewed.
You can get your vegetables in dehydrated soups and stews, or you can buy dehydrated or freeze-dried vegetables unmixed with anything. Don’t rely on fish or wild plants for any part of your food requirements.
Backpackers also need to drink lots of water. Hiking greatly increases a person’s need for fluids to prevent dehydration, particularly at higher elevations and in the desert. Drinking lots of water can offset some of the effects of high altitude, as well as contribute to your general well-being. Plan on drinking at least two quarts of water per day. Hot drinks with breakfast and dinner are helpful. I enjoy hot soup with every dinner. While you’re hiking, keep your water bottle handy and drink often.
Cooking Equipment
What do you cook your food in—if you’re cooking? Perhaps no more than one pot, and certainly no more than three, will be plenty for any ordinary trip of not more than six hikers. While aluminum pots are the lightest weight, stainless steel pots de signed for backpackers are also available. The larger pot should hold one pint per hiker or slightly more, and the others should be progressively smaller so all the pots will nest together. You need lids for the pots, to shorten cooking time. A good substitute for a pot lid is a piece of aluminum foil.
Whether you need a frying pan depends on what you will cook. The lightest frying pan is a cake pan. Some pot lids will double as frying pans. If you want steak the first night out, despite its cost and weight, you can omit a frying pan and barbecue the meat, if you carry a small grate (provided you’ll be camping where a campfire will cause minimal impact). You can barbecue any fish you catch—though some prefer fish fried in margarine or bacon fat. A frying pan is traditional and convenient for cooking eggs, whole or powdered, but these can be cooked in a pot just as well.
Although pot lids shorten cooking time, some dehydrated foods won’t cook at high elevations even if you boil them all day, and everything takes flabbergastingly longer in the mountains. Dried beans are notoriously hard to cook. At 5,000 feet cooking time is doubled, and at 10,000 feet it is quadrupled. Precooked food avoids delay at high elevations.
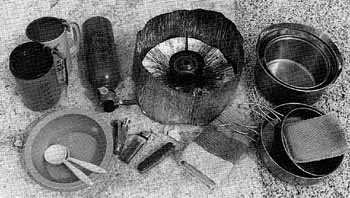
Fig 4-2 A fully equipped kitchen
To speed up measuring liquids in camp, scratch pint lines on the inside of your aluminum pots. In Section 2, I mentioned taking a knife. You’ll need a pint poly bottle for mixing milk and juice. For a group of four or more, a quart poly bottle in addition will be very handy. If you will have to carry water any distance, a plastic water bucket is very convenient. The only other kitchen equipment you will need are a pot-grabber (but gloves will substitute), a fork, and one or two large spoons. I prefer plastic utensils, including the spoon, which are lightweight and won’t scratch my pots. If you are cooking pancakes, you will also need a spatula. Each hiker should carry for himself a spoon, a plastic or stain less-steel cup, and a plastic bowl about six inches across. Any food that goes on a plate can go in a bowl, and you do not need a fork to eat with. Some hikers omit the bowl and eat from the cup, then drink from it later.
A recent innovation in outdoor cooking is the equivalent of an oven for backpackers. Using a heat diffuser and a hood, your pot with lid becomes a convection oven for baking anything from pizza to brownies. Meal preparation requires more of your precious time in the wilderness, but you’re rewarded with an even greater variety of camp meals.
Wood Fire or Stove?
Now comes the basic question of whether to burn wood. Since man discovered fire, he has enjoyed sitting around a fire, especially in the company of people he likes, and especially after a good meal. Modern, urban man certainly seems to enjoy cooking on a bed of coals. But there isn’t enough wood in the wilderness for everyone to use as much as they want. There certainly isn’t enough for everyone to depend on having a campfire. In many places in the mountains, wood fires are now illegal. The lack of wood and the proliferation of unnecessary and unsightly fire rings resulting from overuse led to this drastic measure.
On evenings without a campfire, you may be more inclined to notice the wonders of nighttime in the wilderness. Viewing sun sets from a spectacular vantage point, taking a moonlit stroll, and star-gazing are far more compelling evening activities if you don’t have a campfire holding your attention.
Obviously, the best choice is to depend on a small backpacking stove for cooking. A stove is cheap, it works without much trouble, and together with enough fuel for a weekend trip it weighs less than two pounds. On a backpack trip, human energy is very precious, and the energy you save not gathering and breaking up wood, and not blowing on the fire to make it go, may be greater than the energy you spend carrying those two pounds of stove and fuel on your back.
There are backpacking stoves that burn kerosene, ones that burn white gasoline (also known as Coleman fuel), and ones that burn butane or propane, which comes in a metal cartridge, or canister.
Kerosene stoves must be “primed” with a little gasoline or alcohol before the nozzle will vaporize the fuel. Most white gas stoves must be primed first, with white gas, and some newer models have a built-in pump to help this process. Stoves that burn butane or propane need no priming, so they are simple to light, but the fuel costs considerably more than white gasoline, it doesn’t burn as hot, and butane performs worse as the temperature drops. Butane will not work at all below 31° at sea level or below 12° at 10,000 feet. Some cartridges must be empty before you disconnect them. Others can be disconnected anytime (hence you can take the cartridge to bed with you to keep it warm). Propane does work well when cold, but the cartridges are large and heavy.
You would not, I’m sure, leave used-up cartridges in the wilderness, so with the weight of the empty cartridges included in the carrying, you save weight overall by using a kerosene or gasoline stove.
I use an MSR Whisperlite stove, which is light weight, fuel- efficient, and quiet. It will burn for 4 hours on the fuel in the stove plus the fuel in the standard 1 1/4-pint fuel bottle I carry. You will probably need about 1/2 cup of fuel per day for 2 people (but take more the first time, to make sure). For each additional per son, add 10% to the 2-person fuel ration.
If you buy a stove, be sure to practice using it at home first. Unless it is a propane or butane stove, you will have to prime it before it will start. To do this, you need some fuel in the cup at the base of the burner. If the stove has a pump, open the fuel valve and pump until a few drops run down into the cup. Then close the valve. If it has no pump, you can get some fuel out of the tank or our of your fuel bottle with a plastic eye dropper and put it in the cup, or—if your fuel bottle has a small pouring spout— you can pour directly. After making sure all caps are back on the bottle and the tank, light the fuel. When it has almost all burned up, open the valve a little. If you’re lucky, the stove will start to burn. It may do so in spurts, but if you give it time, the burning will smooth out. If it doesn’t start, go through the priming process again. Clean the stove’s nozzle before using the stove each time.
Instead of fuel, you could use some solid fire starter to prime your stove.
All gasoline stoves are potentially dangerous. Use great care. In particular, don’t let the fuel tank get too hot, or it may explode. Gasoline stoves have a safety valve, which, if it functions, will prevent a bad explosion, but you will still have a jet of flaming fuel to contend with. Avoid it by not overheating the fuel tank. Finally, never refill the stove while it is burning.
Regardless of what stove you’re using, keep in mind that you want to carry and use as little fuel as possible. Use lids on your pots when heating and cooking, and shield the stove’s flame from wind. Set up your kitchen in a sheltered place, and use the wind screen included with many models of stove, or position your gear to crate a wind screen.
When packing a gasoline stove, wrap stove and fuel bottle thoroughly so that gasoline cannot spill in your pack. Better yet, have someone carry the stove and fuel who doesn’t carry any food. Nonfood things aren’t much damaged by a spill.
If you’ve chosen a campsite where a campfire will have a minimal impact, another alternative to using lots of wood in a campfire is using a little. Build a very small fireplace of two rows of rocks with flat upper surfaces, the rows placed only about six inches apart. Your pots and pans will span the gap; you won’t need to carry a grate, which is usually made of some heavy metal, unless you’re going to barbecue.
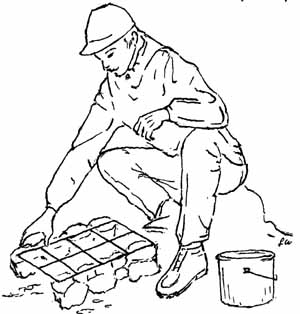
Fig 4-3 keep fireplace small
Dishwashing
Now let us simplify your dishwashing in camp. If you sleep the first night beside your car—as I hope you will if you’re hiking in the mountains, so that your body starts to get used to the lower oxygen content in the air at high elevations before you begin hiking—bring eating plates for dinner and breakfast which you can leave in the car. If paper plates haven’t been outlawed by the time you go, they are the simplest. On the trail, I use no soap or detergent to wash my dishes, utensils, pots or pans. I wipe off any grossly excess food particles and boil everything in my largest pot. Before discarding the dishwater, I remove any food particles that might entice any wildlife. I’ve never got sick in the mountains, so my experience says this method of dishwashing is adequate. (You may find this method too unfastidious.)
Naturally I don’t wash any dishes after eating breakfast on the day I walk back to the trailhead. That’s done at home. And I wash the soot-blackened outsides of my pots and pans just once a year. You have precious little time in the wilderness. Why waste any of it scouring the soot off the bottom of a pot, when you can slip each pot into a plastic bag? Besides, a black pot absorbs heat from your stove or small cooking fire better than a shiny pot does.
Practice Runs
Just as you would try out your cooking stove at home and put up your tent in the backyard, I would advise you to cook every dish at home before you cook it on the trail. If you do that, you will find out in what ways life is different from what the directions on the package suggest. Then, before you actually cook the dish in camp, you’ll be able to make adjustments. You’ll also find out which backpacking “specialty foods” taste lousy to you.
To simulate camp conditions, you can turn off your home stove’s burner for a few minutes, pretending that the fire went out while you were lingering by the stream watching the sunset colors, and you can try to make an instant pudding congeal in a refrigerator that you have set at 40° Fahrenheit. (It won’t.).
PREV: Clothing
NEXT: Day Hikes—A Prelude
All Backpacking articles
© CRSociety.net