If you like to sew, but find that sometimes it s just too much trouble to get out the machine, here the solution. This sewing center, built into a new or existing cabinet, not only puts the machine at your fingertips in a flash, but provides needed work surface as well.
Build this accessory into a sturdy cabinet or, if need be, secure an existing bookcase cabinet to the wall to make the sewing center more stable. Most sewing machines require a shelf 9 to 10 inches deep.
The project described here consists of the sewing shelf only. If you plan to build the complete cabinet, including the sewing shelf, choose a basic case design. Integrate the projects as necessary when deciding on dimensions. For in stance, if the worktable is to be 36 inches wide, build a basic cabinet with at least one bay that is 36 inches wide and high enough to accommodate the worktable when it is in the closed position.
The fold-down work surface opens to reveal the machine in its stored position. Shelves above the machine hold the accessories and materials used most often. Other supplies can be stored in the drawers and cabinets under and around the work surface.
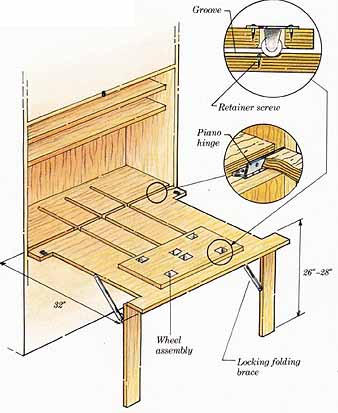
Before installing the sewing table, determine the most comfortable working height, generally between 26 and 28 inches from the floor. Test the height with the actual machine placed on the trial surface. Make the table wide enough to hold the ma chine comfortably (usually 18 to 20 inches is sufficient) or as wide as the bay in the bookcase into which it will be installed. If you are building a special case for this project, 36 inches is a good width.
The following instructions describe two versions of a sewing center.
Version one
The flat work surface of this unit can be marked with a grid that is convenient for layout and pattern work. Using this design requires that the machine be lifted from its storage area at the back of the table and placed out of the way.
Version two
This is the same as the first version except for a movable tray to hold the machine. The tray slides along grooves routed into the surface of the shelf and table (the tabletop is not smooth). If the machine is used frequently and put away after each session, the added convenience makes routing grooves and doing necessary extra construction worthwhile.
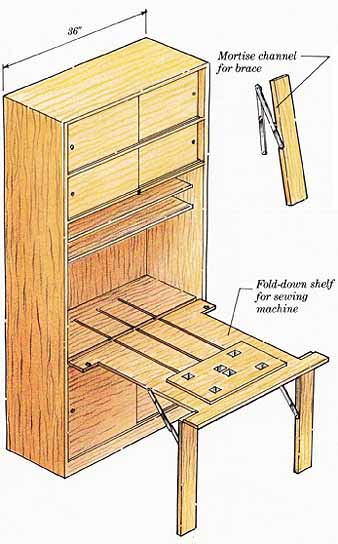
Mortise channel for brace
Rolling tray
Make the tray out of 3/4” plywood and slightly larger than the base of the machine.
Buy 6 small mounted wheels (see illustration opposite). After drilling 6 holes in the tray, mount wheels from the top. Don’t make holes any larger than necessary. Set the 2 center wheels close together; they support the tray as it is rolled over the gap where the table meets the shelf. To make guides for wheels, rout 3 grooves into top of both table and shelf. Make grooves Vs-inch deep and as wide as the wheels.
Building the table
Measure the width and height of the bay that will house the sewing table, then subtract 1/8-inch from the width and 1/4 inch from the height. Using these dimensions, cut the table from a sheet of ¾-inch solid-core or furniture-grade plywood. Choose a veneered plywood to give the cabinet a finished look when table is in the closed position.
Cut 3½-inch-wide notches to accommodate the legs. Length of notches depends on length of legs; cut accordingly. Using ¾-inch ply wood or 1 by 4 stock, make legs to fit the notches.
Using the same ¾-inch plywood stock as for the tabletop, cut a piece to cover the shelf on which the sewing machine will be stored. The ply wood will raise the surface of the shelf to the same height as the work surface. It also strengthens the shelf that will support the work surface. Cut the piece of plywood ¾ inch narrower (from front to back) than the shelf, so that the table, when folded up, lies flush with the front face of the case. Lay out and rout the grooves for the rolling machine tray, if installing one.
You will need a 1½-inch piano (continuous) hinge as long as the work surface is wide, or a longer one cut to size with a hacksaw; 2 hinges 1½ inches wide by 3½ inches long to attach legs; and 3 sliding-bolt latches (1 to secure each leg and 1 to hold work surface in closed position).
Assembly
Before assembling the pieces, check for fit, then sand and finish them.
Fasten legs to work table using a pair of 3½-inch-long hinges. Place smaller plywood sheet onto shelf in cabinet, and secure it with several screws placed at the ends and along the front edge. Attach fold-up work surface to cabinet by first screwing piano hinge to back edge of ply wood, then to top front edge of shelf.
Attaching the hardware
Position legs vertically (with table flat) and hold an open locking brace at a 45-degree angle as you mark the points on the edges of the table and legs for the locking brace screws. Drill pilot holes and screw braces in place. For a more finished appearance, mark position of locking braces with legs folded up, and rout a mortise channel in the edge of each leg for the brace. You will have to remove legs and braces to do this.
Mount the remaining bolt latches. Place small round-head wood screws in the routed grooves of the tabletop, approximately ½ inch from the ends. The wheels will roll over heads of screws when tray is pulled forward, but they (combined with the weight of the sewing machine) will prevent the tray from rolling backward.
Rolling tray
More on Sewing and related subjects
Prev.: Wine Rack
Next: Home Theater,
TV or Stereo Cabinet
Full guide: How to Plan & Build Bookcases, Cabinets & Shelves
Product
Catalog
