Although it is not difficult, building a case involves the same steps needed to create a more elaborate piece of furniture. The materials must be measured, then cut and shaped into individual components; the parts assembled into a structure; and the wood finished to protect it and give it color and luster. Each step is an opportunity to practice fine craftsmanship.
Customizing a case
Before finalizing your design, choose the special features that will tailor the case to your specific needs. These features include adjustable shelves, drawers, cupboard doors, or racks, in or on the case. The list is large and nearly all of the items can be incorporated into almost any of the structural designs shown in the final section of this guide.
Because of this, the special customizing features are displayed in a section of their own.
Look over the “Adding Features” section and decide which options will best suit the case you are constructing. Make your decisions based on the look you want to achieve and the purpose and convenience of the piece. It is important to make these decisions before finalizing a design or starting construction. This way, you can adjust dimensions and make minor changes to the case. For example, if you want to hang a pair of doors on the corner cabinet shown later in section X , you will have to add a center stile to the face frame.
Construction steps
After you have designed and drawn plans for the project and have purchased materials, you are ready to begin building.
The following pointers will help you to visualize the procedure of transforming a pile of wood into an attractive and useful piece of furniture. This list is not a set of hard-and-fast rules. If the design makes it more logical to do things out of sequence, that’s fine. One of the enjoyable aspects of woodworking is that there are always options.
+ Clear your work space and check tools. Sharpen or adjust tools if necessary. Check that you have adequate supplies of such staples as glue, brads, and abrasive paper.
+ Carefully measure and lay out the stock, then measure again.
+ Rip boards that are not already cut to proper width.
+ Crosscut boards to proper length.
+ Make special cuts required by your design, such as dadoes and rabbets.
+ Drill holes for doweled joints and shelf supports. Drill countersinks for all screw heads.
+ Sand inside surfaces of the case as well as surfaces of shelves and dividers that will be installed inside. At this time you may want to apply a finish (stain or paint) and attach hardware to the inside surfaces.
+ Assemble the face frame, if the design calls for one, and let glue set.
+ Assemble the case, joining sides (and vertical dividers, if any) to top and bottom pieces. Set in any fixed shelves, and attach a face frame and the back panel.
Measure the interior and openings of assembled case.
+ Lay out and cut movable shelf boards and drawer pieces.
+ Cut grooves, dadoes, and rabbets on drawer pieces.
+ Assemble the drawers, insert and check them for proper fit, then remove for finishing.
+ Lay out and cut the cabinet doors. Assemble door pieces, if necessary. Check for fit, but do not install yet.
+ Fill or plug any nail and screw holes that might possibly show. Fill cracks and imperfections.
+ Rough-sand entire project, wiping away dust when finished. Remember that a scraper can be used in place of abrasive paper. Re-inspect the piece and fill any remaining flaws.
+ Apply a sanding sealer (unless it conflicts with the finish you have selected) then sand entire project with finer abrasive paper.
+ Apply the finish of your choice. See next section of this guide for finish alternatives. Sand project or rub with steel wool, and apply another coat of finish. Repeat these finishing steps, if required.
+ Install shelf brackets, hang shelves, hang cabinet doors, and install drawers. Adjust drawer glides and door hinges so that they operate smoothly.
+ Fit latches, pulls, and special hard ware, if any.

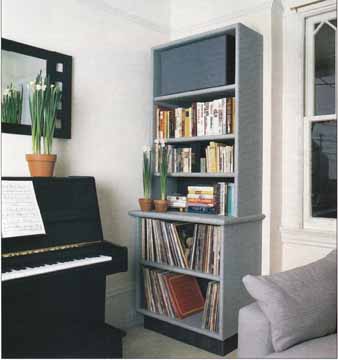
When you build your own cases you can size sections to suit
the equipment that they will store. Here, shelf space at the top matches
the height of the speaker and the lower shelves are deeper so that
records don’t overhang the edge.

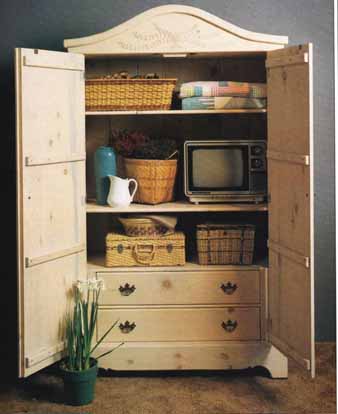
Even if your case is designed to look like a homemade country piece
rather than a sophisticated period reproduction, take the time and care
necessary to make sure that it doesn’t appear amateurishly built.
Preparing a work space -- Clean up your work space and check your tools. Make sure saw blades, chisels, and drill bits are sharp. Unless you have special sharpening equipment, take saws and drill bits to a professional sharpener (Search Google or phone book). Chisels and plane blades can be sharpened on a whetstone, using a simple plastic jig that holds blades at the proper angle during sharpening. Check and repair worn or damaged electrical cords.
Measuring and cutting -- When measuring and cutting material, be as efficient as possible. Minimize waste, or at least try to keep leftover pieces large enough to be useful for a future project. Plan the pieces so that the grain of the wood always runs in the same direction— one cabinet door shouldn’t have a vertical-grain pattern and another, a horizontal pattern. On shelves, keep in mind that the grain should run lengthwise in order for it to have adequate strength.
If you lack extensive experience, initially cut only the material needed for the main structural parts of the cabinet, leaving the back panel, dividers, shelves, drawers, and doors until later. That way you can take measurements from the assembled cabinet and avoid mistakes.
Experienced cabinetmakers scribe measurements onto wood with sharp tools. Purchase a scribe and marking gauge or simply use a sharp pencil. Most importantly, when cutting material, make the cut on the waste side of the scribed line or mark, preserving the mark on the board.
When cutting dadoes, rabbets, grooves, and mortises, always use scrap wood to set up tools. Don’t cut actual material until all adjustments on equipment have been made.
After cutting but before assembling the collection of pieces, take the time to do some finishing work. The first thing you should do is plane rough or oversized pieces, clean out mortises and dadoes with a utility knife, and generally sand all the edges and surfaces that will be hard to reach once the project is assembled. You may even want to apply finish to inside surfaces and install drawer guides or turntables on pieces that will be hard to reach once the case is assembled.
Checking the fit
When the major pieces are properly prepared, loosely assemble the case, without fasteners or glue, just to check the fit. Of course it will probably be impossible to assemble the whole case in its final form, but make sure at least that any 17-inch pieces weren’t cut to 7 inches by mistake. And, check that dadoes and mortises will accept their respective counterparts—you don’t want to discover mistakes after applying glue.
Assembling the case
If the pieces fit, start the assembly. Each project demands a different order of assembly. A cabinet with H-shaped dividers might require that the dividers be assembled first, then installed as a sub-assembly when the rest of the case is put together. A bookcase, on the other hand, might require that you set a number of fixed shelves into one side panel and quickly fit the other side panel before all the glued joints set up. Two rules that you should always follow when assembling a case are:
+ Carefully plan the order of assembly before starting to make sure that there is a way to install each subsequent piece.
+ Square up and clamp the case each time you pause to let glue dry.
Applying a face frame
If the pieces that make up your case are plywood, it will be necessary to cover the exposed front edges. And, even if that case is made of solid wood, a face frame will give a professionally finished look.
A face frame is constructed from thin boards of solid wood. A similar effect can be accomplished by applying sheet or tape veneer, but if a design includes doors, it is easier to attach the hinges to a face frame.
Prev.: Joints
Next: Finishing Techniques
