|
s |
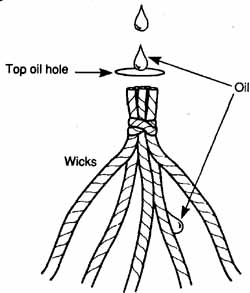
Oiling Your Serger A serger’s need for oil will require more care and diligence in your maintenance. Even fresh from the carton, most sergers seem to be coated with a film of oil. A commercial serger actually sits in a pan of oil when it's run- fling. There are two reasons for this in creased use of oil: 1. Speed. A serger functions nearly twice as fast as a traditional sewing ma chine. This speed creates more heat. The heat breaks down the viscosity (the thickness) of the oil, which causes it to evaporate faster. Therefore the serger needs more oil. 2. Distribution of oil. The majority of overlocks have a hole on the top of the machine that the manual indicates “needs more oil.” Few manuals are specific about amount. The reason you need to put large amounts of oil in the top is that most sergers use a wick for a large part of their lubrication needs (Fig. 8.1).
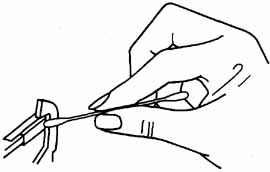
This hole in the top of the serger is the uppermost part of a group of wicks. There may be as many as eight of them knotted right below the sur face. These wicks feed oil to all the essential parts in the machine. The problems of a wick-fed machine are twofold: 1. Like a kerosene lantern wick, the oil in these serger wicks must travel the length of the string and fill it up before it can begin to lubricate the parts it touches. 2. The wick is exposed to the air as it makes its journey through the ma chine. Inside the serger the oil will simply evaporate. What the manual means by “add more oil” is about 20 drops in the wick area about once a month. Most of the more common oiling holes on a machine are enclosed in other metal pieces that prevent this constant evaporation. If you put the overlock away and don’t use it for three months or more, oil it and let it sit for an hour or two before you begin to sew. It takes that long for the oil to work. You almost can't over-oil and damage a serger. The only exception to oiling too much is if you were over zealous, going into the back or side vents and getting oil in the motor. You can under-oil a serger. Listen to your machine and be aware of the changes in noise level. A serger will be come louder and more clattery as it runs out of oil. One day I was making tablecloths and napkins for a large group. I ran my serger for four straight hours, making one rolled hem after another with out slowing down. Finally, the serger growled its last breath and stopped. After a ten-minute cool-off and a thorough oiling, we were off again, with no permanent damage. Don’t be as careless as I was. Listen to your serger. The other lubricating holes only need to be oiled every three months. They are not exposed to the air, which makes the difference in their lasting power. Your manual has a diagram of all the spots to apply oil. Get to know this diagram. The more you use the ma chine, the more oil it requires. A good rule of thumb is to rock the handwheel with one hand while looking inside. Whatever moves together, oil. Proper and adequate oiling will increase the life and productivity of your machine. Few overlock manufacturers recommend that you don’t oil their sergers. These brands have sealed bearings. I would be wary of buying one if the ma chine was going to be used for sustained periods of time. However, this can be a handy feature for the infrequent sewer. Use any standard sewing-machine oil on your serger, but nothing with additives. Hint: Keep your Fray Check separate from your oil. An accidental mix-up will ruin the wicks and prevent them from absorbing oil. Cleaning Your Serger An overlock comes with a cleaning brush, which is a subtle foretelling of things to come. Because of the serger’s ability to cut or trim the fabric edges, it creates an incredible amount of fuzz. Try to keep it fairly free of the fuzz, but you don’t have to be a fanatic. Fuzz does absorb oil, and that's a real issue with these machines because of their need for oil. If allowed to accumulate, fuzz can clump and prevent your machine from operating. Clean your serger at the end of each project or more often if the fabric calls for it. It is difficult, if not impossible, to keep your serger immaculate, but still use your brush often and liberally. If the fuzz seems to stick, dip the brush in rubbing alcohol to cut through the oil and residue. This will strip away the oil; you must replace that oil immediately. Due to the speed at which a serger moves, the flow of thread through the tension mechanism can build up excess fuzz, dye, and surface finishing agents. The specific area to clean is between the separating disks. Loosen the tension mechanism by turning it to zero (left, counterclockwise). Dip a soft cot ton cloth in rubbing alcohol and slide it between the separating plates to re move thread residue. I recommend using caution with canned air products. Most contain Freon, which is extremely cold. Instead, I use a warm hair dryer to clean my machine. I find the warmth helps cut through and thin the oil. Also, the intensity of the canned air stream has a tendency to push the threads around so violently, they dislodge from the proper thread carriers. Prolonging the Life of Your Cutting Blades I have a ten-year-old serger. It has been used and abused in my classroom by all my students for the last four years. This serger has probably overlocked the edges of five to ten garments per week for most of its life. If it were a car, it would have 500,000 miles on it. Yet this machine has only had three blades since it was new. One of those was wrecked by cutting 4-mil plastic to make four paint aprons. I believe the blades have had such excellent endurance because I clean and lubricate the blades every time I do the rest of the machine. Overlocks with a blade that hangs from the top are usually designed to swing the blade up and out of the way. Locks with a cutter that comes from the bottom can also be moved away from the fixed cutter, but often it requires loosening a screw, so read your manual. Use a cotton swab dipped in rubbing alcohol to clean the surfaces of the cutters (Fig. 8.2). After the blades are clean and dry, apply a thin film of oil on the fixed cutter, using the other end of the swab.
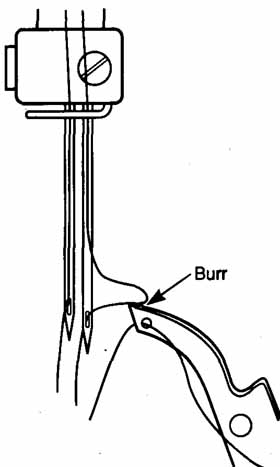
Removing Burrs The most common and serious problem in an overlock can be traced to one thing—BURRS. Even the smallest nick or rough spot can wreak havoc with your stitches. Many of the so-called tension problems of an overlock are the result of burrs. When you clean your machine, check thoroughly for rough spots on the throat plate, bottom and finger of the foot, and both loopers (Fig. 8.3).
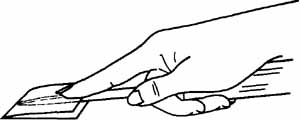
When a needle breaks on an over- lock, it's almost guaranteed that it hit another piece of metal. These collisions usually cause a burr, so check carefully after a break. The thread in the loopers can't slide back and forth to form the chain if they catch on a burr and jerk the thread. Be sure to check the stitch finger, as well as the bottom of the foot. The constant chaining off will cause grooves where the feed dogs scuff against the foot, and the ridges can cause jerky movements when the fabric slides through. The best way to remove burrs is to use crocus cloth (Fig. 8.4). Crocus cloth is located near the sandpaper in hard ware stores. It isn't truly sand paper, but a super-fine buffing compound impregnated on denim.
To remove burrs on loopers and the stitch finger, use a quarter of a sheet of crocus cloth folded over the blade of a small screwdriver. Stroke back and forth evenly without hard pressure. To smooth the bottom of the foot, put the crocus cloth on a table, compound up. Rotate the foot, pressing it lightly against the crocus cloth. |
| PREV: Overlock Choices and Options | NEXT: Thread: Functional and Decorative | Home |
Thursday, 2009-04-30 18:33