No matter what fabric you’re using or what technique, do you always sew with the presser foot that came on the ma chine when you bought it? Feet make a tremendous difference in the ability of your machine to make good quality stitches and especially to keep a balanced tension. Using the wrong foot for a certain fabric, for example, can actually throw off the tension and cause problems that you might be tempted to blame on “the tension” or on a crummy sewing machine.
The presser foot either holds the fabric against the feed dogs firmly or it doesn’t. If the fabric isn’t firmly held, you will get flutter. If the h can shift easily, it won’t offer the necessary resistance against the thread to form stitches with correct tension.
All-Purpose Feet
Only two types of presser feet can be called “all-purpose”: (1) the standard sewing foot and (2) the satin-stitch or embroidery foot (Fig. 4.1). Both are used in all phases of sewing to create different effects on the fabric. Don’t confuse these feet with specialty or one- purpose feet, such as a buttonhole foot.
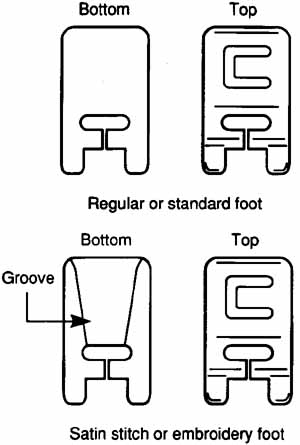
Fig. 4.1 Comparing standard and satin stitch feet: Regular or standard
foot; Satin stitch or embroidery foot
When you pick up a presser foot, take a look at the bottom as well as the top. It is the bottom that comes in contact with the fabric while the feed dogs are moving it.
The standard foot is flat all across the opening toward the back so that the fabric can ease up under it. It is almost always metal, and its purpose is to hold the material firmly and evenly all the way across the feed dogs. This is the foot that came on the machine, and although you will use it much of the time, it does have limitations.
That’s why the satin-stitch foot was created. If you turn it over to look at the bottom, you will notice a groove down the center from front to back. This indentation allows the foot to slide over the buildup of thread from satin stitching, without getting caught up and creating mountains. The satin-stitch foot is usually plastic.
If you were to use the all-purpose foot for satin stitching, there would be no room for the buildup of stitches to pass through smoothly.
Sometimes, however, you may want to use these presser feet for something other than their appointed purposes. These other uses create the appearance of different kinds of tension.
For example, if you are sewing on squooshy fabric such as soft sweat-shirting and you don’t want those ruffled seams, you can use the satin-stitch foot. The groove allows the fabric enough room to pass through without being pressed so tight that it squeezes out around the feed dogs, only to recoil again when released. This foot allows the fabric to keep its shape while being sewn, with enough pressure not to cause skipped stitches from flutter.
On some machines you can loosen the pressure regulator to accomplish this purpose, but if possible, change to the embroidery foot instead. The more firmly the fabric is held against the out side edges of the foot, the more smoothly the feed dogs will move. The two methods don’t exactly perform the same operation, but the results are similar.
Perhaps you’re thinking, “OK, I don’t ever want ruffly seams, so I’m only going to use the satin-stitch foot.”
Wrong.
If you remember how stitches are made, you know that as the needle pulls out of a piece of fabric the stitch is formed. If you use the satin-stitch foot all the time, especially on lighter fabrics that can flutter, then when that fabric moves up with the needle into the groove of the foot, the little thread bubble won’t form underneath. Instead, you will get skipped stitches (Fig. 4.2). The movement in that free space in the foot will also encourage puckers.
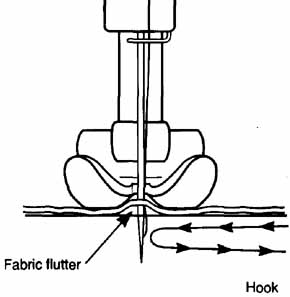
4-2 How stitches skip when wrong foot is used
If you are in fact experiencing skips and puckers and don’t know why, check your presser feet. They are not interchangeable; they have different purposes. Make sure you are using the right one.
Specialized Feet
Many alternate feet are available to expand the range and enjoyability of sewing projects. A few, however, need special mention. They are single-purpose feet and are not interchangeable.
Buttonhole Foot
Whether you have a simple zigzag machine or a new automatic one, if you want to make a buttonhole, you must use a buttonhole foot (Fig. 4.3).
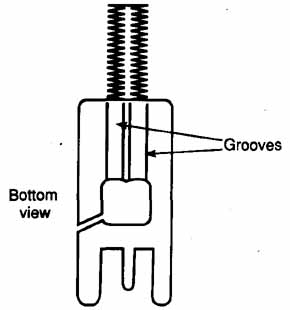
4-3 Buttonhole foot
Buttonholes are two parallel lines of satin stitching that must be lined up carefully and have enough space between to be cut open. When you use an all-purpose foot, the bulk of threads from a row of stitching forms enough resistance to keep the machine from moving the fabric forward at all, or at least to make it slide off to one side. A buttonhole foot has special grooves on the bottom or an open space to allow the first row a place to rest while the second row is being formed.
Some new buttonhole feet will fit on your machine to measure the buttonhole for you. You need to ask around. If your machine has a built-in buttonhole—that is, it will stitch down one side and automatically reverse at the adjustment of a mechanical knob—you can now buy a foot that will actually measure the button and show you where to stop, instead of just sliding along with the fabric (Fig. 4.4).
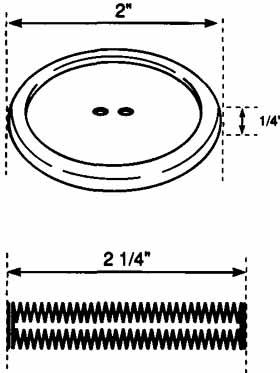
Fig. 4.4 Buttonhole opening measures one width, plus one thickness
These new feet also make corded buttonholes. You would use them to reinforce jeans buttonholes or on sweater knits or stretch fabrics to keep the buttonholes from stretching out of shape. Each foot works basically the same way, but there are variations. Ask the salesperson from whom you buy it.
I recommend looking at the newest feet. They are longer, have some space to see the opening, and have some kind of measuring device (Fig. 4.5). Because they are long, however, and be cause you usually sew along the edge of the garment, the fabric won’t move forward because the weight falls to the back of the foot. With these longer feet (if they stick out more than an inch in front), it's a good habit to put your finger on the front end to keep it from bouncing. Don’t push or shove; simply make a counterweight so the entire foot presses firmly onto the feed dogs.
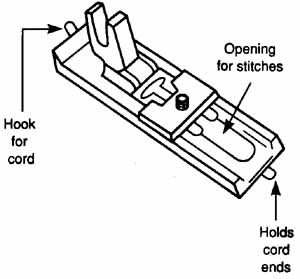
Fig. 4.5 Long buttonhole foot: Opening for stitches; Holds cord
ends; Hook for cord
You must use interfacing for a professional-looking buttonhole. If the pattern or fabric demands a buttonhole in an area where interfacing would be inappropriate, you may use a removable stabilizer. The newest on the market are plastic-like, water-soluble products used primarily for appliqué. If your fabric is white, you might try a paper backing. Some patterns use a third layer of fabric.
Don’t forget that a buttonhole is a zigzag, so it can produce tunneling. You may need to decrease your upper and lower tensions to avoid puckering on finer fabrics. Also, be careful to pinch the threads when you pull out your finished work or you will wind up with one side puckered.
Beware of the super-automated buttonhole feature on the new computer machines. It doesn’t allow for variable thicknesses and placements of buttonholes. If you can’t override the programming, you won’t have the flexibility needed when you encounter a problem.
Be realistic about what your buttonholes will look like made with a home machine. The two sides will never look identical because one side is coming forward and the other is going back up; they are not mirror opposites. You want to make the sides as evenly spaced as possible between stitches, but don’t expect them to look the same. The ma chine can't do it.
You may have been taught years ago to go around the buttonhole twice for that “perfect satin stitch” look. This mind-set prevents you from seeing that such a heavy buttonhole neither buttons well nor looks professional.
Remember: Your goal is to create a good-looking overall garment, not perfect individual sections. If you were as picky about the clothes you buy as the ones you make, you’d be naked most of the time.
Here are several suggestions for opening the finished buttonhole. First, what is commonly called a seam ripper is in reality the buttonhole knife. By scraping its unsharp edge three or four times down the center of the closed buttonhole to separate the threads, it will open easily and you won’t cut the sides (Fig. 4.6). If you have a tendency to be strong-armed, put a pin across the bar tacks so that you can’t cut through them (Fig. 4.7).
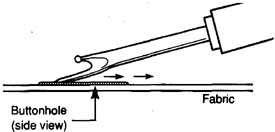
4-6 Scrape edge of seam ripper down center of closed buttonhole to
separate threads.
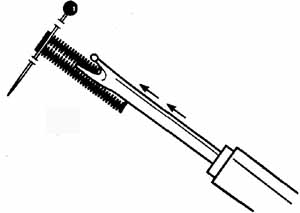
4-7 Pin prevents accidentally cuffing through bar tacks
For heavier fabrics such as leather or several layers of wool and interfacing, investigate a buttonhole chisel.
Overcast Foot
If you have a simple zigzag ma chine with no possibility of making the serpentine stitch and you want to do a full-width zigzag at the edge of a fabric, consider buying an overcast foot. This foot has a projection that stabilizes the thread until the machine makes its stitch, which prevents tunneling even on very light fabrics (Fig. 4.8).
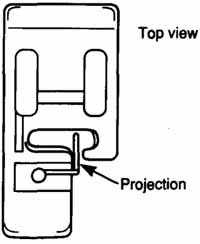
4-8 Overcast foot
Blind-Hem Foot
You can obtain a blind-hem stitch by machine that’s as invisible as by hand, but there is a trick. The reason the dim- pie shows so much by machine isn't because the bite is deeper, but because the amount of pull necessary for a normal seam is too firm for a blind hem. If you loosen the upper tension mechanism so that the knot falls to the back and the thread doesn’t pull against the hem, making that dimple, you will have a professional-looking stitch using the blind-hem foot (Fig. 4.9). Remember: The goal is to arrive at a beautiful hem as seen from the outside, not perfect stitches on the inside.
The guide on this foot also helps make the seam straight. This means it’s useful for straight edge stitching. Just place the guide at the edge of the seam and you will have even lines and speedy sewing (Fig. 4.10).
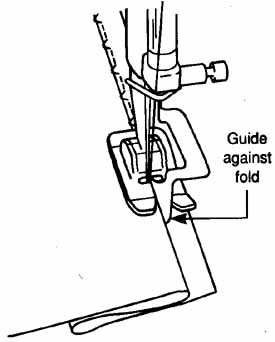
4-9
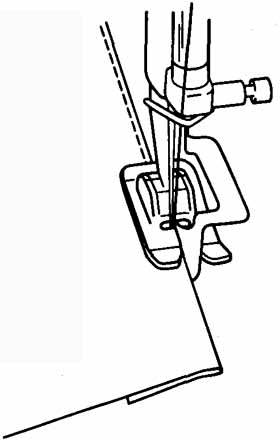
4-10 Using a blind-hem foot for perfect edge stitching
Zipper Foot
Zipper feet are made to hold one side of any project that has a lump—for example, the teeth of a zipper or cording. The foot is designed to sew completely clear of that lump. But many of the newer feet, especially snap-on ones, hang up on the very areas they should be avoiding.
Please check that your zipper foot either works correctly or that your shank is of universal standard so that you may purchase a foot that does work. The shank portion of most snap-off feet is itself removable, so other standard feet can be used.
Shanks
Speaking of feet, we must also talk about shanks. A shank is the part of the foot that attaches to the machine.
Shanks are made in three standard heights; high shank, which measures about 1” from the base of the foot to the screw-on portion; low shank, about 1/2” and is the “most standard”; and slant shank, which is for slant-needle machines (Fig. 4.11).
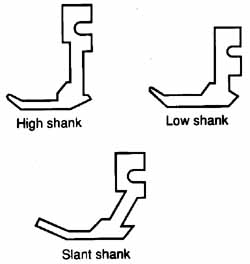
4-11 Presser foot shank types: High shank; Low shank; Slant shank
Too many changes have occurred over the years, even within the same company, to give a chart of absolutes as to which companies make which shanks. For example, Kenmore makes every kind of shank, depending on the year and manufacturer. You must know your machine’s model and number when you buy feet and optional attachments. Your best bet is to take your manual and standard sewing foot with you.
Today more machines use the snap- off rather than the screw-on feature for attaching presser feet. In this case you must also unscrew the shank portion and take it and the standard foot with you to be sure you buy the correct-size attachments.
I caution you to make sure any ma chine you purchase can be fitted with one of the three common shank types. Several machines on the market today have nonstandard shanks that limit attachments to those that come with the machine. If a new, helpful, or interesting foot is developed, or if you need a special one, you will not be able to use it on your machine.
Bernina, by the way, is an animal unto itself, with its own shank design. But the company also makes an adaptor that attaches to other standard, low-shank feet.
Feed Dogs
Since feed dogs are the real movers and shakers of the sewing machine, you need to know how to use them to your advantage. You must next under-stand how feed dogs relate to presser feet and to the total tension in your machine on any given project.
Feed dogs are those tooth-like or pyramid-like projections that grab the fabric from under the foot and move it forward or backward. For the best seams and decorative work, you want as much fabric as possible in contact with the feed dogs.
For the fabric to move at all, the needle must come down and enter the fabric just as the feed dogs drop or stop moving. In other words, the needle must enter when the fabric is stationary.
Most of us don’t take into account the motion and function of the feed dogs when we sew. We assume that the layers automatically move through together. But we know that in the race between the layers, the bottom one usually wins. We’ve gotten to the end of the seam, and the top layer is 1/2” to 1” longer. This is because the feed dogs push up against the lower layers and grip it more firmly than the top layer.
The way you hold the fabric can aggravate the uneven feed. Placing your fingers on the top of the fabric creates more drag on that layer, allowing the bottom layer to move through even faster. You can control the feed by put ting one hand under the fabric, barely holding it in place with your thumb on top, and lifting it slightly just in front of the foot. That puts more drag on the bottom layer and assures a more even feed.
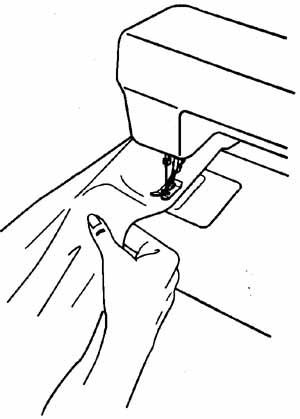
4-12 Control feed by lifting fabric slightly
There are times when you can use this idiosyncrasy to your advantage, however. When sewing a piece where the pattern suggests easing in one layer, for instance, or when you know one layer is longer, then put that layer on the bottom and let the natural action of the feed dogs take over. The longer layer will be pulled through first with each stitch movement. The two will come out even, without puckers or pleats. You can, with practice, go so far as to hold onto the top layer and almost gather in the bottom to obtain an even feed.
Note: When the feed dogs move the fabric, you can’t expect them to push more than two layers through at one time and maintain quality. I suggest “two-by-two” sewing, meaning that you sew only two layers at a time. If you must put four layers together, such as in a collar, sew two together first, then the other two. Then treat them as one each and sew them
together.
Feed dogs can wear out, especially the rubber ones made in the late 1960s when knits were popular. The rubber allowed the fabric to move through without damage. Once the rubber hardens and becomes slick as it dries out, it can’t move any material. You can replace rubber feed dogs fairly inexpensively.
Metal feed dogs rarely wear out unless the metal was of poor quality. If so, they can flatten out over time and will no longer grab the fabric. The pyramid-shaped feed dogs, by the way, hold the fabric much tighter than the tooth- like projections. These metal feed dogs can also be replaced, unless they were welded onto the machine.
When doing free-hand machine embroidery or monogramming, you may want to dispense with the feed dogs entirely. In some machines they can be lowered mechanically; in others a cover plate is required. You can also set the stitch length at zero and ignore the feed dogs.
Bobbins
The importance of a carefully wound bobbin can't be overemphasized. If the thread isn't smooth and even on the bobbin, your stitches will not form properly.
To wind the bobbin properly, first take a look at the bobbin itself. The bobbin should have a hole through which you can run the thread up from the inside out. Hold onto the thread firmly, depress the pedal slowly and the threads will twist off, leaving no excess thread on the outside of the bobbin, which also can throw off the tension (Fig. 4.13).
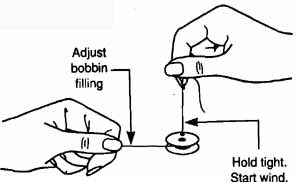
4-13 Winding a bobbin
Always rest a finger on the top of the spool of thread to ensure a smoothly wound bobbin. You may have to help guide the thread with your finger for an even wind; no machine is made with an absolutely perfect bobbin winder. (In fact, that’s one of the things we gave up in the evolution of sewing. Today’s machines are more versatile, but they don’t wind the bobbins nearly as well.)
Any method of filling the bobbin through the eye of the needle will have inherent disadvantages caused by the characteristics of thread. All thread contains slubs, and when they catch on the eye in this method of winding, you risk an improperly wound bobbin.
Can you bring thread directly from the needle across to the top (for a top- or side-winding bobbin) to eliminate having to unthread the machine? Yes, you can do it. No, it's never a good idea because of slubs in the thread.
If your bobbin winds with difficulty, your rubber bobbin-winder tire may be worn out. The tire can be easily replaced.
Be on the alert: Even the smallest crack or burr on a bobbin can wreak havoc with your stitches. Be especially suspicious of the plastic variety; often the problem isn't easily seen. If in doubt, throw it out, or at the very least, try a new one.
Note: There is no such thing as a universal bobbin. If it doesn’t fit your machine, don’t buy if. Bobbins are milled to fit exactly so that the tension will be in balance; improperly fifing bobbins will throw off the tension. Although many brands seem similar in size, make sure you know which size yours requires.
Knob Knotes
Stitch Length
Stitch length is the dial on your machine that measures the distance between stitches. It is expressed in one of two ways: millimeters between stitches (mm), generally 0 to 4; or stitches per inch, from 6 to “fine.”
A basic stitch length for general sewing is about 2 1/2 mm or 12 to 15 stitches/inch. The measurements are not consistent with all fabrics; it's an average measured for a hard-finish, medium-weight fabric.
Note: If you sometimes don’t have the strength to release the clutch on the handwheel in order to wind a bobbin, try this method: Take an old (wooden) spool of thread and place if under the needle-clamp screw (with the foot unattached), with the presser-bar lifter down. When you bring the handwheel forward, this maneuver should give you enough leverage to release the clutch (Fig. 4.14). If also helps to use a rubber jar lid to get a grip on the wheel knob. Remember, right is tight, so turn the knob to the left, or toward you.
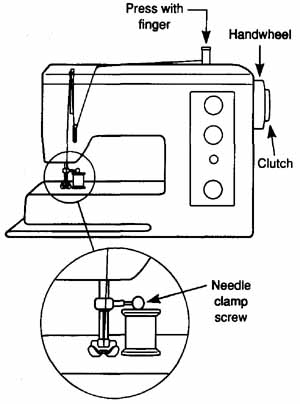
Fig. 4.14 Loosening a too-tight handwheel
Thick fabric needs a longer stitch length than thinner material does to achieve the same distance between the knots. Wool and fleece need a longer stitch to cover the same territory be cause they have so much more resistance to being moved. In other words, thick fabrics don’t move as easily between the feed dogs and the presser foot. Fine fabrics actually sneak through the feed area more quickly; that’s why they sew best seams at a length of 2 mm or 15 to 18 stitches per inch.
Remember that the thread for each stitch is either yanked off the spool by the uptake, or it tries to pull back some of the thread from the previous stitch. That’s why the stitch length needs to be adjusted according to the texture of the fabric. A general rule of thumb is, the thinner the fabric, the shorter the stitch length. As thin fabric is moved forward, it doesn’t have the strength or resistance to hold onto the thread until the machine makes its next stitch. So, unless the stitches are short, it puckers.
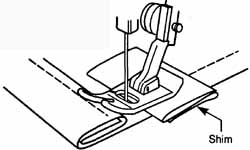
Fig. 4.15: Use a shim to create even sewing height over thick seams
Conversely, a stiff fabric will help stabilize the previous stitch before the ma chine makes the next one, so you can use a longer stitch length and not get puckers.
A machine is set up to pull down 4 mm of thread for its longest possible stitch length. As that's its maximum, there’s no more give at that point. Longer stitches therefore have no slack with which to withstand a jerk, so they can break apart more easily. As stitches get shorter, there is more slack between the knots because they’re not at maximum tautness. So if you want fewer puckers and more give, shorten your stitch length.
Note: When using longer stitch lengths, loosen the upper tension mechanism so the knots fall to the bottom. Then the fabric won’t pull up and pucker.
Needle Position
Needle position is greatly under estimated for its ability to obtain the best possible stitches. It has many uses but isn't a feature on every machine.
For example, accurate, straight stitching lines are always a challenge for edge-stitching and 1/4” seams. People usually move the fabric to the left to achieve this end. If instead you can move the needle to the left or right as needed (Fig. 4.16) and use the outer right edge of the foot as the guide, the feed will be more even and the lines will be straight. The sewing will also proceed more quickly.
It is difficult to find a guide for accurate edge-stitching, and it's especially hard for the machine to push through evenly if the feed dogs are in contact with only a portion of the fabric. The foot has a tendency to fall off the edge, looking for less resistance, so you end up with wavy stitch lines. Again, if you have this option on your ma chine, move the needle instead of the fabric.
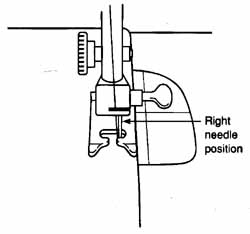
4-16 Move the needle, rather than fabric
Remember: For the most professional work, as much fabric as possible must come into contact with the feed dogs.
Needle position is also useful for machines without a single-hole needle plate. When you want to work on finer fabrics, for example, if you put the ma chine on left (preferably) or right needle position, then three-quarters of the needle will be surrounded by the rim of the hole. The fabric won’t get poked down in and become pulled or frayed. Don’t forget, however, that when you change needle position, you have also changed the placement of your 5/8” seam-allowance guide.
Note: If your machine doesn’t have a single-hole needle plate, you may want to tape the opening with opaque Scotch tape to prevent fine fabrics from being pushed down in with the needle.
If you don’t have a needle position on your machine, you will have trouble adjusting for many of the alternate presser feet. For example, the needle must be in the exact position to get a good hem with the rolled hem foot. If your needle is just 1/16” off, you won’t get the stitching line down the center of the roll, and the hem will not work.
Pressure Regulator
Not all machines have a pressure regulator or adjustment dial. They are more common on older machines. The dial was invented to help thicker fabric move between the feed dogs and the foot by creating more space. This adjustment changed the pressure on the foot for different weights of fabrics.
Now most machines are spring- loaded, so the pressure regulator is obsolete. Most often you will want the pressure on the fabric to be as tight as possible, so it's better to change feet to lighten the pressure. Adjusting the pressure regulator can increase the risks of flutter and skipped stitches.
Note: If your machine isn’t feeding properly, check that your pressure regulator is engaged. Also check your sew/darn lever, if your machine has one.
Tension Mechanism
By now, you understand that tension is resistance against the thread as it travels through the machine. It isn't only that little knob or dial on the front or top of the machine that you turn to adjust the setting. This statement bears repeating, because not understanding this fact is a mind-set that creates most home-sewing problems.
What we refer to as “tension” is basically two things: (1) Where do the knots fall in the fabric? (2) Is the seam puckered? (Remember, if the thread is thicker than the fabric, you will see the knots protruding slightly on both sides.) If either of these two variables is improper, we usually call it “tension problems.” But the real problem is usually a multitude of layers. The least of our problems is usually that knob.
I have discussed the upper tension mechanism in describing the thread’s path through the machine. The bottom mechanism isn't as strong as the top because its only function is to anchor the thread firmly enough so the top thread can loop over to form the knot or stitch. The top thread has a longer path to the knot, and so has a wider variable more critical to stitch formation.
There are reasons and uses for changing both upper and lower tension mechanisms to get the machine to work to your advantage.
On certain machines, you can loosen the upper mechanism for smoother long stitch lengths. Because there is less resistance, the fabric can then move forward without pulling up and developing puckers.
When you work on lightweight fabrics, such as silk, you might try loosening the upper and lower mechanisms equally. The knots will still form in the middle, but there won’t be so much pull against the thread to cause puckers. Finer fabrics have difficulty stabilizing the stitches, as stated, so this is one way to reduce the tug of war between the threads.
If you loosen only the upper tension mechanism, the knots fall to the bottom. In reality, that’s better than puckers, but the seam will be weak. If the two mechanisms are loosened equally, the knots are stronger and will not pull out as easily.
Basting
When you baste, loosen the upper tension mechanism by about half the normal. Also up the stitch length all the way. This procedure allows the knots to fall to the bottom, and the lower thread will pull out more easily when you’ve finished. Also, you won’t get puckers, even with the long stitch.
Although there is no danger to the machine in loosening this mechanism, if you loosen it too much, you can cause a jam underneath; there will be no resistance on the thread to pull it back up again. If you must loosen the tension, do so in small increments, only until the knots fall to the bottom.
Gathering
To machine-gather, tighten the upper tension mechanism so the knots come to the top of the fabric. The feed dogs still push the fabric, but the thread isn’t giving at all. The material then bunches up as you sew along.
Another gathering technique, called finger-easing, is to put your left or right index finger gently behind the presser foot as you sew. That action will cause the material to pleat up slightly, so the thread doesn’t have space to spread itself to form a complete stitch. Instead, it gathers the material. This technique is especially good for bias or corners.
If you have a pre—World War II machine, however, don't crank the tension knob up and down all the time to baste or gather, unless your manual recommends it. You can permanently compress the spring that regulates the tension in that assembly, throwing it off. If you have had problems with varying tensions on that mechanism, know that the knob should not be adjusted. In some cases a repair person can untighten the spring, but that’s costly. Preventive maintenance is always best.
The tension mechanism should not have to be adjusted to accommodate multiple layers, since they are more stabilizing for the threads. The machine will automatically pull down more thread for a proper stitch.
As for the bottom mechanism, if you plan to adjust it often (for example, for machine embroidery or silk), please buy another bobbin case. Over-adjusting the set screw can eventually loosen it so much that it will no longer hold any tension. Mark the extra bobbin case with a spot of nail polish.
Zigzag Stitch
Let’s start by describing how the zigzag stitch is formed. You usually zig-zag on your machine’s widest width and on medium length; let’s use a width of 4 and a length of 2 for now. If the machine is then set up to pull down a maximum of 4 mm of thread and you also want it to move 2 mm forward, then you are asking that it pull down 6 mm of thread to cover a 4 mm space. So you get puckers—that all-too- familiar tunnel down the center that says to everyone, “Hi, I made me.” In fact, these ironed ridges are among the worst tell-tale signs of homemade clothing. They can be avoided.
Put the edge of the fabric under the center of the foot. By doing this, the needle will zag off the edge, but you will be using only 2 mm of thread instead of 4 mm across, equaling 4 mm total thread for 4 mm of distance. Your seam allowance won’t pucker, and the edges won’t pull up (Fig. 4.17). Best of all, no tunnels; the seam allowances will lie flat.
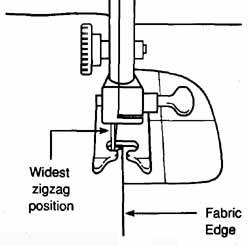
4-17 Preventing puckers
I believe that a zigzag should be used only for satin stitching, button holes, and appliqué. When you sew these projects, be sure to stabilize the area beneath with something like Stitch ‘n’ Tear. When the material is firm enough, the machine will automatically pull down another little length of thread to match the resistance of the fabric, so you eliminate tunneling.
The zigzag is also wonderful for making any long, straight seam, particularly on drapery or bias fabrics. You may have noticed that if you used a straight stitch on a round or A-line skirt, for instance, the seam appeared flat when laying on a surface. Yet it pulled up when the garment was hung or worn. This is because it had no give; the seam was stabilized into one straight line. If instead you use a small zigzag, a width of 1 and length of 1 1/2 or “fine,” this seam will hang out the fabric and the sides won’t pull up shorter or pucker. The seam will still press open as well.
If you thought this problem was caused by “the tension,” now you know better. It was caused by the way the seam was formed.

4-18 Properly adjusted zigzag (from wrong side)
This small zigzag also works well to form seams with knits if you don’t own an overlock, or if you just want to join an area on wool jersey, on circles, or wovens cut on the bias, for example.
Don’t forget that the spongier or thicker the fabric, the more slowly it will move through your machine. You may need to increase your stitch length slightly on zigzag so that the seam hangs well.
Note: Repairmen always test the tension of any machine on zigzag. You can also do this. If you set it at its widest width and normal length (2 1/2 or 15/inch), then when you turn the material over you should see small loops on the bottom (Fig. 4-18). This is correct. The knots should not meet in the middle on zigzag be cause then they would come up to the top when the machine was reset for straight stitch. You need that extra pull on the upper thread—more tension—so that it can pull itself up after circling the bobbin casing.
Also note that if you are getting skipped stitches on your zigzag, your machine might be out of time. If so, it means the hook is barely picking up the first knot and missing the second one altogether. Skips on the left can also mean a needle problem (burr, wrong size), while varying skips can indicate improper or poor-quality thread.
For all those times when it seems that no matter what you do you still get puckers, completely rethread the machine. Then try a test sample on the actual fabric, with correct thread, needle, and foot, and see if that makes a difference.
Serpentine Stitch

4-19 Serpentine stitch
Most machines now feature an al ternate stitch called the serpentine (multiple zigzag or running) stitch (Fig. 4.19). I consider it the most underrated stitch in the world because almost no one uses it. Most likely your instructions recommend it only for mending. Here is another good example of mind- set: we think of a zigzag as the first alternate to the straight stitch. (In fact, during the 1950s, pattern companies used the term in their instructions to do what we now call “clean finish.”)
Because each stitch in the serpentine is made up of many tiny stitches, it will lie flat and won’t pull up. It is also strong. You can reason this out be cause you now know that the slack between shorter stitches doesn’t encourage puckers.
If you don’t own an overlock, the serpentine is the best over-casting stitch available, especially on facings and single layers. As well, it mends a tear (not a hole) beautifully by keeping the edges from coming apart, whereas a zigzag would create a wad.
Reverse Sewing
A machine doesn't stitch as well in reverse as it does going forward. This isn't your imagination. Timing in re verse doesn't work as well because of the way the hook comes by in its sequence. The way the stitch is formed works better in forward motion.
A machine reverses itself in one of two ways, and both have a proper technique.
Your machine probably has some kind of reverse button or lever that, when pressed, puts the feed dogs into reverse. If you depress the mechanism completely, this action makes a long stitch and results in puckers. If you don’t depress the lever to its maximum, you will have a shorter stitch length and fewer chances of puckering.
Reverse-Cycle Stitches
The other way that the machine sews in reverse is with a special reverse cycle or stretch stitches.
Unless you are careful, these stitches will also pucker. They are not formed like overlock stitches, no matter what you have heard. The home machine has a bobbin, whereas the overlock a looper. Never will the stitches be identical.
Some machines have “straight stretch stitches,” which is a misnomer: they don’t have much stretch. The cycle is usually some combination of two stitches forward, one back. They are an extremely good combination of two stitches, especially in high-stress areas: they will not rip out. For a wonderful repair stitch, set the width at zero. But on anything less than bulletproof poly ester or very firm fabric such as denim, the fabric will usually pucker.
Since these stitches are virtually impossible to rip out, first sew the seam with the normal stitch to test for accuracy. Then go over it with the stretch stitch for reinforcement.
