Much like a traditional sewing ma chine, the problems on an overlock stem not from one factor but from a number of small ones. The number of threads and the different configuration of serger stitches make proper adjustment very confusing. To simplify learning how the overlock operates, to try out new methods, or to trouble-shoot a problem, use a different color thread in each slot. Each thread must be of the same brand and fiber content.
Stitch Formation
When the tensions are correct, the looper threads should lay evenly on the top and underside of the fabric. The shape of the threads resembles a zigzag with a slight loop along the edge.
There are two types of needle threads:
The first is part of the overcast stitch. These thread(s) hold the looper threads together. Depending on the model of the serger, there can be one or two. The thread is carried along the top of the fabric and intersects the looper each time the needle goes into the fabric. When the needle tension is correct, you will see a small loop on the underside and a single line on the top side.
The second type is the chain stitch. This thread is to the left of the edge. The top of the fabric looks very much like a traditional seam. The underside has a smooth ropelike appearance.
Tension Tips
Tension on each machine varies. The dial settings are hand-calibrated by a mechanic and can have slightly different pressure on the thread from ma chine to machine. These settings will also vary with thread brand and category.
Hint: Make a note of each new thread or yarn you use on the work sheet in Fig. 10.1; record the tension settings that worked best, along with a sample. Then you will not need to struggle with recalculating each time you use that thread.
Instead of just twisting knobs randomly, here is a good rule of thumb when you need to adjust the tension:
Right is tight and left is loose
Needle Tensions
The needle tensions are primarily adjusted for differences in length. The longer the stitch length, the looser the tension. The shorter the stitch length, the tighter the tension. A serger doesn't have an uptake or bobbin to allow more or less thread for the distance between the stitches. The farther the distance between stitches, the more thread required to cover the distance, the looser the tension should be.
Looper Tensions
The loopers are adjusted for the width of the stitch. The narrower the stitch, the tighter the tension. The wider the stitch, the looser the tension. A wide overcast edge takes more thread be cause of the increased distance the thread must cover. When making a very narrow edge, you don’t need as much thread to go back and forth. If it's too loose, it just looks like globs.
This can be carried one step farther by realizing that the sideways distance also depends on the thickness of the fabric. When you sew on a very thin piece of fabric, the distance of the looper path is actually narrower because it doesn’t have to go up over and back down. Thick fabric uses up more thread for the opposite reason.
Hint: If the tension doesn't seem to change when you move the dial and you are positive the thread is in the separating plates, the internal spring may be compressed. Turn the mechanism to the tightest and then the loosest settings three or four times to release the jammed spring.
If all else fails, turn all the dials to zero and start over again.
Date: ____________ Project: ______________ ______________ ______________ Stitch Length: ______________ Needle Plate: ____________ Presser Foot: ______________ Presser Foot Regulator Position: ______________ Tensions: Left Needle (LN) ______________ Right Needle (RN) ______________ Upper Looper (UP) ______________ Lower Looper (LL) ______________ Threads: Left Needle (LN) ______________ Right Needle (RN) ______________ Upper Looper (UP) ______________ Lower Looper (LL) ______________ ATTACH STITCH SAMPLE HERE |

Fig. 10.1 Serger sample
Cuffing-Blade Placement
The loops off the edge of the fabric can vary from loose and sloppy to tight and bunchy. These edges can be slightly adjusted by changing the looper tension. If adjusting the tension doesn’t seem to help, the placement of the cut ting blades may be the cause of the problem.
When the cutting blades are in the proper position, the area that actually cuts will be aligned in front of and even with the far right side of the stitch finger (Fig. 10.2). If the cutting blades are too far to the left, the blades will cut the fabric off narrower than the loopers can make a stitch. The tension can not pull in a stitch narrower than the finger it creates its stitch over.
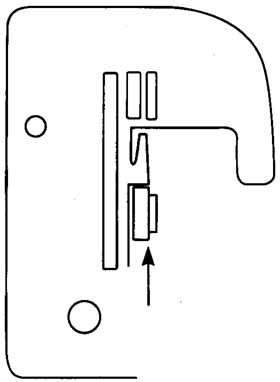
Fig 10-2: Align cuffing edge with right side of stitch finger.
If the cutting blades are too far to the right, the blades will not cut off enough fabric and the overcast will be tight and puckered. The loopers have difficulty moving over the fabric edges and the improper motion can cause fraying.
These differences can be no more than 1/32” but can cause major problems in stitch quality.
This adjustment is the answer to the perplexing problem of large loops off the edge of knit fabrics. Even if the cutter was aligned properly for woven fabrics, it may not be correct for a knit. Knit fabrics tend to stretch and roll when they are cut. When the knit rolls, it be comes narrower than the stitch finger. The looper thread can be tightened until the thread breaks and it still will not make the loops decrease in size.
If these loops are a problem, move the cutting blades to the right until they are past the right edge of the stitch finger by 1/32”. This will cut the knit a tiny bit too wide and when the fabric snaps back, it will be the right size for the finger and the overcast edge will be correct.
Don’t be afraid to learn how to move your blade. It isn’t difficult.
Stabilizing a Seam
Look inside along the shoulder seam of a sweater or knit garment you have purchased. There is often a string or tape there to keep the garment from stretching out of shape.
Many overlocks are set up for you to make this type of insertion simple. You can use either a 3- or 3/4-spool setup. The additional stabilizer could be either a ball or spool of a reinforcing material. I like pearl cotton or soft nylon stabilizer tape (Fig. 10.3). Some machines have special escapements (thread carriers) to guide the stabilizer through the machine. Some feet have feed holes to hold these cords in place, so they don't get cut by the blades. The cords can be aligned so the cord is free under the thread or stitched in place.
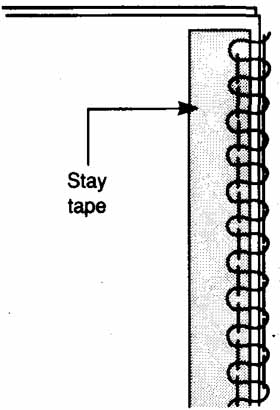
Fig 10-3 Tape used to stabilize seam
If the cording sits free under the thread, it can also be used to gather (Fig. 10.4). The cord that lies under the overlock stitches is easily drawn up. This is especially helpful on long pieces, such as a dust ruffle with yards of fabric.
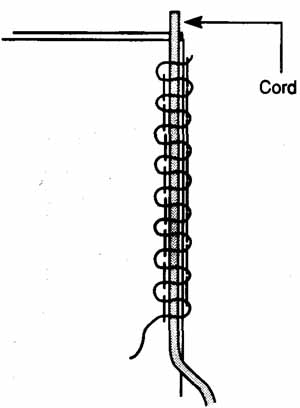
Fig 10-4 Cord used to gather seam
If the cording is caught in a needle seam, it will be held in place. This method offers the greatest degree of stabilization.
Aiming the Fabric
Because the cutting and sewing element of an overlock form a squared L shape instead of a single line as a traditional machine makes, the manner in which you feed the fabric is very different from a traditional sewing ma chine.
The correct method for aiming the fabric is to concentrate on feeding it to the front of the foot, instead of pivoting the fabric.
The difference of feeding shows up most when you are over-casting the edges of fabric that has already been cut out. If you tug the fabric to the right going around a curve, you will discover that the overcast isn't covering the en tire edge. Occasionally it will even completely miss the fabric. Going in the opposite direction will cut off more than you wish.
Gently ease the fabric, using your right hand only, to the edge of the throat plate (Fig. 10.5). This approach feeds the fabric into the overlock in the straightest method.
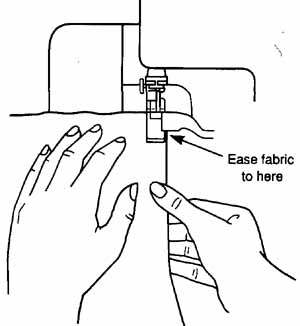
Fig 10-5 Feeding fabric into an overlock
Get your hand out from behind the machine! Pulling on the fabric is an absolute no-no. If you tug the fabric to the rear while the needle(s) are in the fabric, they will bend to the back. Be cause of the close proximity of the looper to the needle, any change in the placement of the needle will cause the needle to strike the looper. This breaks the needle and very often damages the looper.
When to Remove the Cutting Blades
Removing the cutting blade is recommended for doing flatlock and other decorative edges. Flatlocking is often done in the center of the garment, so most instructions tell you to remove the blade to prevent the fabric from being cut.
Removing the movable cutter is possible on all sergers. With some models it's as easy as a flip of a dial; with others it will require a screwdriver and wrench.
No matter how simple or difficult the procedure, be careful. Careless use of a serger with the cutting blade re moved is the most common way to jam your overlock to the point of throwing the machine out of time. In my experience, this has been the number-one cause of major repairs on sergers.
The cutter trims away the edge as the fabric travels through the machine.
The loopers can then arch over the edges to form the overcast. If the fabric extends too far over the edge, the looper will catch in the fabric while the looper is traveling at high speed.
This is similar to running your car into a curb at high speed. At the very least, your front-end alignment will need to be repaired.
Sewing with the movable cutter re moved should be done (if at all) at very slow speed, so you can clearly see that it's moving straight. It should also be done on straight or barely curved seams to prevent the fabric from wandering over the edge.
I recommend that you leave the movable cutter in place all the time. If you don't want to trim the edge of the fabric, feed it carefully just to the left of the throat-plate edge. If you do cut off a small amount by accident, don’t feel bad. That portion would have caused a jam.
The Mysterious Break
I have repeatedly cautioned about a knot forming instead of a chain with out you realizing it. This phenomenon causes what I call the mysterious break.
The serger has been sewing along when you hear a rasping noise and then a snapping sound. Lo and behold, one of the threads has jumped out of a looper or a needle eye but remains part of the chain.
What has actually occurred is the thread has knotted above the eye of the looper or needle and caught. As the fabric is pushed forward, the strain on the thread finally causes it to break. When it snaps, it's still attached to the chain and looks as though it has escaped the eye.
The other mysteries are also related to the repetitious nature of thread breakage. Once a break occurs and you rethread the machine, it seems to break over and over. These breaks generally occur about 1 to 1 1/2” into the seam.
Thread-breakage problems are caused by improper threading. The reason it occurs a short distance after the beginning of a seam is that it takes this distance for the pressure on the thread to finally break it. Reread the proofing section in Section 6, and al ways thread the needle last.
Finishing the Chain
It isn't necessary to finish the end of a serged edge unless the end will be exposed after completion. After sewing off the edge, clip the chain, leaving at least 2” of chained thread to prevent unraveling.
If the edge will never be caught in a cross seam, you can apply a small drop of Fray Check at the edge. Let it dry and trim away the excess.
If the seam sealant might discolor the fabric in a conspicuous place, pull the ends under the previous threads. I recommend a tiny latch hook device that's sold as a snag repair tool. The tool can be eased under the last 1/2” of over cast. Catch the chain in the hook, then cut the threads off to 1/2” and pull through (Fig. 10.6).
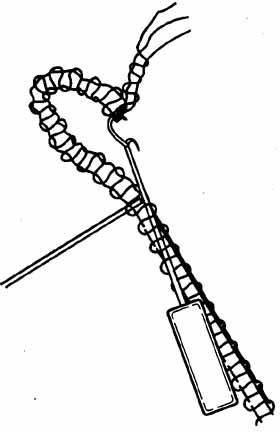
Fig 10-6 Tiny latch hook tool is used to anchor threads
Never, Never, Never’s
Never #1: The movable cutter should last a long time. The fixed cutter should last ten times as long as the movable one. But, if you sew over one pin, you may need to replace both of them. Sewing over pins is an expensive proposition. Not only will the blades be ruined, but the entire machine could become out of time and not be able to make a stitch at all. Try using clothes pins to hold fabric edges, instead of pins (Fig. 10.7).
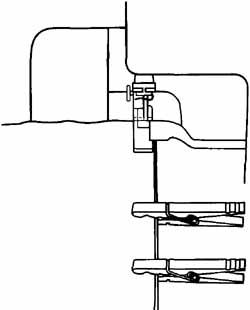
Fig 10-7 Use clothespins to hold fabric edges together
Never #2: Never turn your handwheel against the recommended direction for your machine. Check your manual. Most manufacturers consider it important enough to show a directional arrow on the wheel. Turning the wheel in reverse will cause a knot in stead of a chain, which will lead to breakage.
Never #3: Do not cut the chain off by running it through the cutter. The loose chain threads can catch in the loopers and cause a knot instead of a chain. This break doesn’t happen every time, so it will make it tough to track down the problem. The time it takes to snip the thread with scissors isn't worth the mess of a jam.
The Perfect Corner
If you got excited when you saw this heading, get ready for a jolt of reality. There is no such thing as a perfectly pivoted outside corner. The L-shaped sewing area prevents perfection. The thread must be loosened to become free of the stitch finger in order to go around a corner. The excess thread moves across the end and makes a loop. Please check ready-to-wear as an example. Most use the sew-off and sew-across method.
To pivot an inside corner, you must watch the cutting blades as you approach a corner. When the serger cuts one slice into the corner, leave the foot and needle down and bring the new side straight down, even with the edge of the throat plate (Fig. 10.8). The cut acts like a clip on a garment and frees the fabric to allow you to pivot the fabric. Do not try to force it through in a straight line. Otherwise, as you sew over the corner, you will get a pucker.
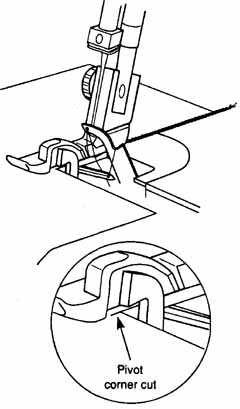
Fig 10-8 Turning Inside corners
Removing Overcast Stitches
The needle threads hold an over cast edge together. If you remove these threads, the looper threads will just fall off.
You can find the needle threads in a chain by running a fingernail over the chain to straighten it out. The one or two shorter threads are the needle threads.
Grasp one thread and pull gently, sliding it along like a gather thread until it comes out (Fig. 10.9). If necessary, slide out the second needle thread.
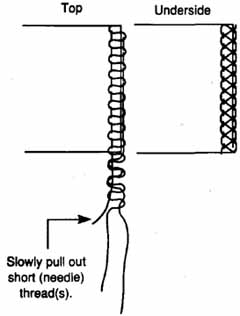
Fig 10-9 Removing the needle thread
If the thread snaps, loosen the next few needle threads on the top and resume pulling it out.
Hint: The fop-side needle thread is straight and the underside is scalloped or just a small knot.
Troubleshooting is really a matter of prevention. Sergers are not more difficult to use than traditional machines. They are just different. Re member, if you do have problems, check one thing at a time.
